The goal of this simulation software is to study users' reaction time in the presence of distractions. The distraction is measured by testing the user's focus by tasking them with keeping a ball moving around inside a box in the center near a crosshair. This ball will move at random velocities and times, with parameters that can be specified.
The distraction is generated by a set of alarms and dials that the user must also keep track of. The user must attempt to see when one of the needles drifts out of the designated green area on a dial. When it does, an alarm will go off that the user must acknowledge using the correct key for that alarm.
The program will then track the position of the ball in relation to the crosshair, and measure the Root Mean Squared Error (RMSE), and also the reaction times to dial alarms and if they ackowledged it using the correct key.
The program was made for the use of the human factor's team at Embry-Riddle Aeronautical University to help with their research. However, the program may be used by any audience with similar needs.
More description and guides are shown in this document.
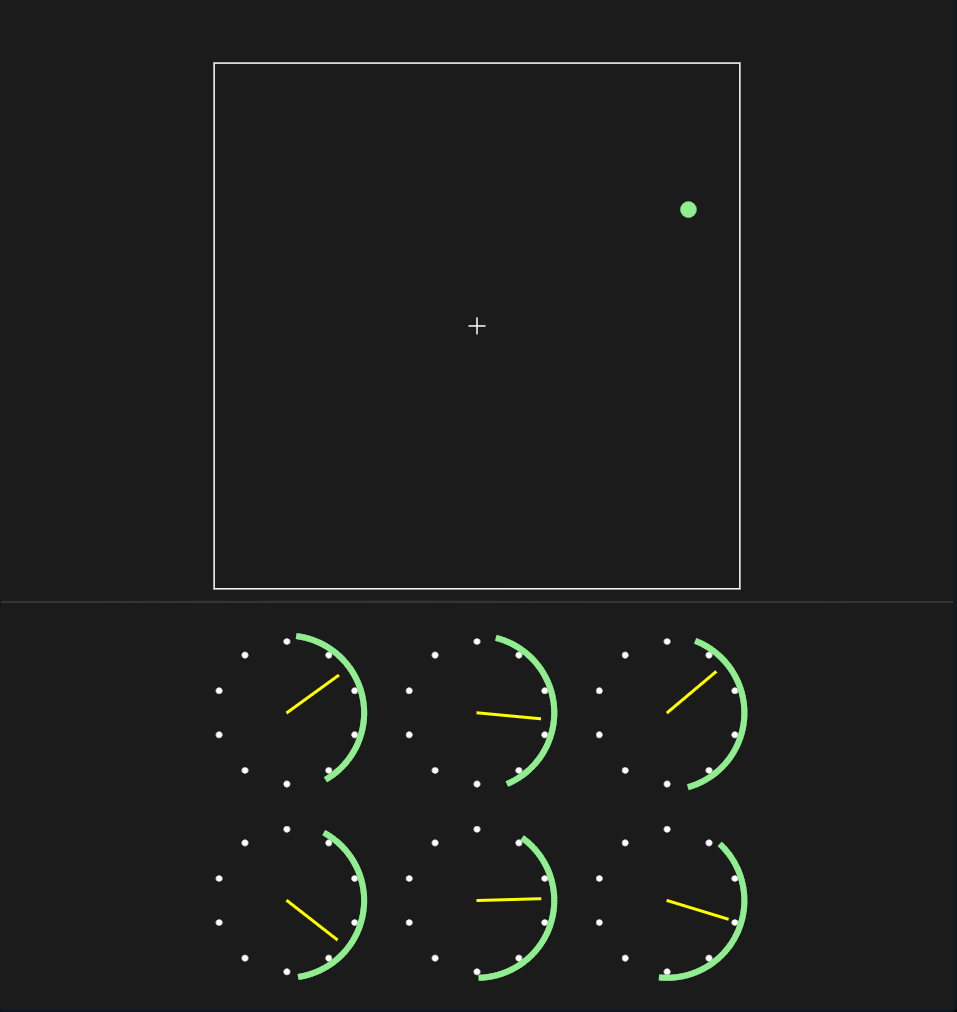
This section shows what the UI of the program looks like:
The main interaction with the program is done in the white outlined box, or Tracking Frame. Within this box there is a crosshair marking its center. The green dot represents the ball, and it will move randomly inside the frame unless acted upon by the user.
The ball on the screen is depicted as a little green dot. Its direction will change randomly at given intervals. These intervals can be customized in the config file. If not acted upon, it will bounce off of the walls of the frame. A user may control the ball in ways. One is by using the arrow keys, and the other more preferred one is the joystick input.
BEWARE!! Not all joysticks have been tested, we cannot guarantee that all joysticks can work.
Below the Tracking Frame there are dials. One is able to configure the numbers of dials that appear in the program via the config file. Each dial can be tied to a Trial which contains information on when the dial should drift out of it's "in-range," or the green area surrounding the dial. The alarm will go off once its trial has reached the time limit. It is possible to set alarms and response keys on a per-trial basis. Once an alarm goes off, the program will wait for a key input before resetting the dial to inside of the proper range. The key input can be any key pressed after the alarm goes off, no matter if it's the wrong or right key. The right key has to be specified in the config file as well or default values will be used.
This section aims to help understand how to properly use the configuration file used in the program. It is important to know that syntax and typos are important in this config. The format of the configuration file is a format named TOML. We will not explain how toml works, I recommend visiting toml_template for any questions on why something is the way it is.
An example config file will be automatically created if no config file is found when the program is run.
The file name that the program looks for is a file in the same folder as the program named config.toml
This is how one specifies the type of input the program should use. It will NOT be detected automatically.
Input Mode should be the first line of the config file, and we suggest leaving it like that to not have any issues.
If the config file is made by the program, it will then choose the keyboard as the default input mode:
input_mode = "keyboard"To change the input mode to joystick, "joystick" should be written instead:
input_mode = "joystick"Input Mode should be only variable that is outside of a section. What do I mean by section? We will explain below.
In toml, one is able to specify a section and separate variables that will only go into that section. That is how the program divides specific information that is important to independent components within the program. For example: the ball. The program allows for some flexibility in order to change some behaviors of how the ball should act.
To specify the Ball Section the following should be written in the config file:
[ball]This is the start of the ball section. Now the variables we put after this correspond to the ball.
The ball only uses 3 variables in total. 2 variables are for the time interval in which the ball should change velocities. The last variable is to specify the speed.
random_direction_change_time_min = 1.0
random_direction_change_time_max = 8.0
As specified before, this two variables are the minimum and maximum values for the interval of when the ball will change its velocity. How it works is that when the program runs, the ball may change its velocity at any random time from, in this example, 1 second and 8 seconds since the last change of velocity. It will always be random at every iteration.
ball_velocity = "slow"The above code shows how to specify the speed of the ball. For now the program only supports 3 types of velocity, slow, medium, and fast. One may not be able to change the values that correspond to slow, medium or fast.
When writing the velocities make sure to always do so in lower case:
ball_velocity = "medium"ball_velocity = "fast"This is an example of a well-formed ball section:
This is where it may get slightly confusing for those who may not have experience in toml files.
When setting up the trials one has to do a few things. First, specify to toml that we want to make a new trial section. This is similar to what we did in the Ball Setup section, just with a small difference. The program is meant to work with multiple trials. To save someone to having to write a new section every time for a new trial like:
[trial1]
[trial2]
[trial3]
Instead we chose to use toml's list synax. Note the double brackets which specify that a new trial should be specified, as part of the larger list of trials:
[[trial]]
[[trial]]
[[trial]]
The above code believe it or not does the same as the previous one with trial1, 2 and 3. But in this case one does not need to give each a unique name. Now is IMPORTANT to know that the order matters. This matters for understanding the output file after the program runs. The first [[trial]] represents trial 1, the second [[trial]] represents trial 2, etc.
DO NOTICE the extra square brackets [ ].
Now one can just modify every trial a different way. So lets go into what variables are needed for every trial.
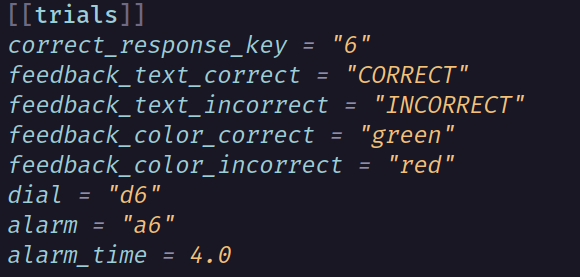
Here is what a normal configuration of a single trial would look like, we will go in-depth into what every variable means.
The correct_response_key is what the name suggests: the correct key to press for that trial. The keys can be any key on a keyboard that is either a number or letter. Special characters are not supported.
Another example:
correct_response_key = "F"But not this:
correct_response_key = "$"The program also has feedback for the trial participant who is performing the trials. This feedback is to nofity the user if they pressed the correct key or not.
There are two types of feedback: text, and frame color. Both of these can be customized as well. They can be specified in the event that the user gets the key correct, or not. This was done with the purpose allowing the researchers to play with the tester's mind to get them to question their trust in the system.
Each variable represents the behavior to their respective action. For example feedback_text_correct will only display it's text if the correct key is pressed. Or, the other way arround if incorrect key is pressed.
As stated before, these two are customizable. The text can be anything, and it does not have to be all capitals.
We recommend to not provide text that too long though. The duration the text will be on the screen for is about 1 second.
These two variables change the color of the Tracking Frame: the white square that contains the ball. Just like the text, the colors are customizable. There are 3 colors to choose from: "red", "green", and "blue". White is not an option as it's the default color.
DO NOTICE the colors must be in lower case.
dial = "d6"This corresponds to the dial that will be attached to the trial. The naming convention is not important, but what it is important is that the name must be the same as a dial specified elsewhere in the configuration file. To establish a dial's name go to Dial Setup section. Just remember that both need to match in order to work properly.
The last two variables correspond to how are alarms set up for each trial.
First is which alarm is the trial going to use. We link them by names, just like the dial.
alarm = "a1"The alarm name can be anything as well, but it must be an existing alarm name. We later show how to set up an alarm.
alarm_time = 4.0Corresponds to the time, in seconds, we want the alarm in the trial to go off at. This time is relative to the last trial that was activated. The first trial's time is the time that has passed since the program was started. If the second trial had an alarm time of four seconds, it will expire 4 seconds after the first one is acknowldeged by the user.
It is important to keep the same syntax for the time: keep the decimal point even if it's a whole number.
We have one more piece of TOML synatx to introduce. We have introduced how to specify a new item in a list of sections:
[[trials]]The program supports customized amount of dials, we wouldn't say an infinite amount as we don't recommend using too many. It will probably make the dials small or impact performance or usability. The way the program organizes these dials is by row. A row may have multiple dials. Rows are a list of items, each called row. Each row of course contains dials as well.
[[row]]This will make a new row item inthe list of rows where we will store all dials in the first row. Now in order to add a dial into this row we write a new dial item:
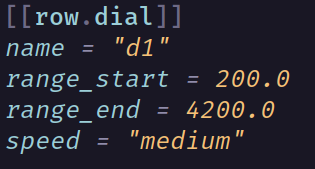
The image above shows the proper way to set up a dial within a row. First notice the very first line of the image:
[[row.dial]]This is the format to use when making a new dial within the row. Be aware this just adds one dial to row. If we wanted two dials in a row we would have to add a second [[row.dial]] directly underneath the first one, and so on.
NOTICE order matters here. Multiple [[row]] sections can be made, and [[row.dial]]'s are specified by placing them after the row declaration. The order in which dials are added to a row are from left to right on the screen.
Now let's break down what the other components are to properly set up a dial.
We have attempted to design the format to be easily understood. The name variable is to specify the name of the dial we are setting up. Make sure this name is the same used when linking a trial to this dial. We HIGHLY RECOMMEND to use the format of using "d" or "dial" as the name initializer to establish a dial. Then use a number to rank the dial. This makes it easier to keep track of the different dials. One could also use a row and dial scheme like: "row1-dial1"
The speed variable is like the speed of ball. There are 3 options for it: slow, medium , and fast. We recommend using slow or medium to allow for an easier follow of the needle in the dial. fast is quite difficult for the user to track, if that is what is desired by the researchers.
IMPORTANT
Make sure that the order of the variables stays the same. Meaning "name" is the first variable specified and speed is the last.
Dial Range corresponds to the green area of the dial. This range goes from 0-10,000. A needle will move in the range area until it's corresponding trial's alarm is ready to go off. Once the alarm of the trial is ready to go off, the needle will make it's way outside the range, causing the alarm to sound.
range_start = 200.0This variable specifies where to start the range from. The start is not bounded to be 0.0, it can start from anywhere. Also, keep in mind how the number is written. The number you use must be in decimal syntax, even if it is a whole number.
range_end = 4200.0This variable specifies where to end the range. Just like the range_start, the range_end is not bounded by anything. It can be any value, even the same as the start value (although that may cause problems for program operation). This also MUST have the decimal point included.
The above guide helped make a single dial in a single row. If we wanted to make more dials we would just repeat the steps once again.
But now lets add a second row. How would we do this? It is the same way as making a new row. We would write:
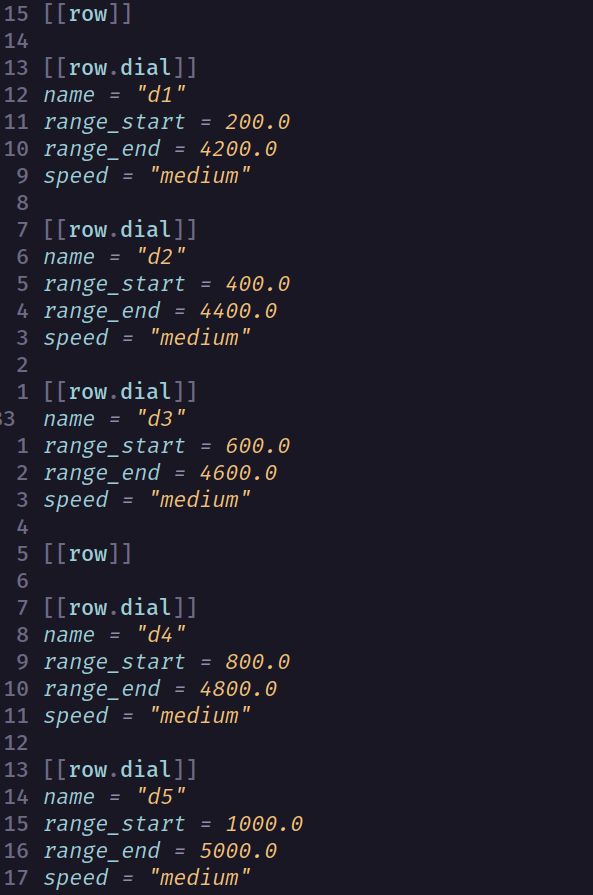
[[row]]Then repeat the steps to make dials within the row. Here is an example on how the config file may look for two rows:
The image above shows the creation of 2 rows of dials. The first [[row]] marks the start of the first row, and we proceed to make 3 dials within the row. Then we wrote [[row]] once more in order to make the second row, and make 2 dials within the row.
Last but not least we will show how to configure an alarm:
Making an alarm is very simple as the image above shows. One establishes a name, this is a1 in this case. Then we specify a path to the audio file for the alarm. It is important to know how to correcly specify the path.
For example, if the audio files are within the same directory/folder as the program then the name should be only thing written. But in case you want to have the alarms within a folder, then you need to write the whole path to the audio file you are trying to use. Something like:
audio_path = "folder/alarm.wav"In this example the program will look into a folder with the name "folder" for the file alarm.wav.
NOTE: Currently the program supports .wav and .mp3 files.
IMPORTANT Notice that to start the alarms section we use the syntax [[alarms]]. This allows for the creation of multiple alarms. Just like we did with trials.
If at any time there are issues using the program please be sure to make a Github Issue and one of the authors should respond at their earliest convenience.
Keep in mind this program was done with the purpose of research and not as a game or general use software. So we as the authors won't be actively working on this software unless it aids with similar research to the area this was initialially intended for: the Human Factors research department.


