The aim of this project is to explore the possibilities the deep learning can offer to the data visualization domain. The first step is to train a neuronal network to classify charts.
First of all , we choose tensorFlow API to build and train neuronal networks because :
-
TensorFlow is quite fast and can be used with a GPU to run even faster. GPU can handle large amounts of data in many streams, performing relatively simple operations which is excatly what we do. (we went from 260 ms to 8 ms on convolutional.py)
-
TensorFlow has a great and active community and a lot of documentation which help develop faster.
-
TensorFlow comes with TensorBoard a local web server which allows an user to visualize the execution, the weight values, variables flow, variables evlotion in some categories like graph, images, histograms etc ... This is a plus because tensorFlow API have some parts in "black box" and the neuronal network can be hard to read.
tutorials available here.
To quickly have global view of this platform, you can see those videos (5 minutes each)
To run TensorFlow with python you will need to install :
The folowings instruction was used in linux ubuntu 16.04 64-bits based os. For futher information or if you have another configuration please consult tensorflow installation guide [here] (https://www.tensorflow.org/get_started/os_setup)
- Python(2.7 or above or 3.5 or above) we choose python 3.5. numpy and Pil lib can be usefull too.
- tensorFlow or tensorflow-gpu (gpu will run faster but requires more installations)
sudo apt install python3-pip python-dev
pip3 install tensorflow-gpu
export TF_BINARY_URL=https://storage.googleapis.com/tensorflow/linux/gpu/tensorflow_gpu-0.12.1-cp35-cp35m-linux_x86_64.whl
sudo pip3 install --upgrade $TF_BINARY_URL
If you want to use tensor-gpu and have an Nvidia graphics card:
- CUDA
- CUDNN the folowings line can be added to a bashrc
export LD_LIBRARY_PATH="$LD_LIBRARY_PATH:/usr/local/cuda/lib64:/usr/local/cuda/extras/CUPTI/lib64"
export CUDA_HOME=/usr/local/cuda
supposing your cuda repository is at "/usr/local/cuda"
tar xvzf cudnn-8.0-linux-x64-v5.1-ga.tgz
sudo cp -P cuda/include/cudnn.h /usr/local/cuda/include
sudo cp -P cuda/lib64/libcudnn* /usr/local/cuda/lib64
sudo chmod a+r /usr/local/cuda/include/cudnn.h /usr/local/cuda/lib64/libcudnn
sudo apt install libcupti-devfirstStepMnist.py is a script provided by tensorflow as a demo and learning support.
This script comes with an explanation available here
To sum up, this script is a basic machine learning program "hello world" like. But, however it allows to understand how it works.
First of all, the script downloads the data set and divides it to use it efficiently. A neuronal network must never learn from validation and test data. This will make laborious the study of any result as there will be no tracks. It may also interfer with the trainning sessions (especially if you are using the deep learning for classification and test it on pictures out of output possibilities).
Once you have the right dataset, the next steps is modelization. The modelization can be divided in 3 parts:
-
Input and Output modelization must be choosen wisely as it will affect the structure of the neuronal network.
-
The loss modelization can be summarized in a function representing the loss to determine if the trainnig was efficient.
-
The test modelization is the function that we will use to train the algorithm in order to reduce the loss.
in progress ....
NanoNets is an online application which allow an user to build a model in a "blackbox" system .
NanoNets is efficient and can be used with text , videos , pictures and audio , it have a free and prenium content. However, nanonets is a 'blackbox' tool and doesn't help us understanding what can the deep learning do to help data visualization
We used it to build a binary image classifier of bar chart. This model have a 91 % success rate which is far more better than our CNN. This result can be explainned by the fact that nanonets is a neuronal network on top of a pre trained model. (as seen in the picture below)

This overlay simply take the output of the pre-trained neuronal network and convert it into the classes we force him to.(here bar Chart or not bar chart).
On top of that, Nanonets also is a restfull application so we can use our model with an API we can made with http requests which return json objects of results as :
{
    "message": "Model trained",
    "result": [
        {
            "prediction": [
                {
                    "label":        "barChart",
                    "probability":  0.3055455504251506,
                },
                {
                    "label":        "not Bar Chart",
                    "probability":  0.6944544495748495,
                },
            ],
            "file":"image.jpg"
        }
    ]
}
Our first trained model (boolean barchart /!barchart) 91% of success is available here
Our second trained model (4 categories classification) 97.6% of success is available here
Keras is a high-level neural networks library, written in Python and capable of running on top of TensorFlow. Keras aim is to speed up both research and developpent of protoypes and avanced CNN by being easy to develop and due to his modularity.
in progress ... ( curently reading : keyras tutorial , http://machinelearningmastery.com/binary-classification-tutorial-with-the-keras-deep-learning-library/ , http://machinelearningmastery.com/binary-classification-tutorial-with-the-keras-deep-learning-library/)
More informations [here] (https://keras.io/)
in progress : possible use insted of tensorflow
Sklearn is an userfriendly machine learning tool which run on python. Sklearn is mainly used as an machine learning tool. The main issue in sklearn and in most machine learning solutions is the data. The data is the most important thing is machine learning, transform data and shape as the methods and algorithm required is quite a challenge. As a matter of fact, this is the only challenge as the main code is roughtly 50 lines with methods like :
  from sklearn.svm import SVC
    iris = datasets.load_iris()
    clf = SVC()
    clf.fit(iris.data, iris.target)
    clf.fit(iris.data, iris.target_names[iris.target])
    SVC(C=1.0, cache_size=200, class_weight=None, coef0=0.0,
    decision_function_shape=None, degree=3, gamma='auto', kernel='rbf',
    max_iter=-1, probability=False, random_state=None, shrinking=True,
    tol=0.001, verbose=False)
    list(clf.predict(iris.data[:3]))
whatch this video to see a demo using MNIST dataSets here.
reading :
- http://scikit-learn.org/stable/
- http://machinelearningmastery.com/binary-classification-tutorial-with-the-keras-deep-learning-library/
- https://www.quora.com/What-are-the-main-differences-between-TensorFlow-and-SciKit-Learn
- https://sebastianraschka.com/faq/docs/tensorflow-vs-scikitlearn.html
More informations [here] (http://scikit-learn.org/stable/)
ImagePrep is a python script, developped by our hands, which can be used as a standalone with the main function or as an API to import. It uses the PIL lib to manipulates images and os to get images from a directory.
This script has three functions :
-
Convert2gray , This function uses 3 parameters the extention of the output pictures,the directory containing the pictures and the directory where the new images will be
-
Resize , this function uses 2 more parameters than convert2gray which are the width and height of the new pictures
-
Resize2gray do booth with the same number of parameters than resize.
This script allows us to uses images the same parameters no matter their size/color at the beginning, in order to use them in a neuronal network as an input.
On top of that , this script can be used with parameters as :
-
'--inp' to declare the input directory
-
'--out' to declare the input directory
-
'--ext' to declare the extention wanted Default: 'JPG'
-
'--size' to declare the size of output pictures Default: 100 px
Used like this , the script will use the function Resize2gray with the said parameters.
We have made our first image classifier to analyze and distinct bar chart. However, this Convolutional Neural Networks (CNN) have a low rate of success ( between 43 % and 53 % of errors) which is pretty bad in a binary image classier.
Due to our low rate of success we doubted our own data. To test it and to explore possibilities we made a model of image classifier on NanoNets an online neuronal network which allow you to had some class in an existing model.
in progress...
Overfitting is caused by trainning a CNN with only a few of data. This cause a neuronal network to be to much specialaze as if, in your life, you only saw lumberjacks with hats you may assume that all lumberjacks have hats and use this as a distinction.
To avoid overfitting we can use data augmentation. This can be summarized into adding random noises on pictures before using them. As a result , the CNN won't be trained to only classify our dataset. Due to the fact that even with some noise we still use the same images,data augmentation isn't enough to fight agaisnt overfitting.
in progress ...
Data can be read as described in those two folowing links :
- http://stackoverflow.com/questions/37340129/tensorflow-training-on-my-own-image
- https://www.tensorflow.org/programmers_guide/reading_data
(curently reading -> https://www.quora.com/How-do-we-train-neural-networks-on-images-rather-than-numerical-data)
In our cases we used pictures resized and converted to grey scales to reduce the size of the input. This pictures are compressed in '.tar.gz' and used as numpy array.
Modelization and which algorithm pick depends on the datasets. This is roughtly summarized as the following graph discribes.
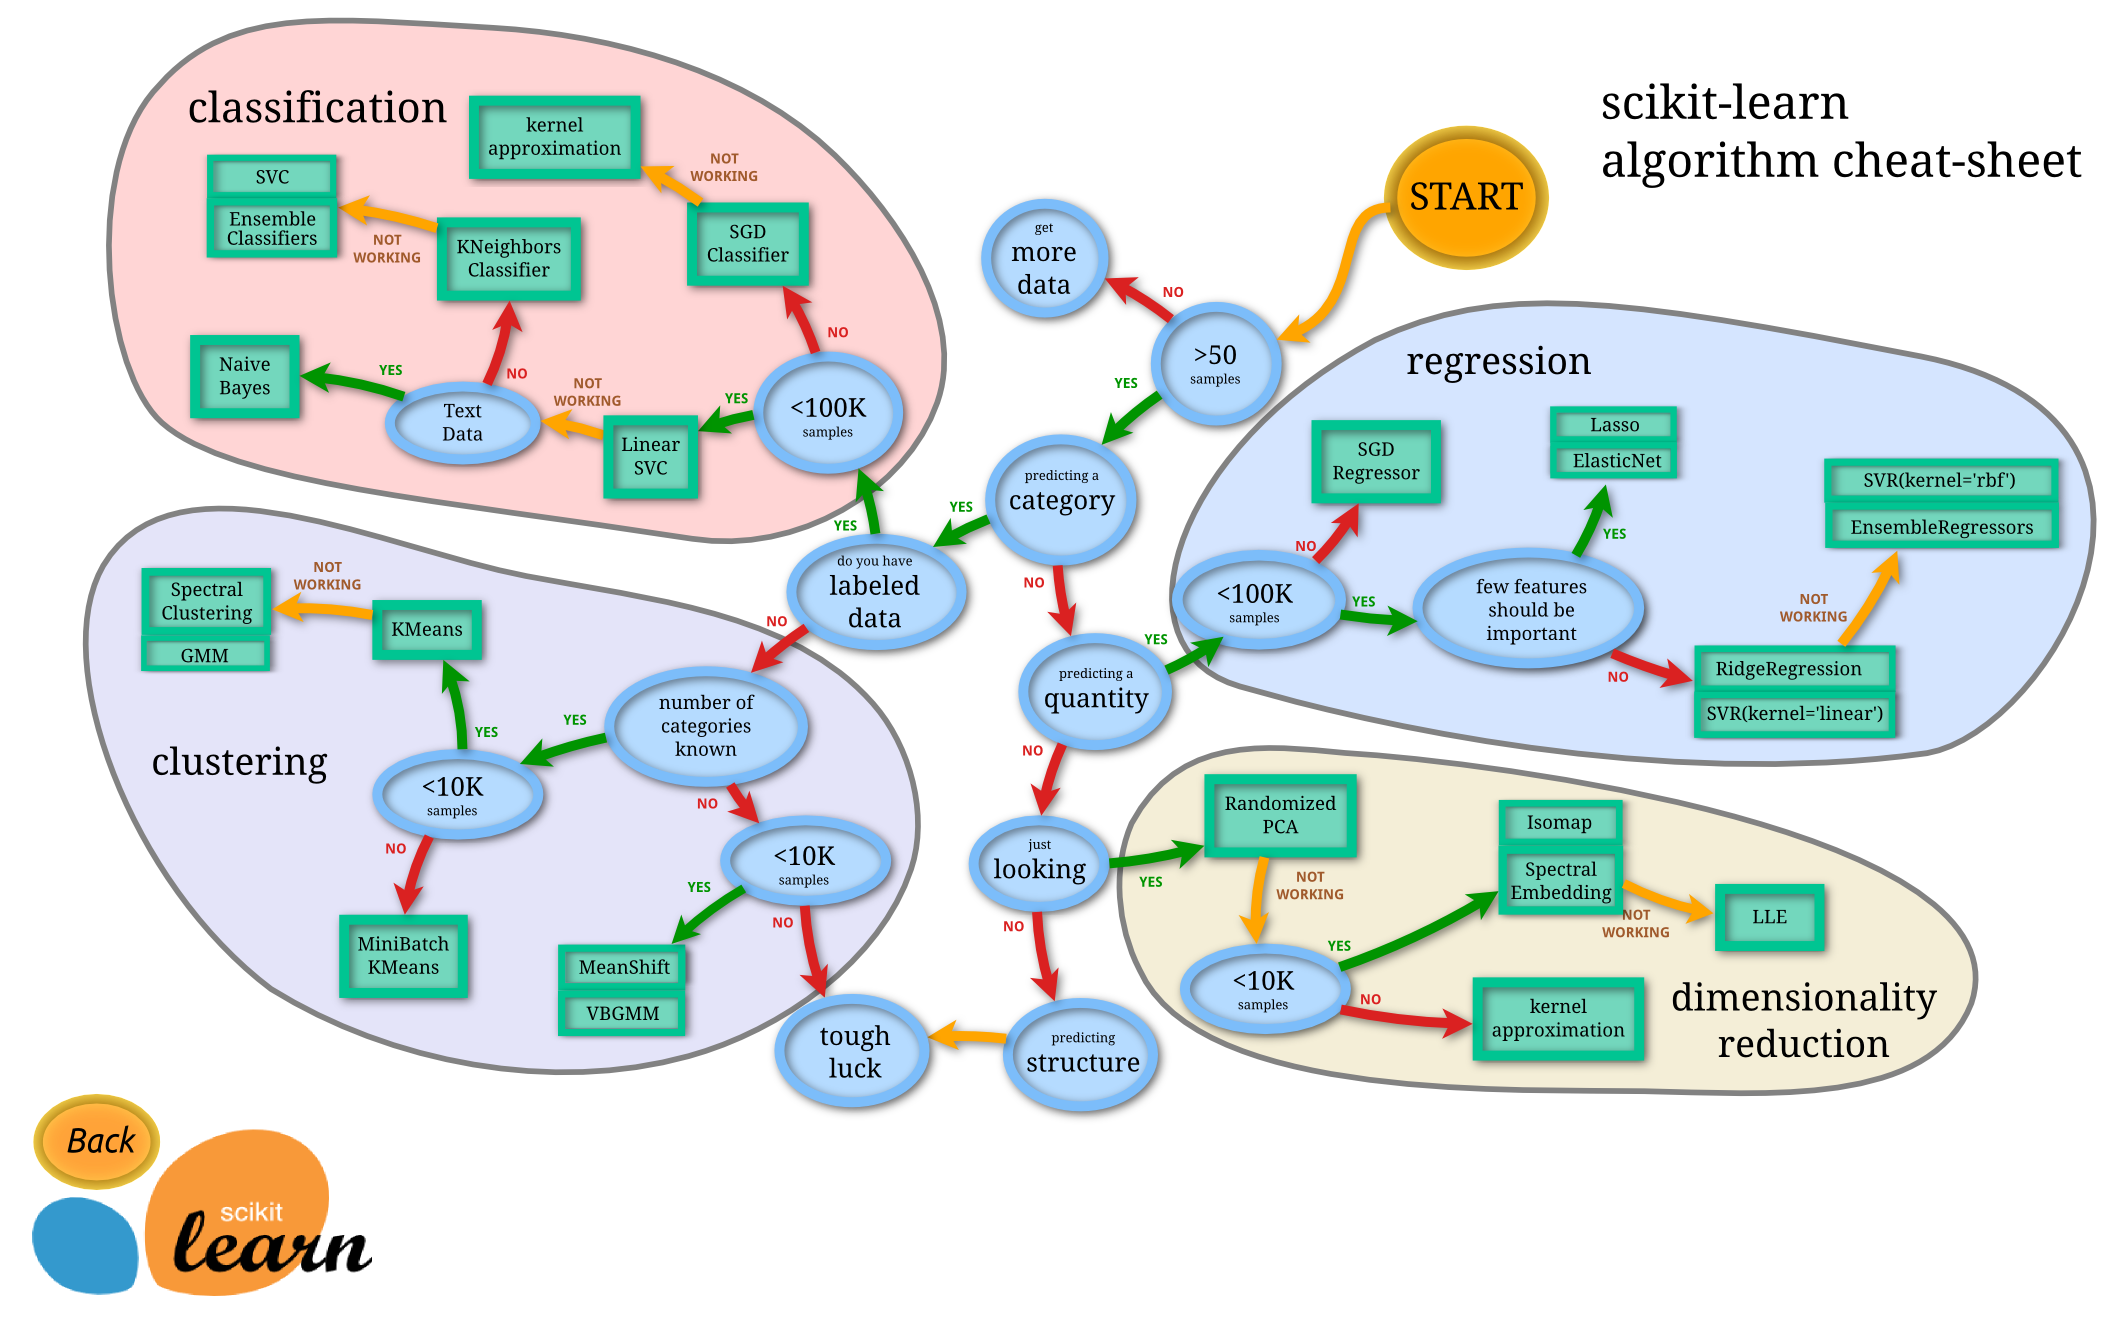
interactive map [here] (http://scikit-learn.org/stable/tutorial/machine_learning_map/index.html) in progress ... curently reading
- https://fr.mathworks.com/help/vision/examples/image-category-classification-using-deep-learning.html
- https://blog.keras.io/building-powerful-image-classification-models-using-very-little-data.html
- http://machinelearningmastery.com/binary-classification-tutorial-with-the-keras-deep-learning-library/
currently whatching [stanford course] (https://www.youtube.com/watch?v=UzxYlbK2c7E)
The inception model is a google trained neuronal network made to classify images. The training took 7 weeks on 8 Telsa K40 GPU, and nearly cost 30000$. This model was trained on 100 000 images into 1000 categories using less than 25 million parameters.

As we can see in this picture, the inception model is made of multiple layers. Each layer represent an extraction from the picture. Those extraction becames more and more abstract on at each steps. It begins from basic aspects as shape and and edge to end with abstrat matrix to process with convolutionnal neuronal network.
topic found : simple logistic regression on top of your hidden layers .