NPM 包的开发解决方案。
- 支持导出 esm, cjs, esnext 三种格式的产物
- 支持 bundle 和 transform 两种模式
- 支持使用 docusaurus 作为文档生成方案
- 支持 React 组件预览
- 基于 Rollup & SWC
在项目下安装:
$ npm i -D @ice/pkg

# 或通过 pnpm 安装
$ pnpm i -D @ice/pkg# 构建
$ ice-pkg build
# 实时编译 es&lib 产物
$ ice-pkg start
# 实时编译 dist 产物
$ ice-pkg start --dist
# 组件预览
$ ice-pkg start --doc默认情况下,src 文件夹存放所书写的源代码。在源代码的写法中,有以下限制:
- 添加文件后缀
比如,以下 TypeScript 代码:
import { add } from './filename'; // 引用相对路径的文件
import { mulitply } from './directory'; // 引用相对路径下的默认的 index.js 文件

...
在 esm 规范下,以上的写法属于不规范写法,因此 @ice/pkg 亦不支持上述写法。正确的写法如下:
import { add } from './filename.js'; // 引用相对路径的文件
import { mulitply } from './directory/index.js'; // 引用相对路径下的默认的 index.js 文件

...
若主动开启 autoPathcompletion 则在构建产物中会自动进行路径补全,该配置默认为
false。
- 不支持 require、__dirname 等用法
不支持的方法或变量主要有:
require、require.resolve和require.cache__dirname和__filename
目前,Package 导出依赖 main、module 和 exports 等导出配置。@ice/pkg 默认的导出配置为:
{
  ...
  "module": "es/index.js",
  "exports": {
    "esnext": "./esnext/index.js",
    "import": "./es/index.js",
    "default": "./es/index.js"
  }
}
其中 module 配置可供给不支持 exports 的浏览器端构建工具使用(比如 webpack4)。
Node 和其他浏览器端工具并不默认消费 esnext 产物。以 webpack5,我们介绍如何在浏览器端使用 esnext 产物。
- 通过 conditionNames 使得 webpack 能够 resolve Package 的 esnext 产物。
module.exports = {
  //...
  resolve: {
    conditionNames: ['esnext'],
  },
};- 一般来说,esnext 产物需要根据应用的目标浏览器进行二次编译。比如:
module.exports = {
  module: {
    rules: [
      test: '/\.js$/',
      use: 'swc-loader',
      include: [
        path.resolve(precess.cwd(), 'src'),
        path.resolve(precess.cwd(), 'node_modules/packageName'),
      ]
    ]
  }
};若开启 lib 配置,则 @ice/pkg 会编译出 CommonJs 产物。此时,推荐的 Package Exports 配置如下:
{
  ...
+ "main": "lib/index.js",
  "module": "es/index.js",
  "exports": {
    "esnext": "./esnext/index.js",
    "import": "./es/index.js",
+   "require": "./lib/index.js",
-   "default": "./es/index.js"
+   "default": "./lib/index.js"
  }
}
更多有关 Package Exports 的知识可阅读 Webpack Package Exports 和 Node Package。
@ice/pkg 支持的配置文件有:
build.jsonbuild.config.jsbuild.config.tsbuild.config.mjsbuild.config.mts
推荐使用 build.config.ts 进行配置,并引入 defineConfig 以获得更好的类型提示:
// build.config.ts
import { defineConfig } from '@ice/pkg';

export default defineConfig({
  minify: true,
})
在没有配置
type="module"的 Package 中, 配置文件build.config.[j|t]s仍推荐使用 esm 规范语法,而非 CommonJs 规范语法。
所有配置项如下:
- 类型
object - 默认值
{}
比如,将 @ 指向 ./src/ 目录。
import { defineConfig } from '@ice/pkg';

export default defineConfig({
  alias: {
    '@': './src/'
  }
})- 类型
boolean - 默认
false
设置为 false 可以禁用代码混淆能力。@ice/pkg 使用 swc 进行混淆。
- 类型
object - 默认
{}
配置全局变量,在构建时会被静态替换。
import { defineConfig } from '@ice/pkg';

export default defineConfig({
  define: {
    __APP_VERSION__: '1.1.0'
  }
})- 类型
array - 默认
[]
可以使用 babelPlugin 来预处理一些代码片段。被 babelPlugin 处理过的代码,接下来仍会交给 swc 做进一步的处理。
import { defineConfig } from '@ice/pkg';

export default defineConfig({
  plugins: [["transform-remove-console", { "exclude": ["error", "warn"] }]]
})- 类型
boolean - 默认
false
为 JavaScript 代码生成类型文件。@ice/pkg 默认为文件后缀为 .ts 生成类型文件。
如果使用 jsdoc 为 JavaScript 生成了类型注解,该配置会非常有效。
// 下面通过 jsdoc 进行了类型注解
/**
 *
 * @param {number} a
 * @param {number} b
 * @returns {number}
 */
export function add(a, b) {
  return a + b;
}
若开启该配置,则生成如下 .d.ts 文件:
export function add(a: number, b: number): number;- 类型
boolean - 默认
false
@ice/pkg 默认生成 esm 模块规范的代码。esm 模块已广泛应用于 Node(^12.20.0 || ^14.13.1 || >=16.0.0)和 Browser 端(webpack 4 & webpack 5 & vite & rollup)。
若需要生成 commonjs 规范的产物,可以配置该选项,则会生成 lib 文件目录,存放 commonjs 产物。
相应地,可能需要修改 Package Exports 导出的配置。
- 类型
boolean - 默认
false
是否为不规范的 esm 导入提供自动路径补全。
- 类型
array - 默认
[]
@ice/pkg 基于 build-scripts 插件系统。更多内容请参考 插件开发。
- 类型
object - 默认
{}
@ice/pkg 提供过渡性的 umd bundle 产物。配置开启,则生成 dist 文件目录,存放 bundle 产物。
umd 配置有以下参数:
- 类型
string - 默认
package.name
library 导出的名称,可以通过 window[name] 访问。默认为 package.json 配置的 name 字段。
- 类型
string - 默认
index.js
生成的文件名,默认为 index.js。
- 类型
boolean | 'inline' - 默认
false
是否生成 sourcemap,这在代码调试的时候非常有用。
- 类型
boolean | object - 默认
true
混淆代码。也可以配置具体的 混淆策略。@ice/pkg 使用 swc 进行代码混淆。
- 类型
string | object - 默认
{ mode: "usage", coreJs: "3", targets: { chrome: 49, ie: 11 } }
一次性配置 polyfills 和 browserlist。
若配置为 es3 | es5 | es2015 | es2016 | es2017 | es2018 | es2019 | es2020 | es2021 | es2022,则只会进行对应的语法转换。
若配置为:
import { defineConfig } from '@ice/pkg';

export default defineConfig({
  umd: {
    env: {
      mode: 'usage',
      coreJs: '3',
      targets: {
        chrome: 80
      }
    }
  }
})
@ice/pkg 会根据对应的 browserlist 进行对应的语法转换,以及添加对应的 polyfills。
@ice/pkg 基于 build-scripts 插件系统。通过 build-scripts 插件,可以极大地扩展 @ice/pkg 的能力。
插件的使用如下:
import { defineConfig } from '@ice/pkg';

export default defineConfig({
  plugins: [
    "./customPlugin.ts"
  ]
})可以通过 onGetConfig API,可以修改 Package 编译的入口、出口等 @ice/pkg 等默认配置:
const plugin = (api) => {
  const { context, onGetConfig } = api;
  const { rootDir } = context;

  onGetConfig('component-es', config => {
    return (
      ...config,
      outputDir: path.join(rootDir, 'esm'), // 将出口修改为 esm 文件夹
    )
  })
}
@ice/pkg 注册三个 build-script 任务:
component-es- 主任务,默认启动component-esnext- 主任务,默认启动component-lib- 当开启 lib 配置时启动component-dist- 当开启 dist 配置时启动
当不指定任务名(比如,指定 component-es)时,配置对所有任务生效。
import svelte from 'rollup-plugin-svelte';

const plugin = (api) => {
  const { context, onGetConfig } = api;
  const { rootDir } = context;

  // 不指定 Task name
  onGetConfig(config => {
    return (
      ...config,
      rollupPlugins: [
        svelte(...) // 编译 svelte 文件则会进行对应的
      ]
    )
  })
}
有以下参数可以配置:
- 类型
string - 默认值
./src | ./src/index.[j|t]s
配置组件编译的入口。
| 任务 | 默认值 |
|---|---|
| component-es | ./src |
| component-esnext | ./src |
| component-lib | ./src |
| component-dst | `./src/index[j |
- 类型
string - 默认值
es | lib | dist
配置组件编译的出口。
| 任务 | 默认值 |
|---|---|
| component-es | es |
| component-esnext | esnext |
| component-lib | lib |
| component-dst | dist |
- 类型
array - 默认值
[]
配置额外的 rollupPlugins。
- 类型:
object - 默认值
{}
当开启 lib 选项,可通过 rollupOptions 配置额外的 rollup 配置。
当试图修改 rollupOptions.plugins 参数时,建议直接使用 rollupPlugins 参数。
- 类型
array - 默认值
{}
swc 编译选项。具体可参考 swc 配置。
@ice/pkg 插件提供一下生命周期钩子:
- build 命令:
| 生命周期 | 参数 | 调用时机 |
|---|---|---|
| before.build.load | { args: CommandArgs; config: ComponentConfig[] } | 获取所有任务配置后 |
| before.build.run | { args: CommandArgs; config: ComponentConfig[] } | 编译执行之前 |
| after.build.compile | - | 编译结束 |
| error | { errCode: string; err: Error } | 错误 |
- start 命令
| 生命周期 | 参数 | 调用时机 |
|---|---|---|
| before.start.load | { args: CommandArgs; config: ComponentConfig[] } | 获取所有任务配置后 |
| before.start.run | { args: CommandArgs; config: ComponentConfig[] } | 编译执行之前 |
| after.start.compile | - | 编译结束 |
| error | { errCode: string; err: Error } | 错误 |
其他有关插件的使用可参考 build-scripts 插件开发。
@ice/pkg 依赖 @ice/pkg-plugin-docusaurus 插件支持编写文档和预览组件,所有文档默认存放至 docs 文件夹下。支持以 .md 及 .mdx 为后缀的文档。用法:
# 若存在 docs 文件夹,则默认启动文档预览;并启动 es/lib 编译
$ ice-pkg start

# 不启动文档预览
$ ice-pkg start --doc=false

# 若存在 docs 文件夹,则默认构建预览产物
$ ice-pkg build文档以 .md 或 .mdx 为后缀,采用 yaml 和 markdown 语法。
---
title: Simple Usage
sidebar_position: 1
---
## 本 Demo 演示一行文字的用法
+ 将代码块渲染成源代码
```jsx
import MyComponent from 'my-component';
import './my-component.css';
const App = () => {
return (
<div>
<MyComponent />
</div>
)
}
export default MyComponent;
```
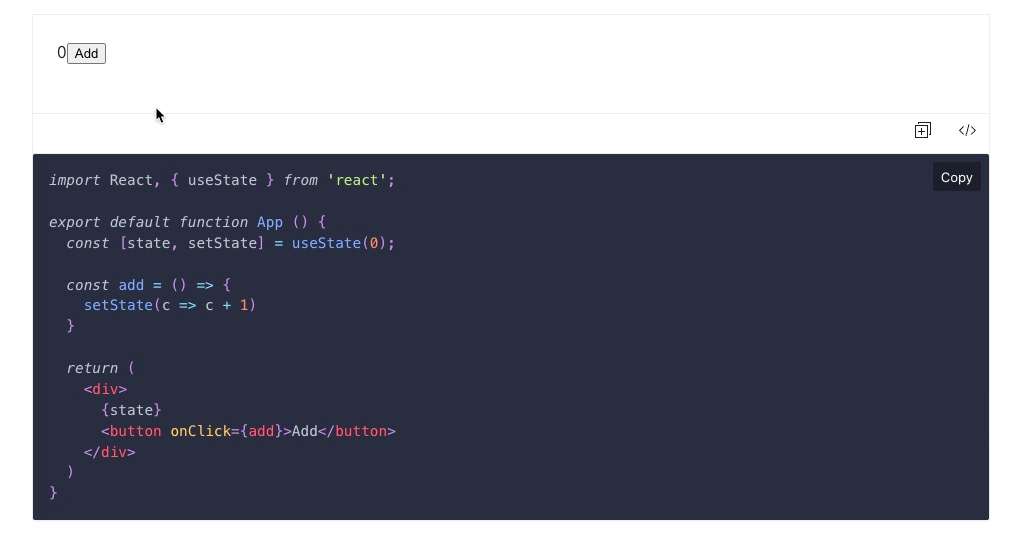
+ 将代码渲染成组件
```jsx preview
import MyComponent from 'my-component';
import './my-component.css';
const App = () => {
return (
<div>
<MyComponent />
</div>
)
}
export default MyComponent;扁平结构的含义是可以将文档平铺在 docs 文件夹下:
.
├── index.md
└── intro.md此外还支持嵌套结构,比如:
.
├── Foo
│   ├── Basic.md
│   └── Complex.md
├── index.md
└── intro.md文档默认按照文件(或文件夹)的字母顺序进行排列。若要修改排列顺序,可通过下面两种方式。
- 使用
sidebar_position
可以在文档头部使用 YAML 标记顺序,比如想要将 index.md 设置为:
---
sidebar_position: 0
---

# 这是首页,同时也是标题

在此处描述首页说明信息- 文档添加数字前缀
.
├── 01-intro.md
├── 02-Foo
│   ├── 01-Basic.md
│   └── 02-Complex.md
└── index.md文档会默认使用第一个 markdown 标题,作为文档的 title。此外,可以通过 yaml 语法来修改文档标题:
---
sidebar_label: 这是标题
---

# 这里不再是默认标题了

在此处描述文档内容...若想要预览组件,需要给代码块添加 preview 属性。
import MyComponent from 'my-component';
import style from './style.module.css';

const App = () => {
  return (
    <div className={styles.container}>
      <MyComponent />
    </div>
  )
}

export default MyComponent;
则会渲染成下面的样子:
需要注意的是,在 preview 的代码块中引入的样式会 污染 全局,因此建议使用 css-module 或 css-in-js 等方式引入样式。
若想要给代码块添加 title,可以使用 title 属性。
import MyComponent from 'my-component';
...@ice/pkg-plugin-docusaurus 插件接受如下配置:
export interface PluginDocusaurusOptions {
  /**
   * 文档的 title,默认为 "飞冰组件"
   */
  title?: string;
  /**
   * 文档部署的顶层 url。比如部署在 github,则是 https://你的项目.github.io
   */
  url?: string;
  /**
   * 文档路由的 baseUrl。
   */
  baseUrl?: string;
  /**
   * 文档站点的 favicon 文件位置,默认为 static/img/favicon.ico
   */
  favicon?: string;
  /**
   * 侧边栏 logo,默认为 static/img/logo.png
   */
  navBarLogo?: string;
  /**
   * 侧边栏 title,默认为 "飞冰组件"
   */
  navBarTitle?: string;
  /**
   * 文档启动的端口,默认为 4444
   */
  port?: number;
};
使用方式如下:
import { defineConfig } from '@ice/pkg';

export default defineConfig({
  plugins: [
    ['@ice/pkg-plugin-docusaurus', {
      title: '标题'
    }]
  ]
})若想要完整的 Docusaurus 能力,可在工程下自定义 docusaurus.config.js。具体的使用方式参考 Docusaurus 文档。
Please see our CONTRIBUTING.md