Integration of ETA (Heating) sensors and switches to Home Assistant
This integration uses the ETA REST API to get sensor values and set switch states from the ETA pellets heating unit.
This is a fork of nigl's repo with the following changes:
- Friendly sensor names
- Shows the current values for all sensors during configuration
- This makes it way easier to select the relevant sensors
- Implemented Switches
- Implemented Text Sensors (state of some endpoints, e.g.
Bereit(Ready) orHeizen(Heating) for the boiler) - Implemented error sensors:
- A binary sensor, which activates if the ETA terminal reports at least one error
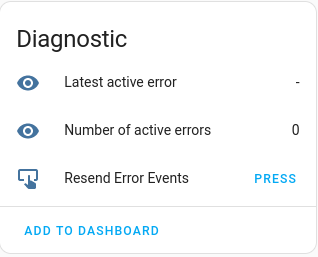
- A sensor, which shows the number of active errors
- A sensor, which shows the latest active error message
- Implemented error events (details)
- Implemented a custom service to set the value of an endpoint (details)
- Implemented writable sensors (details)
| Sensors | Controls | Diagnostic |
|---|---|---|
 |
 |
 |
This integration can be configured directly in Home Assistant via HACS:
- Go to
HACS->Integrations-> Click on the three dots in the top right corner --> Click onUserdefined repositories - Insert
https://github.com/Tidone/homeassistant_eta_integrationinto the fieldRepository - Choose
Integrationin the dropdown fieldCategory. - Click on the
Addbutton. - Then search for the new added
ETAintegration, click on it and the click on the buttonDownloadon the bottom right corner - Restart Home Assistant when it says to.
- In Home Assistant, go to
Configuration->Integrations-> Click+ Add IntegrationSearch forEta Sensorsand follow the instructions.- Note: After entering the host and port the integration will query information about every possible endpoint. This step can take a very long time, so please have some patience.
- Note: This only affects the configuration step when adding the integration. After the integration has been configured, only the selected entities will be queried.
- Note: The integration will also query the current sensor values of all endpoints when clicking on
Configure. This will also take a bit of time, but not as much as when adding the integration for the first time.
-
You have to activate the webservices API on your pellet heater first: see the "official" documentation:
- Log in to
meinETA - Go to
Settingsin the middle of the page (not the bottom one!) - Click on
Activate Webservices - Follow the instructions
- Log in to
-
For best results, your pellet heater has to support at least API version 1.2. If you are on an older version the integration will fall back to a compatibility mode, which means that some sensors may not be correctly detected/identified. The ones that are correctly detected and identified should still work without problems.
If you want to update the firmware of your pellet heater you can find the firmware files onmeinETA(Settings at the bottom->Installation & Software). -
Your ETA pellets unit needs a static IP address! Either configure the IP adress directly on the ETA terminal, or set the DHCP server on your router to give the ETA unit a static lease.
If you have problems setting up this integration you can enable verbose logs on the dialog where you enter your ETA credentials.
This will log all communication responses, which may help locating the problem.
After setting up the integration you can download the logs at Settings -> System -> Logs -> Download Full Log.
Please note that these logs may be very large, and contain sensitive information from other integrations. If you want to post them somewhere you may have to manually edit the file and delete the lines from before you started setting up this integration.
This integration publishes an event whenever a new error is reported by the ETA terminal, or when an active error is cleared. These events can then be handled in automations.
If a new error is reported, an eta_webservices_error_detected event is published.
If an error is cleared, an eta_webservices_error_cleared event is published.
Every event has the following data:
| Name | Info | Sample Data |
|---|---|---|
msg |
Short error message | Water pressure too low 0,00 bar |
priority |
Error priority | Error |
time |
Time of the error, as reported by the ETA terminal | 2011-06-29T12:48:12 |
text |
Detailed error message | Top up heating water! If this warning occurs more than once a year, please contact plumber. |
fub |
Functional Block of the error | Kessel |
host |
Address of the ETA terminal connection | 0.0.0.0 |
port |
Port of the ETA terminal connection | 8080 |
If you want to check the data of an active event, you can follow these steps.
Note: This is only possible if the ETA terminal actually reports an ective error!
- Open Home Assistant in two tabs
- On the first tab go to
Settings->Devices & Services->Deviceson top ->ETA - On the second tab go to
Developer tools->Eventson top -> Entereta_webservices_error_detectedin the fieldEvent to subscribe to-> Click onStart Listening - On the first tab click on the
Resend Error Eventsbutton - On the second tab you can now see the detailed event info
If you want to send a test event to check if your automations work you can follow these steps:
- Go to
Developer tools->Eventson top - Enter
eta_webservices_error_detectedin the fieldEvent type - Enter your test payload in the
Event datafield-
msg: Test
priority: Error
time: "2023-11-06T12:48:12"
text: This is a test error.
fub: Kessel
host: 0.0.0.0
port: 8080
-
- Click on
Fire Event - Your automation should have been triggered
This implementation supports setting the value of sensors which have a unit of °C, kg, or %.
These writable sensors are not immediately added to the dashboard in Home Assistant. You can find the sensors (after adding them via configuration) on the ETA device page under Config.
You can add writable sensors by clicking on Configure on the ETA Integeration page in Home Assistant.
If you are clicking this button for the first time after updating this integration from a previous version without support for these sensor types, this step will take a while because the integration will have to query the list of valid sensors from the ETA unit again.
API v1.1 does not have some endpoints, which are used to query the valid values of writable sensors. If your terminal is on this API version, the integration will fall back to a compatibility mode and guess the valid value ranges for these sensors.
Also, on API v1.1 it is not possible to query if a sensor is writable at all! This integration therefore shows all sensors in the list of writable sensors, and the user has to choose the ones which are actually writable.
The authors cannot be made responsible if the user renders their ETA heating unit unusable because they set a sensor to an invalid value.
This integration implements a custom service to write values to ETA endpoints.
Attention: This service is very low-level and does not respect the scaleFactor and other attributes of the endpoints! You have to calculate the correct value yourself!
E.g. If an endpoint has a scaleFactor of 10 and you want set the value 55, you have to write 550 to the endpoint.
- Open Home Assistant
- Go to
Developer tools->Serviceson top - Select the
Eta Sensors: Set valueservice - Enter the numeric part of the endpoint URI (e.g.
/40/10021/0/0/12080, which should be the On/Off button) - Enter the value you want to write (e.g.
1803to turn on the heating unit) - Some endpoints, such as the heating windows, require a begin and end time in addition to the value
- These values have to be specified in 15 minute increments since midnight!
- E.g. a time of 15:30 (3:30pm) would be a value of
62(15*4+2or(15*60+30)/15)
- E.g. a time of 15:30 (3:30pm) would be a value of
- These values have to be specified in 15 minute increments since midnight!
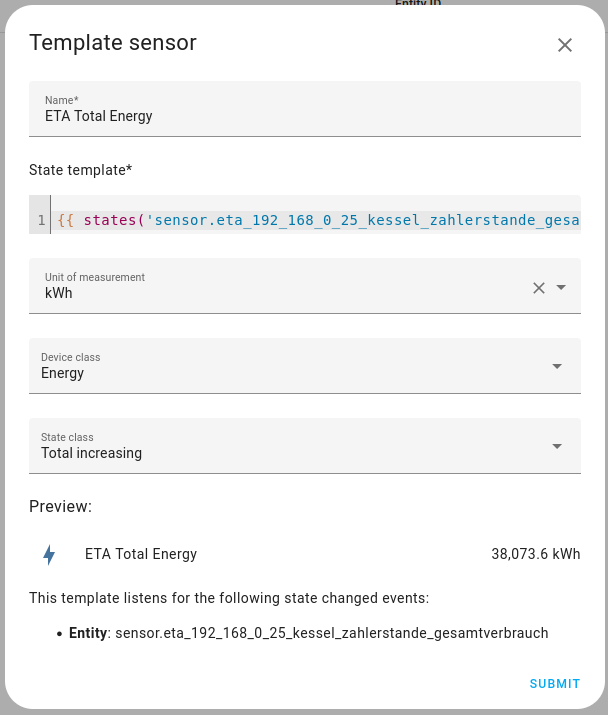
You can add the ETA Heating Unit into the Energy Dashboard by converting the total pellets consumption into kWh, and adding that as a gas heater.
To convert the consumption you have to add a custom template sensor to your configuration.yaml file:
# Convert pellet consumption (kg) to energy consumption (kWh)
template:
  - sensor:
    - name: eta_total_energy
      unit_of_measurement: kWh
      device_class: energy
      state_class: total_increasing
      state: >
        {{ states('sensor.eta_<IP>_kessel_zahlerstande_gesamtverbrauch') | float(default=0.0) | multiply(4.8) | round(1) }}
Make sure to replace the `<IP> field with the Ip address of your ETA unit. You can also check the sensor id by going to the options of the sensor, and
You can also use the web interface to create a template helper:

You can then add your ETA heating unit to your Energy Dashboard by adding this new sensor to the list of gas sources.
If you have some ideas about expansions to this implementation, please open an issue and I may look into it.
