This repository is the backup for my part @ ** JingDong GRASPING ROBOT CHALLENGE ** Also the implements of my paper: ** Robotic hand-eye calibration with depth camera: A sphere model approach **
| Ubuntu 1604 & ROS Kinetic Kame |
Yang, Lixin, et al. " Robotic hand-eye calibration with depth camera: A sphere model approach. " 2018 4th International Conference on Control, Automation and Robotics (ICCAR). IEEE, 2018. PDF
@inproceedings{yang2018robotic,
  title={Robotic hand-eye calibration with depth camera: A sphere model approach},
  author={Yang, Lixin and Cao, Qixin and Lin, Minjie and Zhang, Haoruo and Ma, Zhuoming},
  booktitle={2018 4th International Conference on Control, Automation and Robotics (ICCAR)},
  pages={104--110},
  year={2018},
  organization={IEEE}
}
handeyeCalibWithDepthCamera is freely available for free non-commercial use, and may be redistributed under these conditions. Please, see the license for further details
- Ubuntu 16.04
- ROS Kinetic Kame // full install
- **PCL 1.7+ ** (should be included in ROS Kinetic Kame)
- OpenCV 3.3 (should be included in ROS Kinetic Kame)
- cv_bridge
sudo apt-get install ros-kinetic-cv-bridge - Eigen3 (should be included in Ubutnu 16.04)
sudo apt-get install libeigen3-dev - Sophus (https://github.com/stonier/sophus) // standard
make && make install - Ceres (http://ceres-solver.org/) // follow the installation guild
- librealsense2 (https://github.com/IntelRealSense/librealsense) :
We use thelibrealsense2version to drive Intel RealSense ZR300 Camera. and wrap it by ROS topics and services. Ourrealsense2_driverneed thelibrealsense2.so. The recommended way to install it is by following the Linux guide:(https://github.com/IntelRealSense/librealsense/blob/master/doc/distribution_linux.md) , or as below:
Register the server's public key :
sudo apt-key adv --keyserver keys.gnupg.net --recv-key C8B3A55A6F3EFCDE || sudo apt-key adv --keyserver hkp://keyserver.ubuntu.com:80 --recv-key C8B3A55A6F3EFCDE
Add the server to the list of repositories in Ubuntu 16 LTS:
sudo add-apt-repository "deb http://realsense-hw-public.s3.amazonaws.com/Debian/apt-repo xenial main" -u
Then:
sudo apt-get update
And install byapt-get:
sudo apt-get install librealsense2-dev
standard ROS workspace catkin_make procedure;
cd ~/WhereEver_You_Want
git clone https://github.com/lixiny/calib_ws.git
cd calib_ws
catkin_make
cd calib_ws
source devel/setup.bash
roslaunch realsense2_driver realsense_driver.launch
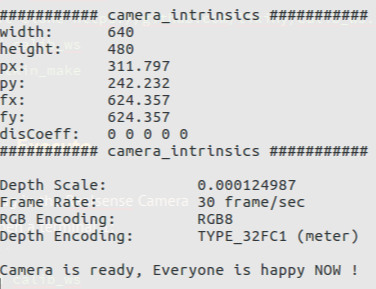
when it shows the INFO like:
means the realsense2_driver is successfully tuned up.Important: you should use the pop-up parameters: ###### camera_intrinsics ###### to update:
./calib_ws/src/handeye_calib_sphere/camera_intrinsic_color.xml .
After roslaunch, you should have topics as blow in your terminal when you run: rostopic list
we use a 3D-printed hollow sphere model with Radius 75mm ( you can modify this radius if necessary).
we use RANSAC to localize the sphere inside the captured pointclouds. instead to iterate from a full bunch of scatted points, if we can use a aruco plate to segmente a region and make sure the points inside the region are all captured on the sphere, RANSAC would be much easier( it should be ).
The Aruco Plate is not compulsory again, you can de-activate the aruco module as described in Advanced Usage part.
We use the aruco plate with 2 different size:
Till now, we only implement the eye-in-hand configration. If you are familiar with the hand-eye problem, you can easily implement the eye-to-hand yourself.
We use the hand-mounted camera viewing the Sphere-ArucoPlate setups as shown below.
[这里添一张图片]
we use UR5 and self-defined [我还没写完]
cd calib_ws
source devel/setup.bash
## 开始采集数据:
