Overhave is the web-framework for BDD: scalable, configurable, easy to use, based on Flask Admin and Pydantic.
- Ready web-interface for easy BDD features management with Ace editor
- Traditional Gherkin format for scenarios provided by pytest-bdd
- Execution and reporting of BDD features based on Allure
- Auto-collection of pytest-bdd steps and display on web-interface
- Simple scenarios structure, easy horizontal scaling
- Built-in wrappers for pytest-bdd hooks to supplement Allure report
- Ability to create and use several BDD keywords dictionary with different languages
- Versioning and deployment of scenario drafts to Bitbucket or GitLab
- Synchronization between git repository and database with features
- Built-in configurable access management of users and groups
- Configurable strategy for user authorization (LDAP also provided)
- Database schema based on SQLAlchemy models and works with PostgreSQL
- Still configurable as Flask Admin, supports plug-ins and extensions
- Has built-in API application with Swagger docs, based on FastAPI
- Distributed producer-consumer architecture based on Walrus Redis streams
- Command-line interface, provided with Typer
- Integrated interaction for files storage with s3-cloud based on boto3
- Web-browser emulation ability with custom toolkit (GoTTY, for example)
You can install Overhave via pip from PyPI:
pip install overhaveThe web-interface is a basic tool for BDD features management. It consists of:
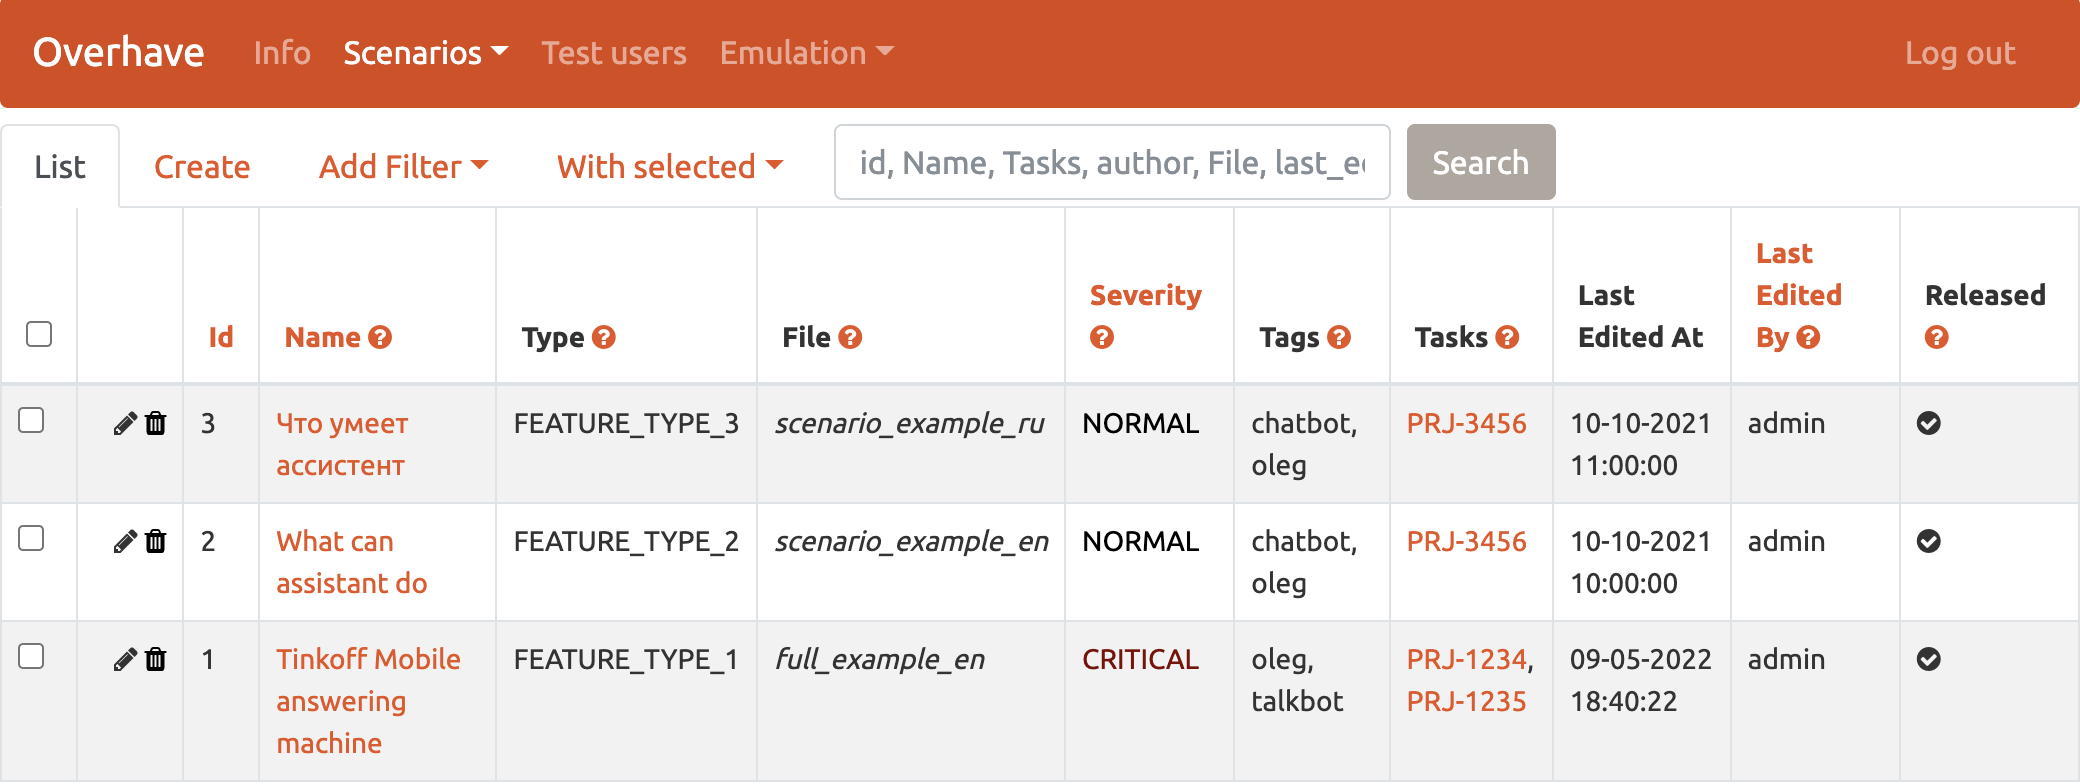
Info - index page with optional information about your tool or project;
- Scenarios - section for features management, contains subsections
Features, Test runs, Versions and Tags:
- Features
gives an interface for features records management and provides info about id, name author, time, editor and publishing status; it is possible to search, edit or delete items through Script panel.
- Test runs
gives an interface for test runs management and provides info about.
- Versions
contains feature versions in corresponding to test runs; versions contains PR-links to the remote Git repository.
- Tags
contains tags values, which are used for feature's tagging.
Test users - section for viewing and configuring test users;
- Access - section for access management, contains Users and
Groups subsections;
- Emulation - experimental section for alternative tools implementation
(in development).
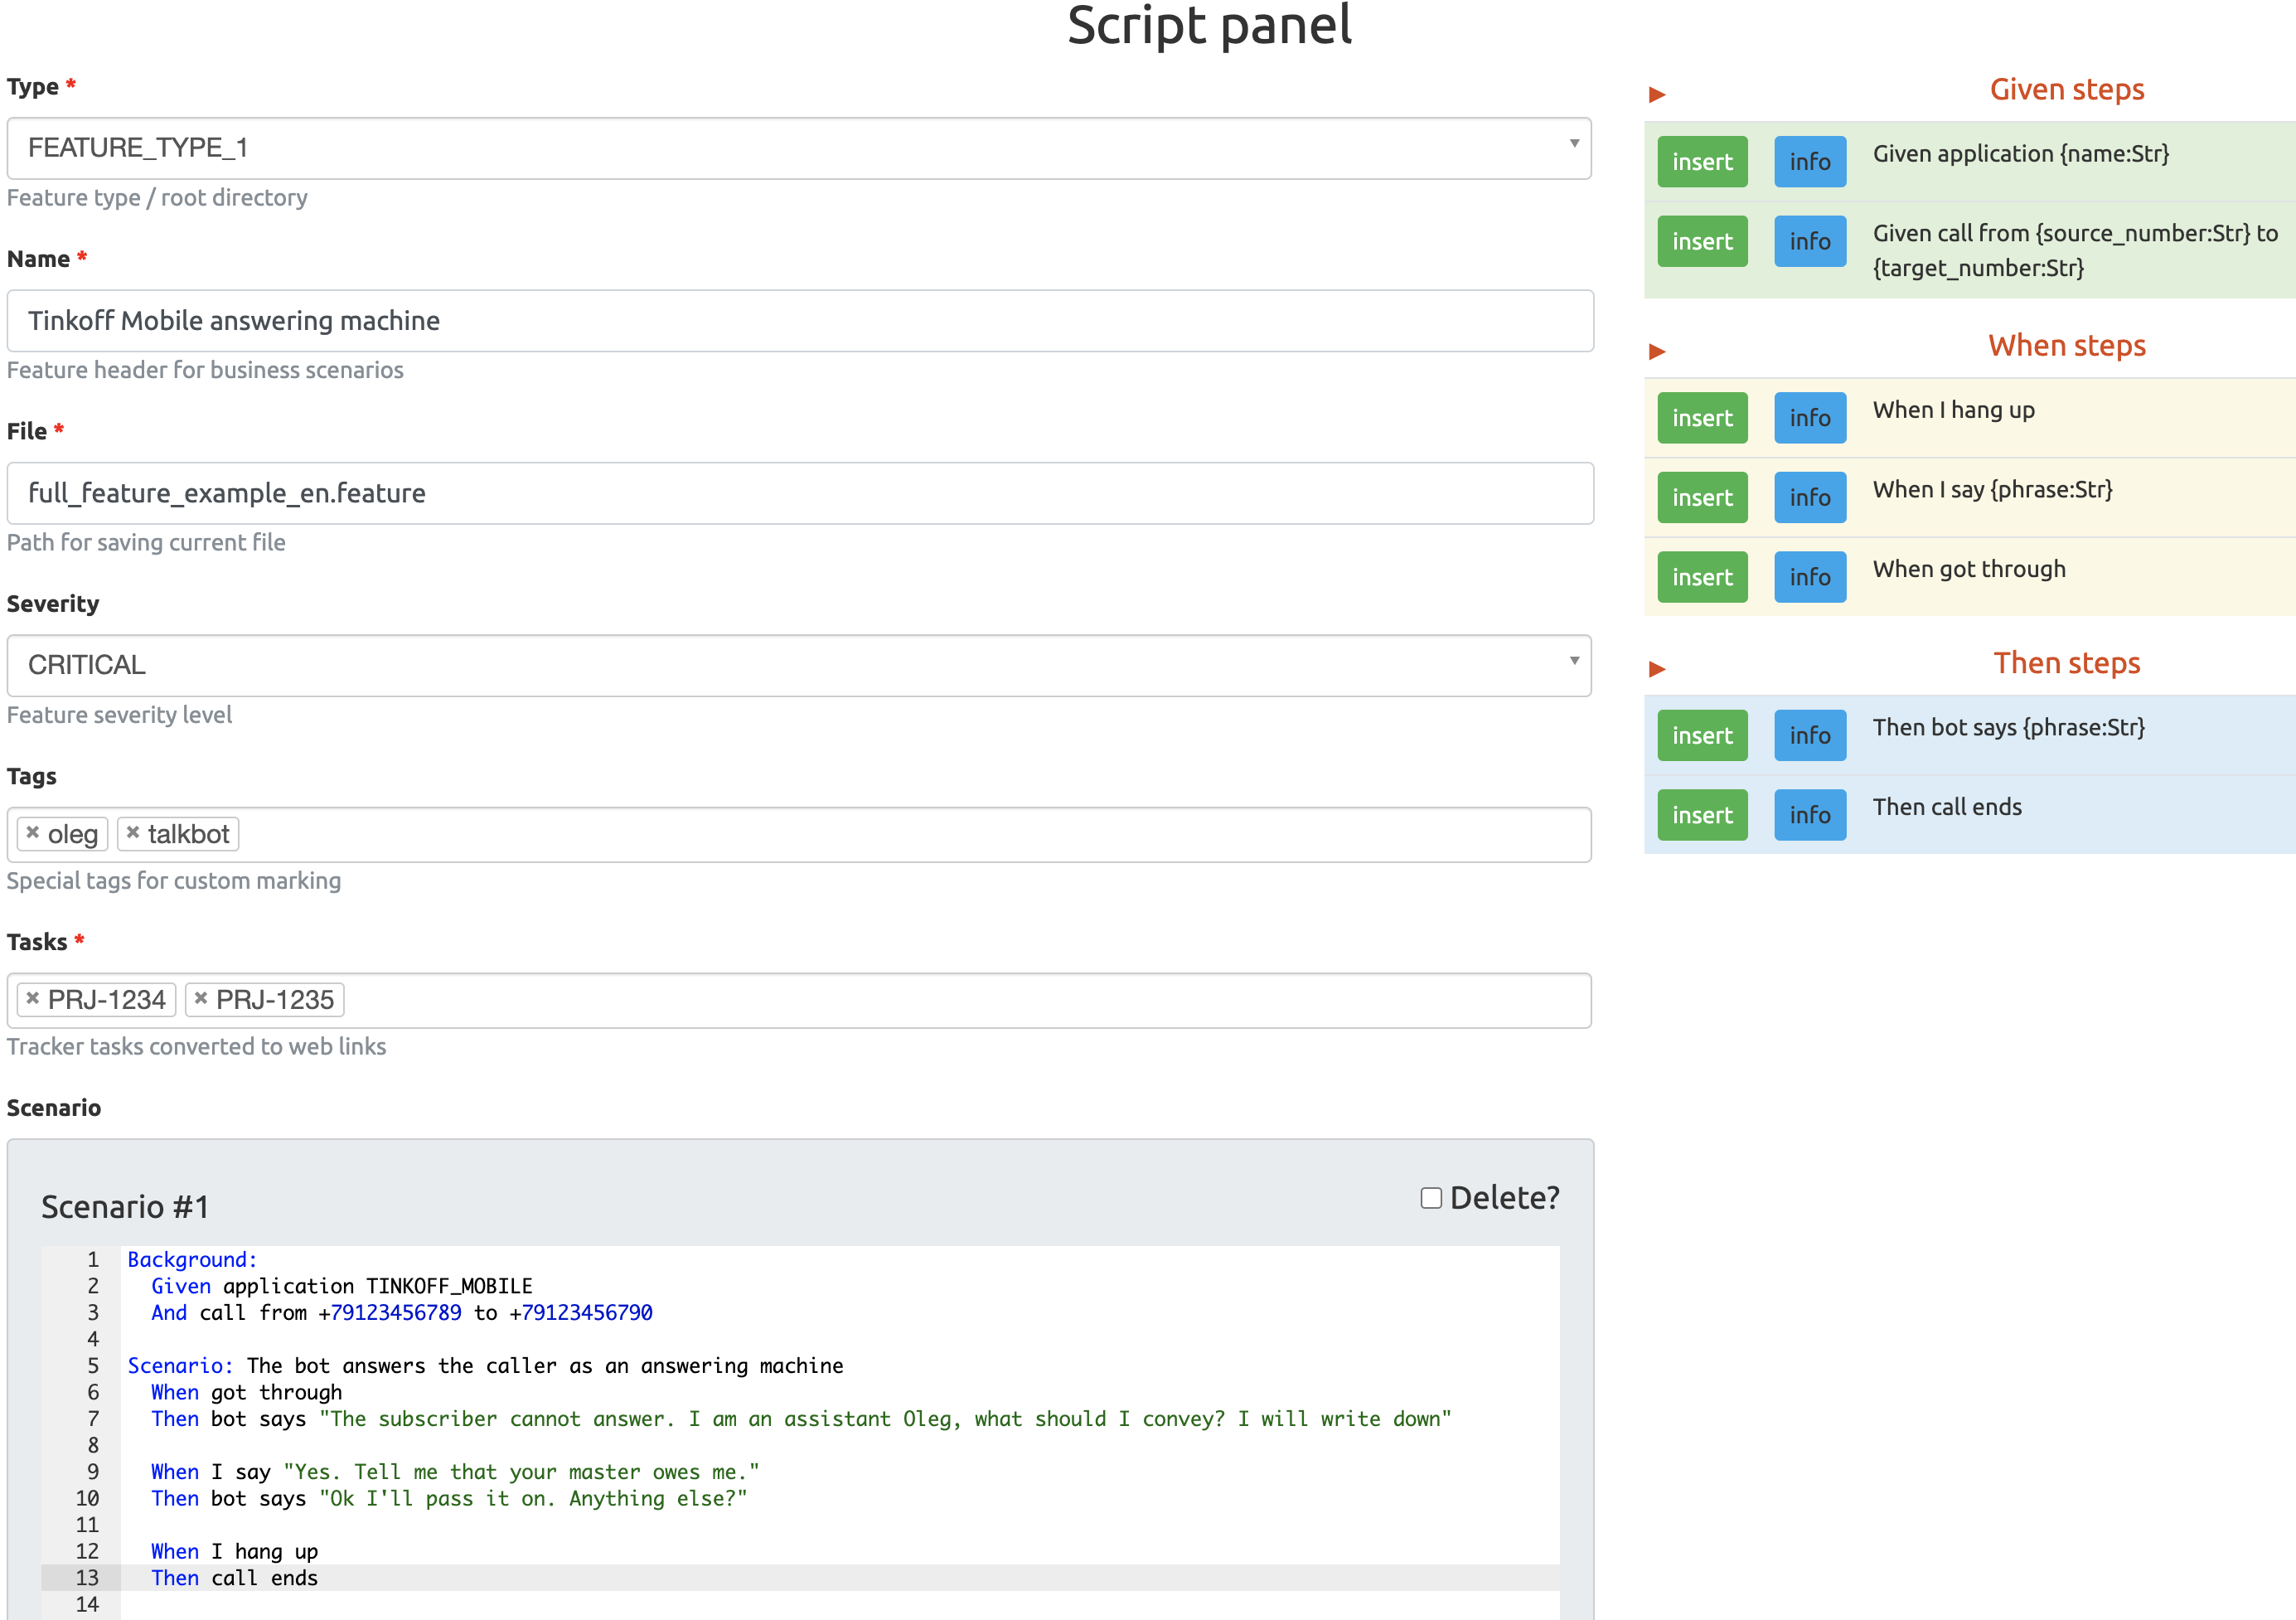
Overhave features could be created and/or edited through special
script panel in feature edit mode. Feature should have type registered by the
application, unique name, specified tasks list with the traditional format
`PRJ-NUMBER` and scenario text.
Script panel has pytest-bdd steps table on the right side of interface. These steps should be defined in appropriate fixture modules and registered at the application on start-up to be displayed.
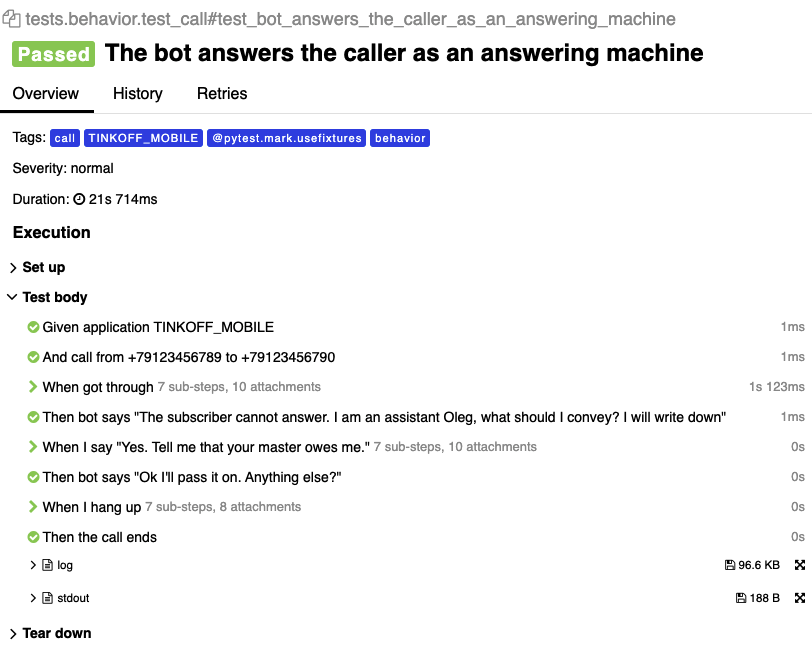
Overhave generates Allure report after tests execution in web-interface. If you execute tests manually through PyTest, these results are could be converted into the Allure report also with the Allure CLI tool. This report contains scenarios descriptions as they are described in features.

Example of generated Allure report after execution of Overhave's feature
Overhave has special demo-mode (in development), which could be possibly used for framework demonstration and manual debugging / testing. The framework provides a CLI entrypoints for easy server run in debug mode:
make up  # start PostgreSQL database and Redis
overhave db create-all  # create Overhave database schema
overhave-demo admin  # start Overhave admin on port 8076 in debug mode
overhave-demo consumer -s test # start Overhave test execution consumerNote: you could run admin in special mode, which does not require consumers. This mode uses threadpool for running testing and publication tasks asynchronously:
overhave-demo admin --threadpool --language=ruBut this threadpool mode is unscalable in kubernetes paradigm. So, it's highly recommended to use corresponding consumers exactly.
Overhave has a CLI that provides a simple way to start service web-interface, run consumer and execute basic database operations. Examples are below:
overhave db create-all
overhave admin --port 8080
overhave consumer -s publication
overhave api -p 8000 -w 4Note: service start-up takes a set of settings, so you can set them through
virtual environment with prefix `OVERHAVE_`, for example `OVERHAVE_DB_URL`.
If you want to configure settings in more explicit way through context injection,
please see next part of docs.
Service could be configured via application context injection with prepared
instance of OverhaveContext object. This context could be set using
`set_context` function of initialized `ProxyFactory` instance.
For example, `my_custom_context` prepared. So, application start-up could
be realised with follow code:
from overhave import overhave_app, overhave_admin_factory

factory = overhave_admin_factory()
factory.set_context(my_custom_context)
overhave_app(factory).run(host='localhost', port=8080, debug=True)Note:
`overhave_app`is the prepared Flask application with already enabled- Flask Admin and Login Manager plug-ins;
`overhave_factory`is a function for LRU cached instance of the Overhave- factory
`ProxyFactory`; the instance has an access to application components, directly used in`overhave_app`.
`my_custom_context`is an example of context configuration, see an- example code in context_example.rst.
- RedisSentinel - redis connection through sentinel. To enable sentinel connection use env OVERHAVE_REDIS_SENTINEL_ENABLED=True
- Redis - default redis connection without sentinel.
Overhave has producer-consumer architecture, based on Redis streams, and supported 3 consumer's types:
- TEST - consumer for test execution with it's own factory
`overhave_test_execution_factory`;
- PUBLICATION - consumer for features publication with it's own factory
`overhave_publication_factory`;
- EMULATION - consumer for specific emulation with it's own factory
`overhave_emulation_factory`.
Note: the `overhave_test_execution_factory` has ability for context injection
and could be enriched with the custom context as the `overhave_admin_factory`.
Overhave supports it's own special project structure:
The right approach is to create a root directory (like "demo" inside the current repository) that contains features, fixtures and steps directories.
The Features directory contains different feature types as separate directories, each of them corresponds to predefined pytest-bdd set of steps.
The Fixtures directory contains typical PyTest modules splitted by different feature types. These modules are used for pytest-bdd isolated test runs. It is necessary because of special mechanism of pytest-bdd steps collection.
The Steps directory contains pytest-bdd steps packages splitted by differrent feature types also. Each steps subdirectory has it's own declared steps in according to supported feature type.
So, it is possible to create your own horizontal structure of different product directions with unique steps and PyTest fixtures.
Note: this structure is used in Overhave application. The formed data gives a possibility to specify registered feature type in the web-interface script panel. Also, this structure defines which steps will be displayed in the right side of script panel.
Overhave has it's own special feature's text format, which inherits Gherkin from pytest-bdd with unique updates:
- required tag that is related to existing feature type directory, where
- current feature is located;
- any amount of arbitrary tags;
- severity tag - implements Allure severity to feature or just tagged
- scenario (for example:
`@severity.blocker`);
- info about feature - who is creator, last editor and publisher;
- task tracker's tickets with format
`PRJ-1234`;
An example of filled feature content is located in feature_example.rst.
Overhave implements solution for PyTest markers usage with custom additional information:
- "disabled": same as skip marker, but it's necessary to setup reason;
- "xfail": traditional xfail with strict reason presence.
Examples:
@disabled(not ready)
Feature: My business feature
@disabled(TODO: https://tracker.myorg.com/browse/PRJ-333; deadline 01.01.25)
Scenario: Yet another business feature@xfail(bug: https://tracker.myorg.com/browse/PRJ-555)
Scenario outline: Other business featureIf reason contains URL, so Overhave will attach Allure link to report: for disabled - it will be LinkType.LINK, for xfail - LinkType.ISSUE.
Overhave has ability to set links to it's own admin service in Allure
test-cases. Link will be set automatically when you generate Allure report.
This function can be enabled via setup of environment variable
`OVERHAVE_ADMIN_URL`:
export OVERHAVE_ADMIN_URL=https://overhave-admin.myorg.comAlso, Overhave has ability to set links to feature file in Git repository.
Link will be set automatically when you generate Allure report. This function
can be enabled via setup of environment variable
`OVERHAVE_GIT_PROJECT_URL`:
export OVERHAVE_GIT_PROJECT_URL=https://git.myorg.com/bdd-features-repoThe web-interface language is ENG by default and could not be switched
(if it's necessary - please, create a `feature request` or contribute
yourself).
The feature text as well as pytest-bdd BDD keywords are configurable with Overhave extra models, for example RUS keywords are already defined in framework and available for usage:
from overhave.extra import RUSSIAN_PREFIXES

language_settings = OverhaveLanguageSettings(step_prefixes=RUSSIAN_PREFIXES)Note: you could create your own prefix-value mapping for your language:
from overhave import StepPrefixesModel

GERMAN_PREFIXES = StepPrefixesModel(
    FEATURE="Merkmal:",
    SCENARIO_OUTLINE="Szenarioübersicht:",
    SCENARIO="Szenario:",
    BACKGROUND="Hintergrund:",
    EXAMPLES="Beispiele:",
    EXAMPLES_VERTICAL="Beispiele: Vertikal",
    GIVEN="Gegeben ",
    WHEN="Wann ",
    THEN="Dann ",
    AND="Und ",
    BUT="Aber ",
)Overhave gives an ability to sent your new features or changes to remote git repository, which is hosted by Bitbucket or GitLab. Integration with bitbucket is native, while integration with GitLab uses python-gitlab library.
You are able to set necessary settings for your project:
publisher_settings = OverhaveGitlabPublisherSettings(
    repository_id='123',
    default_target_branch_name='master',
)
client_settings=OverhaveGitlabClientSettings(
    url="https://gitlab.mycompany.com",
    auth_token=os.environ.get("MY_GITLAB_AUTH_TOKEN"),
)
The pull-request (for Bitbucket) or merge-request (for GitLab) created when you click the button Create pull request on test run result's page. This button is available only for success test run's result.
Note: one of the most popular cases of GitLab API authentication is the OAUTH2 schema with service account. In according to this schema, you should have OAUTH2 token, which is might have a short life-time and could not be specified through environment. For this situation, Overhave has special TokenizerClient with it's own TokenizerClientSettings - this simple client could take the token from a remote custom GitLab tokenizer service.
Overhave gives an ability to synchronize your current git repository's state with database. It means that your features, which are located on the database, could be updated - and the source of updates is your repository.
For example: you had to do bulk data replacement in git repository, and now you want to deliver changes to remote database. This not so easy matter could be solved with Overhave special tooling:
You are able to set necessary settings for your project:
overhave sync run  # only update existing features
overhave sync run --create-db-features  # update + create new features
overhave sync run --pull-repository  # pull git repo and run sync
You are able to test this tool with Overhave demo mode. By default, 3 features are created in demo database. Just try to change them or create new features and run synchronization command - you will get the result.
overhave-demo sync-run # or with '--create-db-features'Overhave supports validation of existing feature files. Command try to parse features and fill defined feature info format. If there is any problem, special error will be thrown.
overhave sync validate-features
overhave sync validate-features --raise-if-nullable-id
overhave sync validate-features --pull-repository
And yes, your are able to try it with demo mode:
overhave-demo validate-features
overhave sync validate-features -r # --raise-if-nullable-idOverhave gives an ability to set custom index.html file for rendering. Path to file could be set through environment as well as set with context:
admin_settings = OverhaveAdminSettings(
    index_template_path="/path/to/index.html"
)Overhave provides several authorization strategies, declared by
`AuthorizationStrategy` enum:
- Simple - strategy without real authorization.
- Each user could use preferred name. This name will be used for user authority. Each user is unique. Password not required.
- Default - strategy with real authorization.
- Each user could use only registered credentials.
- LDAP - strategy with authorization using remote LDAP server.
- Each user should use his LDAP credentials. LDAP server returns user groups. If user in default 'admin' group or his groups list contains admin group - user will be authorized. If user already placed in database - user will be authorized too. No one password stores.
Appropriate strategy and additional data should be placed into
`OverhaveAuthorizationSettings`, for example LDAP strategy could be
configured like this:
auth_settings = OverhaveAuthorizationSettings(auth_strategy=AuthorizationStrategy.LDAP)
ldap_manager_settings = OverhaveLdapManagerSettings(ldap_admin_group="admin")Overhave implements functionality for s3 cloud interactions, such as bucket creation and deletion, files uploading, downloading and deletion. The framework provides an ability to store reports and other files in the remote s3 cloud storage. You could enrich your environment with following settings:
OVERHAVE_S3_ENABLED=true
OVERHAVE_S3_URL=https://s3.example.com
OVERHAVE_S3_ACCESS_KEY=<MY_ACCESS_KEY>
OVERHAVE_S3_SECRET_KEY=<MY_SECRET_KEY>
Optionally, you could change default settings also:
OVERHAVE_S3_VERIFY=false
OVERHAVE_S3_AUTOCREATE_BUCKETS=true
The framework with enabled `OVERHAVE_S3_AUTOCREATE_BUCKETS` flag will create
application buckets in remote storage if buckets don't exist.
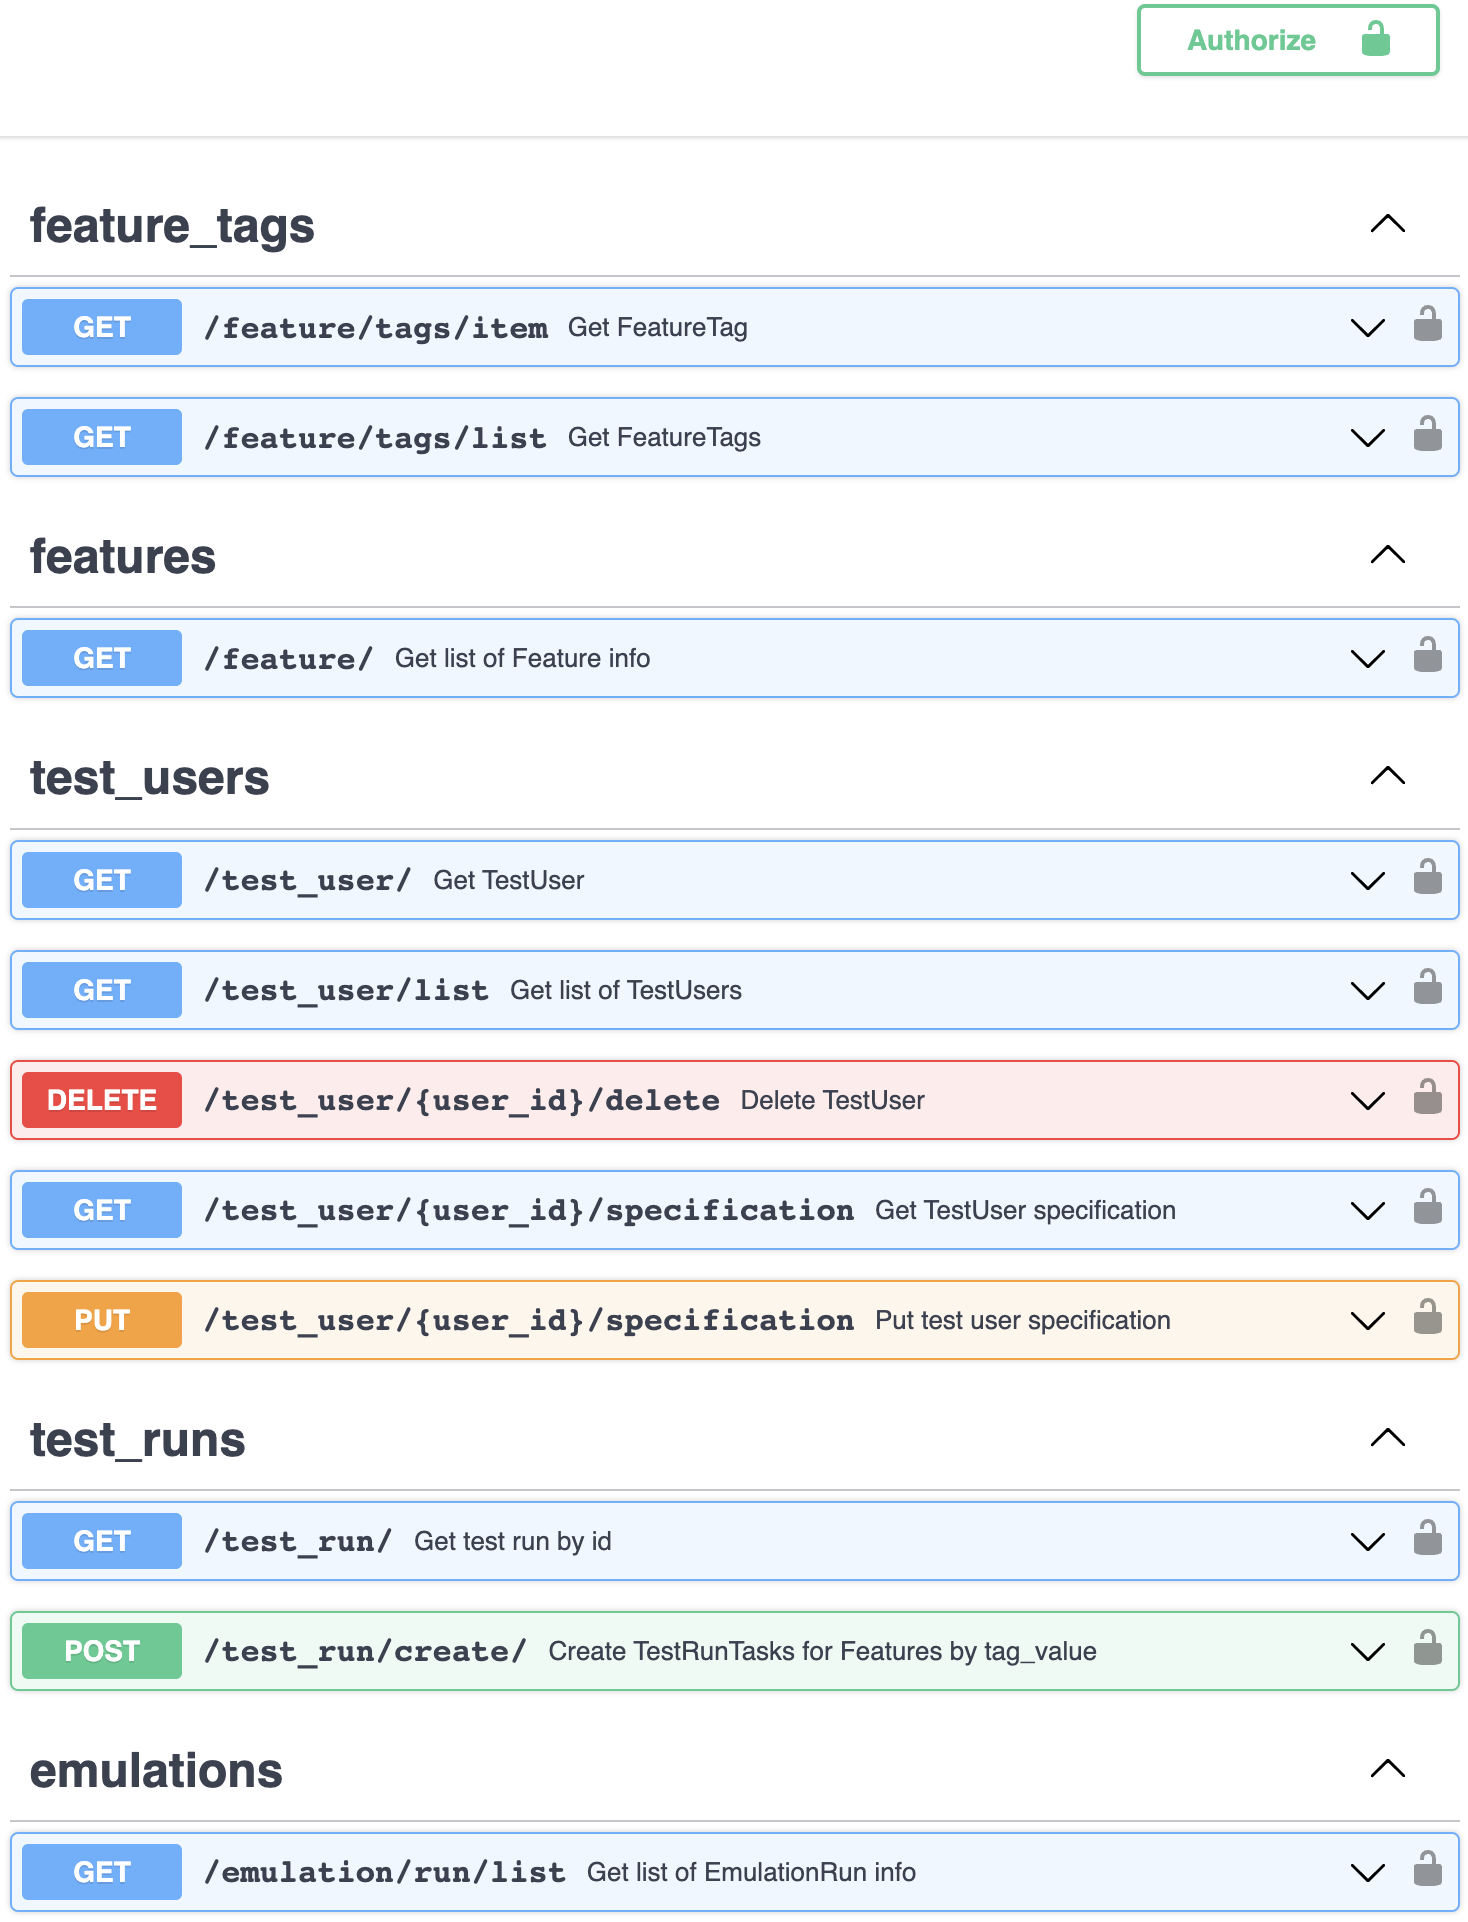
Overhave has it's own application programming interface, based on FastAPI.

Overhave openapi.json through Swagger
Current possibilities could be displayed through built-in Swagger - just run the API and open http://localhost:8000 in your browser.
overhave api -p 8000Interface has authorization through oauth2 scheme, so you should setup
`OVERHAVE_API_AUTH_SECRET_KEY` for usage.
Right now, API implements types of resources:
- feature_tags
- get feature tag or get list of feature tags;
- features
- get features info by tag ID or tag value;
- test_users
- get test user info, specification, put new specification or delete test user;
- test_runs
- get test run info or create test run with given parameters;
- emulations
- get emulation runs by test user id.
Contributions are very welcome.
Project installation is very easy and takes just few prepared commands (make pre-init works only for Ubuntu; so you can install same packages for your OS manually):
make pre-init
make init
Packages management is provided by Poetry.
Tests can be run with Tox. Docker-compose is used for other services preparation and serving, such as database. Simple tests and linters execution:
make up
make test
make lint
Please, see make file and discover useful shortcuts. You could run tests in docker container also:
make test-dockerProject documentation could be built via Sphinx and simple make command:
make build-docsBy default, the documentation will be built using html builder into _build directory.
Distributed under the terms of the GNU GPLv2 license.
If you encounter any problems, please report them here in section Issues with a detailed description.


