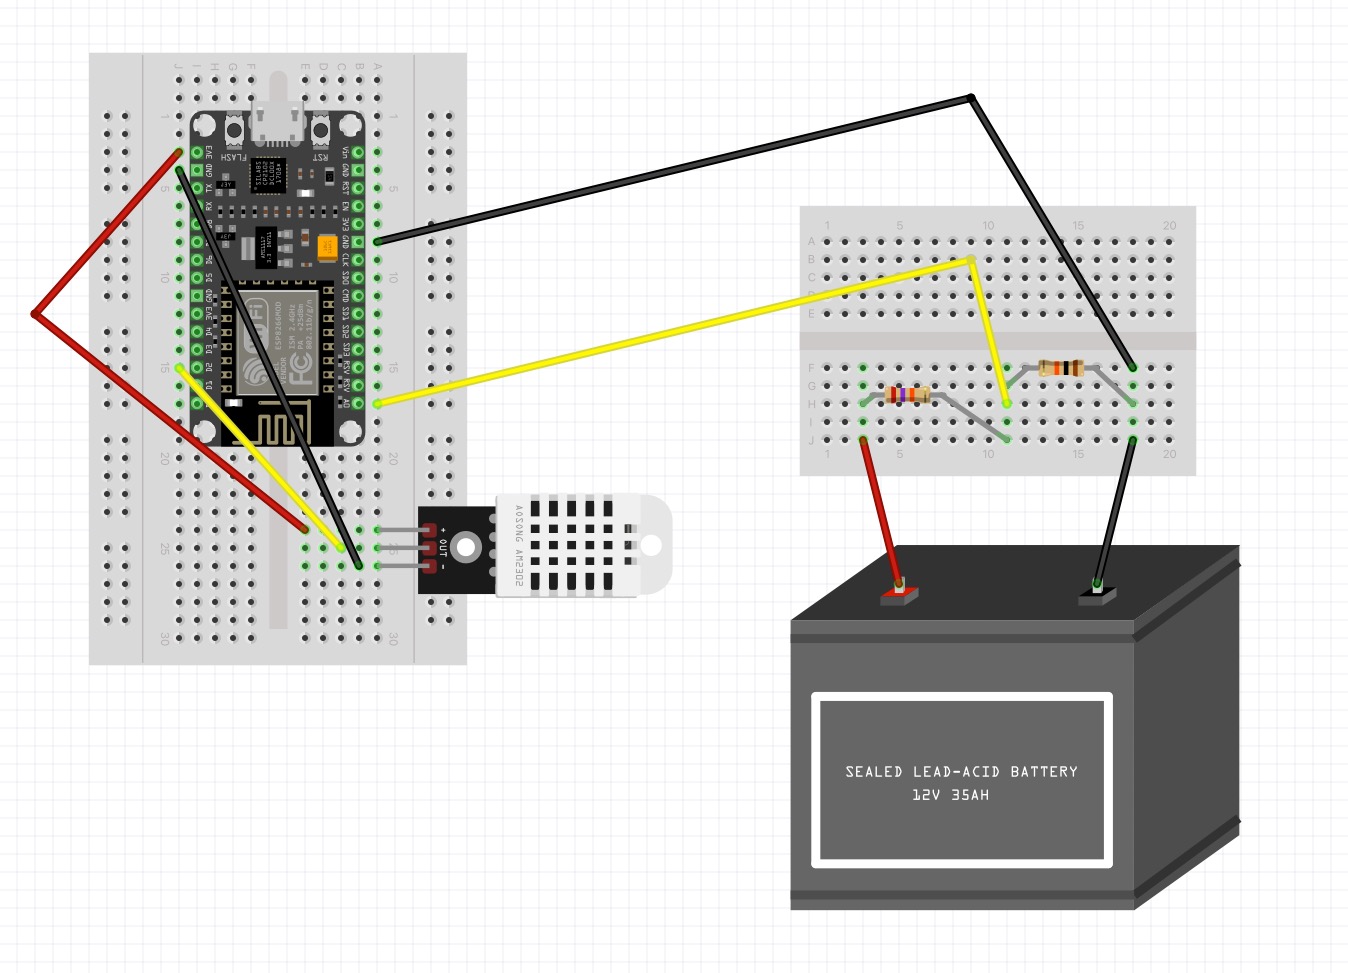
Project for measuring humidity and temperature using an HiLetgo ESP8266 NodeMCU and HiLetgo DHT22 sensor and send date to Adafruit IO to create a visual dashboard.
Adapted from:
- Adafruit tutorial and code for ESP8266 Temperature / Humidity Webserver.
- Tutorial for measuring 12v battery voltage using an ESP8266 and https://www.youtube.com/watch?v=m5jasXwLQa4&ab_channel=HamedAdefuwa
- Try 47k resistor vs 27k to lower max voltage enough and work with this math
- Try 3.2v factor vs 5v factor since the board runs at 3.x volts
- HiLetgo ESP8266 NodeMCU
- HiLetgo DHT22 Humidity + Temp with breakout board or AM2302 or DHT22 (note: if using a DHT22 without a breakout board, you'll need a 10k resistor more info)
- power supply, usb cable, hookup supplies
See Fritzing design in /fritzing directory.
The following assumes OSX:
-
Download and install the Arduino IDE
-
Download and install the CP210x USB to UART Bridge VCP Drivers so the USB chipset on the NodeMCU can communicate with your computer
-
Clone this repo from GitHub to your computer
-
Create an Adafruit IO account to store your data and create a dashboard of your data
-
Open
/main/temphumidityadafruitio/in the Arduino IDE and create a 'secrets.h' file
Create a 'secrets.h' file in the Sketch's root directory (ex. /main/temphumidityadafruitio/) with the following contents:
#define WLAN_SSID       "WiFiSSID"
#define WLAN_PASS       "WiFiPassword"

#define AIO_HUM_FEED   "/feeds/garage-humidity"
#define AIO_TEMP_FEED  "/feeds/garage-temperature"
#define AIO_MOISTURE_FEED  "/feeds/garage-moisture"
#define AIO_SERVER      "io.adafruit.com"
#define AIO_SERVERPORT  1883
#define AIO_USERNAME    "AdafruitIOUsername"
#define AIO_KEY         "AdafruitIOKey"
The 'secrets.h' file is ignored by Git.
-
Install support for NodeMCU boards in the Arduino IDE.
-
Download and install Arduino libraries needed by this project.
- Install ESP8266 custom boards
- https://github.com/adafruit/DHT-sensor-library
- https://github.com/adafruit/Adafruit_Sensor
- https://github.com/adafruit/Adafruit_MQTT_Library
See Arduino IDE library tutorial if needed.
- Setup Arduino IDE under Tools menu:
- Board: NodeMCU 1.0 (ESP=12E Module)
- CPU Frequency: 80MHz
- Flash Size: 4M (3M SPIFFS)
- Upload Speed: 115200
- Port: SLAB_USBtoUART (or similar)
- Wire NodeMCU and DHT22:
- DHT22 "-" to NodeMCU "GND"
- DHT22 "+" to NodeMCU "3.3v"
- DHT22 "out" to NodeMCU "D2"
-
Plug in the board via USB via the Apple USB A to C adapter (don't use a USB hub)
-
Compile and Upload Sketch in Arduino IDE
-
Use Arduino IDE terminal to debug at 115200 baud
