Also refer to the Instructable.
The Stomp Shield for Arduino from Open Music Labs use an Arduino Uno and four opamps as a guitar effects box. Similar to a previous design (also with an instructable ATMega1284P-Guitar-and-Music-Effects-Pedal, that shows how to port the Electrosmash Uno Pedalshield, I have also ported the Open Music Labs Guitar Effects box to the ATMega1284P which has eight times more RAM than the Arduino Uno (16kB versus 2kB).
Compared to the previous instructable using the ATMega1284 effects unit, this box has the following advantages:
- It has a mixer which mixes the unprocessed signal with the MCU processed signal - that means that the quality of the signal at the output is much improved.
- It does 16 bit output processing for the two PWM outputs wheras the previous effects box use 8 bits for some of the examples such as the delay effect.
- It has a feedback potentiometer which can be used to enhance the effects - especially with the flanger/phaser effect about 30 percent feedback adds considerably to the quality of the effect.
- The low-pass filter frequency is 10 kHz compared to the 5 kHz of the previous effects box - this means the signal at the output sounds considerably "crispier".
- It use a different interrupt trigger which may explain the considerably lower noise level shown by this effects box.
I started by bread-boarding the Uno-based Open Music Labs Stompbox Shield and I was so impressed with the performance of this four OpAmp signal processing circuit (even when using an Arduino Uno), that I transferred it to stripboard for more permanent use.
The same four opamp circuit and DSP code was then ported to the ATMega1284 - again, surprisingly apart from the non-essential changes such as assigning the switches and LED to a different port, and allocating 7,000 kilo-words instead of 1,000 kilo-word of RAM for the delay buffer, only two essential changes had to be made in the source code, namely changing to ADC0 from ADC2, and changing the Timer1/PWM OC1A and OC1B outputs from Port B on the Uno to Port D (PD5 and PD4) on the ATMega1284.
As previously noted, although development boards for the ATMega1284 are available (Github: MCUdude MightyCore), it is an easy exercise to buy the bare (bootloader-free) chip (buy the PDIP version which is bread-board and strip-board friendly), then load the Mark Pendrith fork of the Maniacbug Mighty-1284p Core Optiboot bootloader or the MCUdude Mightycore, by using an Uno as the ISP programmer, and then loading sketches again via the Uno to the AtMega1284. Details and links for this process are given in appendix 1 of the previous instructable.
- ATMega1284P (PDIP 40 pin package version)
- Arduino Uno R3 (used as an ISP to transfer the boot loader and sketches to the ATMega1284)
- OpAmp MCP6004 quad OpAmp (or similar RRIO (Rail to Rail Input and Output) OpAmp such as TLC2274)
- 1 x Red LED
- 1 x 16 MHz crystal
- 2 x 27 pF capacitors
- 1 x 3n9 capacitor
- 1 x 1n2 capacitor
- 1 x 820pF capacitor
- 2 x 120 pF capacitor
- 4 x 100n capacitors
- 3 x 10uF 16v electrolytic capacitors
- 4 x 75k resistors
- 4 x 3k9 resistors
- 1 x 36k resistor
- 1 x 24k resistor
- 2 x 1M resistors
- 1 x 470 ohm resistor
- 3 x 1k resistors
- 2 x 50k Potentiometers (linear)
- 1 x 10k Potentiometer (linear)
- 3 x pushbutton switches (one of them should be substituted with a 3-pole 2-way footswitch if the effects box is going to be used for live work)
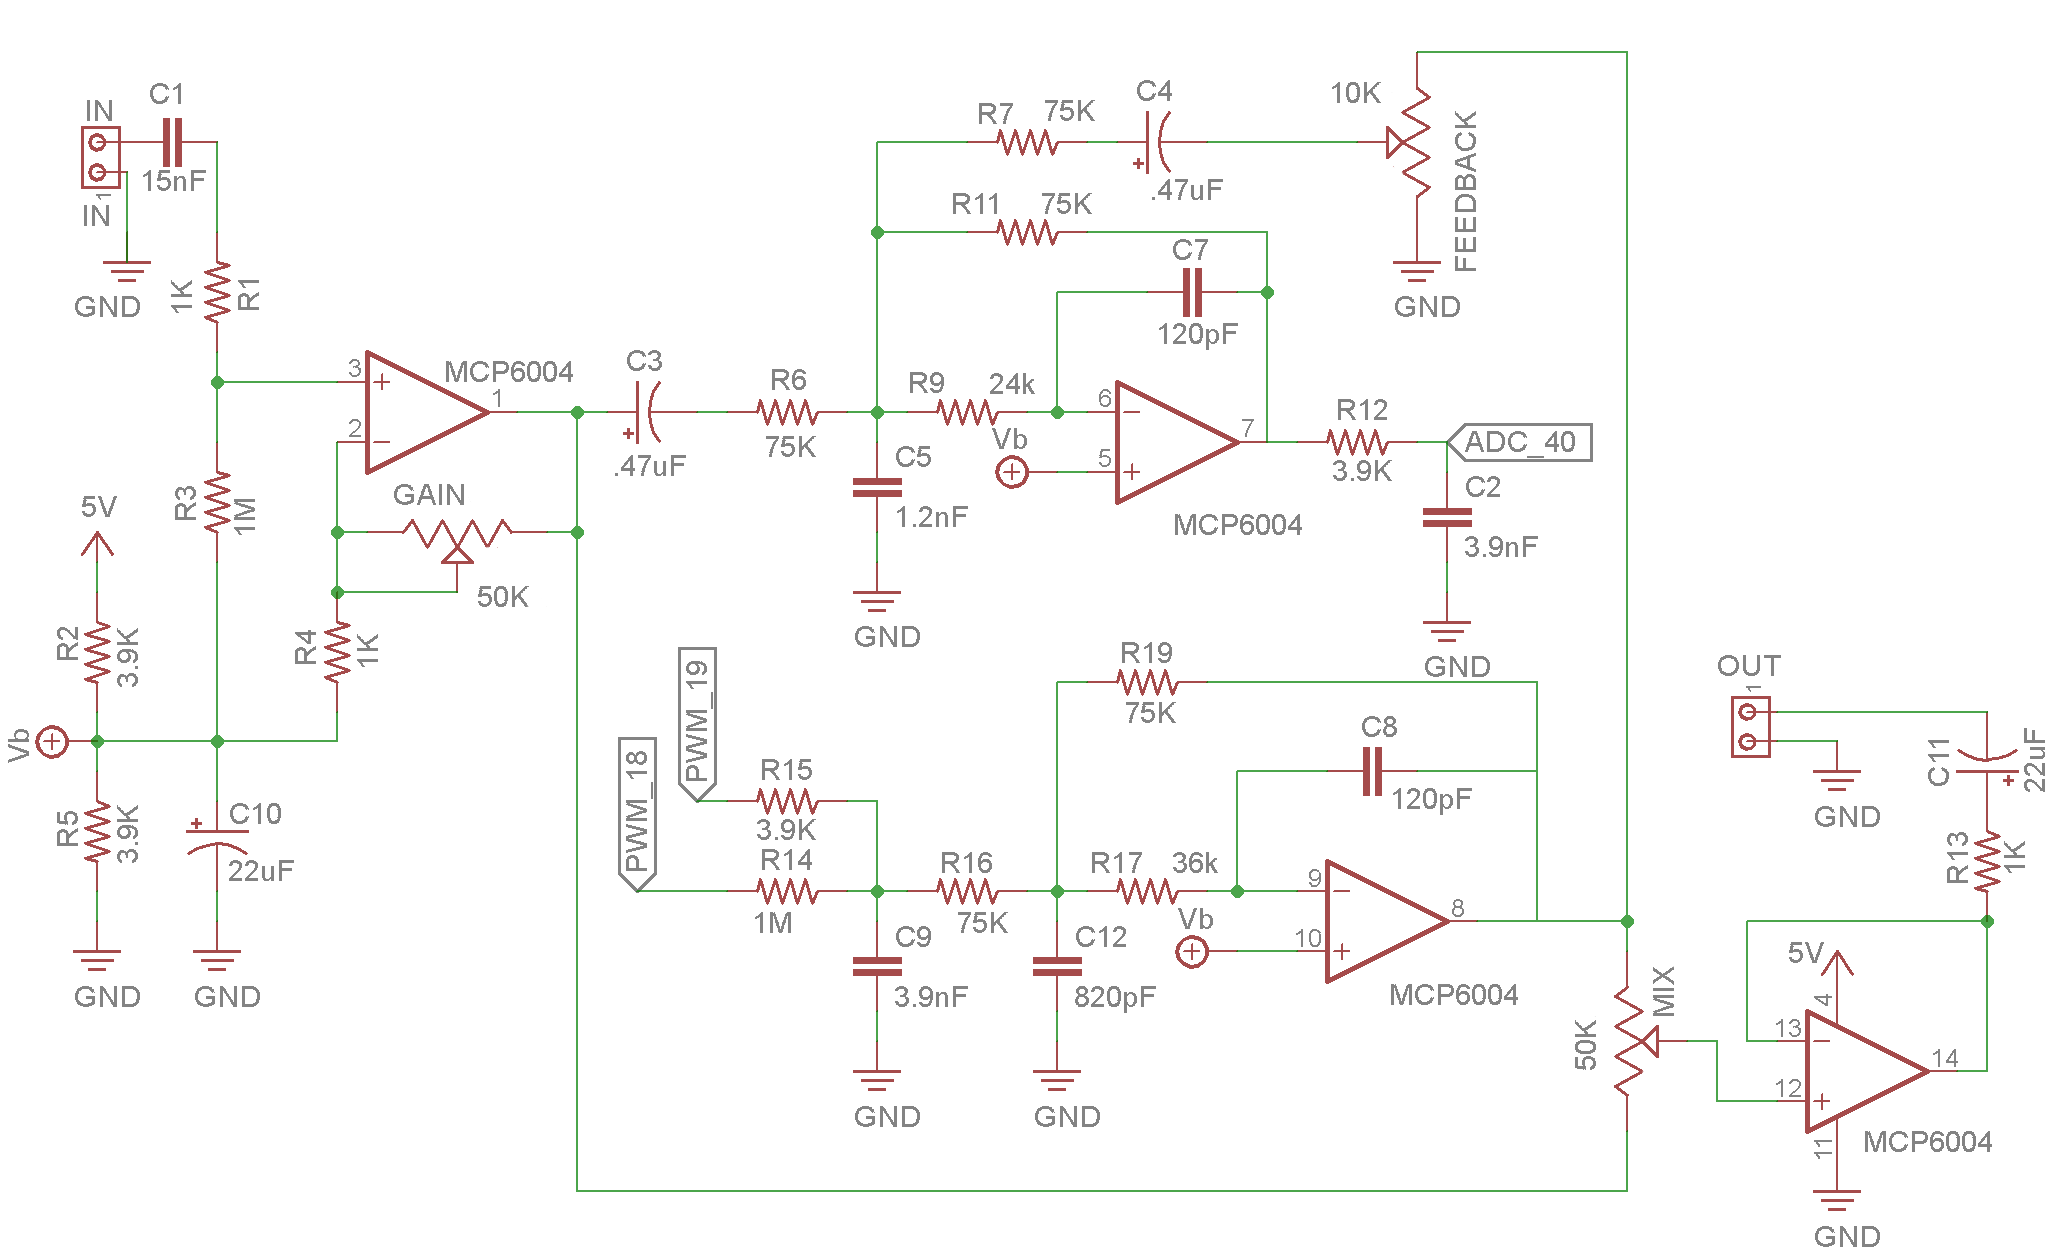
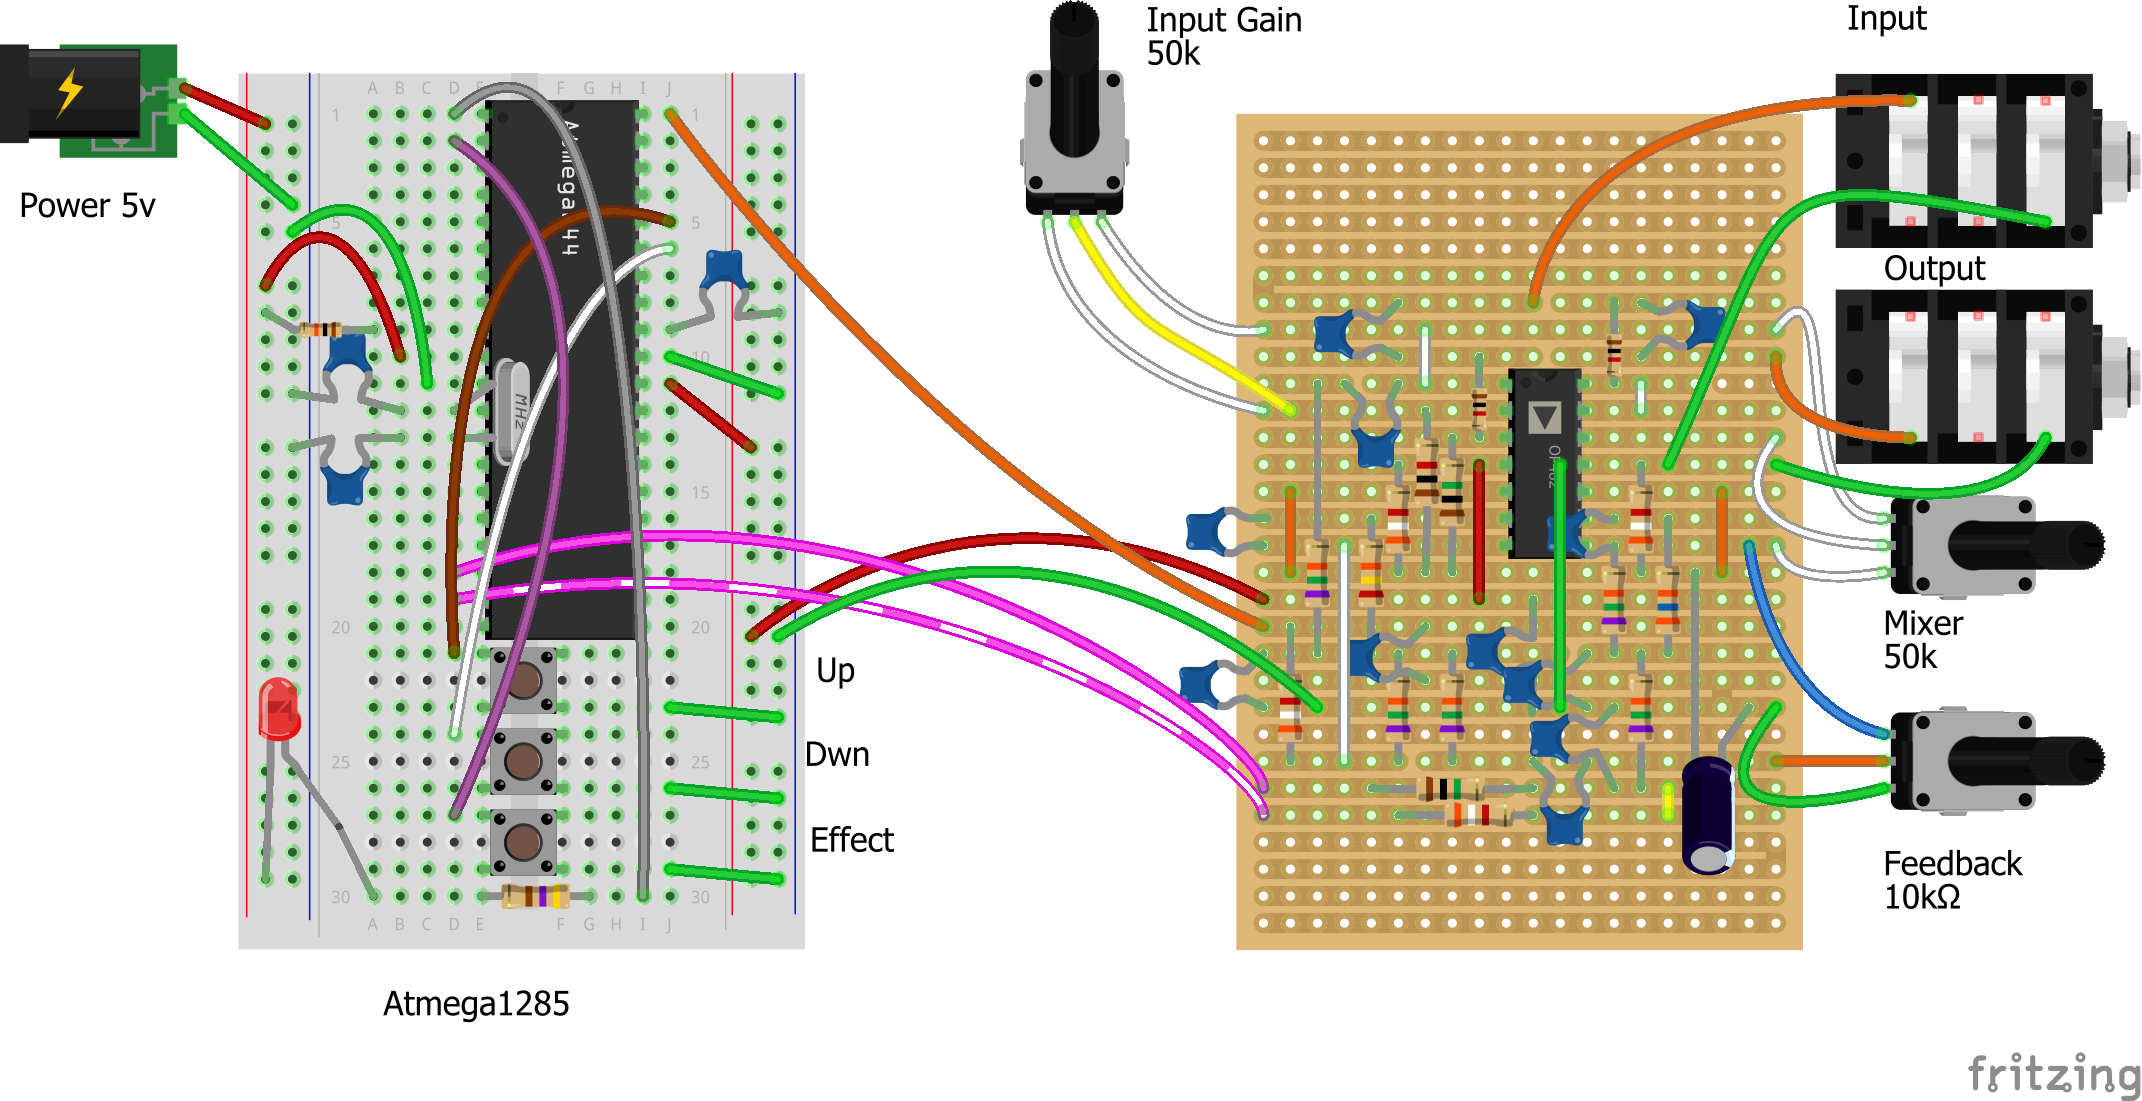
Circuit 1 (above), shows the circuit used and Stripboard 1 (see below), is its physical representation (Fritzing 1 in the file-list) with Photo 1 (at the top), the actual bread-boarded circuit in operation. Two small circuit changes were made: The shared half-level opamp bias circuit and the feedback capitors were increased to 120pF. The rotary control was replaced with two pushbuttons which are used to increase or decrease effects parameters. The three-wire connection to the ATMega1284 is shown on the circuit as ADC to pin 40, PWMlow from pin 19, and PWMhigh from pin 18. The three push buttons are coneccted to pins 1, 36 and 35 and earthed at the other end. An LED is connected via a 470 resistor to pin 2.
OpAmp Input and Output Stages: It is important that a RRO or preferably a RRIO OpAmp is used because of the large voltage swing required at the OpAmp output to the ADC of the ATMega1284. The parts list contains a number of alternative OpAmp types. The 50k potentiometer is used to adjust the input gain to a level just below any distortion, and it can also be used to adjust the input sensitivity for an input source other than a guitar such as a music player. The second OpAmp input stage and the first opamp output stage has a higher order RC filter to remove the digitally generated MCU noise from the audio stream.
ADC Stage: The ADC is configured to be reading via an timer interrupt. A 100nF capacitor should be connected between the AREF pin of the ATMega1284 and ground to reduce noise as an internal Vcc source is used as a reference voltage - do NOT connect the AREF pin to +5 volt directly!
DAC PWM Stage: As the ATMega1284 does not have its own DAC, the output audio waveforms are generated using a pulse width modulation of an RC filter. The two PWM outputs on PD4 and PD5 are set as the high and low bytes of the audio output and mixed with the two resistors (3k9 and 1M) in a 1:256 ratio (low byte and high byte) - which generates the audio output.
The software is based on the Open Music Labs stompbox pedal sketches, and the two examples are included namely the flanger/phaser effect, and the delay effect. Again the switches and LED had been moved to other ports away from those used by the ISP programmer (SCLK, MISO, MOSI and Reset), the delay buffer has been increased from 1000 words to 7000 words, and PortD has been set as the output for the two PWM signals. Even with the increase in the delay buffer the sketch still use only about 75% of the available ATMega1284 16 kB RAM.
Other examples such as the tremolo from the Open Music Labs website for the pedalSHIELD Uno can be adapted for use by the Mega1284 by changing the include header file Stompshield.h:
Change:
DDRB |= 0x06; // set pwm outputs (pins 9,10) to output
to
DDRD |= 0x30;
and
ADMUX = 0x62; // left adjust, adc2, internal vcc as reference
to
ADMUX = 0x60; // left adjust, adc0, internal vcc as reference
// These changes are the ONLY essential code changes
// when porting from the Uno to the ATMega1284
For the two examples included the header file required are included in the sketch - i.e. no header files need to be used
The pushbuttons 1 and 2 are used in some of the sketches to increase or decrease an effect. In the delay example it increases or decreases the delay time. When the sketch is first loaded it starts with the maximum delay effect. For the flanger phaser sketch try to increase the feedback control for an nhanced effect.
To change the delay to an echo effect (add repetition) change the line:
buffer[location] = input;                               // store new sample
to
buffer[location] = (input + buffer[location])>>1;       // Use this for echo effct
The footswitch should be a three pole two way switch
- Electrosmash: https://www.electrosmash.com/pedalshield-uno
- Open Music Labs: http://wiki.openmusiclabs.com/wiki/StompShield
- ATMega1284 Effects Pedal: https://www.instructables.com/id/ATMega1284P-Guitar-and-Music-Effects-Pedal/
- Electrosmash: https://www.electrosmash.com/pedalshield-uno
- Open Music labs Music: http://wiki.openmusiclabs.com/wiki/StompShield
- ATMega Effect Pedal: https://www.instructables.com/id/ATMega1284P-Guitar-and-Music-Effects-Pedal/


