This project consists of Node JS Azure serverless functions that make up the Merge Train bot. These are as follows;
- A function that can be invoked through a Slack Bot to keep track of a growing list of Merge requests.
- A function that is invoked by Github Webhooks whenever a PR is modified.
The proposed contract for interacting with the bot on Slack is as follows:
/merge next- Display the next URL in the list. This will not remove it from the list./merge list (public)- Display all URLs in the list, in the order they were added. Addpublicto share this list with the channel./merge pause- Pause the merge train. While paused, no automatic merges will be triggered./merge resume- Resume the merge train./merge help- Display this contract to the user as an ephemeral message.
The Github App function will be invoked when the chosen webhooks are triggered.
| Action | Output |
|---|---|
| Labeled | If the label mentions "Ready for merge", a receipt will be posted to the "merge" Slack channel. If the merge train has been paused previously, this will apply the same merge train paused label to the newly labeled PR. |
| Unlabeled | If the label mentions "Ready for merge", a receipt will be posted to the "merge" Slack channel. |
| Review Requested | A message will be posted to the "reviews" Slack channel, tagging the users requested. To avoid duplicate calls, this app is setup to only look for a requested_team property, as this indicates users have been selected from an organisation team by GitHub. If your organisation does not use this, you will need to modify this code to ignore this field. |
| Status changed | If you have a CI pipeline linked to Github, Status changes will trigger the webhook. If a status becomes success and applies to the default branch (see Configuration below), it will trigger the next PR in the list to be merged. |
You'll need to create a Slack App for deployment. You can find instructions on how to do this in the Slack API documentation. At least one Slash Command will be needed for interactivity with Slack Bot.
You'll need to create a GitHub App for deployment. You can find instructions on how to do this in the GitHub documentation.
The following App permissions will need to be set:
| Permission | Level | Reason |
|---|---|---|
| Contents | Read & Write | Provides ability to merge pull requests |
| Pull requests | Read & Write | Provides ability to read pull requests and apply new labels |
| Commit statuses | Read-only | Provides status checks for every commit |
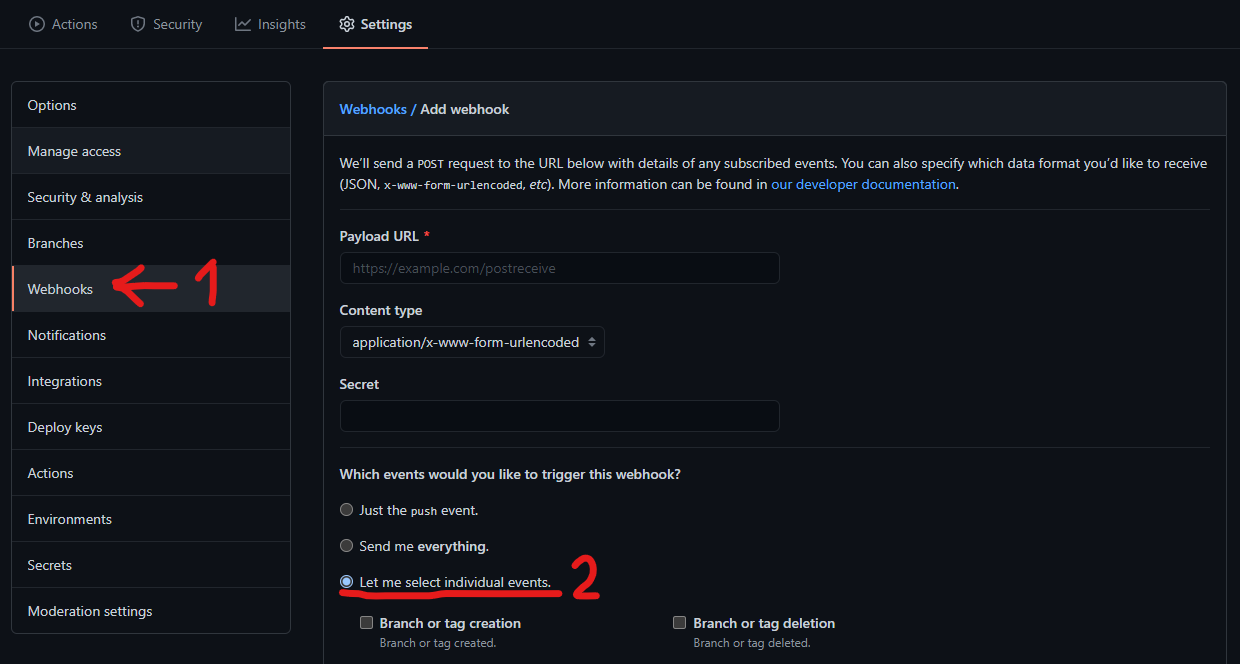
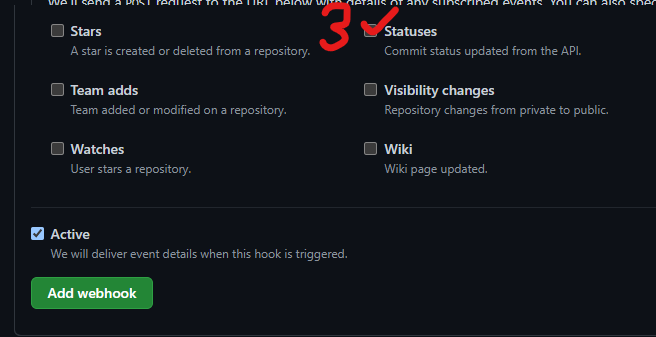
This app will need to be installed in the repository you wish to track, and an additional webhook for Status events will need to be set in the repository.
Some basic configuration options are available for the functions. The config file contains these options to be changed;
| Option | Purpose | Default |
|---|---|---|
| ChannelName | Slack channels where you wish merge and review messages to be sent. These do not need to be different. |
merge, reviews |
| Branch | List of branches that are meaningful within the context of these functions. Only DEFAULT is defined, and this corresponds to the default branch of your GitHub repository. |
master |
| Label | Label names used in Github to represent various PR states | ready for merge, merge train paused |
| mergeMethods | An ordered list of Regular Expressions and merge methods to match particular branch rules you wish to enforce. | By default, all PRs will be merged with the SQUASH method, apart from branches beginning with release/. |
| icon_emoji | The emoji to use in Slack messages | :steam_locomotive: |
If you want Slack users to be tagged in the reviews, they will need to add their GitHub login ID to their Slack profile under "What I do". If this is not filled, the GitHub ID will be posted instead.
Deployment is handled through Terraform, using an Azure Service Principal to autheticate with an Azure account. See the following table for the Environment Variables the deployment expects;
| Variable Name | Purpose |
|---|---|
| ARM_ACCESS_KEY | The storage access key for saving Terraform state files. If you don't need this, remove the backend block from the provider file |
| ARM_CLIENT_ID | Azure service principal app ID |
| ARM_CLIENT_SECRET | Azure service principal password |
| ARM_SUBSCRIPTION_ID | Azure subscription to deploy to |
| ARM_TENANT_ID | Azure service principal tenant |
| SLACK_BOT_TOKEN | Slack OAuth token required for posting and listening to messages |
| SLACK_SIGNING_SECRET | Secret used to authenticate messages coming from Slack |
| GHAPP_SECRET | GitHub App secret required to authenticate messages coming from GitHub |
| GHAPP_PRIVATE_KEY | The private RSA key generated by GitHub when your app is first created. This is needed to generate JWTs for the GraphQL endpoint to act as your app. |
| GH_APP_ID | The GitHub app ID, found on your app's info page. |
| GH_INSTALLATION_ID | The ID of the installation that your app should access. Information on how to find this is in the GitHub documentation |
| GH_HOSTNAME | The hostname for the GraphQL endpoint. If you use public GitHub, you do not need to set this; Only set it if you have an Enterprise Github app. |
| GH_OWNER | The name of the owner of the repository your app will be monitoring. If your repository is https://github.com/myOrg/hello-world.git then myOrg is the owner. |
| GH_REPOSITORY | The name of the repository your app will be monitoring. If your repository is https://github.com/myOrg/hello-world.git then hello-world is the repository name. |
Before running the terraform deployment, you have to package the apps. This can be done by running
npm i
npm run build

npm ci --only=prod  # Dev dependencies aren't needed and will bloat the function zip files
npm i -g @ffflorian/jszip-cli mkdirp
npm run build:zip
To run the deployment manually, you'll need the Azure CLI and be logged into an account with an active subscription. Then run the following;
cd deployment
terraform init
terraform apply
This repostory also includes a GitHub Actions workflow as an example of how to deploy the apps in a CI environment.
Azure Functions Core Tools are needed to run this project locally.
If you build and run the project in the VSCode DevContainer all prerequisites will be installed automatically - this is the recommended method of development.
To run the function locally;
npm i
npm start
This will install all dependencies and begin running the function on a random port. You can then send POST requests to interact with the bot.
Unit tests are also available to run with
npm t

