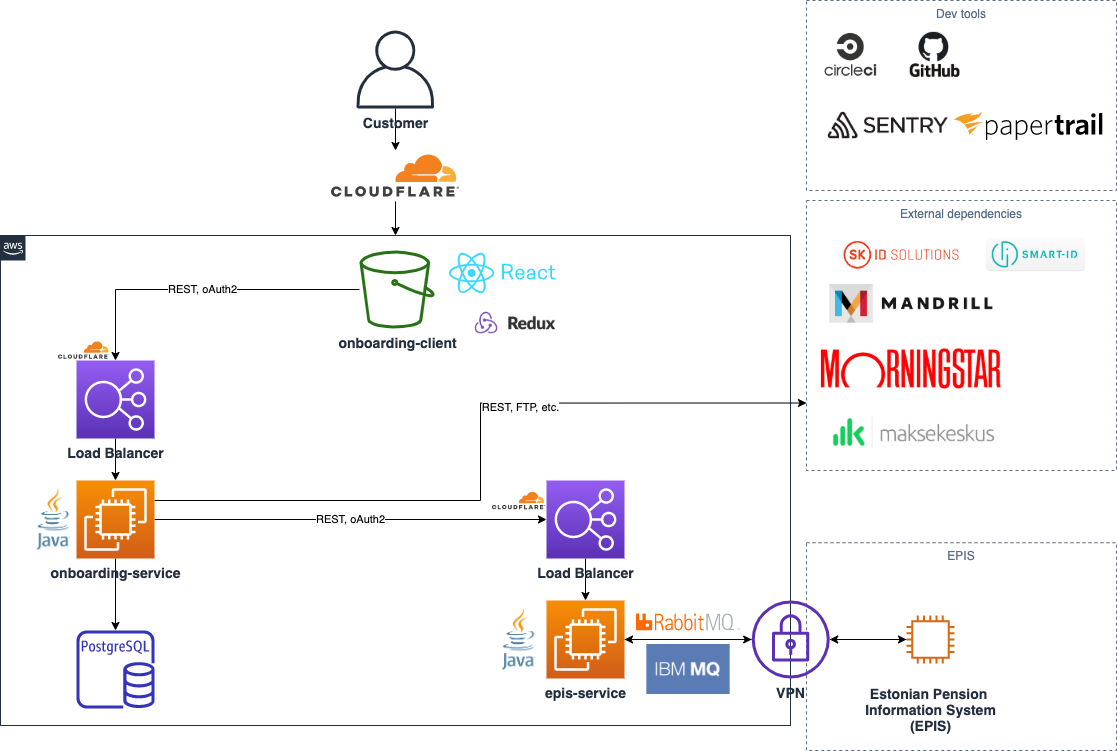
- JDK 21
- Groovy
- Git
- Gradle
- Lombok
- IntelliJ
- AWS Toolkit for IntelliJ
- Docker
Database
PostgreSQL
Running locally with Docker: docker compose up database -d
Spring Profile
IMPORTANT: Set your Spring active profile to dev - this will also run DB schema/dev data migration
Backend
Java 21, Spring Boot, Gradle, Spock for testing
Running locally: ./gradlew bootRun
Frontend
React, TypeScript, scss, custom bootstrap, react-testing-library
Exception Monitoring
Sentry
Analytics
Google Analytics / Mixpanel
Hosting
AWS Elastic BeanStalk: EC2 and ELB
Continuous Integration
CircleCI
Production Logs
Papertrail
Authentication: oAuth2 with Mobile-ID, ID-card and Smart-ID
Postman API collection (outdated)
Production: Merge GitHub pull request to master -> build in CircleCI -> auto-redeploy (if build is green)
- Add the new fund to the
fundsdatabase table.
If you don't want to run epis-service,
then you can use mock spring profile to mock EpisService, and adjust MockEpisService to your needs.
error="unsupported_grant_type", error_description="Unsupported grant type: mobile_id"
Make sure you are running against the right backend environment (dev or prod).
- If you do
npm run developyourpackage.jsonmust proxy tohttp://localhost:9000 - If you do
npm run develop-productionyourpackage.jsonmust proxy tohttps://onboarding-service.tuleva.ee
- Digital signing does not work in the dev environment. Use the production
configuration to test it locally. See
DigiDocConfiguration.digiDocConfigDev()andsmartid.hostUrl,smartid.relyingPartyUUID,smartid.relyingPartyNameconfig values inapplication.ymland change them to production values. Use VPN for testing.
When updating Spring Boot, sometimes you need to remove all of the existing access tokens from the
oauth_access_token database table. However, there's one special token granted for tuleva.ee which
allows it to fetch Fund NAV values and register new users. In order to generate a new token, you need to:
token by
curl --location --request POST 'https://pension.tuleva.ee/api/oauth/token' \
--header 'Authorization: Basic <base64 of client_id:client_secret>' \
--data-urlencode 'grant_type=client_credentials' \
--data-urlencode 'client_id=tuleva.ee'
and then update the token values in the WordPress Tuleva template.
In order to test ID-card locally, you need to run nginx locally with the right certificates and the right domain names.
- Add tuleva certs to
./nginx(4 files) - Update
$frontendand$backendurls inetc/eb/.ebextensions/nginx/conf.d/01_ssl_proxy.conf - Add to
hostsfile:127.0.0.1 id.tuleva.ee 127.0.0.1 pension.tuleva.ee 127.0.0.1 onboarding-service.tuleva.ee - Run nginx with docker:
docker compose up nginx - Add
DANGEROUSLY_DISABLE_HOST_CHECK=trueto.envinonboarding-client - add
server.servlet.session.cookie.domain: tuleva.eetoapplication.yml - Test through https://pension.tuleva.ee
- Later, don't forget to clean up your
hostsfile
WE use AWS SSO, to get it working properly you need to configure the profile first either by running aws configure sso or
pasting the following into ~/.aws/config:
[profile tuleva]
region = eu-central-1
output = json
sso_start_url = https://tuleva.awsapps.com/start
sso_region = eu-central-1
sso_account_id = 641866833894
sso_role_name = AdministratorAccessWe use AWS Client VPN. To get started, log into AWS SSO Portal and follow VPN Client Self Service instructions.
- Establish VPN connection
- Configure AWS Profile and login
aws sso login - Connect to the DB using AWS IAM authentication where user is
iamuserand profiletuleva.
Configuration is available AWS S3 s3://tulevasecrets/development-configuration/
- Update
.pemfile inetc/docker - If file was renamed, rename it in
gradle/packaging.gradle.kts
In case file has multiple certificate chains, import-certs.sh will add all of them.
