WebSocket is a computer communications protocol, providing full-duplex communication channels over a single TCP connection. WebSocket is distinct from HTTP. The protocol enables interaction between a web browser (or other client application) and a web server with lower overhead than half-duplex alternatives such as HTTP polling, facilitating real-time data transfer from and to the server.
Once a websocket connection is established between a client and a server, both can exchange information until the connection is closed by any of the parties.
This is the main reason which websocket is preferred over the HTTP protocol when building a chat-like communication service that operates at high frequencies with low latency.
Simple (or Streaming) Text Oriented Message Protocol (STOMP), formerly known as TTMP, is a simple text-based protocol, designed for working with message-oriented middleware (MOM). It provides an interoperable wire format that allows STOMP clients to talk with any message broker supporting the protocol.
Since websocket is just a communication protocol, it doesn’t know how to send a message to a particular user. STOMP is basically a messaging protocol which is useful for these functionalities.
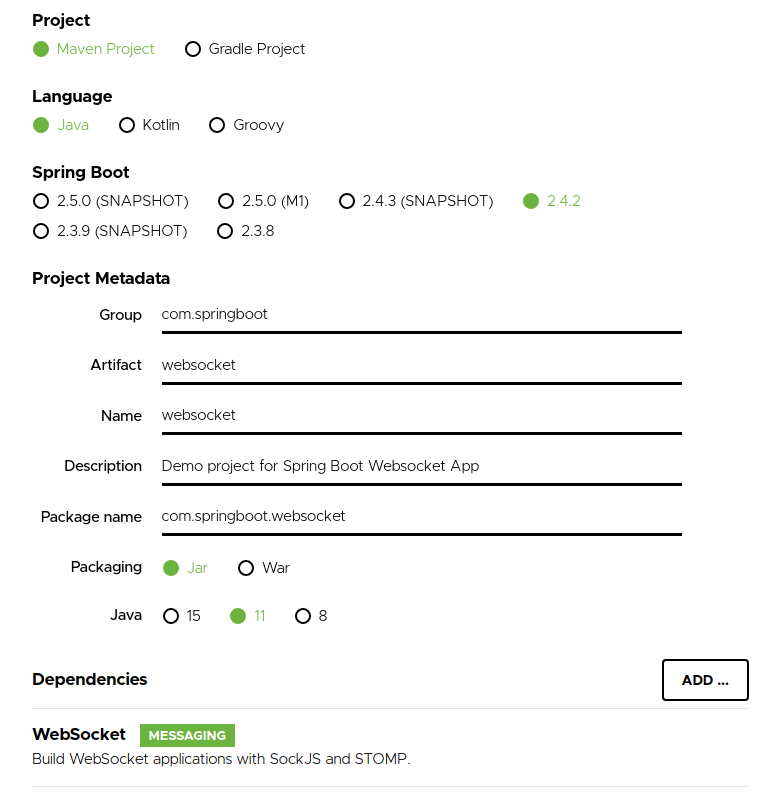
Our application will have the following configuration which can be set using Spring Initializer :
-
Java version : 11
-
Type : Maven Project
-
Dependencies : Websocket
-
Spring Boot version : 2.4.2
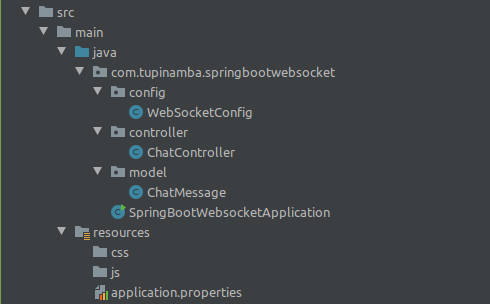
Configuring our websocket endpoint and message broker is fairly simple.
@Configuration
@EnableWebSocketMessageBroker
public class WebSocketConfig implements WebSocketMessageBrokerConfigurer {

    @Override
    public void registerStompEndpoints(StompEndpointRegistry registry) {
        registry.addEndpoint("/websocket").withSockJS();
    }

    @Override
    public void configureMessageBroker(MessageBrokerRegistry registry) {
        registry.enableSimpleBroker("/topic");
        registry.setApplicationDestinationPrefixes("/app");
    }
}
-
@EnableWebSocketMessageBroker annotation is used to enable our WebSocket server.
-
WebSocketMessageBrokerConfigurer interface is used to provide implementation for some of its methods to configure the websocket connection.
-
registerStompEndpoints method is used to register a websocket endpoint that the clients will use to connect to the server.
-
configureMessageBroker method is used to configure our message broker which will be used to route messages from one client to another.
SockJS is also being used to enable fallback options for browsers that don’t support websocket.
Our chat model is the message payload which will be exchanged between the client side and server side of the application.
public class ChatMessage {
    private String content;
    private String sender;
    private MessageType type;

    public enum MessageType {
        *CHAT*, *LEAVE*, *JOIN
    *}

    public String getContent() {
        return content;
    }

    public void setContent(String content) {
        this.content = content;
    }

    public String getSender() {
        return sender;
    }

    public void setSender(String sender) {
        this.sender = sender;
    }

    public MessageType getType() {
        return type;
    }

    public void setType(MessageType type) {
        this.type = type;
    }
}
Our controller will be responsible for handling all message methods present in our chat application which will basically receive messages from one client and then broadcast it to others.
@Controller
public class ChatController {

    @MessageMapping("/chat.register")
    @SendTo("/topic/public")
    public ChatMessage register(@Payload ChatMessage chatMessage, SimpMessageHeaderAccessor headerAccessor) {
        headerAccessor.getSessionAttributes().put("username", chatMessage.getSender());
        return chatMessage;
    }

    @MessageMapping("/chat.send")
    @SendTo("/topic/public")
    public ChatMessage sendMessage(@Payload ChatMessage chatMessage) {
        return chatMessage;
    }
}
The use of /app as a destination point is because of our websocket configuration file which says that all messages will be routed to these handling methods annotated with @MessageMapping.
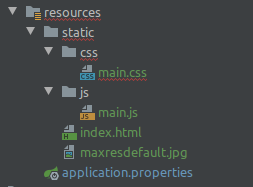
Our UI is a simple cardbox built using HTML and CSS that runs some JS functions to send and receive messages.
- index.html is a HTML file which contains some basic structure a Sock.js to enable fallback options to those that can’t run JS on their browsers and a STOMP library to serve as a message broker.
- main.css is a CSS file that styles our HTML.
- main.js is a Javascript file which connects the websocket endpoint to send and receive messages. It also displays and format the messages on the screen.


