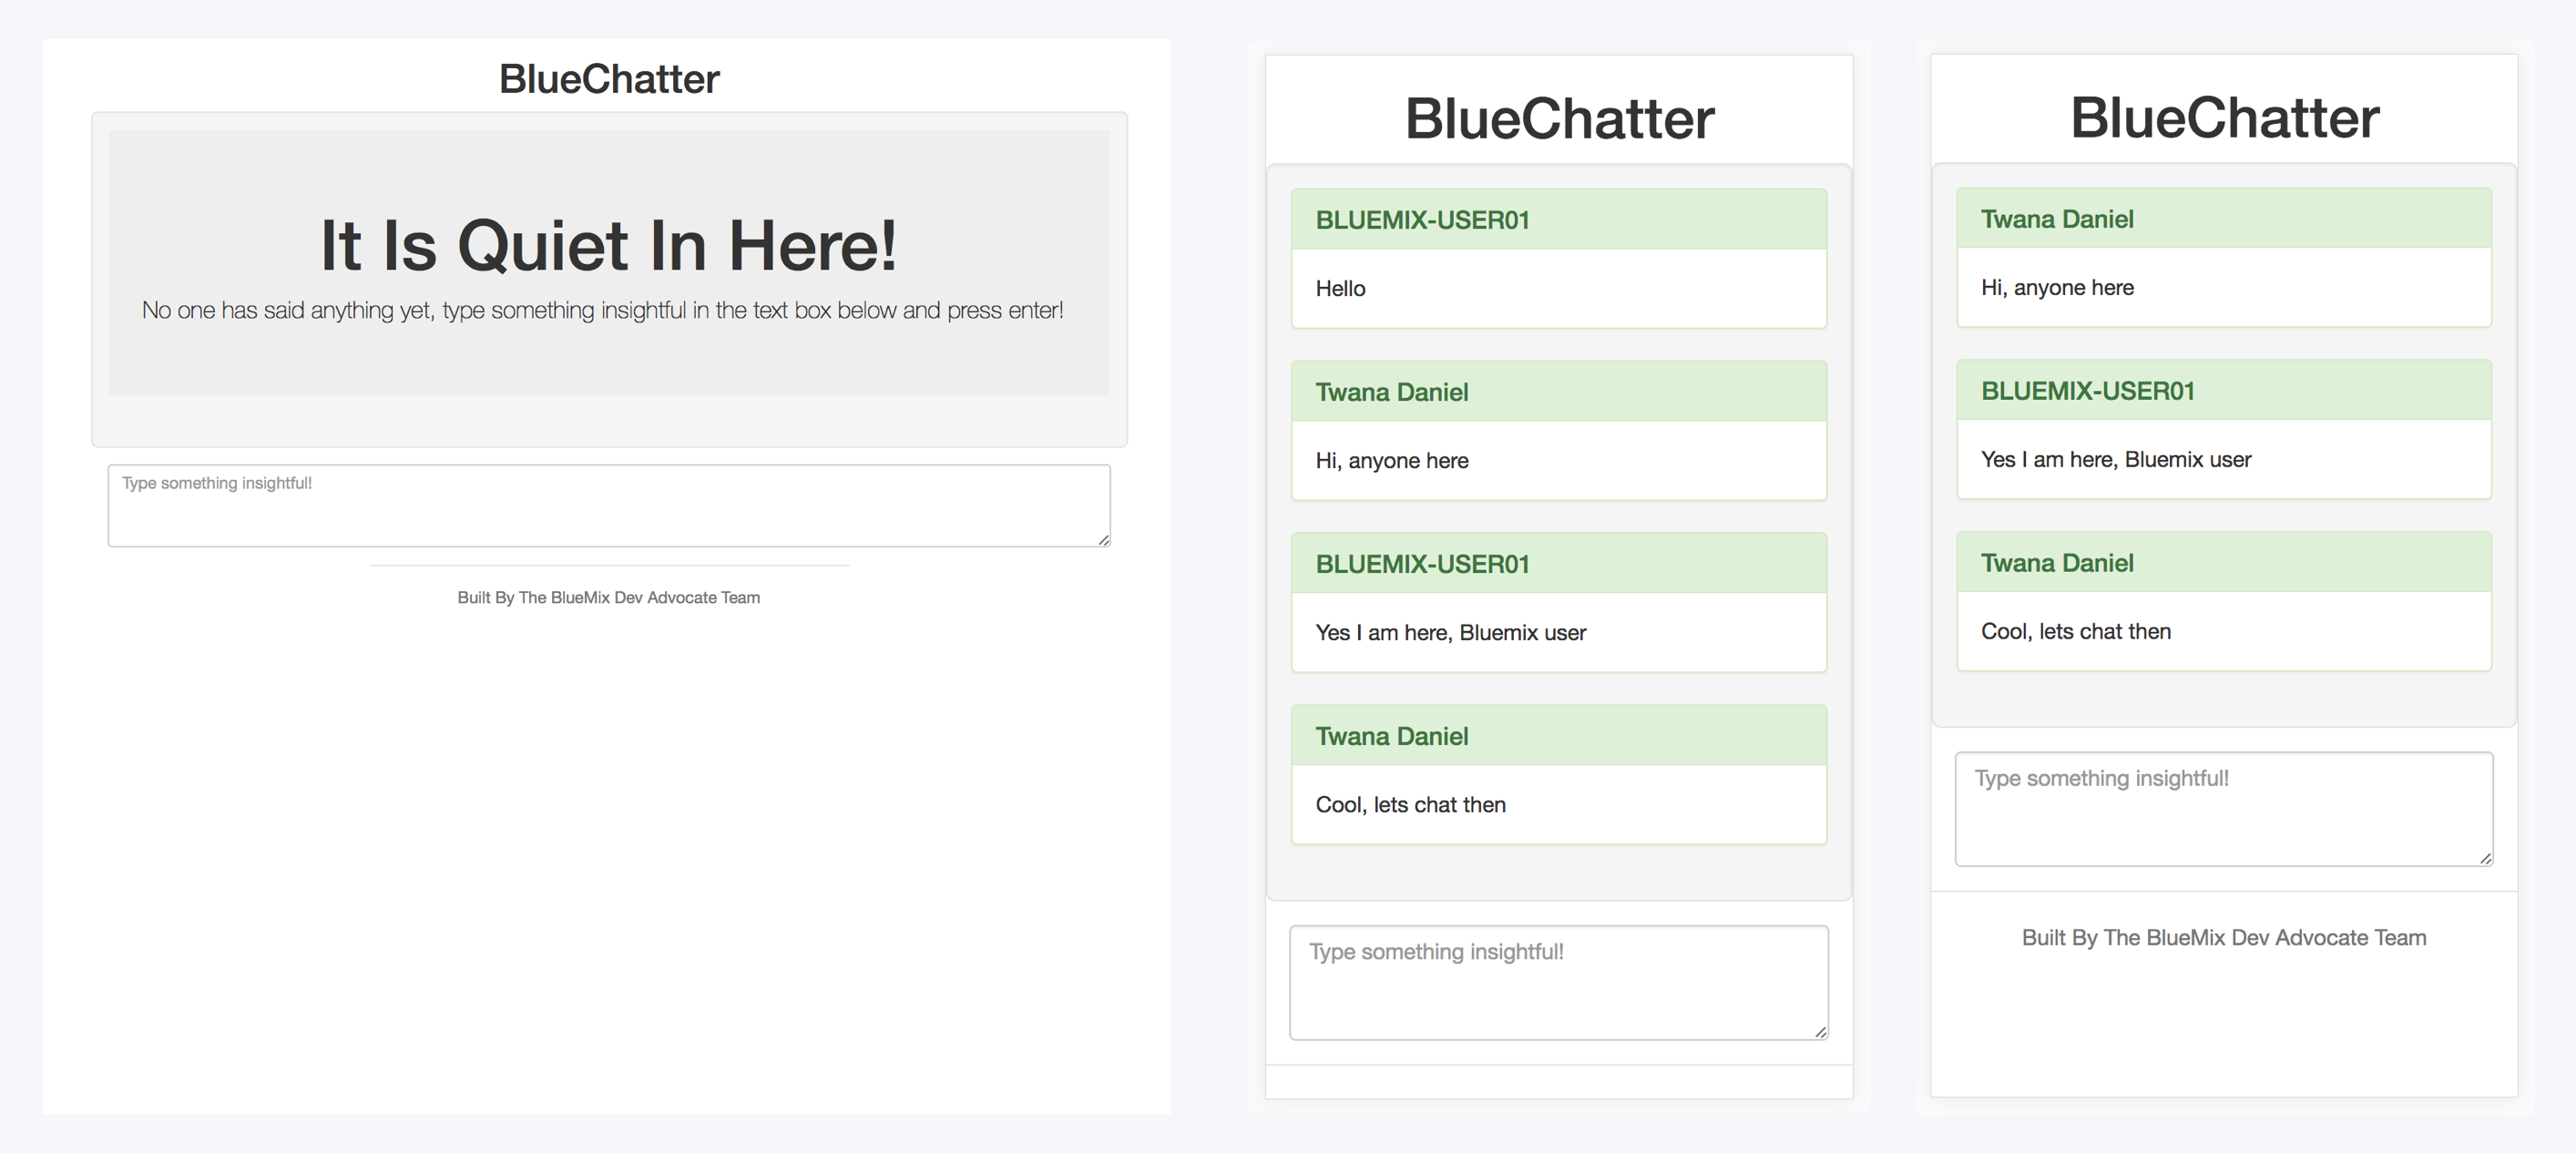
The BlueChatter app is a simple chat/IRC type application for your browser which allows multiple users to chat when online at the same time. The sample app is used to showcase how to deploy and scale a chat application using Cloud Foundry and Docker container service and Kubernetes approach. The demo demonstrates how quickly you can deploy and scale your application where been it's a Cloud Foundry, Docker Container Service or Kubernetes Cluster.
See how the browser chat application looks like:
https://bluechattercontainergroup.mybluemix.net/
- BlueChatter Overview
- Table of contents
- Learning Objectives
- Technologies Used
- Auto Deploy To Bluemix
- 1.0 Cloud Foundry Deployment Approach
- 2.0 Docker Deployment Approach
- 3.0 Kubernetes Deployment Approach
- Useful Kubernetes commands
- License
- Dependencies
- Learn how to deploy and scale Cloud Foundry application using IBM Bluemix.
- Learn how to deploy and scale a Docker Container application using IBM Bluemix Docker service.
- Learn how to deploy and scale a Kubernetes Cluster using IBM Bluemix Kubernetes approach.
- Learn how to create a simple Chat application with NodeJs and Express.
- Learn more on the tooling and reporting when working with Docker Containers and Kubernetes clusters.
BlueChatter uses Node.js and Express for the server. On the frontend, BlueChatter uses Bootstrap and Jquery. The interesting part of this application is how the communication of messages is done. The application uses long polling to enable the clients (browsers) to listen for new messages. Once the app loads successfully, a client then issues a request to the server. The server waits to respond to the request until it receives a message. If no message is received from any of the chat participants, it responds back to the client with a 204 - no content. As soon as the client gets a response from the server, regardless of whether that response contains a message or not, the client will issue another request and the process continues.
The main goal of this application is to demonstrate the deployment and scaling of Docker container and Cloud Foundry application on IBM Bluemix. We will look at why and when you should deploy your application to a docker container over the classic Cloud Foundry root. You will learn on how to scale your application, scaling is big factor to any production applications, no matter which root you would take you would still need to scale your application for when traffic spike occur. With using the IBM Bluemix auto scaling service, we can automatically scale our Cloud Foundry Application or Docker Container application. To forwarder explain what scaling means, all scaling is to have multiple instance of the same application running at the same time, this means all users seen the same application while each user is directed to different instance of the application depending on the number of the instances you scale to.
Another area we should outline is how do the chat messages happen between the different servers, how do all instance of the applications talk to the same database to offer the chat experience to the users like if they are all on one instance? For that we use the pubsub feature of Redis to solve this. All the servers will be bound to a single Redis instance and each server is listening for messages on the same channel. When one chat server receives a chat message it publishes an event to Redis containing the message. The other servers then get notifications of the new messages and notify their clients of the. This design allows BlueChatter to scale nicely to meet the demand of its users.
The easiest way to deploy BlueChatter is by clicking on the "Deploy to Bluemix" button which automatically deploys the application to Bluemix.
Using the Deploy To Bluemix button will automatically set up several things for you. First, it will create a Git repository in IBM DevOps Services containing the code for the application. Also, a deployment pipeline will automatically be set up and then run to deploy the application to Bluemix for you. The deployment pipeline will both deploy the application as a Cloud Foundry application and in a Docker container. Both versions of the application will share the same route (URL) in Bluemix. Thus, accessing the application URL will either be using the Cloud Foundry application or the Docker container. In addition to deploying the app using Cloud Foundry and Docker, the pipeline will build a Docker image and place it in your Docker registry on Bluemix. That way you can deploy additional containers based on that image if you want.
-
Create a Bluemix Account
Signup for Bluemix, or use an existing account. -
Download and install the Cloud-foundry CLI tool
-
If you have not already, [download node.js 6.7.0 or later][https://nodejs.org/download/] and install it on your local machine.
-
Clone the app to your local environment from your terminal using the following command
git clone https://github.com/IBM-Bluemix/bluechatter.git
cdinto thebluechatterfolder that you cloned
cd bluechatter
-
Edit the
manifest.ymlfile and change the applicationhostto something unique. The host you use will determinate your application url initially, e.g.<host>.mybluemix.net. -
Connect and login to Bluemix
$ cf login -a https://api.ng.bluemix.net
- Create a Redis service for the app to use, we will use the RedisCloud service.
$ cf create-service rediscloud 30mb redis-chatter
- Push the application
cf push
Done, now go to the staging domain(<host>.mybluemix.net.) and see your app running.
Since we are using Redis to send chat messages, you can scale this application as much as you would like and people can be connecting to various servers and still receive chat messages. We will be looking on how to scale the application runtime instances for when needed, to do this we are going to look at the manual scaling command or use the Auto-Scaling service to automatically increase or decrease the number of application instances based on a policy we set it.
- Manually scale the application to run 3 instances
$ cf scale my-blue-chatter-app-name -i 3
- Then check your that all your instances are up and running.
$ cf app my-blue-chatter-app-name
Now switch over to your staging domain(<host>.mybluemix.net.) to see your running application. Note, you know which instance you are connecting to in the footer of the form.
If you have more than one instance running chances are the instance id will be different between two different browsers.
- It's good to be able to manually scale your application but Manual scaling wont work for many cases, for that reason we need to setup a Auto-Scaling to automatically scale our application for when needed. To learn more on Auto-Scaling checkout the blog post Handle the Unexpected with Bluemix Auto-Scaling for detailed descreption on Auto-Scaling.
Here we are going to look on how to deploy the BlueChatter application on a Docker container where it will be running on IBM Bluemix. We will then look on how to scale your Docker container on Bluemix to scale your application where needed. First, let's look at running the BlueChatter application inside a Docker container locally on your machine. Next, we will deploy the container to Bluemix and then scale it for when needed. Let's get started and have fun.
-
Create a Bluemix Account
Signup for Bluemix, or use an existing account. -
Download and install the Cloud-foundry CLI tool
-
Install Docker using the Docker installer, once installation completed, test if docker installed by typing the "docker" command in your terminal window, if you see the list of docker commands, then you are ready to go.
-
Install the IBM Bluemix Container Service plug-in to execute commands to IBM Bluemix containers from your terminal window. Install Container Service plug-in by running this command if on OS X.
$ cf install-plugin https://static-ice.ng.bluemix.net/ibm-containers-mac
-
If you have not already, [download node.js 6.7.0 or later][https://nodejs.org/download/] and install it on your local machine.
-
Clone the app to your local environment from your terminal using the following command
git clone https://github.com/IBM-Bluemix/bluechatter.git
cdinto thebluechatterfolder that you cloned
cd bluechatter
- Build your docker container
$ docker-compose build
- Start your docker container
$ docker-compose up
Done, now go to http://localhost to see your app running if you are on a Mac Linux.
- On Windows, you will need the IP address of your Docker Machine VM to test the application.
Run the following command, replacing
machine-namewith the name of your Docker Machine.
$ docker-machine ip machine-name
Now that you have the IP go to your favorite browser and enter the IP in the address bar, you should see the app come up. (The app is running on port 80 in the container.)
Before running the container on Bluemix, I recommend you to checkout the Docker container Bluemix documentation to better understand the steps below. Please review the documentation on Bluemix before continuing.
-
Download and install the Cloud-foundry CLI tool if haven't already.
-
Install the IBM Bluemix Container Service plug-in to execute commands to IBM Bluemix containers from your terminal window. Install Container Service plug-in by running this command if on OS X.
$ cf install-plugin https://static-ice.ng.bluemix.net/ibm-containers-mac
If you are on Linux or windows then find the installation command here
- Login to Bluemix with your Bluemix email and password
$ cf login -a api.ng.bluemix.net
- Login to the IBM Containers plugin to work with your docker images that are on Bluemix
$ cf ic login
- After you have logged in you can build an image for the BlueChatter application on Bluemix.
From the root of BlueChatter application run the following command replacing namespace
with your namespace for the IBM Containers service. (If you don't know what your namespace is
run
$ cf ic namespace get.)
$ cf ic build -t namespace/bluechatter ./
The above build command will push the code for Bluechatter to the IBM Containers Docker service
and run a docker build on that code. Once the build finishes the resulting image will be
deployed to your Docker registry on Bluemix. You can verify this by running
The above build command will push the Bluechatter application to the IBM Containers Docker service and run a docker build on that code. Once the build finishes the resulting image will be deployed to your Docker registry on Bluemix. You can verify this by running
$ cf ic images
You should see a new image with the tag namespace/bluechatter listed in the images available to you.
You can also verify this by going to the catalog on Bluemix,
in the containers section you should see the BlueChatter image listed.
- Our BlueChatter application is using the Redis cloud service to store in memory the chat communication, let's go ahead and use the Redis service. We can create a service on Bluemix using the Bluemix UI or the terminal using the command below. Enter this command in your terminal to create the Redis service:
$ cf create-service rediscloud 30mb redis-chatter
Now we need to switch over to Bluemix UI and complete the steps required to have our Docker image running inside a private docker container repository on Bluemix.
Step 1) Go over Bluemix catalog container area and click on the "bluechatter" registry that we created. 
Step 2) You have the option to create a single or scalable container, in our case, we will select the scalable container option to take the full advantage of the scaling capabilities.
Here are the items you need to choose to create the container:
- Select the scalable option for container type
- Give your container a name, and I named my container bluechatterContainerGroup
- Pick a container size, I chose Nano 128MB 8GB Storage for this example, but you can choose the size in which best for your setup.
- Select number of instances, I chose three instances
- Host leave it as default
- HTTP Port should be 80 and enable automatic recovery option if you wish.
- Last and most important step, bind the Redis service to the container, to do this, click on the "Advanced Options" button then scroll down to select and add the Redis service.
- Click on the Create button.

Done, with above steps completed, you should have your container running within 2-3 mins.
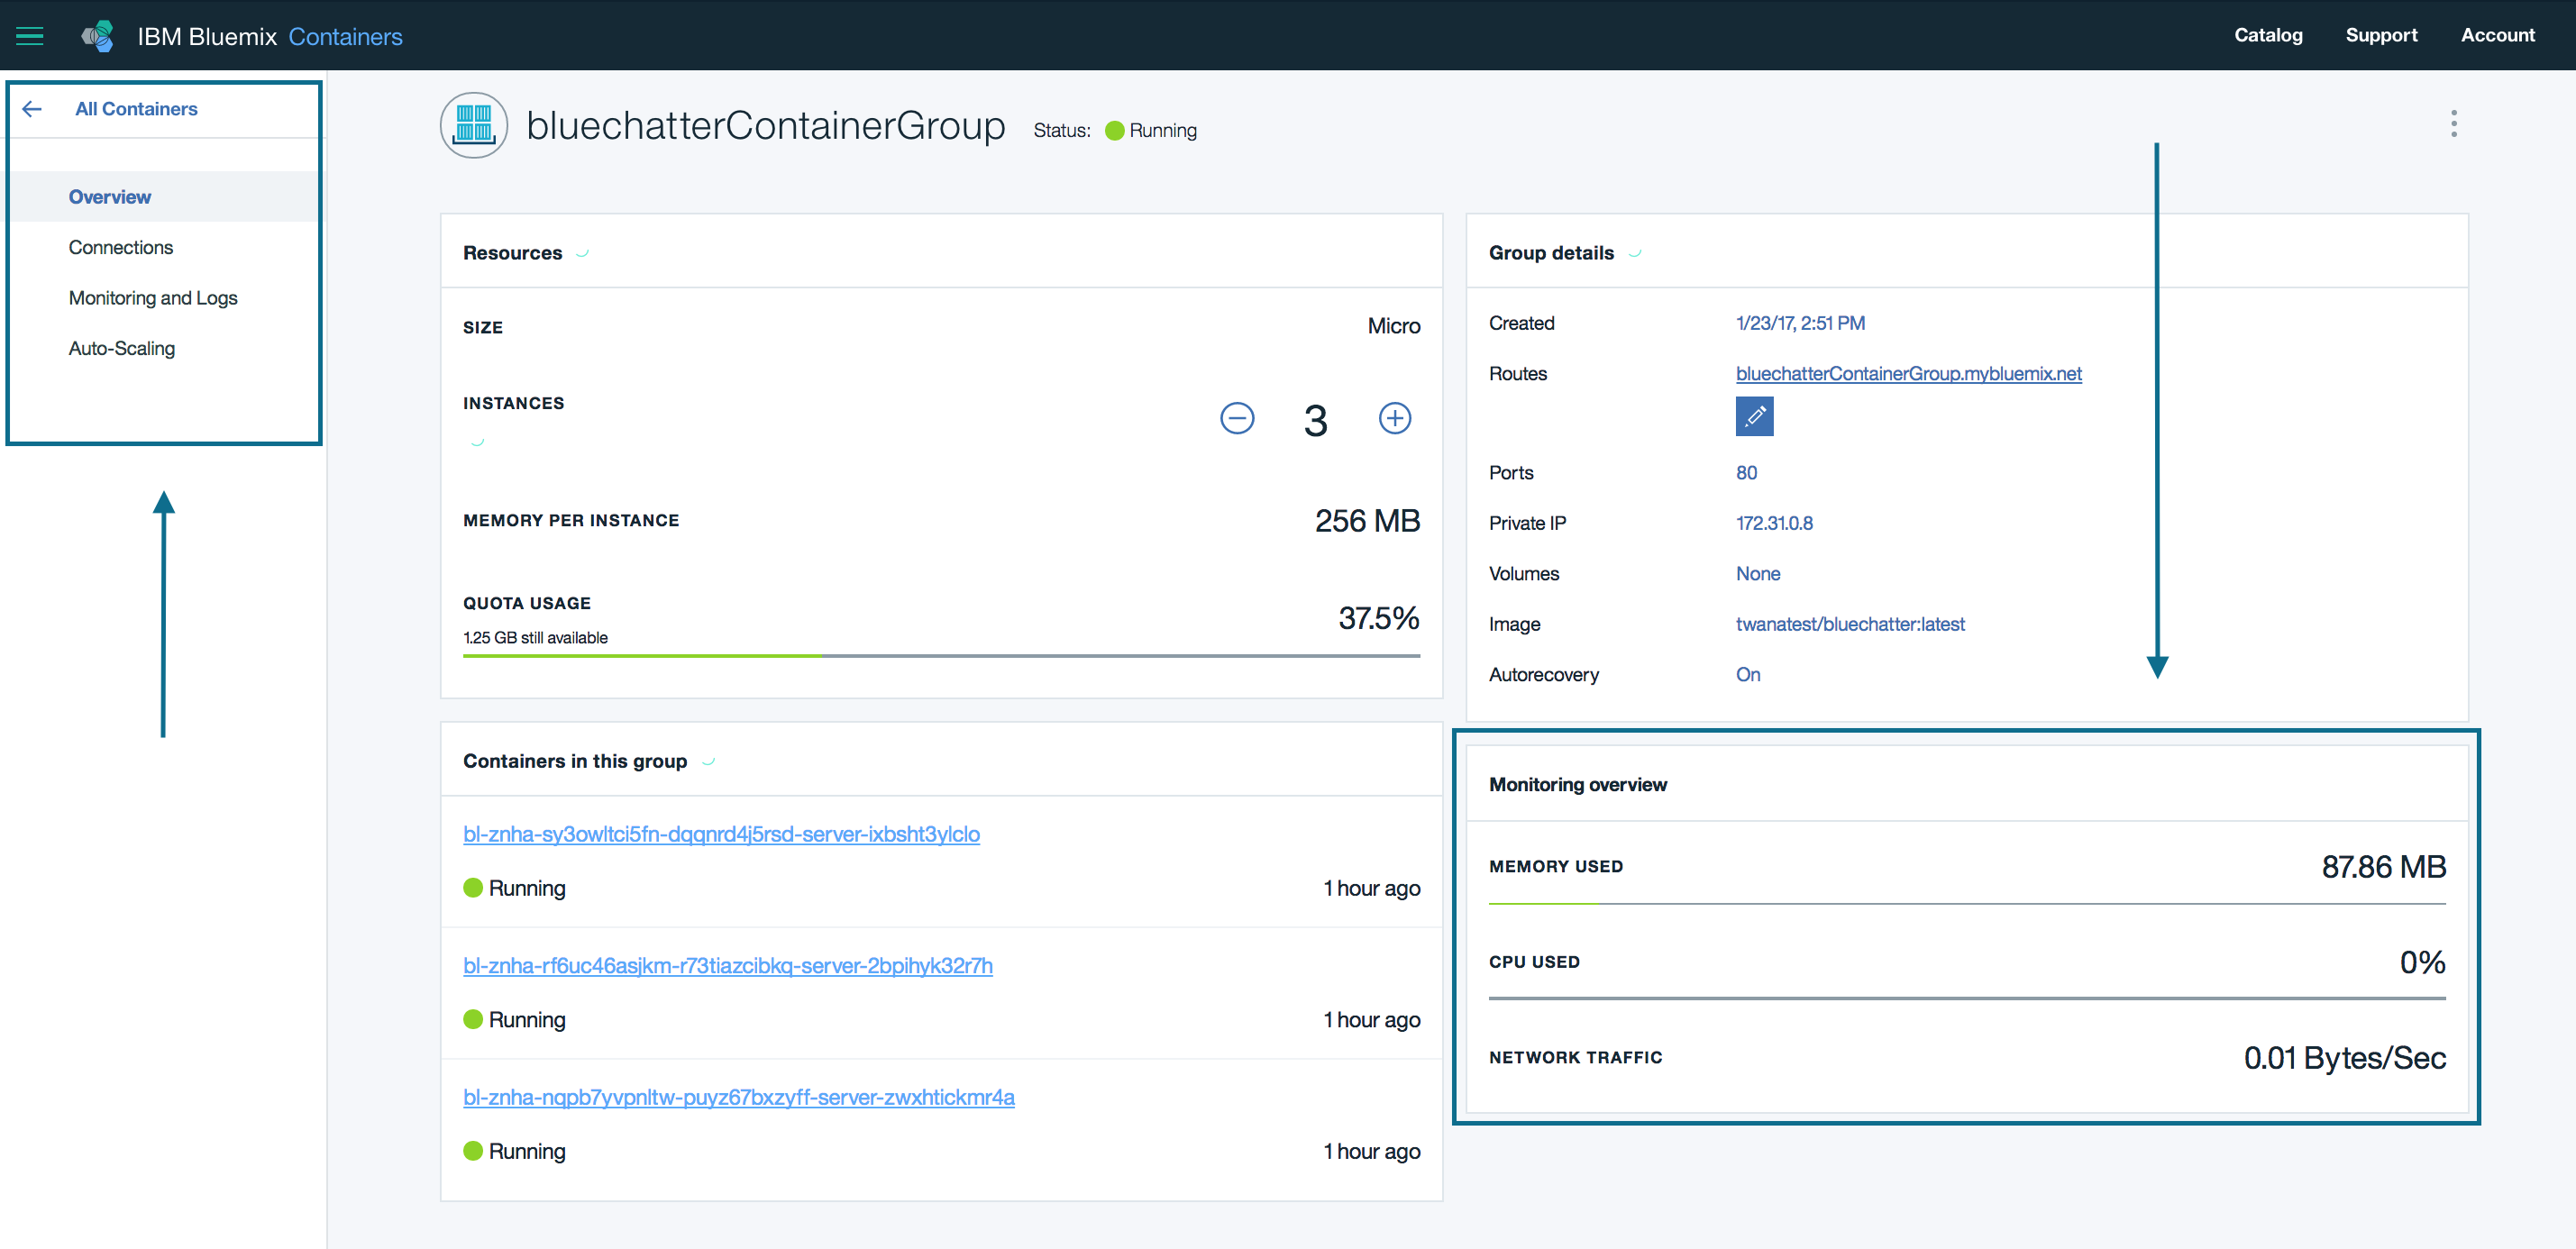
Looking at my container screenshot below, we can quickly see everything we need to know about our docker container.
Note, a staging domain also been created for us with the name of the container group.

The Bluemix containers offer an excellent scaling and reporting functionality where as a developer you don't need to worry about any of the underlying infrastructure and scaling scripts. Let's look at how to setup scaling policies and increasing container instances.
- To setup Auto-Scaling click on the Auto-Scaling tab on the left side.
- Click on the create policy button on the bottom right side of the page.
- Create your scaling policy, see below screenshot to how I setup my scaling policy.
- Finally click on the policy created and click on the Action button to attach the policy to your container Done.

With above four steps you have created your auto scaling policy to increase the number of container instances for when needed.
First, at a quick look at the container dashboard, we can see the usage of your Docker container. From the dashboard we can see memory used, CPU used and Network traffic.
To get more in-depth monitoring and reporting, go over to the monitoring and Logs section.
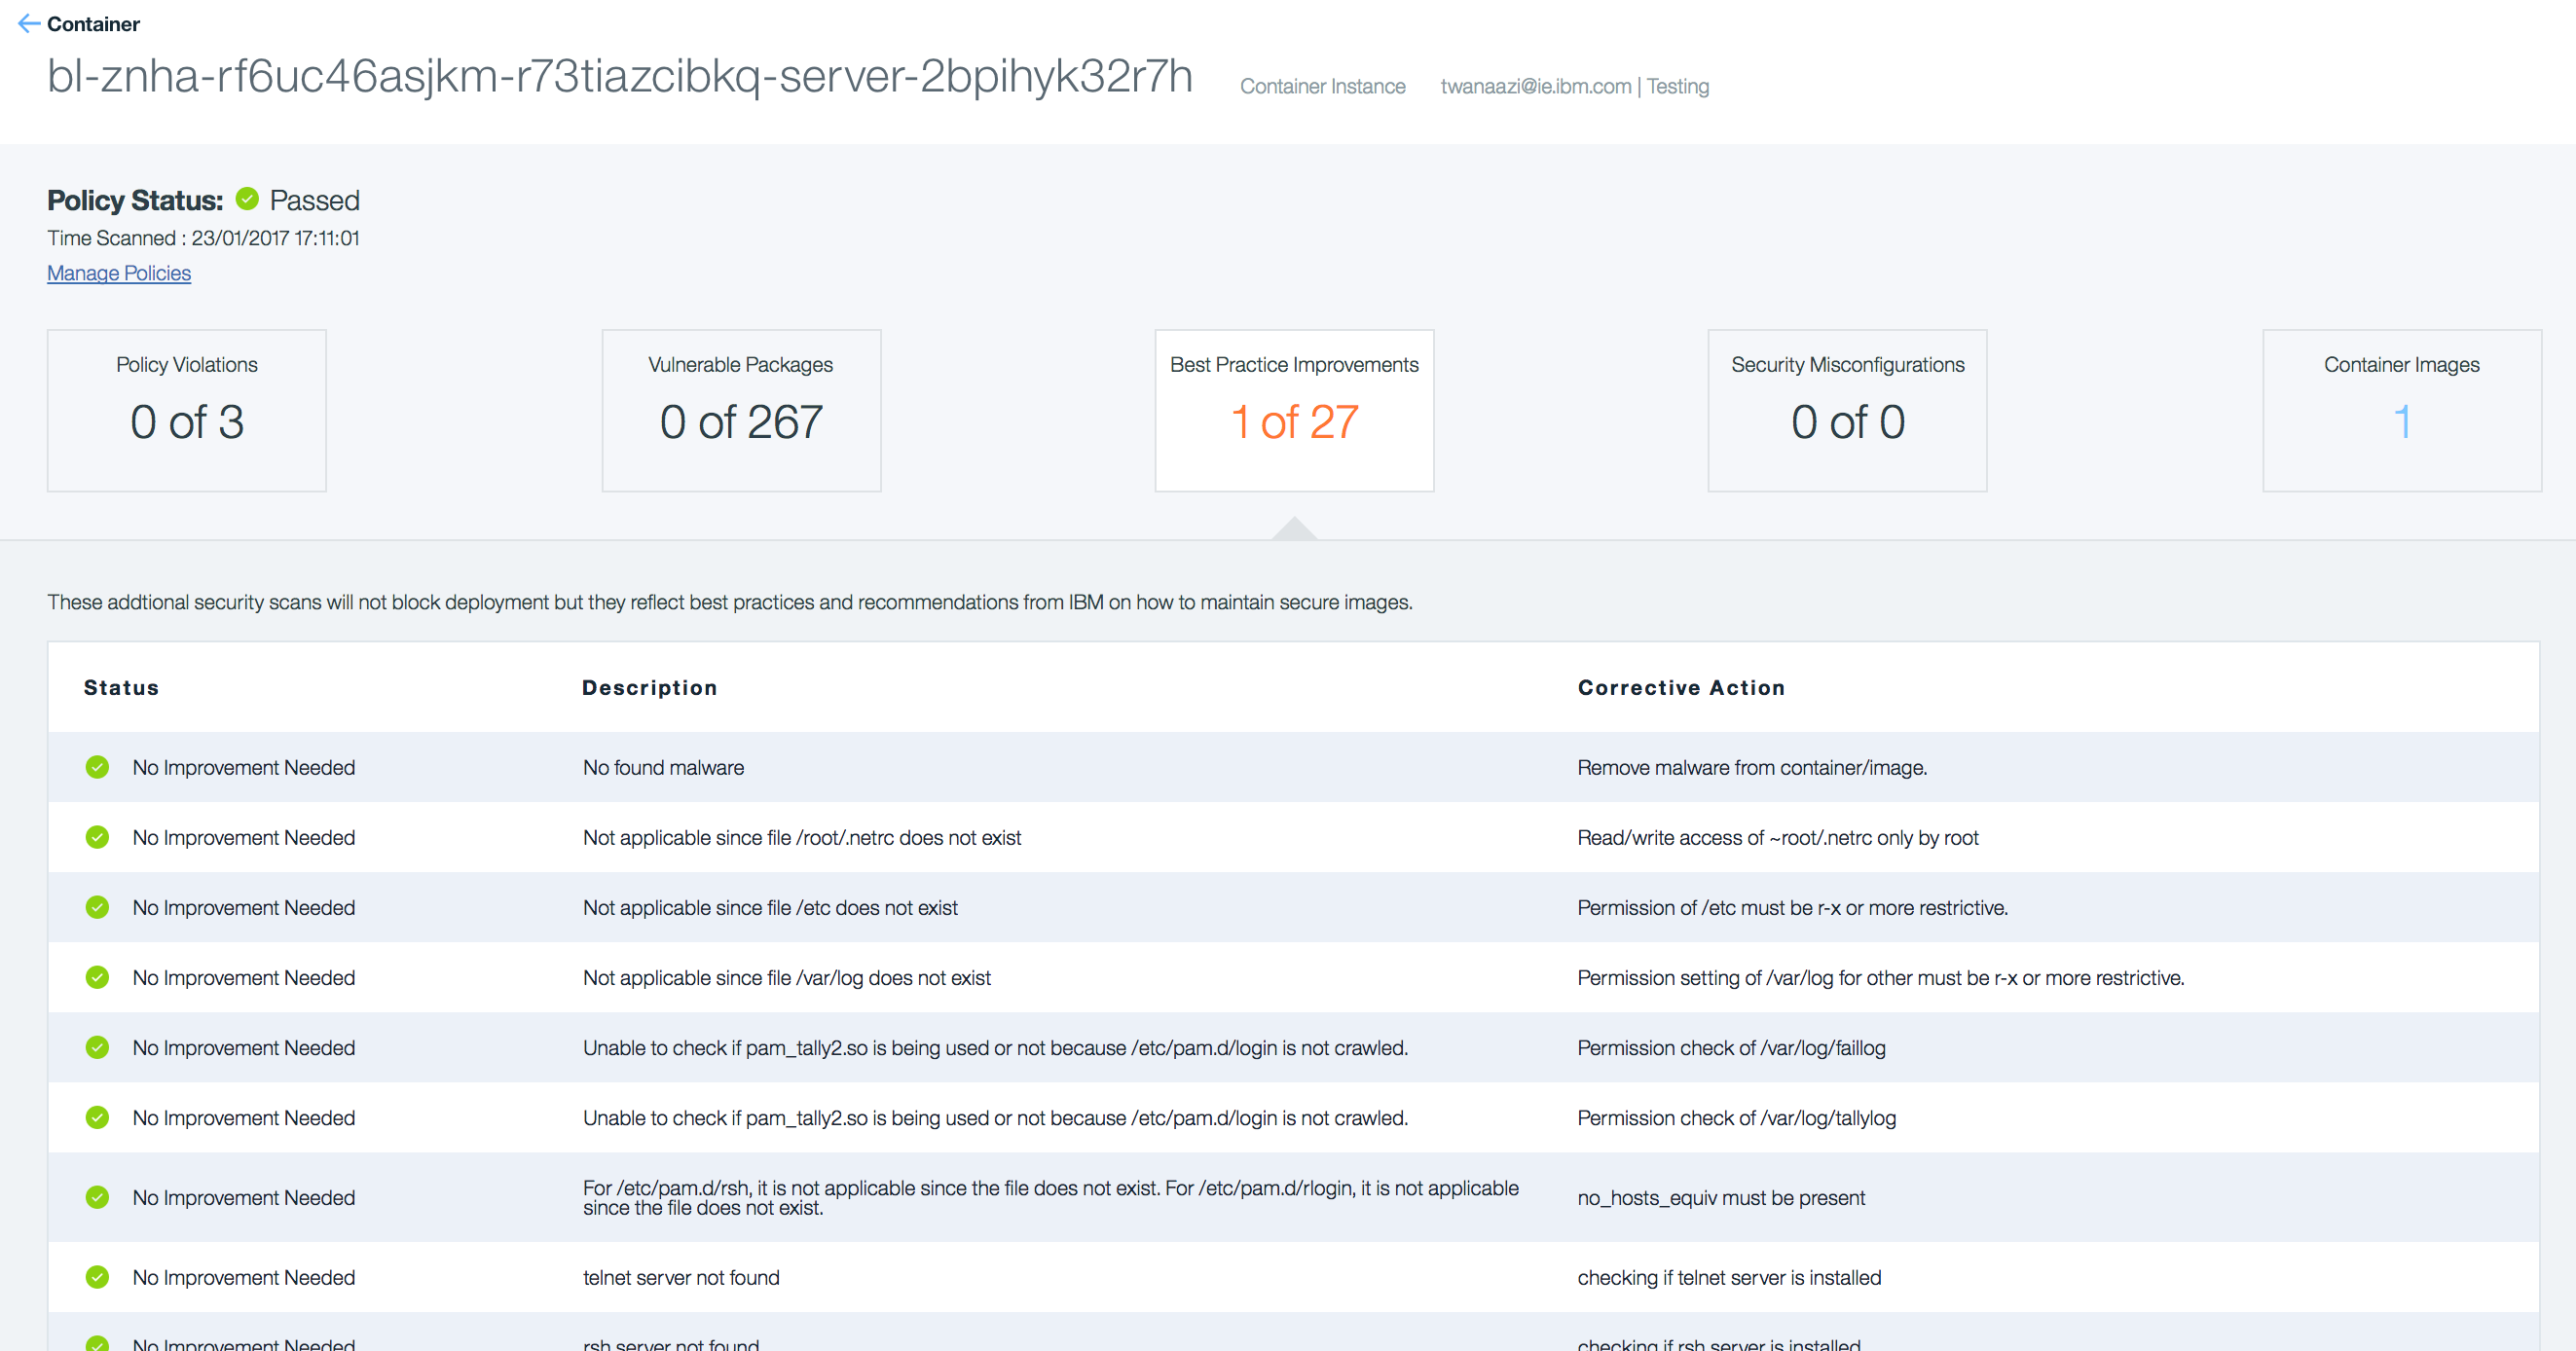
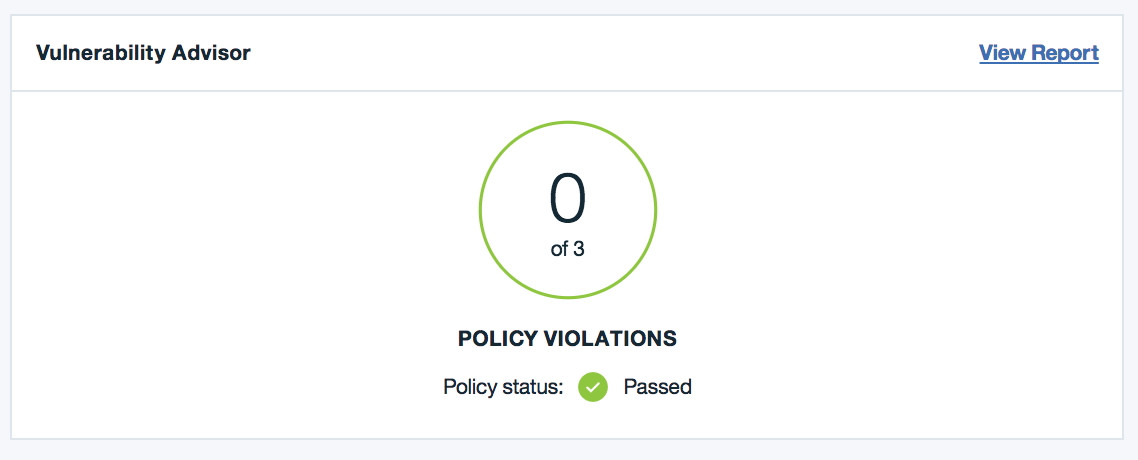
The Bluemix containers services offer a vulnerability report to each one of the containers deployed to Bluemix. This is highly useful as it provides an in-depth vulnerability insight to your application. To get to the vulnerability advisor section, from your container dashboard click on any of the container instances and then you should see the vulnerability Advisor button on the bottom of the page.
Looking at the vulnerability advisor section, we can get things like policy violations, vulnerable packages, best practice improvements and security misconfigurations. The two parts that I find very useful would be the vulnerable packages and best practice improvements.
From the list of best practices improvements, I can understand things like weak passwords; list Malware found, permission settings and more.
IBM Bluemix now support Kubernetes clusters within the platform, kubernetes is the future of docker applications so lets explore how to deploy the BlueChatter application as a Kubernetes cluster. There are few compounds that you must understand before deploying a kubernetes cluster.
Cluster
A Kubernetes cluster consists of one or more virtual machines that are called worker nodes.
Pods
Every containerized app that is deployed into a Kubernetes cluster is deployed, run, and managed by a pod. Pods represent the smallest deployable unit in a Kubernetes cluster and are used to group together containers that must be treated as a single unit.
Deployment
A deployment is a Kubernetes resource where you specify your containers and other Kubernetes resources that are required to run your app, such as persistent storage, services, or annotations.
Service
A Kubernetes service groups a set of pods and provides network connection to these pods for other services in the cluster without exposing the actual private IP address of each pod. You can use a service to make your app available within your cluster or to the public internet.
Learn more on these compounds here
- An IBM Bluemix account. Either [sign up][bluemix_signup_url], or use an existing account.
- Bluemix CLI
- Bluemix Container Registry plugin
- Bluemix Container Service plugin
- Node.js, version 6.9.1 (or later)
- Kubernetes CLI (kubectl) version 1.5.3 (or later)
- Docker CLI version 1.9 (or later)
-
Clone the app to your local environment from your terminal using the following command
git clone https://github.com/IBM-Bluemix/bluechatter.git -
cdinto thebluechatterfolder that you clonedcd bluechatter -
Start the Docker engine on your local computer
See the Docker installation instructions if you don't yet have the Docker engine installed locally or need help in starting it.
-
Log the local Docker client in to IBM Bluemix Container Registry:
bx cr loginThis will configure your local Docker client with the right credentials to be able to push images to the Bluemix Container Registry.
-
Retrieve the name of the namespace you are going to use to push your Docker images:
bx cr namespace-listIf you don't have a namespace, you can create one with
bx cr namespace-create mynamespaceas example. -
Check that you have installed Container Registry plugin and Container Service plugin with this command
bx plugin listOutput:
listing installed plug-ins...
Plugin Name Version
container-service 0.1.238
container-registry 0.1.109 -
Build the Docker image of the service
In the following steps, make sure to replace
<namespace>with your namespace name.docker build -t registry.ng.bluemix.net/twanatest/bluechatter_web:latest . -
Push the image to the registry
docker push registry.ng.bluemix.net/twanatest/bluechatter_web:latest
-
Create a Kubernetes cluster in Bluemix
bx cs cluster-create --name myclusterNote that you can also use an existing cluster
-
Wait for your cluster to be deployed. This step can take a while, you can check the status of your cluster(s) by using:
bx cs clustersYour cluster should be in the state normal.
-
Ensure that the cluster workers are ready too:
bx cs workers myclusterThe workers should appear as Ready.
-
Before deploying the cluster, make sure the steps above are complete and the cluster state is READY
-
Retrieve the cluster configuration
bx cs cluster-config myclusterThe output will look like:
Downloading cluster config for mycluster OK The configuration for mycluster was downloaded successfully. Export environment variables to start using Kubernetes. export KUBECONFIG=/Users/Twana/.bluemix/plugins/container-service/clusters/mycluster/kube-config-prod-dal10-mycluster.yml -
Copy and paste the
export KUBECONFIG=...line into your shell. -
Confirm the configuration worked by retrieving the cluster nodes:
kubectl get nodesOutput:
NAME STATUS AGE
169.47.241.223 Ready 2m -
Modify the deployment.yml to point to the image in the Bluemix Container Registry by replacing the namespace value.
-
Deploy the BlueChatter application to the cluster
kubectl create -f kubernetes.yml -
Get the public IP address for the load balancer and the port for the app in the service's details.
kubectl describe service bluechatterEndpoint running app: 169.47.241.223:30089
Done!
-
To view the clusters graphically we are going to use Cloudweave to see graphically the different pods and overall cluster setup.
Sign up for a free Cloudweave account: https://cloud.weave.works/signup and follow the steps to create your account.
-
Click on the "Explore" option and run the commands provided by Cloudweave to connect to your cluster. This should be something like this:
kubectl apply -n kube-system -f \
   "https://cloud.weave.works/k8s/scope.yaml?service-token=<TOEKN-XXXXXXXXXXXXXXXXXXX>-version=$(kubectl version | base64 | tr -d '\n')"
Once Cloudweave is setup you then should see your cluster pods graphically. In the screenshots below you can see the BlueChatter Web and Redis pods created on the right.
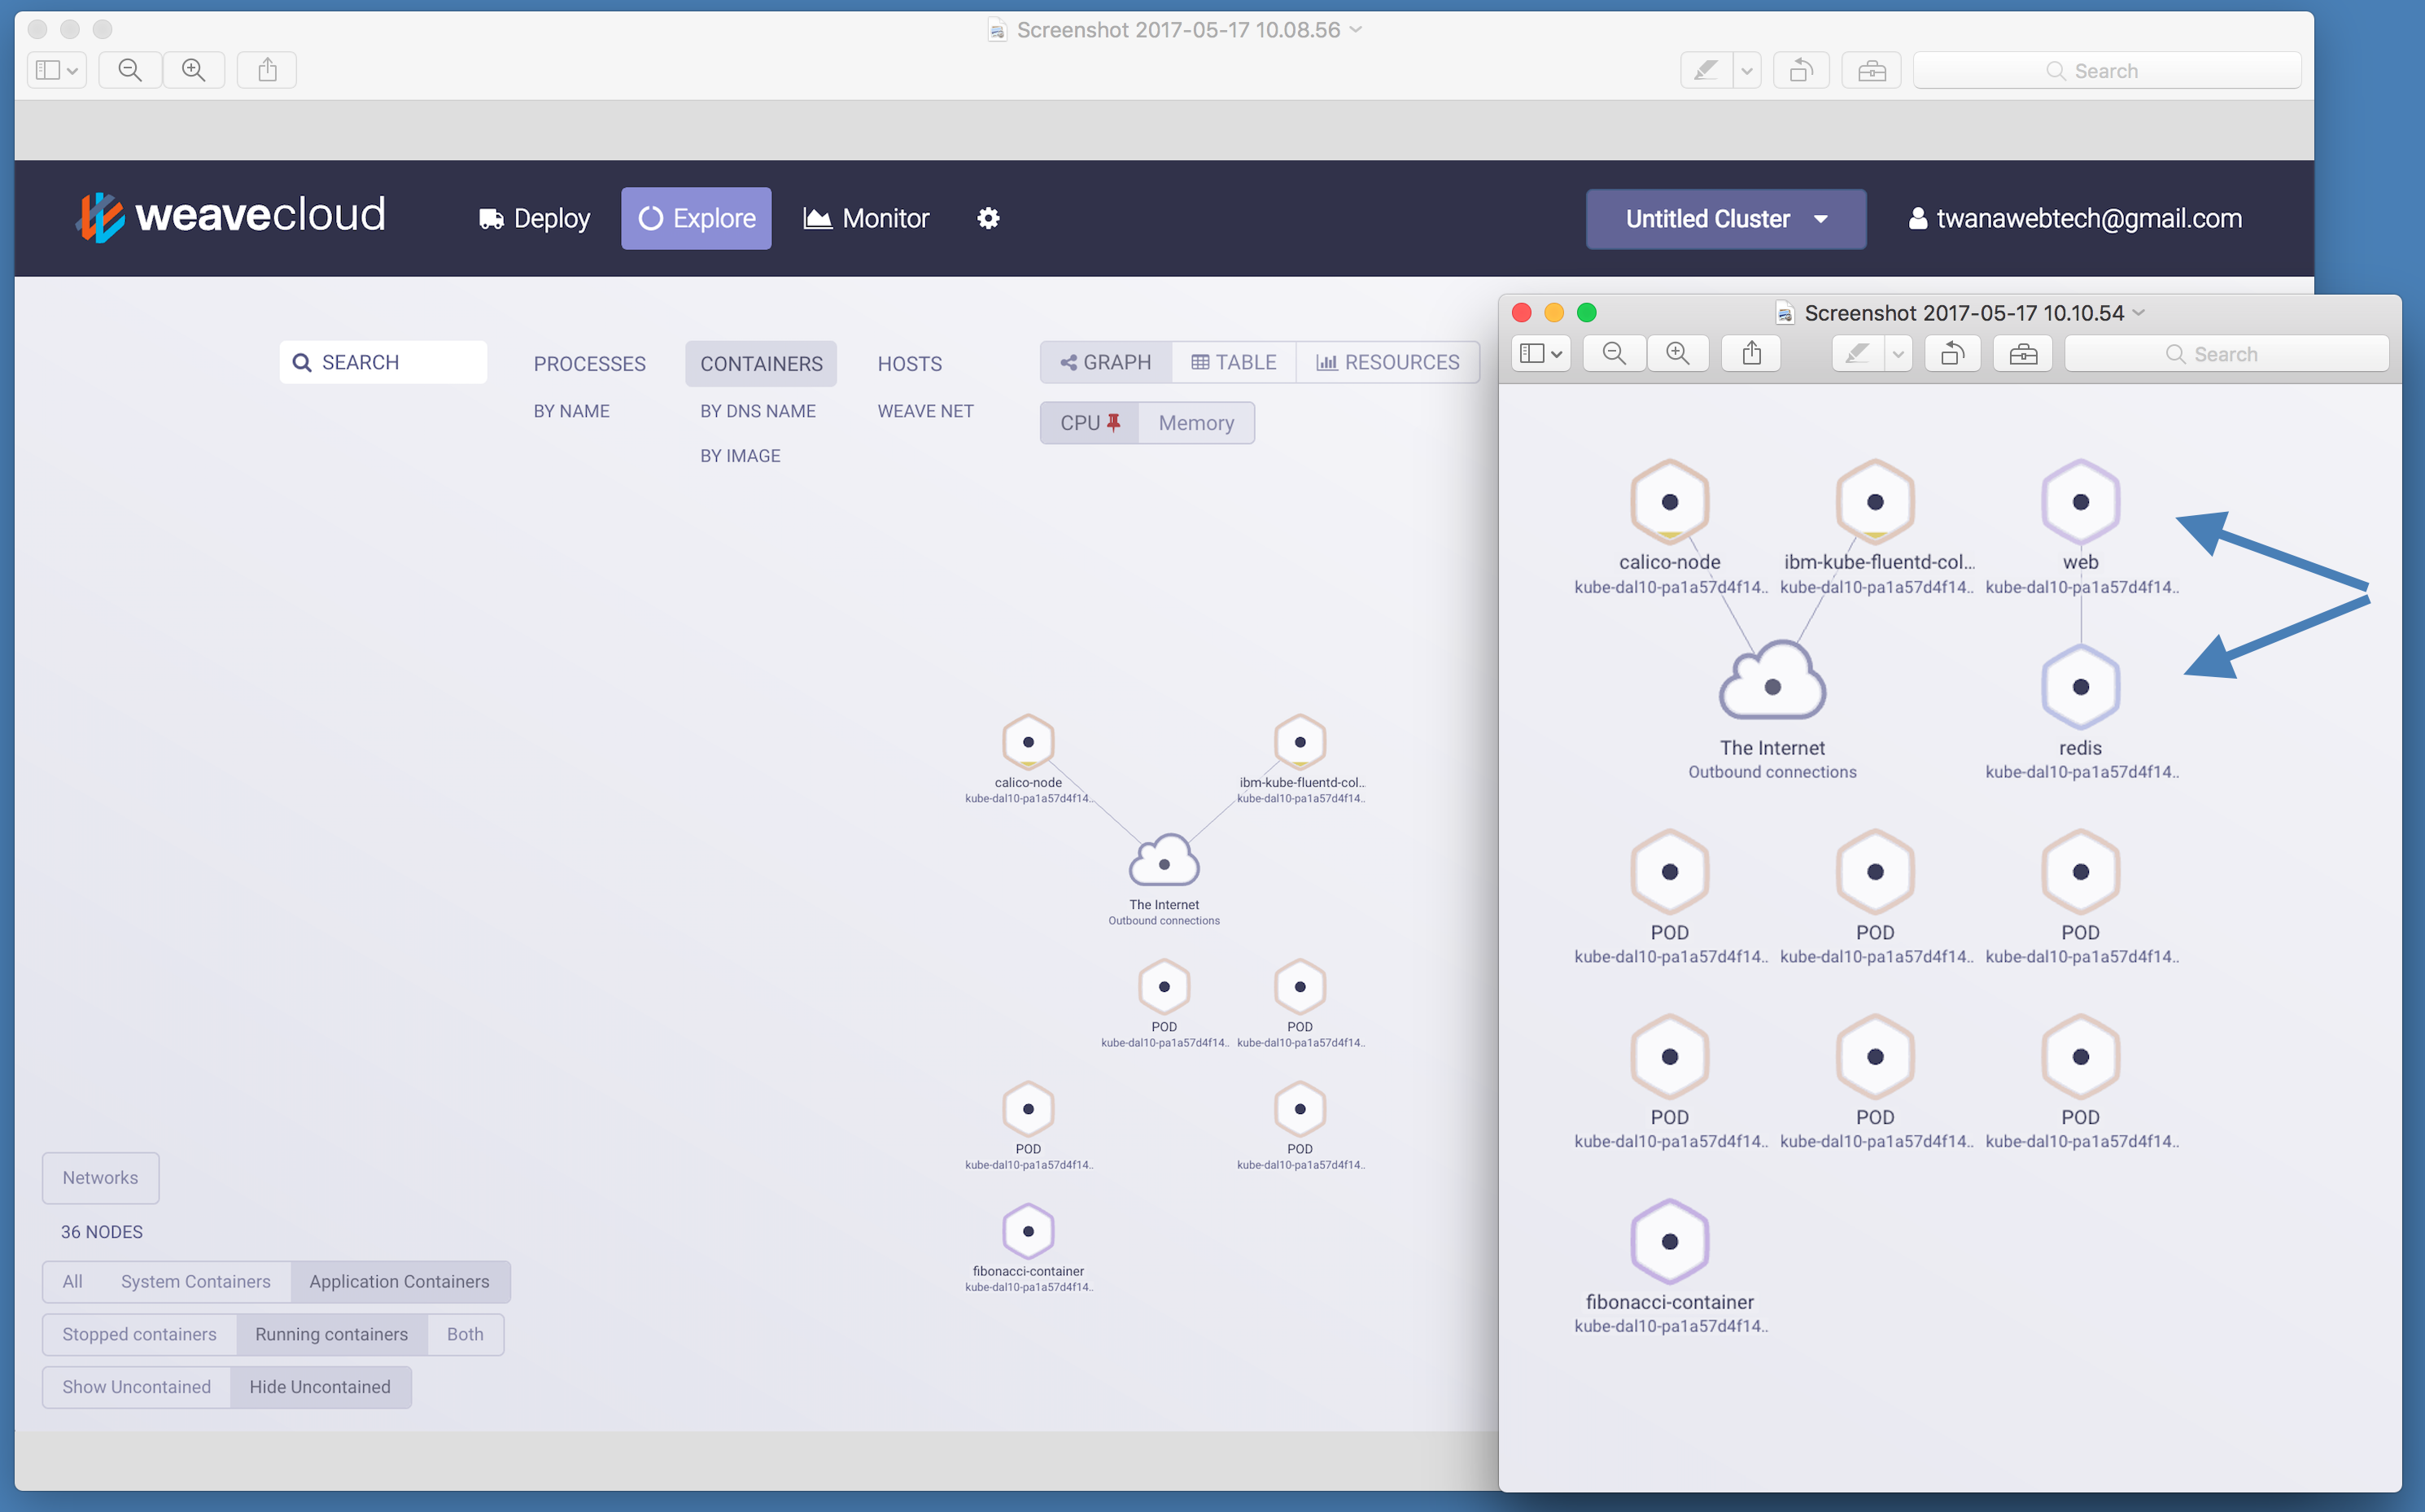
-
Additionally we can also view logs locally if you don't like using the graphical tool, a tool like kubetail can be used to tail the logs of multiple pods https://github.com/johanhaleby/kubetail. Once installed you can do kutetail fibo to watch the Fibonacci service logs.
-
First, run a command to see the number of running pods, we should see one pod for the redis service and one pod for the web application.
kubectl get pods -
Scale from 1 to 4 replicas, note in the kubernetes.yml we have set to have 1 replicas so with this command we tell it to have 4 replicas.
kubectl scale --replicas=4 -f kubernetes.yml -
Scale back down to 1 replica
kubectl scale --replicas=1 -f kubernetes.yml
-
Configure the automatic scaling for Kubernetes
kubectl autoscale -f kubernetes.yml --cpu-percent=10 --min=1 --max=10This tells Kubernetes to maintain an average of 10% CPU usage over all pods in our deployment and to create at most 10 pod replicas.
In order to see Auto Scaling in action, we would need to drive some traffic to the BlueChatter app in order to see the application scaling. You can use something like Apache JMeter to drive traffic to the application, in this demo we will not cover Apache JMeter given that there are many tutorials covering Apache JMeter.
-
Use this command to see the Auto Scaling been setup
kubectl get hpaOutput:
NAME REFERENCE TARGET CURRENT MINPODS MAXPODS AGE redis Deployment/redis 10% <waiting> 1 10 14m web Deployment/web 10% <waiting> 1 10 14m -
Remove the hpa
kubectl delete hpa redis kubectl delete hpa web -
Scale back to down to 1 replica
kubectl scale --replicas=1 -f kubernetes.yml
Done!
-
Get services, pods and deployments
kubectl get service kubectl get pods kubectl get deployments -
Delete services, pods and deployments
kubectl delete service <service-name> kubectl delete pods <pod-name> kubectl delete deployments <deployments-name> `` -
Get cluster node IP Address and state
bx cs workers mycluster -
Get the port (NodePort)
kubectl describe service web
For additional information about on IBM Containers see the the following links:
Bluemix documentation
Docker user manual PDF
A-Z Video docker container setup
Deploy Kubernetes cluster to Bluemix
This code is licensed under Apache v2. See the LICENSE file in the root of the repository.
For a list of 3rd party dependencies that are used see the package.json file in the root of the repository.

