Cincinnati Conference Room Scheduler
The Outlook Room Finder is a solution for discovering and aligning rooms/resources to your team or ad hoc meeting needs. Room Finder is a web-based Add-In that renders within Outlook client and Outlook on the Web (OWA). The design enhances existing Office 365 capabilities. Within the Outlook client, it enables the end-user to schedule rooms using the strengths of Exchange Online and Outlook. The application augments the Outlook client or OWA to read calendar dates, meeting schedule(s) (one-time or recurring) and retrieve information from Exchange Online.
When an office or region wants to enable the Room Finder, their Office 365 Group can be associated with the Add-In. Only users within the Group(s) will see the Outlook Add-In. It leverages Exchange Online, Azure Active Directory (AD), and the Graph API to present Office 365 data within an application (Outlook) to which the user is accustomed. No data is stored within the application.
This solution must be customized to the environment and is not supported by Premier - DO NOT SHARE source code without a MCS Engagement
This project requires installation of back-end components. Please refer to the technical documentation for details.
Prerequisites:
- Office 365 specifically: (Exchange Online, Outlook [Office])
- Azure App Service or Web Server (IIS) for hosting the Office Add-in. Windows or Linux
- (OPTIONAL) Active Directory (LDAP) accessible the web server, containing all room and equipment resources
- IMPORTANT: for Exchange Online (Office 365), mailboxes must be in sync between local JSON file (
\DotNet\src\OutlookRoomFinder.Web\wwwroot\assets\config\resources-objects.epaproduction.json) and Office 365. The primary fields are userPrincipalName and primarySmtpAddress.
- Provides a comprehensive overview, installation and configuration guide of the solution.
You must install the following software to modify and maintain the solution. Once you install the software you can then clone the repository and start building. Before you begin, please read through the Developement Guidance.
- Visual Studio 2019
- ASP.NET and web dev
- .NET Core cross-platform development
- Visual Studio Code
- Extension: Beautify (HookyQR)
- Extension: C# (Microsoft)
- Extension: Debugger for Chrome (Microsoft)
- Extension: Manage User Secrets (reptarsrage)
- Extension: PowerShell (Microsoft)
- Extension: TSLint (Microsoft)
- NodeJs 12.16.x or 10.16.x LTS
- GIT
Add-In is deployed using a Manifest File.
Withing the Repository: \PowerShell\posh\roomfinder\Scripting\assets\manifest
- Side Load Outlook Add In For Testing
- Exchange | Outlook Web Application (side load the app)
There are 2 aspects of this solution.
- The backend code which is written in C# and controlled by the web project
OutlookRoomFinder.Web. - The frontend code is written in Angular and controlled by the VS Code projects
Angular
The Angular project includes a number of NPM Tasks. These tasks as outlined below are to assist in the ease of compilation, build, debug, and packaging.
npm run startBuilds and runs the solutionnpm run start:ieBuilds and runs the solution in the IE Modenpm run start:outlookaddinBuilds and runs the Outlook Add In Projectnpm run start:reportingBuilds and runs the Reporting Projectnpm run buildBuilds the applicationnpm run build:wBuilds the application in IE Mode and Watches the folder for changesnpm run build:w:reportingBuilds the Reporting application and Watches the folder for changesnpm run build:prodBuilds the application for Production Deploymentnpm run build:outlookaddinBuilds the Outlook Add In for Production Deploymentnpm run build:reportingBuilds the Reporting project for Production Deploymentnpm run testRuns the Application for Testing (Unit Test files)npm run test:watchRuns the Application for Testing (Unit Test files) in Watch Modenpm run test:ciRuns the Application for Testing (Unit Test files) with a Code Coverage Report and Continuous Integrationnpm run test:coverageRuns the Application for Testing (Unit Test files) with a Code Coverage Reportnpm run lintRuns the tslint and prints out linting errorsnpm run e2eRuns the application with Jasmine and Protocolnpm run e2e:outlookaddinRuns the Outlook Add In with Jasmine and Protocolnpm run e2e:reportingRuns the Reporting application with Jasmine and Protocolnpm run e2e:DebugRuns the application in test mode with Jasmine and Protocolnpm run e2e:dotnetRuns the application in VS Code Only
EPA Room Finder Developer Guide - Getting Started
- Download and Install NodeJS
- Verify NodeJS is installed:
node -v - Verify NPM is installed:
npm -v - Ensure the latest version of NPM is installed:
npm install npm@latest -g
- Clone repository from Enhanced Room Outlook Addin
- Open the Angular folder within VS Code
- From the Terminal, enter:
npm installto install all missing packages. - From the Terminal, enter:
npm run buildto compile/build the [Outlook AddIn] solution - From the Terminal, enter:
npm run build:reportingto compile/build the [Reporting] solution - Open the OutlookRoomFinderCore.sln file with Visual Studio 2019
- NOTE: Missing Packages will automatically be installed
- Build the OutlookRoomFinderCore.sln
- Right-click on OutlookRoomFinder.Web and "Set as Startup Project"
- Right-click on OutlookRoomFinder.Web and choose "Manage user secrets"
- Update the User Secrets file. Download the zip Located Here and replace the contents on your machine.
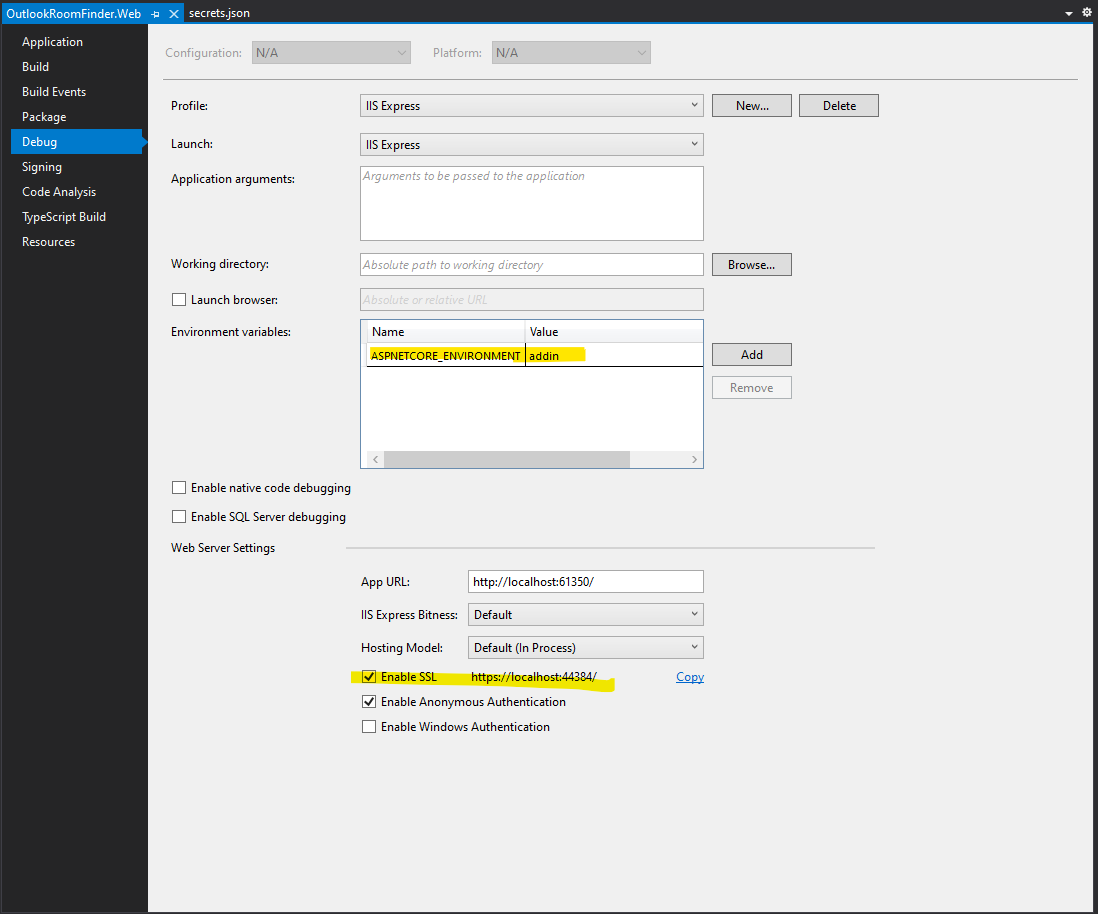
This option is intended to run the code as if it were in production. The following configuration is required to ensure the application runs inside the web application. Open the web project and navigate to Debug. Ensure that "Development" is not the value.
Within Visual Studio Code, using the Angular project:
npm run build:outlookaddinBuilds the Outlook Add In for Production Deploymentnpm run build:reportingBuilds the Reporting project for Production Deployment
Within Visual Studio, using OutlookRoomFinder.Web Select F5 to Debug Use the local IIS SSL Address (located in the taskbar) (https://localhost:44384) to launch in Chrome, Edge, or Firefox
This option is intended to run the code as if it were in production. The following configuration is required to ensure the application runs inside the web application. Open the web project and navigate to Debug. Ensure that "Development" is not the value.
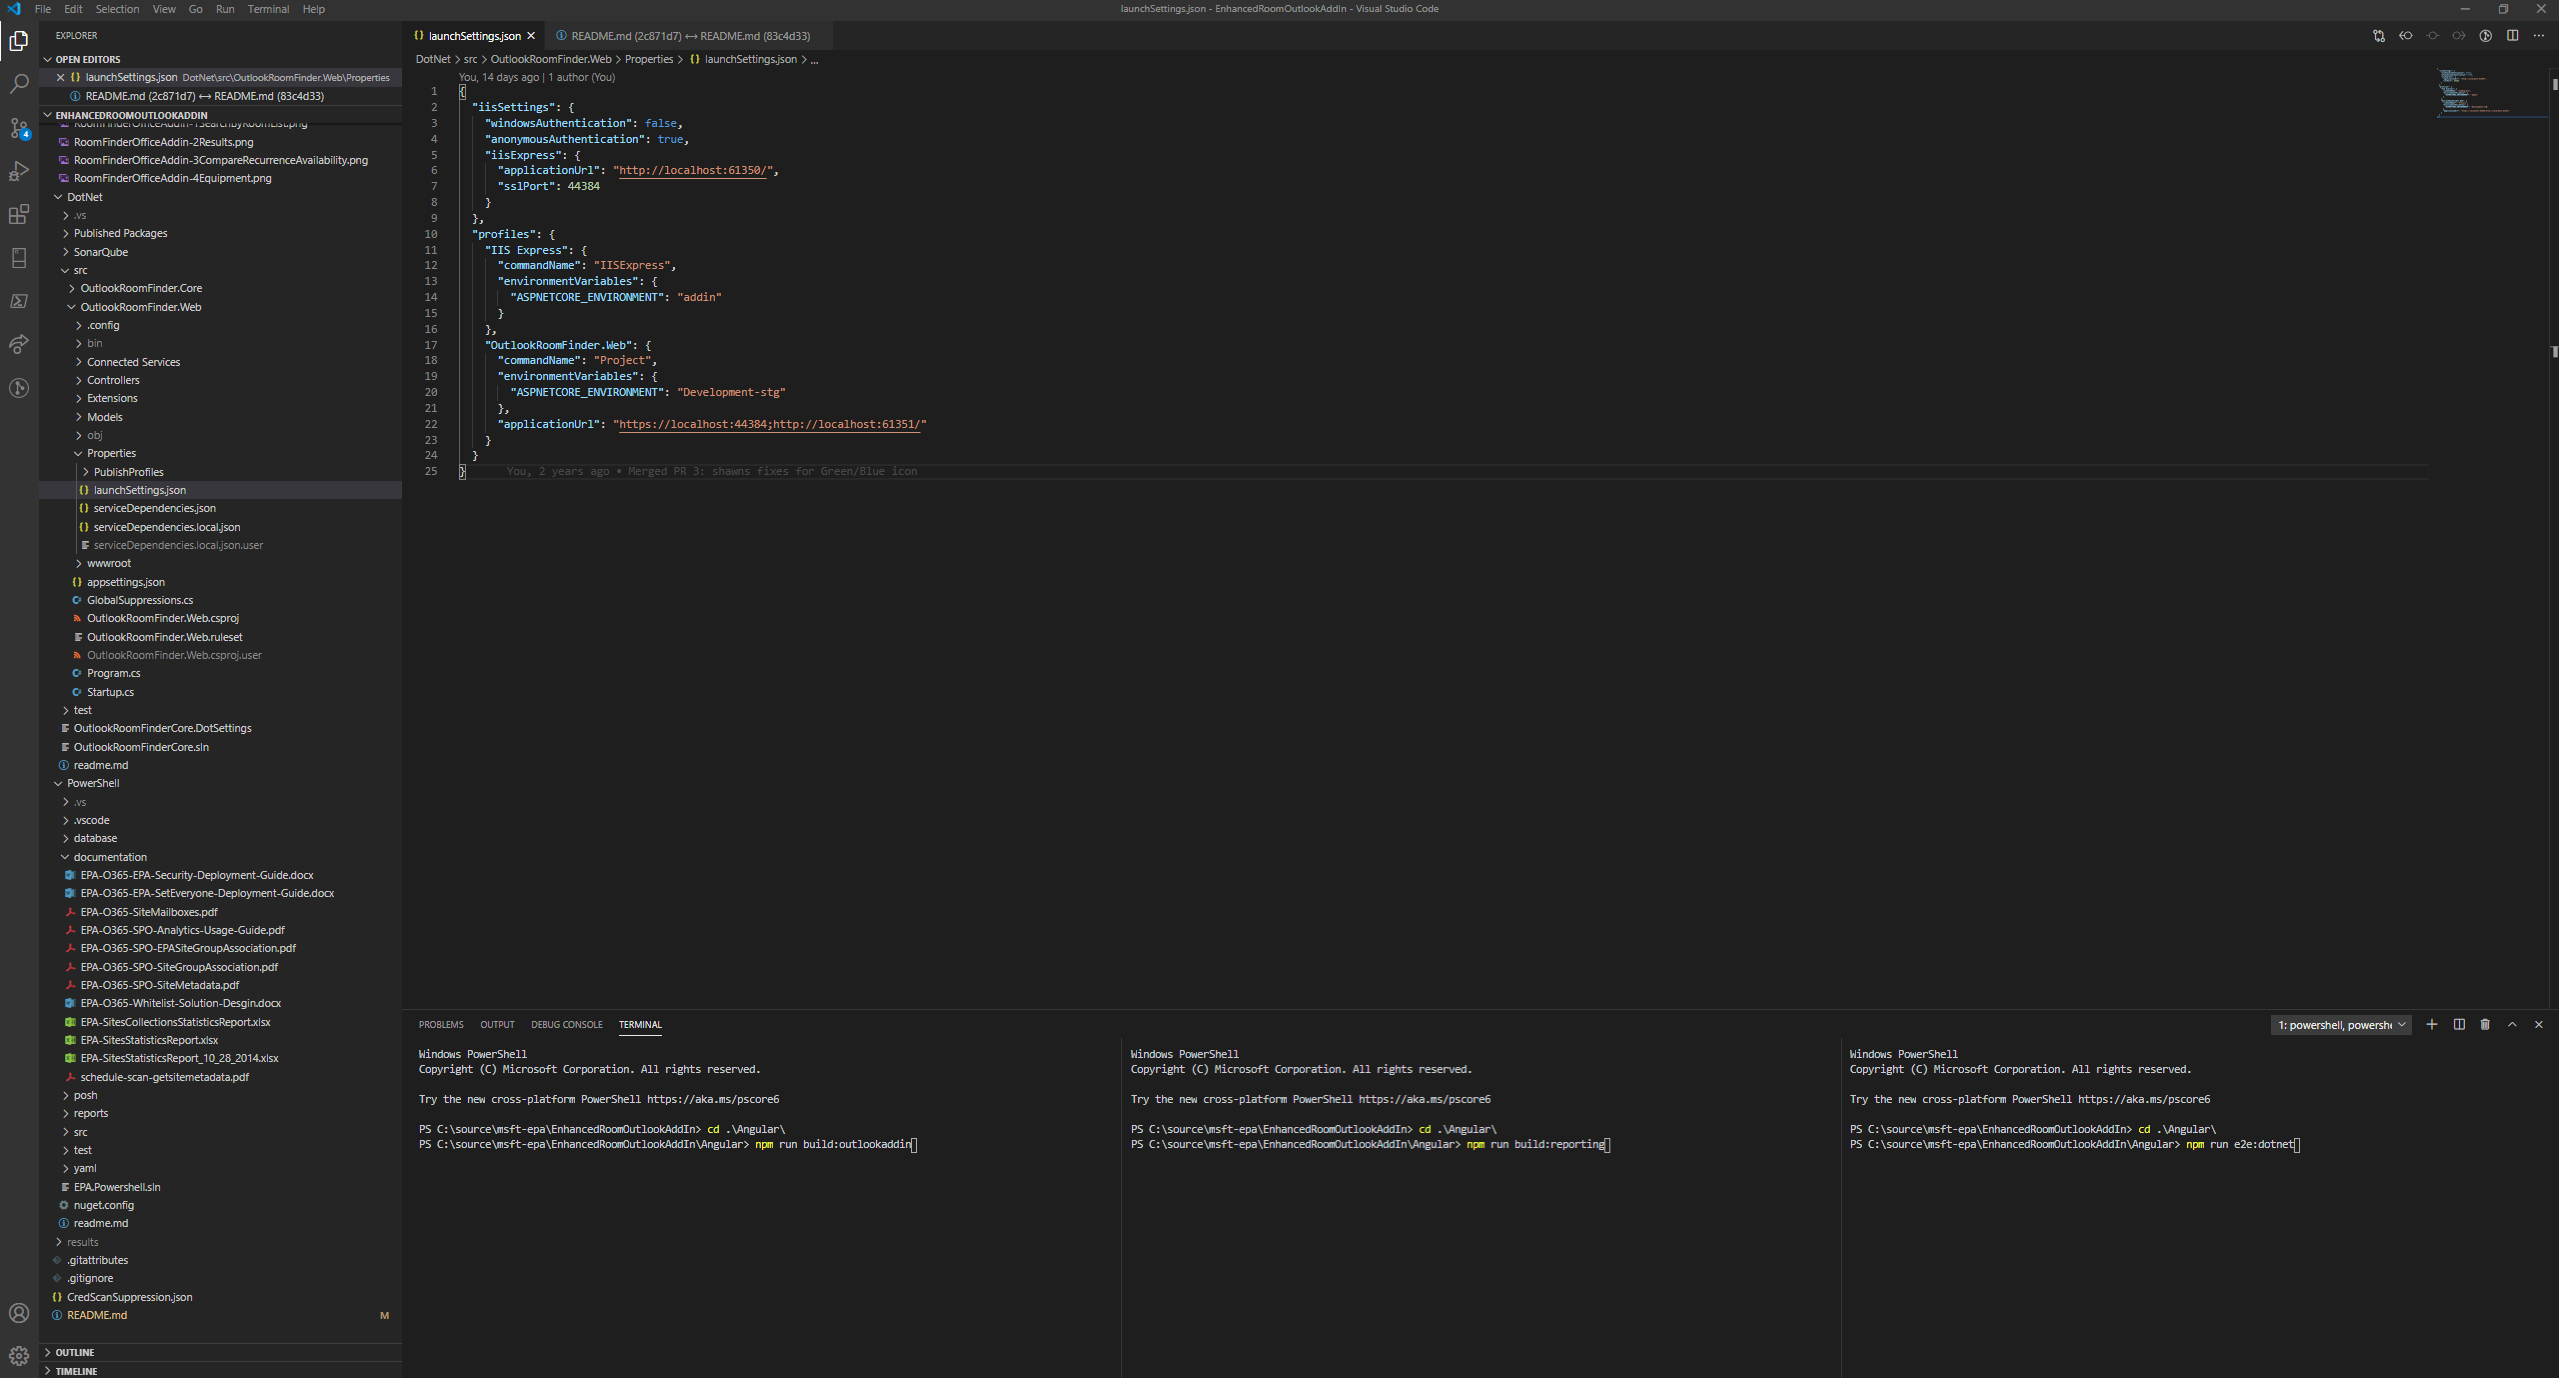
Within Visual Studio Code, navigate to the Angular project directory. Use Visual Studio Code to update the configuration per the screenshot. Open the terminal in VS Code. We recommend opening multiple split screens in the terminal.

npm run build:outlookaddinBuilds the Outlook Add In for Production Deploymentnpm run build:reportingBuilds the Reporting project for Production Deploymentnpm run e2e:dotnetRuns the application in VS Code Only
Use the local IIS SSL Address (located in the VS Code terminal) (https://localhost:44384) to launch in Chrome, Edge, or Firefox
This option is intended to run the code as if it were in production. However, this configuration enables you to change a line of code or stylesheet markup and it will auto recompile. The following configuration is required to ensure the application runs inside the web application. Open the web project and navigate to Debug. Ensure that "Development" is not the value.
Within Visual Studio Code, navigate to the Angular project directory. Use Visual Studio Code to update the configuration per the screenshot. Open the terminal in VS Code. We recommend opening multiple split screens in the terminal.

npm run build:wBuilds the application in IE Mode and Watches the folder for changesnpm run build:w:reportingBuilds the Reporting application and Watches the folder for changesnpm run e2e:dotnetRuns the application in VS Code Only
Use the local IIS SSL Address (located in the VS Code terminal) (https://localhost:44384) to launch in Chrome, Edge, or Firefox
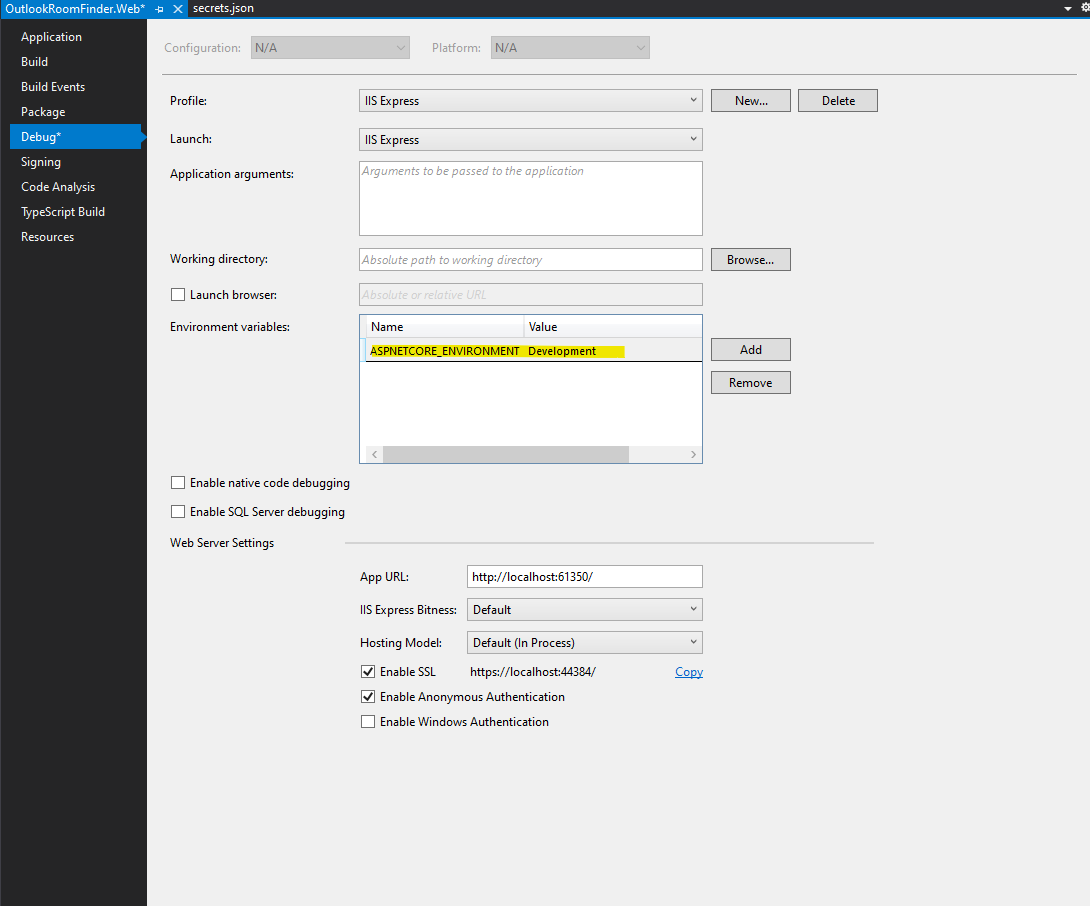
This option is intended to run the code using NG SERVE. Also referred to as proxy development using @angular/cli. This configuration enables you to change a line of code or stylesheet markup and it will auto recompile. The following configuration is required to ensure the application runs inside the web application. Open the web project and navigate to Debug. Ensure that "Development" is the value.
Within Visual Studio Code, navigate to the Angular project directory. Use Visual Studio Code to update the configuration per the screenshot. Open the terminal in VS Code. We recommend opening multiple split screens in the terminal.

npm run start:outlookaddinBuilds and serves the Outlook Add In Projectnpm run start:reportingBuilds and serves the Reporting Projectnpm run e2e:dotnetRuns the application in VS Code Only
Use the local IIS SSL Address (located in the VS Code terminal) (https://localhost:44384) to launch in Chrome, Edge, or Firefox
Builds for Production are generated through Azure DevOps. Pull Requests are required to submit changes. Once Pull Requests are approved, the project will build and publish the solution The published solution can be downloaded as a ZIP file from the Pipelines->(Latest Pipeline)->Summary->Related-Publ
Disclaimer The United States Environmental Protection Agency (EPA) GitHub project code is provided on an "as is" basis and the user assumes responsibility for its use. EPA has relinquished control of the information and no longer has responsibility to protect the integrity , confidentiality, or availability of the information. Any reference to specific commercial products, processes, or services by service mark, trademark, manufacturer, or otherwise, does not constitute or imply their endorsement, recommendation or favoring by EPA. The EPA seal and logo shall not be used in any manner to imply endorsement of any commercial product or activity by EPA or the United States Government.

