Asctec Communication Interface Commander
Require C++11 Compiler.
#include "aci_comm_uav.hpp"

int main() {
    using namespace acc;
    std::string port = "/dev/tty.USB0";

    // Initialize the UAV with serial port,
    // baud rate and control mode
    UAV uav(port, B57600, CTRL_MODE::DIMC);

    try {
        // Enable all the motors read and write;
        uav.motors.enable_read(0).enable_write(0);

        // Start the aci and enable control mode
        uav.start().control_enable(true);

        // Write RPM motors
        uav.motors.write({1500, 1500, 1500, 1500});

        // Read motors 1 RPM
        auto motor_speed_1 = uav.motors[0].read(); // -> 1500;

        uav.motors.write({1075, 1075, 1075, 1075});

    } catch (...) {
        // Stop and clean
        uav.stop();
    }
    return 0;
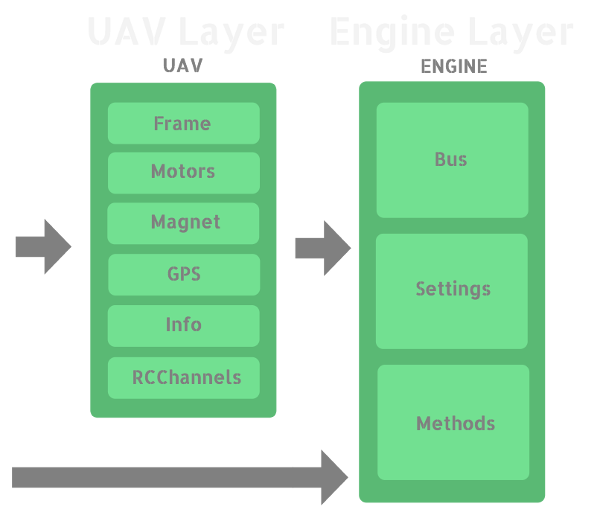
}The aci-comm design is show in the following picture. As you can see, there are two different interfaces in order to control the drone.
The UAV is an high level interface that manage under the hood the Engine interface. Engine manage directly the original API C provided by Asctec.
One of the main differences between the two interfaces is that in the Engine interface the read and written values are raw, as the original API C.
The UAV interface instead properly converts raw values into with their physical units.
Both the interfaces throws errors when you insert
wrong data or when you try to do illegal operations,
so you should wrap all the code in a try and catch block.

There are read-only subclasses, write-only subclasses and read-write subclasses.
Before using every of the following subclass of UAV, it has to be activated:
* to enable the reading, the method .enable_read(i) has to be called, where i is the number of packet.
* to enable the writing, the method .enable_write(i) has to be called, where i is the number of packet.
The Frame class contained in the UAV class, allow the user to get informations related to the UAV frame as:
- Attitude:
- Roll angle:
uav.frame.roll.read() - Pitch angle:
uav.frame.pitch.read() - Yaw angle:
uav.frame.yaw.read() - Quaternion:
uav.frame.quaternion()
- Roll angle:
- Angular Rates:
- Roll angle rate:
uav.frame.roll_d.read() - Pitch angle rate:
uav.frame.pitch_d.read() - Yaw angle rate:
uav.frame.yaw_d.read()
- Roll angle rate:
- Accelerations (readings from the accelerometer):
- x:
uav.frame.x_dd.read() - y:
uav.frame.y_dd.read() - z:
uav.frame.z_dd.read()
- x:
Moreover, the Frame subclass contains some write fields, which are interpreted by th UAV as commands.
- Attitude:
- Roll angle:
uav.frame.roll.write(value)(value in degrees) - Pitch angle:
uav.frame.pitch.write(value)(value in degrees)
- Roll angle:
- Angular Rates:
- Yaw angle rate:
uav.frame.yaw_d.write(value)(value in degrees/second)
- Yaw angle rate:
- Thrust:
uav.frame.thrust.write(value)
The Motors class allow the user to control the
motors speed of the UAV. The number of motors depends on your UAV (four or six) and can be setted defining the macro MOTORS_NUM to four or six (default is four). The speed of the motors is expressed in RPM (round per minute). The i-th motor can be accesed via the following sintax:
uav.motors[i]
This subclass contains only-read informations regarding the readings from the on-board magnetometer. The readings are normalized w.r.t. the Earth magnetic field strength:
* x: uav.magnetometer.x.read()
* y: uav.magnetometer.y.read()
* z: uav.magnetometer.z.read()
Engine controls the Asctec API C, providing an abstraction layer that allow you to forget about the creation of the transmit thread, or to remember the hexadecimal code for each read and write property.
You construct the Engine with a communication bus: the only one that we provide is a SerialBus.
Than you add the properties that you want to read and write, contained in two specific enums, and start the Engine.
After that you can read and write every property that you have requested.
When all the jobs are done, you stop the engine.
#include "aci_comm_engine.hpp"

int main() {
    using namespace acc;
    std::string port = "/dev/tty.USB0";

    // Pointer to the singlenton istance
    // of Engine.
    Engine<SerialBus>* ae;

    try {
        // Init Engine.
        ae = &Engine<SerialBus>::init(port, B57600);

        // Add accelerations read to packet 0
        ae->add_read(0, Var::acc_x, Var::acc_y, Var::acc_z);

        // Add motor writes to packet 1
        ae->add_write(1, Cmd::DIMC_motor_1,
                         Cmd::DIMC_motor_2,
                         Cmd::DIMC_motor_3,
                         Cmd::DIMC_motor_4,
                         Cmd::ctrl_mode,
                         Cmd::ctrl_enabled,
                         Cmd::disable_motor_onoff_by_stick);

        // Start the engine.
        ae->start();

        // Write values for control mode
        ae->write(Cmd::ctrl_mode,                    0,
                  Cmd::ctrl_enabled,                 1,
                  Cmd::disable_motor_onoff_by_stick, 1);

        // Write value to motor_1.
        ae->write(Cmd::DIMC_motor_1, 1000);

        // Read X acceleration.
        auto acc_x = ae->read(Var::acc_x);

    } catch (...) {
        // Stop and clean
        ae->stop();
    }
    return 0;
}
You can find a lot of usage examples in the test.hpp file.
We provide a Makefile that can compile the provided examples, or that build a shared library, or cross-compile on the BeagleBone Black.
You MUST add the original Asctec files in a folder called asctec.
git clone https://github.com/UniTN-Mechatronics/aci-comm
cd aci-comm
// Insert the originals asctec files in the folder asctec
makeSee the LICENSE file for the MIT license text.