📄 Lightning NeRF: Efficient Hybrid Scene Representation for Autonomous Driving
👦 Junyi Cao, Zhichao Li, Naiyan Wang, Chao Ma
Please consider citing our paper if you find it interesting or helpful to your research.
@inproceedings{cao2024lightning,
  title={{Lightning NeRF}: Efficient Hybrid Scene Representation for Autonomous Driving},
  author={Cao, Junyi and Li, Zhichao and Wang, Naiyan and Ma, Chao},
  booktitle={IEEE International Conference on Robotics and Automation (ICRA)},
  year={2024}
}
This repository provides code to integrate the Lightning NeRF into NeRFStudio. Lightning NeRF is an efficient novel view synthesis framework for outdoor scenes that integrates point clouds and images.
We have provided a supplementary video that includes additional novel view synthesis results achieved by the method. Please access the video through these links: Original Version (~170 MB) or Compressed Version (~20 MB).
- PyTorch 1.13.1
- NeRFAcc 0.5.2
- Tiny CUDA Neural Networks
- nr3d_lib 0.3.1 (commit:
e4eba51) 1 - NeRFStudio 0.2.2
- Make sure the dependencies are resolved.
- Clone the repository:
git clone https://github.com/VISION-SJTU/Lightning-NeRF.git
- Install Lightning NeRF:
cd Lightning-NeRF
pip install -e .
- Use our data pack. You may skip the following steps 1 and 2 by downloading the data pack used in our experiments.
- Download link.
- Password:
)!4gkJTo.
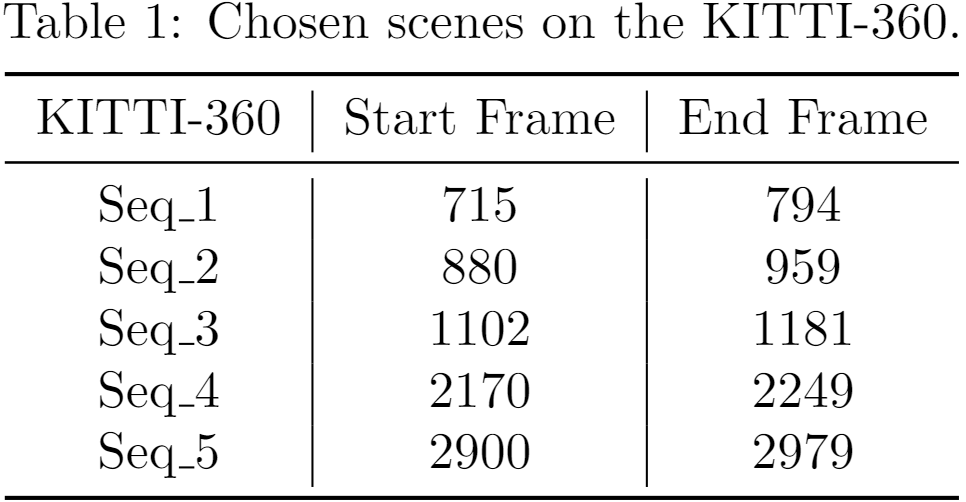
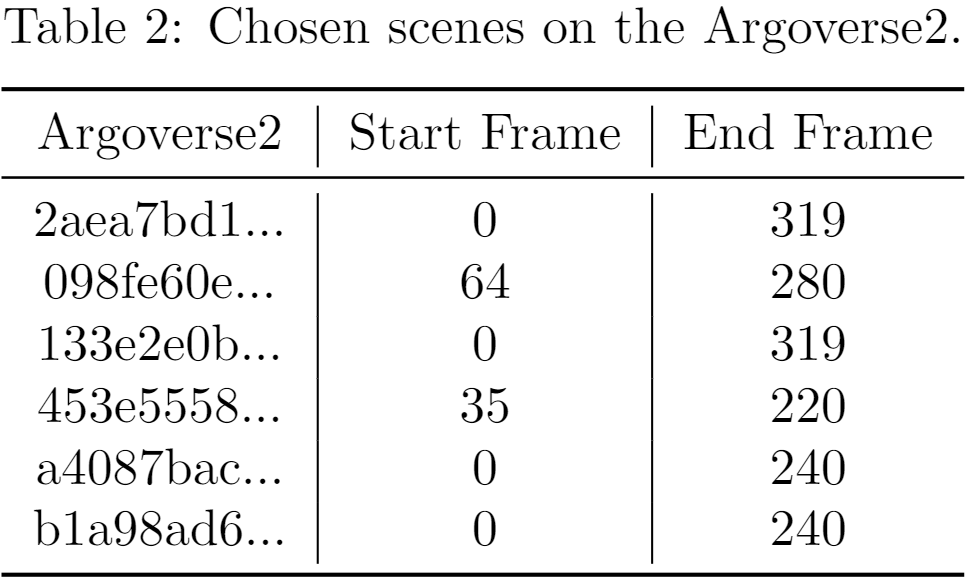
- Download source data. We use KITTI-360 and Argoverse2 (Sensor Dataset) for experiments. Please download the original data from the offical webpages. Here, we list the chosen scenes presented in our paper.
- Preprocess the data. You need to extract camera poses, RGB images, and LiDAR pointcloud from the original data. We've provided the code for preprocessing Argoverse22.
- Implement the dataparser. You need to create the corresponding
dataparserscript for loading the datasets in NeRFStudio. If you would like to use our dataparsers, you may download the scripts via the link below.- Download link.
- Password:
_8Q9+EJc.
To train the model with default parameters, run the following command in the console:
On KITTI-360
ns-train lightning_nerf \
    --mixed-precision True \
    --pipeline.model.point-cloud-path path/to/pcd.ply \
    --pipeline.model.frontal-axis x \
    --pipeline.model.init-density-value 10.0 \
    --pipeline.model.density-grid-base-res 256 \
    --pipeline.model.density-log2-hashmap-size 24 \
    --pipeline.model.bg-density-grid-res 32 \
    --pipeline.model.bg-density-log2-hashmap-size 18 \
    --pipeline.model.near-plane 0.01 \
    --pipeline.model.far-plane 6.0 \
    --pipeline.model.vi-mlp-num-layers 3 \
    --pipeline.model.vi-mlp-hidden-size 64 \
    --pipeline.model.vd-mlp-num-layers 2 \
    --pipeline.model.vd-mlp-hidden-size 32 \
    --pipeline.model.color-grid-base-res 128 \
    --pipeline.model.color-grid-max-res 2048 \
    --pipeline.model.color-grid-fpl 2 \
    --pipeline.model.color-grid-num-levels 8 \
    --pipeline.model.bg-color-grid-base-res 32 \
    --pipeline.model.bg-color-grid-max-res 128 \
    --pipeline.model.bg-color-log2-hashmap-size 16 \
    --pipeline.model.alpha-thre 0.01 \
    --pipeline.model.occ-grid-base-res 256 \
    --pipeline.model.occ-grid-num-levels 2 \
    --pipeline.model.occ-num-samples-per-ray 750 \
    --pipeline.model.occ-grid-update-warmup-step 256 \
    --pipeline.model.pdf-num-samples-per-ray 8 \
    --pipeline.model.pdf-samples-warmup-step 100000 \
    --pipeline.model.pdf-samples-fixed-step 100000 \
    --pipeline.model.pdf-samples-fixed-ratio 0.5 \
    --pipeline.model.appearance-embedding-dim 0 \
    ${dataparser_name} \
    --data <data-folder> \
    --orientation-method none
On Argoverse2
ns-train lightning_nerf \
    --mixed-precision True \
    --pipeline.model.point-cloud-path path/to/pcd.ply \
    --pipeline.model.frontal-axis x \
    --pipeline.model.init-density-value 10.0 \
    --pipeline.model.density-grid-base-res 256 \
    --pipeline.model.density-log2-hashmap-size 24 \
    --pipeline.model.bg-density-grid-res 32 \
    --pipeline.model.bg-density-log2-hashmap-size 18 \
    --pipeline.model.near-plane 0.01 \
    --pipeline.model.far-plane 10.0 \
    --pipeline.model.vi-mlp-num-layers 3 \
    --pipeline.model.vi-mlp-hidden-size 64 \
    --pipeline.model.vd-mlp-num-layers 2 \
    --pipeline.model.vd-mlp-hidden-size 32 \
    --pipeline.model.color-grid-base-res 128 \
    --pipeline.model.color-grid-max-res 2048 \
    --pipeline.model.color-grid-fpl 2 \
    --pipeline.model.color-grid-num-levels 8 \
    --pipeline.model.bg-color-grid-base-res 32 \
    --pipeline.model.bg-color-grid-max-res 128 \
    --pipeline.model.bg-color-log2-hashmap-size 16 \
    --pipeline.model.alpha-thre 0.02 \
    --pipeline.model.occ-grid-base-res 256 \
    --pipeline.model.occ-grid-num-levels 4 \
    --pipeline.model.occ-num-samples-per-ray 750 \
    --pipeline.model.occ-grid-update-warmup-step 2 \
    --pipeline.model.pdf-num-samples-per-ray 8 \
    --pipeline.model.pdf-samples-warmup-step 1000 \
    --pipeline.model.pdf-samples-fixed-step 3000 \
    --pipeline.model.pdf-samples-fixed-ratio 0.5 \
    --pipeline.model.appearance-embedding-dim 0 \
    ${dataparser_name} \
    --data <data-folder> \
    --orientation-method none
You can run ns-train lightning_nerf --help to see detailed information of optional arguments.
Note: Since NeRFStudio attempts to load all training images to cuda device before training starts, it may occupy a large memory. If OOM is occured, you may consider load a subset of training images once a time by including:
    ...
    --pipeline.datamanager.train-num-images-to-sample-from 128 \
    --pipeline.datamanager.train-num-times-to-repeat-images 256 \
    ...
in the training script.
To evaluate a model, run the following command in the console:
ns-eval --load-config=${PATH_TO_CONFIG} --output-path=${PATH_TO_RESULT}.jsonNote: There are differences in the calculation of SSIM across NeRF variants. We by default adopt the NeRFStuidio version (i.e., implementation from torchmetrics) in our experiments. However, in Table 1 of the manuscript, some results are cited from DNMP. For fairness, we adopt the DNMP version (i.e., implementation from skimage) for comparing SSIM in this table. See the discussion here for details.
Note: The center camera from Argoverse2 (Sensor Dataset) captures the hood of the self-driving vehicle, which should be masked for NeRF's training pipeline. In our data pack, we simply create a mask with the same shape for each input image with the bottom 250 rows set to 0 and other places to 1. The masks are used here in NeRFStudio during training. For the evaluation of this dataset, we first crop the ground-truth and predicted images by removing the bottom 250 rows and then calculate the corresponding metrics.
Since Lightning NeRF is integrated into the NeRFStudio project, you may refer to docs.nerf.studio for more functional supports.
Footnotes
-
If you use the version 0.6.0, you may need to modify the code in
Lightning-NeRF/lightning_nerf/sampler.py. See discussion here. ↩ -
When calculating the foreground region (aabb) from Argoverse2's camera information, we clip the height (z-axis) of the view frustums to have a minimum value of -5m in the world coordinate to avoid wasting much space on underground areas. ↩

