Dev logs and resources for setting up my own Torque app log server using AWS EC2 instance
Torque pro is a great app. I used it in conjunction with OBDLink LX which is a very reliable OBD Link BlueTooth interface device.
The motivation for me to do this project was because the Torque web app lacks of existing log management functionalities including
- View, sort, and search for specific logs
- List, and bulk download or access to existing logs
These features are critical to me. I really wish the dev have had an open web API so I can query the uploaded logs in his database and do the rest by myself. After searching for the Torque forum, I found very few duscissions related to the bulk download and web API features, but no feature was ever implemented. The existing web app is decent but lacks of the features I wanted above. For example, I want to download all of the existing logs that I've uploaded in a batch so I can proceed with some data analysis. However, downloading them is such a pain. I have to first load a particular session (3 clicks), and only after loading it I can really click download to get the CSV file (1 clicks). This means if I have 1000 log sessions stored in the database, I have to manually click at least ~4,000 times.
Therefore, this motivates me to start building my own log delivery server so I have the flexibility to manage the logs.
I'm using the Torque webser project by econpy as a starting point. And to save cost and be versatile, the server will be hosted using AWS EC2 instance.
The server will be running on a AWS EC2 instance with Amazon Linux kernel. The first step is to configure the EC2 instance.
- Get to AWS EC2 and create a new EC2 instance.
- In Step 1, choose
Amazon Linux AMI 2017.09.0 (HVM), SSD Volume Type(version might be different as Amazon updates it). This is a Linux kernel that includes most of the necessary packages including PHP and MySQL. - In Step 2, I'm using
t2.microinstance type in order to be qualified for the Free Tier to save money. - Feel free to keep the rest settings default and launch the instance. I did some additional tweaking in the IAM role (created a dedicated role to only allow access to related AWS services) and storage size (16GiB instead of the default 8GiB, still under Free Tier)
Now you can review and launch the instance.
After launching the instance, I need to connect to it using SSH. There are two options if you are using Windows 10 OS like me.
- Windows PowerShell SSH tool. You can use Pole-SSH
- PuTTY.
I choose to use PuTTY as it's quite straightforward. Follow AWS's tutorial to setup PuTTY, and try to connect after you finished.
From now on, let's call new EC2 instance the log server.
After connecting the server through SSH or PuTTY, let's prepare the environment for a dedicated PHP server. Many of the steps are referenced from Alex Korn's blog post on Getting PHP and MySQL running on Amazon EC2
- Update the basic environment
sudo yum update
sudo yum upgrade -y- Install PHP modules
sudo yum install php-mysql php php-xml php-mcrypt php-mbstring php-cli mysql httpd -y- Install MySQL server
sudo yum install mysql-server -y- Install Git and clone the repository
sudo yum install git -y
git clone https://github.com/chenchen2015/Torque-LogServer-EC2 ./torque
cd torqueEverything is ready now. Let's start our MySQL server and configure it according to econpy's guide on configuring MySQL server
- Start running the MySQL server
sudo /etc/init.d/mysqld start- Set root password. Alex Korn recommended a very good password generator here
mysqladmin -u root password 'RandomPassword'- Now login to MySQL as the root user by running the command below and type in the same password you just set.
mysql -u root -p- Follow econpy's guide on configuring MySQL server. Replace
usernameandpasswordwith your desired username and password. Note that I have modified the third row due to an error.
CREATE DATABASE torque;
CREATE USER 'username'@'localhost' IDENTIFIED BY 'password';
GRANT USAGE, FILE ON *.* TO 'username'@'localhost';
GRANT ALL PRIVILEGES ON torque.* TO 'username'@'localhost';
FLUSH PRIVILEGES;- Create a table in the database to store logged data using the
create_torque_log_table.sqlsql script that we just cloned.
SOURCE ./scripts/create_torque_log_table.sqlCongrats! Now the MySQL server is set. Let's move on to configure our PHP server.
- Create directory for PHP apps and grant access
sudo mkdir -p /opt/app/current
sudo chown ec2-user /opt/app/current-
Modify web server configuration files to update source directory. First install a text editor as needed. I'm using
emacs. Find and modifyhttpd.confusing commandsudo emacs /etc/httpd/conf/httpd.confthen navigate to the bottom of the file and uncomment the section between<VirtualHost *:80>and</VirtualHost>. Then update theDocumentRootdirectory to/opt/app/current. Save and close the file. -
Copy source files and overwrite permission
cd /home/ec2-user/torque/web
sudo mv * /opt/app/current
sudo chown -R ec2-user:apache /opt/app/current
sudo chmod 2775 /opt/app/current
find /opt/app/current -type d -exec sudo chmod 2775 {} \;
find /opt/app/current -type f -exec sudo chmod 0664 {} \;- Configure source files. First rename
creds-sample.phptocreds.phpand then fill in the information section between$db_hostand$db_table
sudo mv creds-sample.php creds.php...
// MySQL Credentials
$db_host = "localhost";
$db_user = "username";
$db_pass = "password";
$db_name = "torque";
$db_table = "raw_logs";
...- Start
httpd
sudo /etc/init.d/httpd restart- First create a PHP page that displays current information
echo "<?php phpinfo(); ?>" > /opt/app/current/phpinfo.php- Launch the webpage use your public DNS URL
http://[EC2 Public DNS Address].amazonaws.com/phpinfo.php. If you see a PHP information page output then congrats! It's all setup and ready.
Now that the log server is up and running, I need a better way of visualizing and managing data in the MySQL database than CLI. phpMyAdmin sounds like a decent solution. Let's go set it up.
- Install phpMyAdmin
sudo yum-config-manager --enable epel
sudo yum install -y phpMyAdmin- Edit phpMyAdmin configuration file to allow public ip access
sudo emacs /etc/httpd/conf.d/phpMyAdmin.conf# /etc/httpd/conf.d/phpMyAdmin.conf
<Directory /usr/share/phpMyAdmin/>
<IfModule !mod_authz_core.c>
# Apache 2.2
Order Deny,Allow
Allow from All
Allow from 127.0.0.1
Allow from ::1
</IfModule>
</Directory>
- Update
httpd.confto enable phpMyAdmin
sudo emacs /etc/httpd/conf/httpd.conf<VirtualHost *:8080>
DocumentRoot /usr/share/phpMyAdmin/
</VirtualHost>
- Restart
httpd
sudo service httpd restartAll set, now you should be able to login to phpMyAdmin using URL http://[EC2 Public DNS Address].amazonaws.com/phpmyadmin. Use the SQL user name and password you just created or use the root user to login.
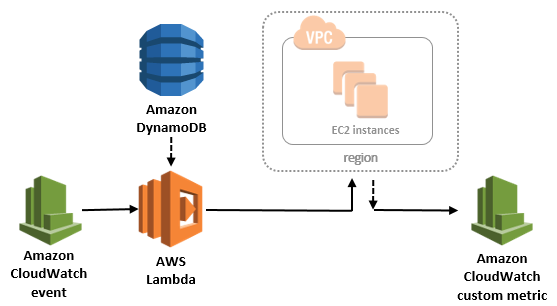
In my usage case, I mainly logs my driving during daily commute, which means the log server is needed regularly during 8-9:30 am and 4-6 pm from Monday to Friday. Therefore, running the EC2 instance 24/7 definitely sounds unnecessary and will induce additional cost.
Here, I will be implementing an automated deployment architecture to control the log server EC2 instance so it will only be running during active hours that I specified.
References:
To start, follow the instructions in the AWS Documentation - EC2 Scheduler on AWS.
- First launch the CloudFormation template and customize the parameters. Most important things are
- Schedule - scheduled expression for the CloudWatch Event rule that invokes the EC2 Scheduler Lambda function. Use a short schedule is not necessary and will invoke the Lambda function more frequently, increasing the cost.
- CustomTagName - identifier for tagging the target EC2 instance. For example,
scheduler:torqueserver
- When the stack deployment has completed, go find the EC2 log server instance and add the following tags based on your need. Use my case as an example, my daily commute during workdays only happens in the early morning and late afternoon. And I will be on a flexible schedule during the weekend. Based on this, my custom tag set is ():
- Tag Key
scheduler:ec2-logserver:weekdayamTag Value0800;1100;cdt;weekdays - Tag Key
scheduler:ec2-logserver:weekdaypmTag Value1600;1930;cdt;weekdays - Tag Key
scheduler:ec2-logserver:weekendTag Value0800;2200;cdt;sat,sun
- Tag Key
Therefore, with the new automatic scheduler architecture, my weekly active EC2 hours is 60.5 hours, which tranlates to ~64% of cost reduction given the total 168 hours in a week.
Now that the scheduler is properly setup, EC2 will be shut off during inactive hours and rebooted during active hours. The reboot process will cause two major issues. The first issue is restarting service. During reboot, some of the essential services like httpd and mysqld will not get automatically retarted by default. You will find the server seems to be down since the API is not running, but the EC2 instance is indeed working, it's just the PHP server or MySQL server isn't. To solve this, simply add httpd and mysqld to the auto-restart service list using the following command:
sudo chkconfig mysqld on
sudo chkconfig httpd on
After running the commands, you can check if they are on the auto-restart list:
sudo chkconfig --list mysqld
sudo chkconfig --list httpd
Note that they should be on under runlevel 3.
Another issue is the reboot process will also cause AWS to resign a new public IP address. This is catastrophic given we now don't have a reliable IP address and both us and the Torque app will not be able to connect to the server periodically, unless we manually update the server's new IP address on the Torque app, which is definitely a bad choice.
Good news is, AWS allows EC2 instances to bind to an Elastic IP Address. Once you allocate the log server instance a dedicated elastic IP address, the new IP address will be reliable regardless what the actual allocated internal/external IP address is. Problem solved!
By default, the deployed solution only supports UTC timezone as the input. Therefore, in order to get the right time, I need to manually convert the timezone from local (e.g. Chicago time) to UTC timezone format. Instead of manually convert the tag value entries, we can simply override the Lambda code to do the job. The following script is part of the TorqueLogServer-EC2Scheduler-ec2SchedulerOptIn-[ID] Lambda function. Note that your [ID] will be different. I'm in the central timezone, hence it will be UTC-6 which means it is 6 hours behind of UTC timezone.
#... Line 90

# Override default timezone from UTC to CDT
awsregion = region['RegionName']
now = datetime.datetime.now() - datetime.timedelta(hours=6)
now = now.strftime("%H%M")
nowMax = datetime.datetime.now() - datetime.timedelta(hours=6,minutes=59)
nowMax = nowMax.strftime("%H%M")
nowDay = datetime.datetime.today() - datetime.timedelta(hours=6)
nowDay = nowDay.strftime("%a").lower()
The downside of this approach is that it does not take account for the daytime saving shifts. Depends on the daytime saving shift, the timezone differece could be either UTC-5 or UTC-6. Therefore, it's better to use the python timezone library pytz to handle the timezone conversion. But this is good for now.