Landrush: DNS for Vagrant 
Landrush is a simple cross-platform DNS for Vagrant VMs that is visible on both, the guest and the host.
It spins up a small DNS server and redirects DNS traffic from your VMs to use it, automatically registering/unregistering IP addresses of guests as they come up and go down.
Note: Windows support is currently considered experimental. If you having problems using Landrush on Windows please let us know.
Installation
Install under Vagrant (1.1 or later):
$ vagrant plugin install landrush
Usage
Getting started
-
Enable the plugin in your
Vagrantfile:config.landrush.enabled = true -
Bring up a machine.
$ vagrant up -
You are able to get your VM's hostname resolved on your host:
$ dig -p 10053 @localhost myhost.vagrant.test
-
If you shut down your guest, the entries associated with it will be removed.
Landrush retrieves your VM's hostname from either the vagrant config (see the
examples/Vagrantfile)
or it uses the system's actual hostname by running the hostname command.
A default of "guest-vm" is assumed if hostname is otherwise not available.
Dynamic entries
Every time a VM is started, its IP address is automatically detected and a DNS record is created that maps the hostname to its IP. The detection works by listing all configured interfaces of the guest using landrush-ip, picking the last valid IP found, while ignoring any excluded interfaces.
Excluded interfaces are an array of regular expressions; the value shown here is the default used
when no explicit value for config.landrush.host_interface_excludes is specified in your
Vagrantfile:
config.landrush.host_interface_excludes = [/lo[0-9]*/, /docker[0-9]+/, /tun[0-9]+/]
If Landrush fails to detect the correct IP address (or none at all), you can extend this exclusion range to exclude more interfaces.
If you need or want to select an interface explicitly and you know its name, you can also tell Landrush to grab that interface's IP address explicitly:
config.landrush.host_interface = 'eth0'
Do note that, if you specify an interface explicitly, it will have priority over
config.landrush.host_interface_excludes. In other words, if config.landrush.host_interface_excludes
is set to [/eth[0-9]*/], but config.landrush.host_interface is set to eth0 and eth0 exists
as an interface, the IP address of eth0 is returned. The interface setting takes precedence over
the exclude setting. If the interface does not exist, the regular heuristics will apply and Landrush
will pick the last non-excluded IP found.
If all else fails, you can override it entirely:
config.landrush.host_ip_address = '1.2.3.4'
This setting will override both the exclude and interface settings completely.
If you are using a multi-machine Vagrantfile, configure this inside each of your config.vm.define
sections.
Static entries
You can add static host entries to the DNS server in your Vagrantfile like so:
config.landrush.host 'myhost.example.com', '1.2.3.4'
This is great for overriding production services for nodes you might be testing locally. For example, perhaps you might want to override the hostname of your puppetmaster to point to a local vagrant box instead.
Wildcard Subdomains
For your convenience, any subdomain of a DNS entry known to landrush will resolve to the same IP
address as the entry. For example: given myhost.vagrant.test -> 1.2.3.4, both
foo.myhost.vagrant.test and bar.myhost.vagrant.test will also resolve to 1.2.3.4.
If you would like to configure your guests to be accessible from the host as subdomains of something
other than the default vagrant.test, you can use the config.landrush.tld option in your
Vagrantfile like so:
config.landrush.tld = 'vm'
Note that from the host, you will only be able to access subdomains of your configured TLD by default- so wildcard subdomains only apply to that space. For the guest, wildcard subdomains work for anything.
Unmatched Queries
Any DNS queries that do not match will be passed through to an upstream DNS server, so this will be able to serve as the one-stop shop for your guests' DNS needs.
If you would like to configure your own upstream servers, add upstream entries to your
Vagrantfile like so:
config.landrush.upstream '10.1.1.10'
# Set the port to 1001
config.landrush.upstream '10.1.2.10', 1001
# If your upstream is TCP only for some strange reason
config.landrush.upstream '10.1.3.10', 1001, :tcp
Visibility on the Guest
Linux guests should automatically have their DNS traffic redirected via iptables rules to the Landrush DNS server. File an issue if this does not work for you.
To disable this functionality:
config.landrush.guest_redirect_dns = false
You may want to do this if you are already proxying all your DNS requests through your host (e.g. using VirtualBox's natdnshostresolver1 option) and you have DNS servers that you can easily set as upstreams in the daemon (e.g. DNS requests that go through the host's VPN connection).
Visibility on the Host
Visibility on the host means that the hostname of the VMs can be resolved on the host's DNS system. Depending on the OS this might require some manual configuration.
OS X
If you're on an OS X host, we use a nice trick to unobtrusively add a secondary DNS server only for
specific domains. Landrush adds automatically during startup a file into /etc/resolver
that points lookups for hostnames ending in your config.landrush.tld domain to its DNS server.
(Check out man 5 resolver on your Mac OS X host for more information on this file's syntax.)
Linux
Though it's not automatically set up by Landrush, similar behavior can be achieved on Linux hosts
with dnsmasq. You can integrate Landrush with dnsmasq on Ubuntu like so (tested on Ubuntu 13.10):
sudo apt-get install -y resolvconf dnsmasq
sudo sh -c 'echo "server=/vagrant.test/127.0.0.1#10053" > /etc/dnsmasq.d/vagrant-landrush'
sudo service dnsmasq restart
If you use a TLD other than the default vagrant.test, replace the TLD in the above instructions
accordingly. Please be aware that anything ending in '.local' as TLD will not work because the
avahi daemon reserves this TLD for its own uses.
Windows
On Windows a secondary DNS server can be configured via the properties of the network adapter used by the VM. Landrush will attempt to configure the adapter automatically during startup. If this fails, please follow the manual setup instructions below.
It is recommended to use an elevated command prompt (command prompt with full administrator permissions), since admin privileges are needed to make the required changes. Landrush will try to elevate your prompt automatically, but this requires to spawn additional processes which in turn loose some potentially important log messages.
In the following section manual network configuration is described using Windows 10 and VirtualBox.
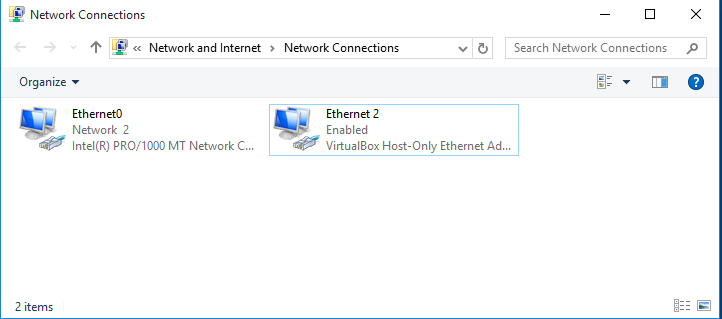
When running VirtualBox on Windows in combination with Landrush the Network
Connections (Control Panel\Network and Internet\Network Connections) looks
somewhat like this after a successful vagrant up:
There will be at least one VirtualBox network adapter. There might be multiple depending on your configuration (number of networks configured) and how many VMs you have running, but you just need to modify one.
In a first step you need to identify the VirtualBox network adapter used for the
private network of your VM. Landrush requires a private network adapter to work
and will create one in case you are not explicitly configuring one in your
Vagrantfile.
To quickly view the settings of each network adapter you can run the following command in a shell:
netsh interface ip show config
The output should look something like that:
Configuration for interface "Ethernet0"
    DHCP enabled:                         Yes
    IP Address:                           172.16.74.143
    Subnet Prefix:                        172.16.74.0/24 (mask 255.255.255.0)
    Default Gateway:                      172.16.74.2
    Gateway Metric:                       0
    InterfaceMetric:                      10
    DNS servers configured through DHCP:  172.16.74.2
    Register with which suffix:           Primary only
    WINS servers configured through DHCP: 172.16.74.2

Configuration for interface "VirtualBox Host-Only Network"
    DHCP enabled:                         No
    IP Address:                           10.1.2.1
    Subnet Prefix:                        10.1.2.0/24 (mask 255.255.255.0)
    InterfaceMetric:                      10
    Statically Configured DNS Servers:    None
    Register with which suffix:           Primary only
    Statically Configured WINS Servers:   None
In our case we are interested in the VirtualBox Host-Only Network which
has in this example the private network IP 10.1.2.1. If you don't have a static
private network IP configured and you cannot determine the right adapter via
the netsh output, ssh into the VM (vagrant ssh) and run ifconfig to view
the network configuration of the VM.
Once you identified the right network adapter run the following as Administrator (using the network adapter name of the adapter with the determined private network IP):
netsh interface ipv4 add dnsserver "VirtualBox Host-Only Network" address=127.0.0.1 index=1
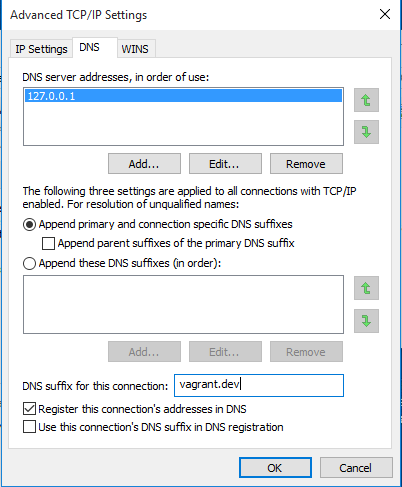
This should be enough for Windows 10. On other Windows versions, you might have to also add your TLD to the DNS suffix list on the DNS Advanced TCP/IP Settings tab:
Other Devices (phone)
You might want to resolve Landrush's DNS-entries on additional computing devices, like a mobile phone.
Please refer to /doc/proxy-mobile for instructions.
Additional CLI commands
Check out vagrant landrush for additional commands to monitor the DNS server daemon.
Development
The following should get you started to develop on the Landrush code base. As a prerequisite you will need a Ruby 2.0 environment. We recommend to use RVM to create an isolated development environment. On Windows the RubyInstaller for Windows is probably the easiest way to get started. In this case you will need the DevKit as well.
Once you have a working Ruby environment it is time to fork the repository (refer to the CONTRIBUTING.md guide for more info].
The following are the most important commands you will need for development:
-
Install Bundler:
$ gem install bundler -
Install dependencies:
$ bundle install -
Get a list of all available build tasks:
$ bundle exec rake -T -
Run the test suite:
$ bundle exec rake test -
Run a single test file:
$ bundle exec rake test TEST=<path to test file> -
Run cucumber/aruba acceptance tests:
$ bundle exec cucumberNote, that the acceptance tests currently only work out of the box on OS X. On Linux one has to manually configure the host visibility for the TLD landrush-acceptance-test. See for Linux. On Windows the acceptance tests won't work due to a current bug in Aruba.
-
Build the Landrush gem:
$ bundle exec rake install -
Clean all generated files:
$ bundle exec rake clean clobber -
Run the vagrant binary with the Landrush plugin loaded from your local source code:
bundle exec vagrant landrush <command>
Help Out!
This project could use your feedback and help! Please don't hesitate to open issues or submit pull requests. NO HESITATION IS ALLOWED. NONE WHATSOEVER. See CONTRIBUTING.md for more details.
The Maintainers try to meet periodically. Notes are available.


