This repository contains the source codes for the paper Choy et al., 3D-R2N2: A Unified Approach for Single and Multi-view 3D Object Reconstruction, ECCV 2016. Given one or multiple views of an object, the network generates voxelized ( a voxel is the 3D equivalent of a pixel) reconstruction of the object in 3D.
If you find this work useful in your research, please consider citing:
@inproceedings{choy20163d,
  title={3D-R2N2: A Unified Approach for Single and Multi-view 3D Object Reconstruction},
  author={Choy, Christopher B and Xu, Danfei and Gwak, JunYoung and Chen, Kevin and Savarese, Silvio},
  booktitle = {Proceedings of the European Conference on Computer Vision ({ECCV})},
  year={2016}
}
The project page is available at http://cvgl.stanford.edu/3d-r2n2/.
 Left: images found on Ebay, Amazon, Right: overview of
 3D-R2N2
Traditionally, single view reconstruction and multi-view reconstruction are disjoint problems that have been dealt using different approaches. In this work, we first propose a unified framework for both single and multi-view reconstruction using a 3D Recurrent Reconstruction Neural Network (3D-R2N2).
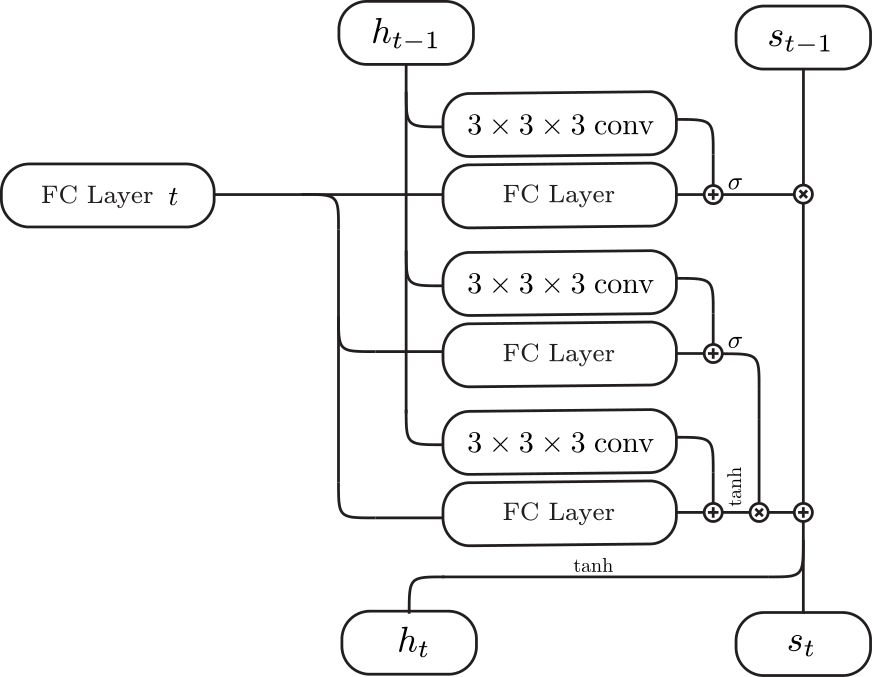
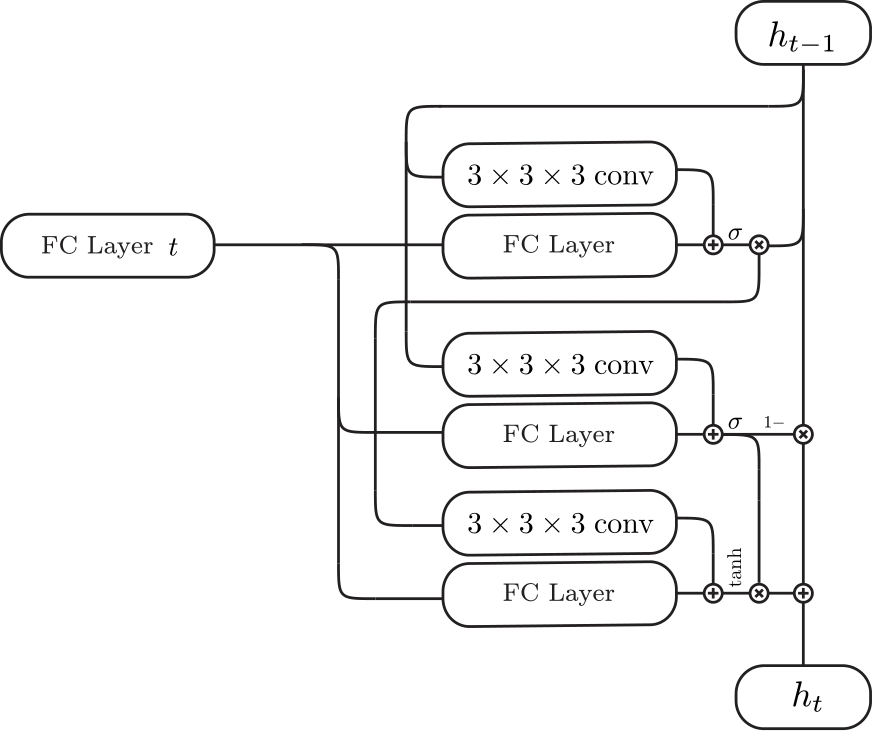
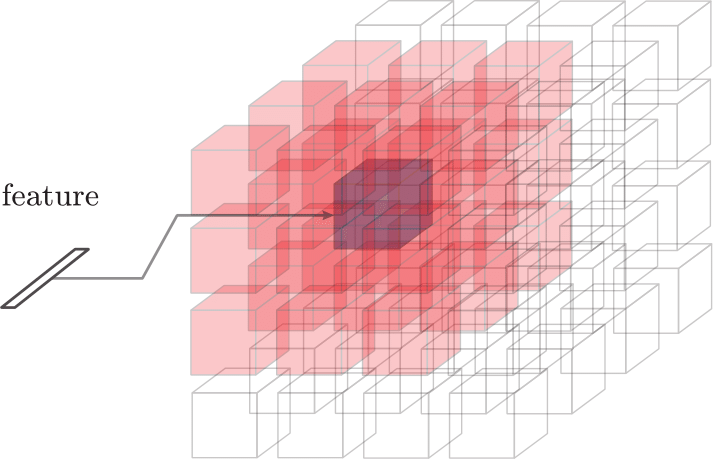
| 3D-Convolutional LSTM | 3D-Convolutional GRU | Inputs (red cells + feature) for each cell (purple) |
|---|---|---|
 |
 |
 |
We can feed in images in random order since the network is trained to be invariant to the order. The critical component that enables the network to be invariant to the order is the 3D-Convolutional LSTM which we first proposed in this work. The 3D-Convolutional LSTM selectively updates parts that are visible and keeps the parts that are self-occluded.
 We used two different types of networks for the experiments: a shallow network (top) and a deep residual network (bottom).
Please visit the result visualization page to view 3D reconstruction results interactively.
We used ShapeNet models to generate rendered images and voxelized models which are available below (you can follow the installation instruction below to extract it to the default directory).
- ShapeNet rendered images ftp://cs.stanford.edu/cs/cvgl/ShapeNetRendering.tgz
- ShapeNet voxelized models ftp://cs.stanford.edu/cs/cvgl/ShapeNetVox32.tgz
- Trained ResidualGRUNet Weights ftp://cs.stanford.edu/cs/cvgl/ResidualGRUNet.npy
The package requires python3. You can follow the direction below to install virtual environment within the repository or install anaconda for python 3.
- Download the repository
git clone https://github.com/chrischoy/3D-R2N2.git
- Setup virtual environment and install requirements and copy the theanorc file to the
$HOMEdirectory
cd 3D-R2N2
pip install virtualenv
virtualenv -p python3 --system-site-packages py3
source py3/bin/activate
pip install -r requirements.txt
cp .theanorc ~/.theanorc
- Install meshlab (skip if you have another mesh viewer). If you skip this step, demo code will not visualize the final prediction.
sudo apt-get install meshlab
- Run the demo code and save the final 3D reconstruction to a mesh file named
prediction.obj
python demo.py prediction.obj
The demo code takes 3 images of the same chair and generates the following reconstruction.
| Image 1 | Image 2 | Image 3 | Reconstruction |
|---|---|---|---|
 |
 |
 |
 |
- Deactivate your environment when you are done
deactivate
- Activate the virtual environment before you run the experiments.
source py3/bin/activate
- Download datasets and place them in a folder named
ShapeNet
mkdir ShapeNet/
wget ftp://cs.stanford.edu/cs/cvgl/ShapeNetRendering.tgz
wget ftp://cs.stanford.edu/cs/cvgl/ShapeNetVox32.tgz
tar -xzf ShapeNetRendering.tgz -C ShapeNet/
tar -xzf ShapeNetVox32.tgz -C ShapeNet/
- Train and test the network using the training shell script
./experiments/script/res_gru_net.sh
Note: The initial compilation might take awhile if you run the theano for the first time due to various compilations. The problem will not persist for the subsequent runs.
To use cuDNN library, you have to download cuDNN from the nvidia website. Then, extract the files to any directory and append the directory to the environment variables like the following. Please replace the /path/to/cuDNN/ to the directory that you extracted cuDNN.
export LD_LIBRARY_PATH=/path/to/cuDNN/lib64:$LD_LIBRARY_PATH
export CPATH=/path/to/cuDNN/include:$CPATH
export LIBRARY_PATH=/path/to/cuDNN/lib64:$LD_LIBRARY_PATH
For more details, please refer to http://deeplearning.net/software/theano/library/sandbox/cuda/dnn.html
MIT License