Rev. 2.1
The USB Keyboard Shield for VT100 connects a standard USB keyboard to Digital's VT100 terminal.
Features:
- All keys on the VT100 keyboard are mapped to the USB keyboard keys.
- VT100 keyboard LEDs and bell are implemented on the shield.
The Gerber file, BOM, schematic and Arduino sketch for the shield are included in the project folder. The steps to assemble, program and connect the shield are described in this document.
This shield requires the USB Host Shield by Circuits@Home.
Please use the information in this project at your own risk. No warranty or guarantee is provided.
- USB Keyboard Shield for VT100 (the shield from this project)
- USB Host Shield by Circuits@Home, the "full-sized board"
- Arduino Uno
- Keyboard cable for VT100 (see "Keyboard Cable" below)
- USB Keyboard
- Assemble the shield
- Make a keyboard cable
- Program the Arduino
- Connect the shields and cables
The details of each step are described in the next few sections.
The USB Keyboard Shield for VT100 can be assembled using the following info:
- PCB Gerber File: usbkbd_vt100_2_1_gerber.zip
- Schematic: usbkbd_vt100_sch.pdf
- BOM: usbkbd_vt100_BOM_2_1.pdf
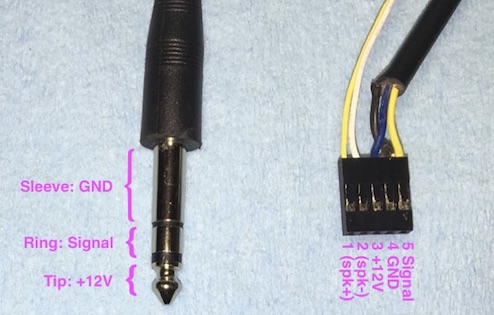
To make the keyboard cable, connect these components:
- 1/4 inch stereo plug/cable
- 5-pin header connector
PIN CONNECTION
| Pin | Plug | Value |
|---|---|---|
| 1* | - | (spk+)* |
| 2* | - | (spk-)* |
| 3 | Tip | +12V |
| 4 | Sleeve | GND |
| 5 | Ring | Signal |
* optional
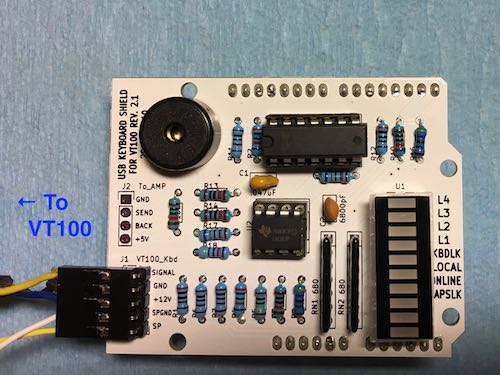
The pin connector is attached to J1 header on the USB Keyboard shield for VT100. The stereo plug is connected to the keyboard port on VT100 terminal.
It is recommended to program the Arduino Uno before attaching the shields.
-
Install USB Host Shield Library 2.0 and Timer1 Library into Arduino IDE.
-
Clone or download this project.
-
Open the sketch
usbkeyboardvt100/usbkeyboardvt100.inoin Arduino IDE, and program the Arduino Uno.
There are two options in usbkeyboardvt100.ino:
// SWAPCAPS: If defined, LeftCtrl and CapsLock are swapped on USB Keyboard.
#define SWAPCAPS

// SWAPLFBAR: If defined, swap LineFeed and '|\' key codes for VT100.
//#define SWAPLFBAR
Comment out/uncomment the #define lines as needed.
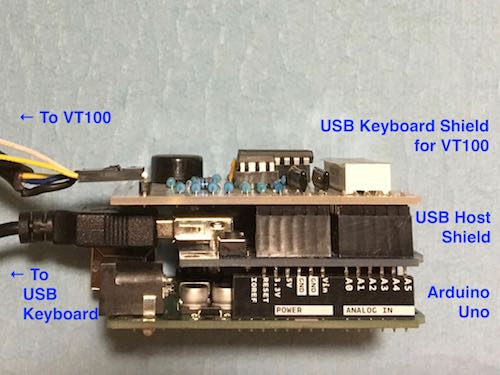
- Connect the USB keyboard to the USB connector on the USB Host Shield.
- Connect the keyboard cable for VT100 to J1 header on the USB Keyboard Shield for VT100.
- Connect the keyboard cable to the keyboard port on VT100 terminal.
- Stack and connect the Arduino Uno, the USB Host Shield, and the USB Keyboard Shield for VT100, in this order, from the bottom to the top.
- No external power supply is needed. The power is supplied by the VT100 terminal via the keyboard cable.
Some hard-to-guess keys:
| VT100 Key | USB Keyboard Key |
|---|---|
| SET UP | F1, SysRq |
| CTRL | Caps Lock |
| CAPS LOCK | Left Ctrl |
| BREAK | Break |
| LINE FEED | End |
| NO SCROLL | Scroll Lock |
| PF1 | Num Lock, F9 |
| PF2 | (pad) /, F10 |
| PF3 | (pad) *, F11 |
| PF4 | Page Up, F12 |
| (pad) , | (pad) + |
The key mapping is defined in usb_key_tbl[] in usbkeyboardvt100.h. Also see "Configuration Options" above.
The following configuration was used during development of the shield:
- USB Host Shield 2.0
- Arduino Uno R3
- VT100-WA
- USB Keyboards: HP K1500 and Logitech K310
- When the VT100 terminal is turned off, a short beep may be generated on the shield.
- Keyboard connected via a USB hub is not supported.
The code is released under the GNU General Public License.


