Our implementation of the 4th AI Edge Contest on SIGNATE.
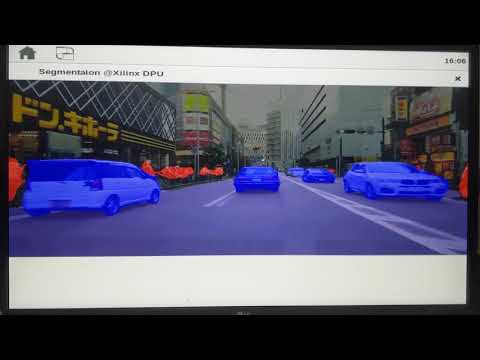
The semantic segmentation applications are executed on the Ultra96-V2 using DPU generated by Vitis-AI. The model is trained on a Japanese traffic image dataset, and the classification classes are road surface, traffic lights, pedestrians, cars, and others. The training code also supports training on the BDD100K dataset.
- DNN model and inference code is based on Xilinx ML-Caffe-Segmentation-Tutorial.
- Training code is based on fregu856/deeplabv3.
- Lovasz-Loss is adopted at training phase instead of Cross-Entropy Loss
- The applications run multi-threaded to execute efficiently
The mIoU score using the contest evaluation data is 0.6014857.
See the report (Japanese) for more details.
- Ubuntu18.04
- Vitis-AI v1.1
./app- applications of semantic segmentation running on the Ultra96-V2
./data- BDD100K/SIGNATE dataset will be stored
./dpu_info- DPU configuration data for the Vitis-AI quantizer and compiler
./files/Segment/workspace- model definition files for the Xilinx Caffe
./files/Segment/VAI- model quantize and compile scripts for the Vitis-AI quantizer and compiler.
./report- implementation report for the contest (written in Japanese)
./submission_material- submission materials for the contest
./training- training scripts on PyTorch
./utils- weight convert scripts between PyTorch and Caffe and signate dataset utils
Two types of applications are implemented in app directory.
app/fpn_eval: evaluate the implementation of semantic segmentation for the contestapp/fpn_video: perform the semantic segmentation of video in real-time
First, format an SD image and divide it into two partitions:
- FAT (first partition, 512MB, label:
BOOT) - extf4 (second partition, all the rest, label:
rootfs)
/dev/sda1           2048  1050623  1048576   512M  b W95 FAT32
/dev/sda2        1050624 23490559 22439936  10.7G 83 Linux
Second, copy the data to the SD card.
# Download petalinux rootfs.tar.gz from https://drive.google.com/file/d/1CZCmH-_F6JzCOsH1YQWjfvzYKzBldcuu/view?usp=sharing
$ sudo tar xvf rootfs.tar.gz -C /media/<username>/rootfs/
# Clone this repository
$ git clone https://github.com/Vertical-Beach/ai-edge-contest4 && cd ai-edge-contest4
# Copy boot image to SD card
$ cp prebuilt/boot/* /media/<username>/rootfs/
# Copy dpu image to SD card
$ cp prebuilt/dpu.xclbin /media/<username>/rootfs/usr/lib/
# Download Vitis-AI DNNDK
$ wget -O vitis-ai_v1.1_dnndk.tar.gz https://www.xilinx.com/bin/public/openDownload?filename=vitis-ai_v1.1_dnndk.tar.gz
$ tar -xvzf vitis-ai_v1.1_dnndk.tar.gz
# Copy Vitis-AI DNNDK to SD card
$ sudo cp -r vitis-ai_v1.1_dnndk /media/<username>/home/root/
Finaly, compile application and run on the Ultra96-V2. The applications are able to cross-compile on a host machine. The cross-compile environment is set up by following commands:
# Download sdk.sh, and execute it
$ wget -O sdk.sh https://www.xilinx.com/bin/public/openDownload?filename=sdk.sh
$ chmod +x sdk.sh
$ ./sdk.sh -d ~/work/petalinux_sdk_vai_1_1_dnndk
# Set the envirionment path (needs to be done every time)
$ unset LD_LIBRARY_PATH
$ source ~/work/petalinux_sdk_vai_1_1_dnndk/environment-setup-aarch64-xilinx-linux
# Install vitis-ai_v1.1_dnndk
$ ./vitis-ai_v1.1_dnndk/install.sh $SDKTARGETSYSROOT
Note that the trained model should be coped to model directory before compile.
The DPU application will be compiled using BDD100K or SIGNATE trained model.
$ cp ./prebuilt/trained_model/<signate or bdd100k>_segmentation.elf ./app/fpn_<video or eval>/model/dpu_segmentation_0.elf
$ cd app/fpn_<video or eval>
$ make
$ sudo cp -r ../app/fpn_<video or eval> /media/<username>/home/root/
After that, connect an USB Mouse, an USB Keyboard, and a DP-HDMI adapter to the Ultra96-V2, and turn on power it. Then launch a terminal on the Ultra96-V2 board, and install Vitis-AI DNNDK by following commands:
$ cd vitis-ai_v1.1_dnndk
$ source ./install.sh
Each application is run as follows:
$ cd ../fpn_eval
$ ./segmentation
$ cd ../fpn_video
$ sh change_resolution.sh
$ ./segmentation <any video>.mp4This application stores app/fpn_eval, which performs semantic segmentation of test images for the competition.
The input test image is pre-processed (resize and normalization) by the CPU, infered by the DPU (FPGA), and post-processed (labeling and resize) by the CPU.
The application is implemented in multi-threading to perform efficiently these processes.

Three threads are created: a pre-processing thread, an inference processing thread, and a post-processing thread, and those are executed in parallel. To achieve multi-threading efficiently, a thread-safe FIFO class is implemented to pass the image data between threads.
This application stores app/fpn_video, which performs semantic segmentation of video in real-time.
The implementation is based on cf_fpn_cityscapes_256_512_8.9G on Xilinx's AI-Model-Zoo.
The input flame size of DPU is modified to 256*512 to 320*640.
The application achieved about 15.5fps, which is slower than the original implementation that achieved 27 FPS.
Demo Video (Youtube Link):
We modified the mean and scale parameter of FPN model of Xilinx tutorial.
The mean and scale was modified as follows:
<     mean_value: 73
<     mean_value: 82
<     mean_value: 72
<     scale: 0.022
---
>     mean_value: 104
>     mean_value: 117
>     mean_value: 123
>     scale: 1.0
These values are equal to the model definition of the segmentation sample contained in Vitis-AI Model Zoo. This modification improves the inference accuracy on DPU for the following reason.
On the inference application using deployed DNN model on DPU, the image pixel value is normalized and inputted to the first layer based on the formula.
(pixval - mean) * scale * scaledFix
The scaledFix is automatically calculated by the Vitis-AI Quantizer and compiled DPU model contains this value.
You can get the scaledFix by dpuGetInputTensorScale() on DNNDK API.
The scaledFix is a value to prevent the value calculated by the above formula from overflowing into the char range
(i.e. the values are normalized to the range -128 to 127 with an average of zero).
For example, the scaledFix value is calculated as 16 when the scale is set as 0.022.
In this case, image information is reduced from 256 to 90 gradations (256*0.022*16=90.1).
If the scale is set as 1.0, the scaledFix is calculated as 0.5.
In this case, the inference accuracy is expected to improve because the pixel value is represented as 128 gradations.
For the values of mean that we have set,
if scale is set as 0.861, the scaledFix will be 1.0, and the pixel value will be represented as 256 gradations,
however, we did not experiment.
And we also modified the number of classes of the final output layer.
<     num_output: 19
---
> num_output: 5On the referenced tutorial, the model training is performed on the Xilinx Caffe framework and SoftmaxWithCrossEntropy loss function is used.
To improve the model accuracy, we used Lovasz-Loss function.
The published Lovasz-Loss implementation is only for TensorFlow and PyTorch, and TensorFlow implementation is very slow (see issue).
so we perform training on PyTorch and export trained weight to Caffe.
We did not use a model converter like ONNX because the converted model cannot be quantized on Vitis-AI Quantizer.
We manually extract model weight to NumPy array and export it.
In this step, we explain training on BDD100K dataset.
First, extract the pre-trained weight of the Xilinx tutorial. This step is performed on the Xilinx Vitis-AI docker environment.
$ conda activate vitis-ai-caffe
$ cd files/Segment/workspace/model/FPN
$ python ../../../../../utils/caffe_pytorch_conversion/extract_caffe_to_npy.py -m deploy.prototxt -w final_models/pretrained.caffemodel  -o ../../../../../npy
Weights of each layer are generated in npy directory.
Next, setup the PyTorch training environment by using deepo. You had better mount your Vitis-AI directory on deepo environment to share files between docker containers.
$ docker run --gpus all -v <path to Vitis-AI>/:/workspace -it ufoym/deepo bin/bashExport pre-trained weight from NumPy array to PyTorch(.pth) The number of classes is different from the pre-trained model(19), so this code doesn't copy the weight of the final layer.
$ cd training
$ python ../utils/caffe_pytorch_conversion/convert_from_npy_to_pytorch.py -i ../npy/ -o ./pretrained.pth
Download BDD100K datasets from here: https://bdd-data.berkeley.edu/
Unzip bdd100k datasets and put seg directory to data/bdd100k.
Modify DATASET_MODE and LOSS_MODE in train.py. and set model_id in train.py
model_id = 'unique_name'
DATASET_MODE = BDD100K
LOSS_MODE = LovaszLoss
You can also train on your custom dataset by modifying /training/datasets.py and adding a custom data loader.
$ python train.pyWhile training, the loss curve graph is updated for every epoch and generated to /training/training_logs/<model_id>/loss_curve.png like:

set DATASET_MODE=BDD100K and mode=TEST in training/evaluation/eval_on_val.py for test.
set mode = VAL for validation, and set LOSS_MODE for validation loss value function.
set trained modedl path in network.load_state_dict().
$ cd training/evaluation
$ python eval_on_val.py
label images are generated in <model_id>/<test or val>/label, and overlayed images are generated in <model_id>/<test or val>/overlayed.
After training is finished, export the PyTorch weight to a NumPy array and import it into Caffe.
# On the PyTorch envirionment
$ cd training
$ python ../utils/caffe_pytorch_conversion/extract_pytorch_to_npy.py -i ./training_logs/bdd100k/checkpoints/model_bdd100k_epoch_334.pth -o ../npy2
Modify final output class in files/Segment/workspace/model/FPN/deploy.prototxt
<     num_output: 19
---
> num_output: 5#On Vitis-AI environment
$ conda activate vitis-ai-caffe
$ cd files/Segment/workspace/model/FPN/
$ python ../../../../../utils/caffe_pytorch_conversion/convert_from_npy_to_caffe.py -m ./deploy.prototxt -i ../../../../../npy2/ -o converted.caffemodelconda activate vitis-ai-caffe
cd files/Segment/workspace/scripts/test_scripts
sh test_fpn.shThe output is slightly different between PyTorch and Caffe.
| PyTorch | Caffe |
|---|---|
 |
 |
- English instruction: Vitis-AI 1.1 Flow for Avnet VITIS Platforms - Part 1
- Japanese instruction: DNNDK on Vitis AI on Ultra96v2
In this project, we modified <DPU-TRD>/prj/Vitis/config_file/prj_config as follows.
[clock]
id=4:dpu_xrt_top_1.aclk
id=5:dpu_xrt_top_1.ap_clk_2

[connectivity]

sp=dpu_xrt_top_1.M_AXI_GP0:HPC0
sp=dpu_xrt_top_1.M_AXI_HP0:HP0
sp=dpu_xrt_top_1.M_AXI_HP2:HP1


nk=dpu_xrt_top:1

[advanced]
misc=:solution_name=link
param=compiler.addOutputTypes=sd_card

#param=compiler.skipTimingCheckAndFrequencyScaling=1

[vivado]
prop=run.synth_1.strategy=Flow_AreaOptimized_high
prop=run.impl_1.strategy=Performance_ExtraTimingOpt
#param=place.runPartPlacer=0
id=4, 5 means we give 200MHz and 400MHz for DPU IP.
We also modified [vivado] option to change the vivado synthesis and implementation strategy and meet timing.
We disabled some layer support on DPU, dpu_conf.vh was modified to reduce resource utilization.
`define POOL_AVG_DISABLE
`define DWCV_DISABLE
After following the tutorial and create an FPGA image using Vitis, the following files will be generated.
$ ls DPU-TRD-ULTRA96V2/prj/Vitis/binary_container_1/sd_card
BOOT.BIN  README.txt  ULTRA96V2.hwh  dpu.xclbin  image.ub  rootfs.tar.gz
After you created the SD image, connect USB Mouse/Keyboard and DP-HDMI adapter, and launch a terminal on the Ultra96-V2 board. You can check your DPU configuration on board.
$ dexplorer -w
[DPU IP Spec]
IP  Timestamp            : 2020-03-26 13:30:00
DPU Core Count           : 1

[DPU Core Configuration List]
DPU Core                 : #0
DPU Enabled              : Yes
DPU Arch                 : B2304
DPU Target Version       : v1.4.1
DPU Freqency             : 300 MHz
Ram Usage                : Low
DepthwiseConv            : Disabled
DepthwiseConv+Relu6      : Disabled
Conv+Leakyrelu           : Enabled
Conv+Relu6               : Enabled
Channel Augmentation     : Enabled
Average Pool             : Disabled
I don't know why, but the clock frequency is displayed as 300MHz. But running time of DPU is faster than when implementing on 150/300MHz, so the displayed clock frequency by dexproler command is probably not correct.
This step is the same as the referenced tutorial.
We add -seg_class_num 5 for input arguments of vai_q_caffe for test quantized model.
(Without this argument, the default number of classes 19 is used for measuring mIoU)
Modify source_param and input_param in float.prototxt for calibration process in Vitis-AI quantizer.
Modify arch input arguments for vai_c_caffe in quantize_and_compile.sh.
These settings should be set by absolute path.
$ conda activate vitis-ai-caffe
$ cd files/Segment/VAI/FPN
$ cp <path-to converted.caffemodel> ./float.caffemodel
$ sh quantize_and_compile.sh
output example
I1229 02:30:40.637688  6650 net.cpp:284] Network initialization done.
I1229 02:30:40.640810  6650 vai_q.cpp:182] Start Calibration
I1229 02:30:40.735327  6650 vai_q.cpp:206] Calibration iter: 1/1000 ,loss: 0
I1229 02:30:40.765679  6650 vai_q.cpp:206] Calibration iter: 2/1000 ,loss: 0

...
I1229 02:31:31.386523  6650 vai_q.cpp:360] Start Deploy
I1229 02:31:31.456115  6650 vai_q.cpp:368] Deploy Done!
--------------------------------------------------
Output Quantized Train&Test Model:   "quantize/quantize_train_test.prototxt"
Output Quantized Train&Test Weights: "quantize/quantize_train_test.caffemodel"
Output Deploy Weights: "quantize/deploy.caffemodel"
Output Deploy Model:   "quantize/deploy.prototxt"
...
Kernel topology "segmentation_kernel_graph.jpg" for network "segmentation"
kernel list info for network "segmentation"
                               Kernel ID : Name
                                       0 : segmentation_0
                                       1 : segmentation_1

                             Kernel Name : segmentation_0
--------------------------------------------------------------------------------
                             Kernel Type : DPUKernel
                               Code Size : 0.39MB
                              Param Size :
                Boundary Input Tensor(s)   (H*W*C)
                              score:0(0) : 320*640*5

               Boundary Output Tensor(s)   (H*W*C)
                              score:0(0) : 320*640*5

                           Input Node(s)   (H*W*C)
                                   score : 320*640*5

                          Output Node(s)   (H*W*C)
                                   score : 320*640*5
**************************************************
* VITIS_AI Compilation - Xilinx Inc.
************************************************** 5.84MB
                           Workload MACs : 10934.67MOPS
                         IO Memory Space : 5.47MB
                              Mean Value : 104, 117, 123,
                      Total Tensor Count : 129
                Boundary Input Tensor(s)   (H*W*C)
                               data:0(0) : 320*640*3

               Boundary Output Tensor(s)   (H*W*C)
                        toplayer_p2:0(0) :
                Boundary Input Tensor(s)   (H*W*C)
                              score:0(0) : 320*640*5

               Boundary Output Tensor(s)   (H*W*C)
                              score:0(0) : 320*640*5

                           Input Node(s)   (H*W*C)
                                   score : 320*640*5

                          Output Node(s)   (H*W*C)
                                   score : 320*640*5
**************************************************
* VITIS_AI Compilation - Xilinx Inc.
************************************************** 95
                           Input Node(s)   (H*W*C)
                         conv1_7x7_s2(0) : 320*640*3

                          Output Node(s)   (H*W*C)
                          toplayer_p2(0) : 320*640*5


                             Kernel Name : segmentation_1
--------------------------------------------------------------------------------
                             Kernel Type : CPUKernel
                Boundary Input Tensor(s)   (H*W*C)
                              score:0(0) : 320*640*5

               Boundary Output Tensor(s)   (H*W*C)
                              score:0(0) : 320*640*5

                           Input Node(s)   (H*W*C)
                                   score : 320*640*5

                          Output Node(s)   (H*W*C)
                                   score : 320*640*5
**************************************************
* VITIS_AI Compilation - Xilinx Inc.
**************************************************- https://signate.jp/competitions/285
- https://github.com/Xilinx/Vitis-AI-Tutorials/tree/ML-Caffe-Segmentation-Tutorial
- https://github.com/fregu856/deeplabv3
- https://github.com/bermanmaxim/LovaszSoftmax
Apache License 2.0