FasterSeg: Searching for Faster Real-time Semantic Segmentation [PDF]
Wuyang Chen, Xinyu Gong, Xianming Liu, Qian Zhang, Yuan Li, Zhangyang Wang
In ICLR 2020.
We present FasterSeg, an automatically designed semantic segmentation network with not only state-of-the-art performance but also faster speed than current methods.
Highlights:
- Novel search space: support multi-resolution branches.
- Fine-grained latency regularization: alleviate the "architecture collapse" problem.
- Teacher-student co-searching: distill the teacher to the student for further accuracy boost.
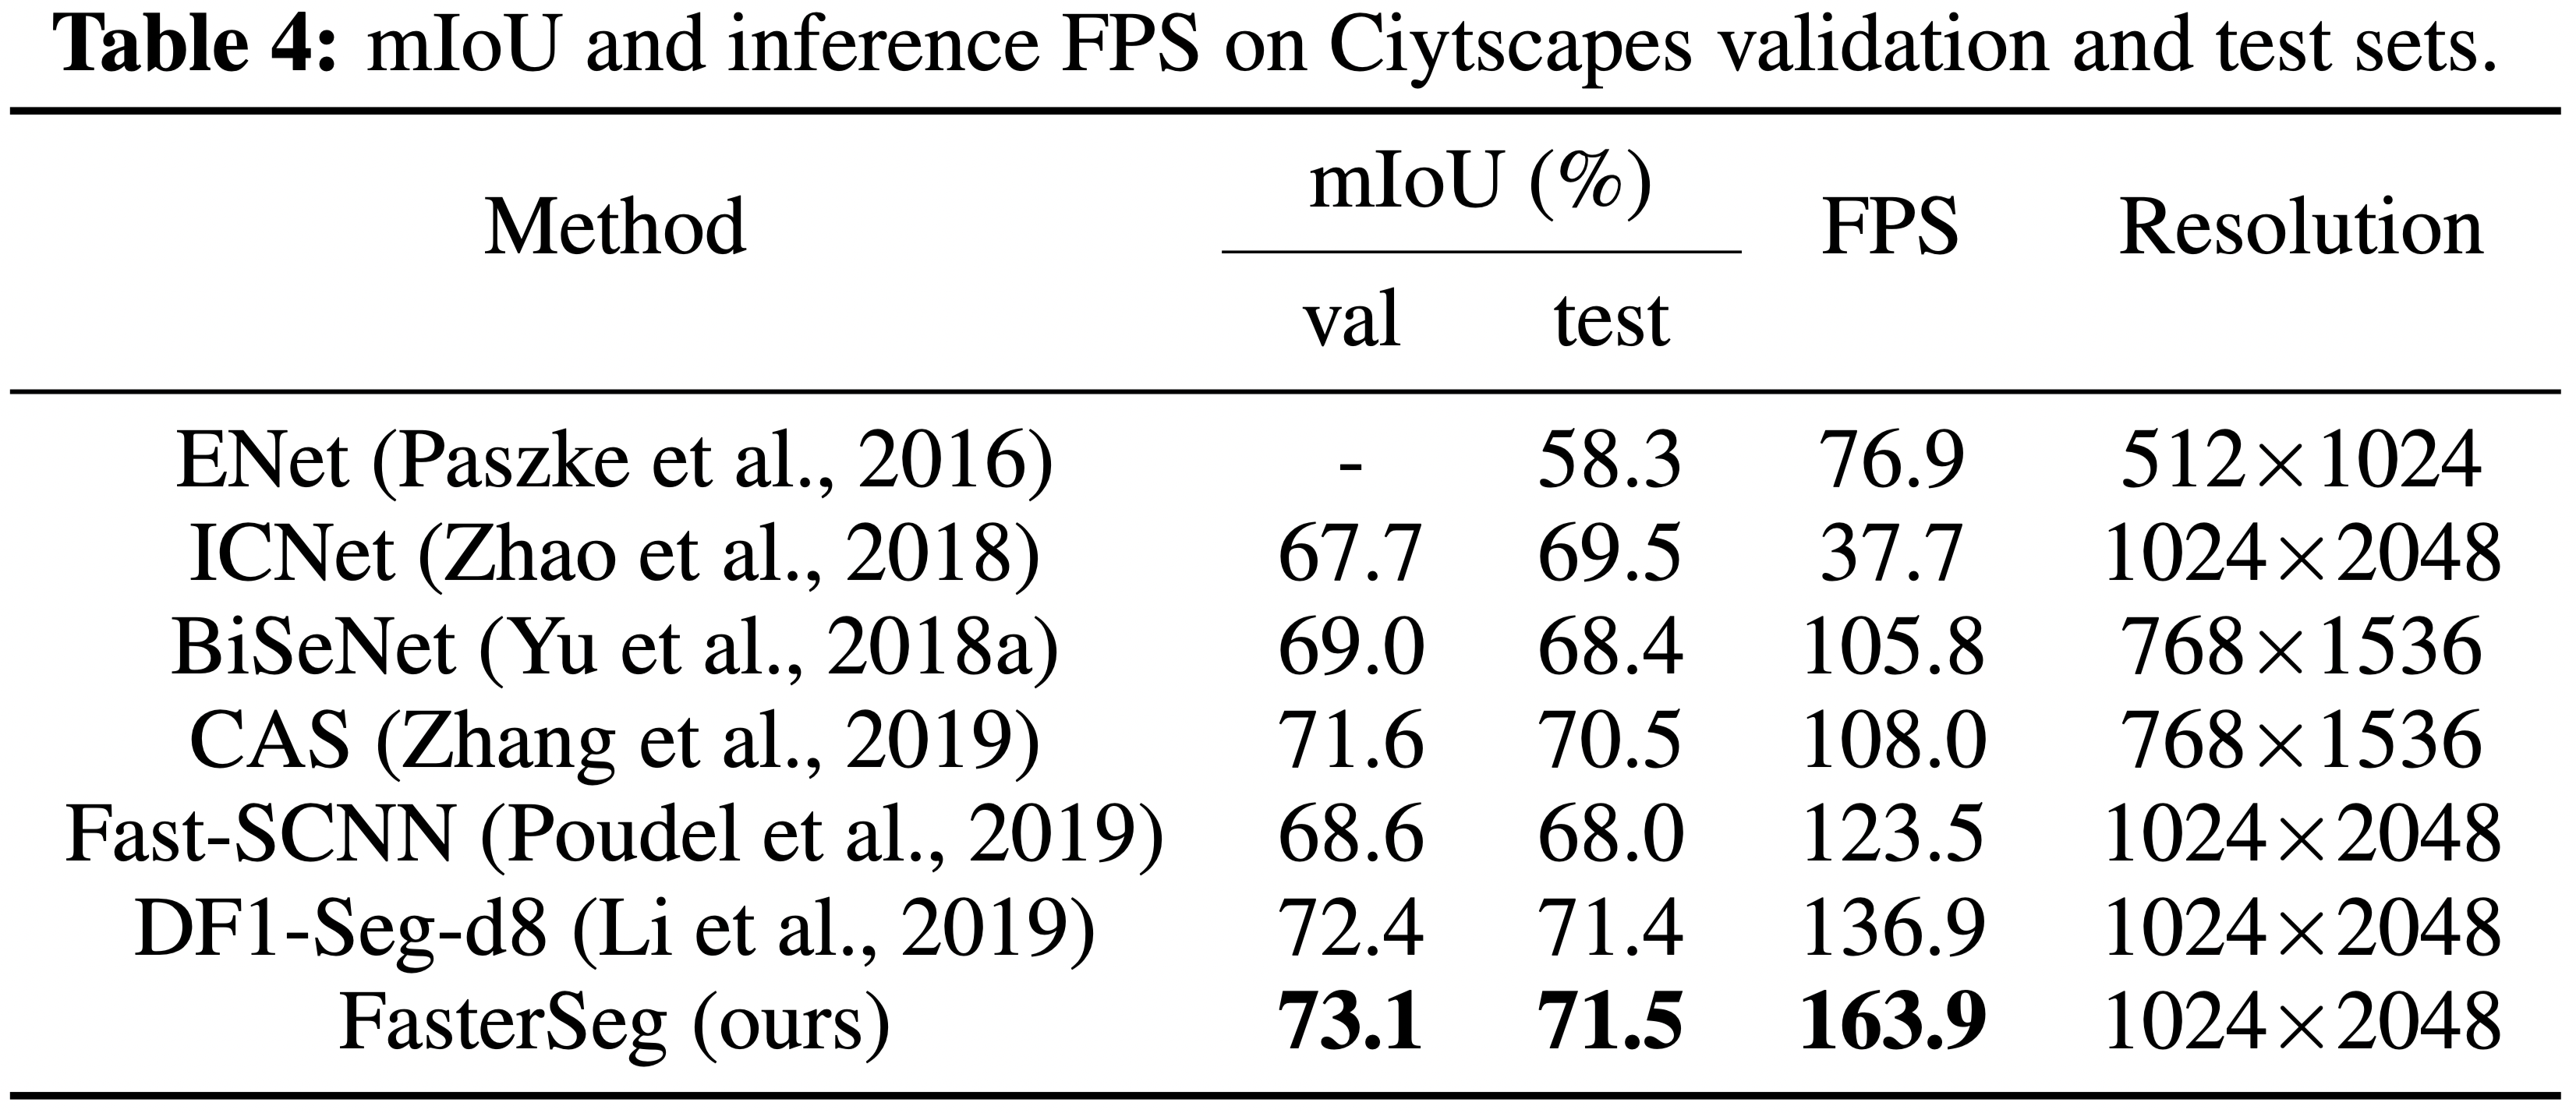
- SOTA: FasterSeg achieves extremely fast speed (over 30% faster than the closest manually designed competitor on CityScapes) and maintains competitive accuracy.
- see our Cityscapes submission here.
- Ubuntu
- Python 3
- NVIDIA GPU + CUDA CuDNN
This repository has been tested on GTX 1080Ti. Configurations (e.g batch size, image patch size) may need to be changed on different platforms.
- Clone this repo:
git clone https://github.com/chenwydj/FasterSeg.git
cd FasterSeg- Install dependencies:
pip install requirements.txt- Install PyCuda which is a dependency of TensorRT.
- Install TensorRT (v5.1.5.0): a library for high performance inference on NVIDIA GPUs with Python API.
- Work flow: pretrain the supernet → search the archtecture → train the teacher → train the student.
- You can monitor the whole process in the Tensorboard.
- Download the leftImg8bit_trainvaltest.zip and gtFine_trainvaltest.zip from the Cityscapes.
- Prepare the annotations by using the createTrainIdLabelImgs.py.
- Put the file of image list into where you save the dataset.
- Remember to properly set the
C.dataset_pathin theconfigfiles mentioned below.
cd searchWe first pretrain the supernet without updating the architecture parameter for 20 epochs.
- Set
C.pretrain = Trueinconfig_search.py. - Start the pretrain process:
CUDA_VISIBLE_DEVICES=0 python train_search.py- The pretrained weight will be saved in a folder like
FasterSeg/search/search-pretrain-256x512_F12.L16_batch3-20200101-012345.
We start the architecture searching for 30 epochs.
- Set the name of your pretrained folder (see above)
C.pretrain = "search-pretrain-256x512_F12.L16_batch3-20200101-012345"inconfig_search.py. - Start the search process:
CUDA_VISIBLE_DEVICES=0 python train_search.py- The searched architecture will be saved in a folder like
FasterSeg/search/search-224x448_F12.L16_batch2-20200102-123456. arch_0andarch_1contains architectures for teacher and student networks, respectively.
cd FasterSeg/train- Copy the folder which contains the searched architecture into
FasterSeg/train/or create a symlink vialn -s ../search/search-224x448_F12.L16_batch2-20200102-123456 ./
- Set
C.mode = "teacher"inconfig_train.py.
- Set the name of your searched folder (see above)
C.load_path = "search-224x448_F12.L16_batch2-20200102-123456"inconfig_train.py. This folder containsarch_0.ptandarch_1.pthfor teacher and student's architectures. - Start the teacher's training process:
CUDA_VISIBLE_DEVICES=0 python train.py- The trained teacher will be saved in a folder like
train-512x1024_teacher_batch12-20200103-234501
- Set
C.mode = "student"inconfig_train.py.
- Set the name of your searched folder (see above)
C.load_path = "search-224x448_F12.L16_batch2-20200102-123456"inconfig_train.py. This folder containsarch_0.ptandarch_1.pthfor teacher and student's architectures. - Set the name of your teacher's folder (see above)
C.teacher_path = "train-512x1024_teacher_batch12-20200103-234501"inconfig_train.py. This folder contains theweights0.ptwhich is teacher's pretrained weights. - Start the student's training process:
CUDA_VISIBLE_DEVICES=0 python train.pyHere we use our pretrained FasterSeg as an example for the evaluation.
cd train- Set
C.is_eval = Trueinconfig_train.py. - Set the name of the searched folder as
C.load_path = "fasterseg"inconfig_train.py. - Download the pretrained weights of the teacher and student and put them into folder
train/fasterseg.
- Start the evaluation process:
CUDA_VISIBLE_DEVICES=0 python train.py- You can switch the evaluation of teacher or student by changing
C.modeinconfig_train.py.
We support generating prediction files (masks as images) during training.
- Set
C.is_test = Trueinconfig_train.py. - During the training process, the prediction files will be periodically saved in a folder like
train-512x1024_student_batch12-20200104-012345/test_1_#epoch. - Simply zip the prediction folder and submit to the Cityscapes submission page.
- If you have successfully installed TensorRT, you will automatically use TensorRT for the following latency tests (see function here).
- Otherwise you will be switched to use Pytorch for the latency tests (see function here).
- Run the script:
CUDA_VISIBLE_DEVICES=0 python run_latency.pycd FasterSeg/latency- Run the script:
CUDA_VISIBLE_DEVICES=0 python latency_lookup_table.pywhich will generate an .npy file. Be careful not to overwrite the provided latency_lookup_table.npy in this repo.
- The
.npycontains a python dictionary mapping from an operator to its latency (in ms) under specific conditions (input size, stride, channel number etc.)
@inproceedings{chen2020fasterseg,
  title={FasterSeg: Searching for Faster Real-time Semantic Segmentation},
  authors={Chen, Wuyang and Gong, Xinyu and Liu, Xianming and Zhang, Qian and Li, Yuan and Wang, Zhangyang},
  booktitle={International Conference on Learning Representations},
  year={2020}
}
- Segmentation training and evaluation code from BiSeNet.
- Search method from the DARTS.
- slimmable_ops from the Slimmable Networks.
- Segmentation metrics code from PyTorch-Encoding.


