 Imbue Network is a decentralised crowdfunding DAO built on top of the Polkadot blockchain platform. It is an idea incubator open to the entire world that allows anyone, from any walk of life and for any kind of endeavour, to submit and vote on Ideas worth funding from the communities that believe in them the most.
This documentation will cover the below explanation
- Launching the network: Will explain how you can launch the network locally using the docker configuration with as simple as one step
- Going through our proposal pallet (our core pallet), explaining the usage step by step
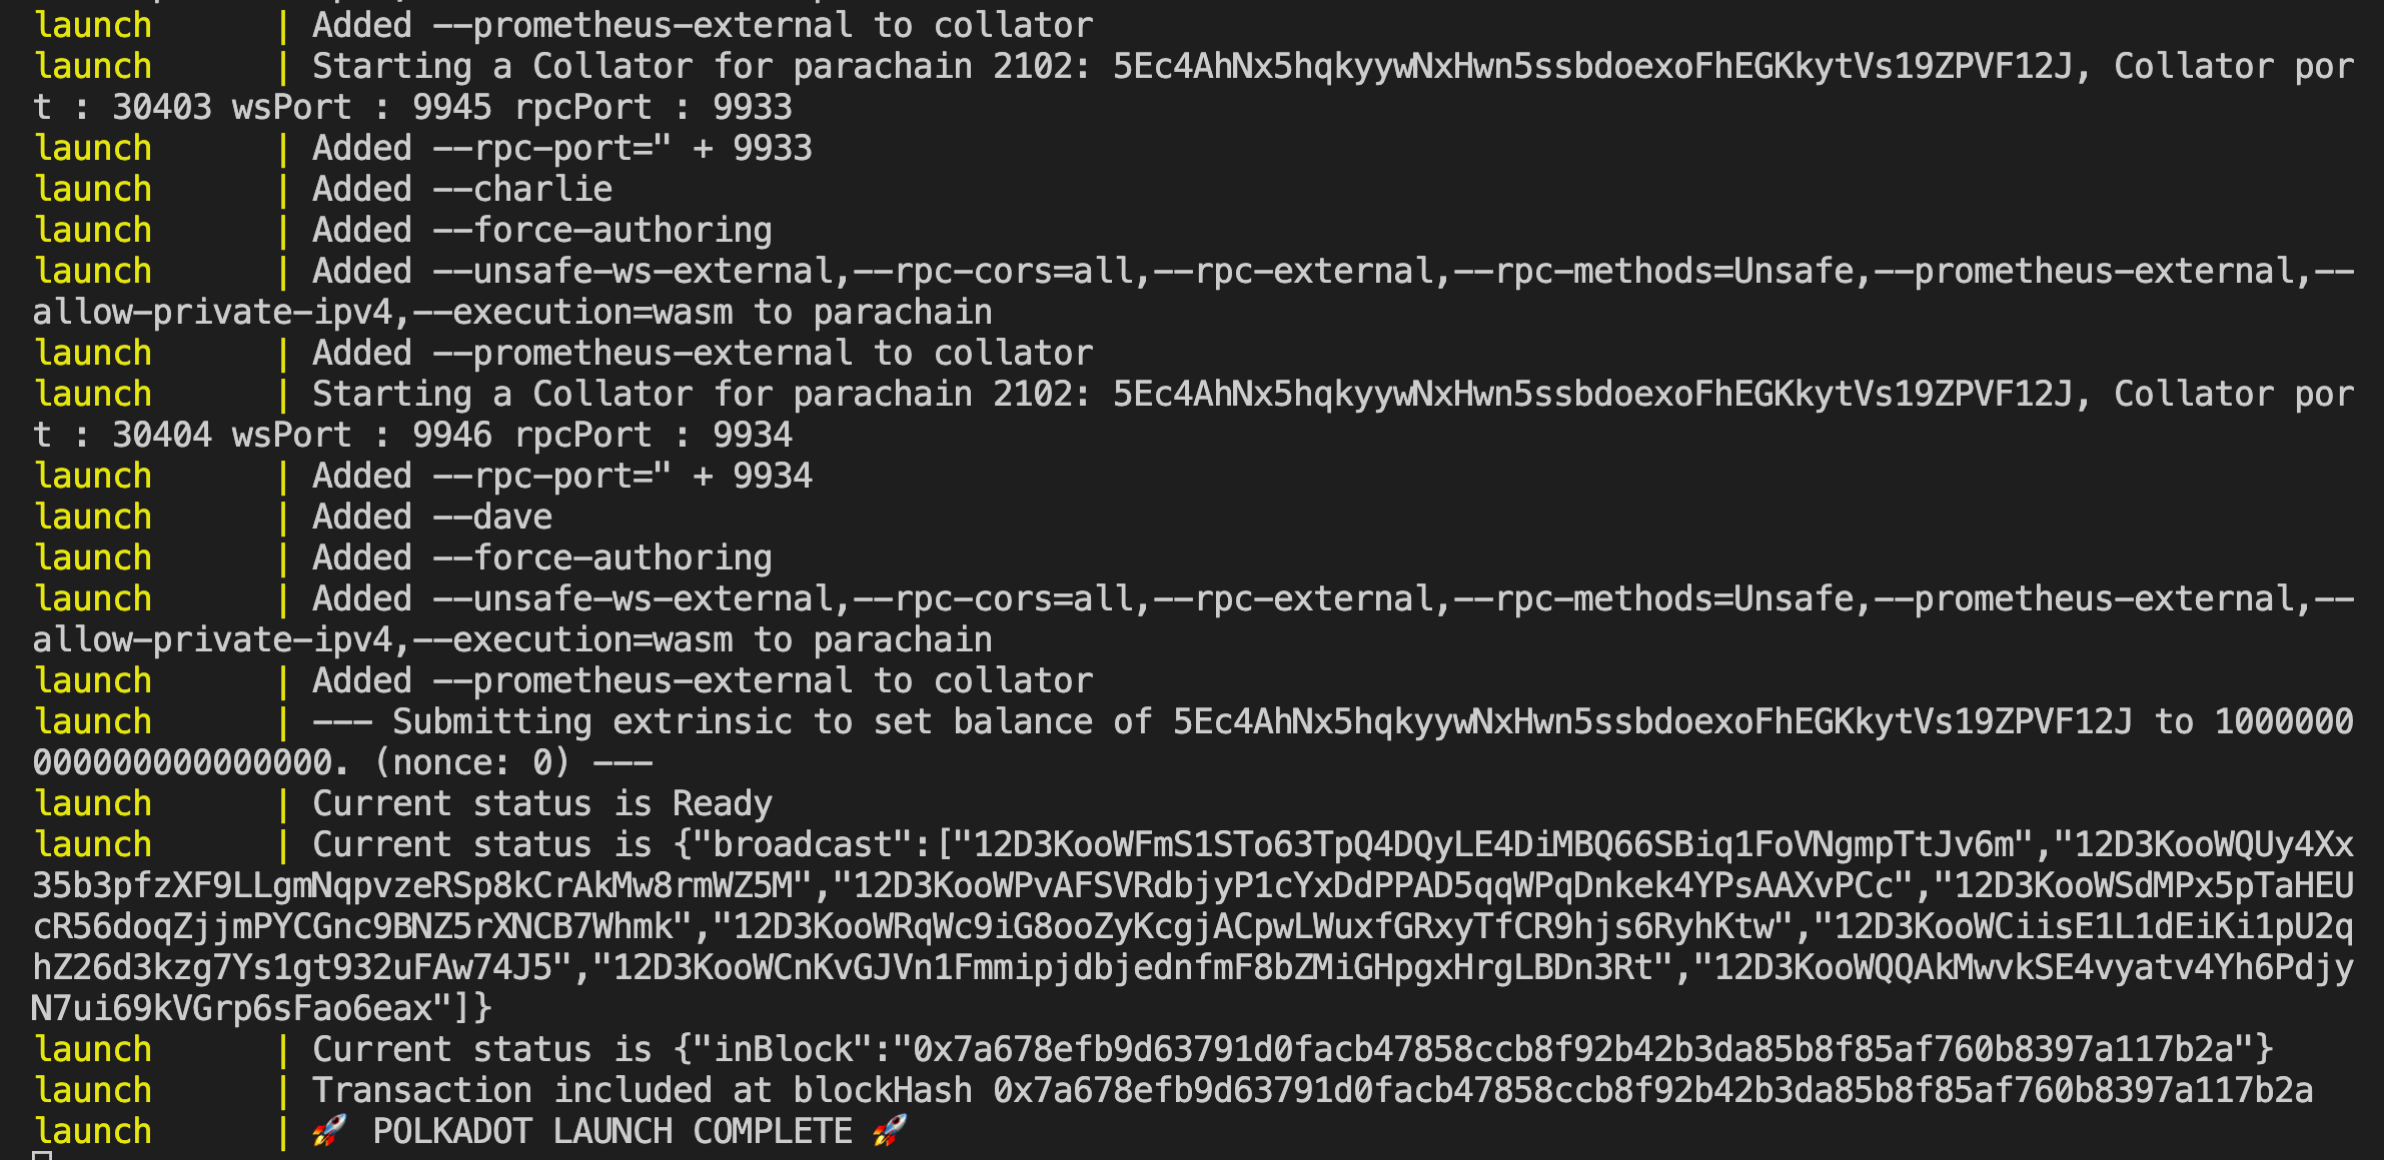
The default compose file automatically launches a local network containing multiple relaychain validators (polkadot nodes) and collators (Imbue collators) which you can interact with using the browser-based polkadotjs wallet. Additionally, docker can be used to launch a collator to supported testnets. Follow these steps to prepare a local development environment 🛠️
- You will need to install docker to launch our pre-built containers
- Checkout the repository
git clone --recursive https://github.com/ImbueNetwork/imbue.git

cd imbuecargo testLaunch a local network using docker compose:
docker-compose -f scripts/docker-compose.yml up -dThe scripts directory contains the docker-compose file which is used to launch the network using a single command. Launching with docker ensures parachains are registered to the relaychain automatically and will begin authoring blocks shortly after launch.
To ensure your network is functioning properly:
- Confirm docker containers are running
docker ps- These container names should have a status of 'up':
- frontend
- launch
- Check the container logs
docker logs launchdocker logs frontend- If successful,
Accepting connections at http://localhost:3001will be displayed in the terminal.
You can manually launch a relaychain and parachain then register the parachain directly from the source code
-
First, setup your Rust development environment. Then,
-
Checkout the imbue and polkadot repositories and build the respective binaries:
-
imbue
git clone --recursive https://github.com/ImbueNetwork/imbue.git cd imbue git submodule update --recursive --remote cargo build --release -
polkadot
git clone https://github.com/paritytech/polkadot.git

cd polkadot
cargo build --release


If the prerequisites have been completed and we have our binaries as shown [above](#prerequisite-for-both-approaches), follow the steps below to launch the network.
-
# Generate westend-local spec file
./target/release/polkadot build-spec --chain westend-local --raw --disable-default-bootnode > westend-local.json# Start Alice
./target/release/polkadot --alice --validator --base-path cumulus_relay/alice --chain rococo-local.json --port 30444 --ws-port 9944
# Start Bob
./target/release/polkadot --bob --validator --base-path cumulus_relay/bob --chain rococo-local.json --port 30555 --ws-port 9955
# Start Charlie
./target/release/polkadot --charlie --validator --base-path cumulus_relay/bob --chain rococo-local.json --port 30666 --ws-port 9966
# Start Dave
./target/release/polkadot --dave --validator --base-path cumulus_relay/bob --chain rococo-local.json --port 30777 --ws-port 9977cd imbue
# Genesis
./target/release/imbue export-genesis-state --parachain-id 2000 > para-2000-genesis-local
# WASM
./target/release/imbue export-genesis-wasm > para-wasm-local# Customize the --chain flag for the path to your 'rococo-local.json' file
./target/release/imbue --alice --collator --force-authoring --parachain-id 2000 --base-path cumulus_relay/imbue --port 40333 --ws-port 8844 -- --execution wasm --chain <path to 'rococo-local.json' file> --port 30343 --ws-port 9942
./target/release/imbue --alice --collator --force-authoring --parachain-id 2013 --base-path cumulus_relay/imbue --port 40334 --ws-port 8845 -- --execution wasm --chain <path to 'rococo-local.json' file> --port 30344 --ws-port 9943
- You should see your collator running and peering with the already running relay chain validators.
- Your parachain will not begin authoring blocks until you have registered it on the relay chain.
To connect to your local network's user interface, visit polkadot.js on port 3001. Interacting with your network is detailed below
NOTE: If you launched your network using docker or polkadot-launch, your parachains should be automatically registered to the relaychain and you can skip the below two steps and can continue here.
- Verify parathread is registered
- On custom endpoint 9944, select
Network->Parachains - On the parathreads tab you should see your paraid with a lifecycle status of
Onboarding - After onboarding is complete you will see your parachain registered on the Overview tab
- On custom endpoint 9944, select
- Verify parachain is producing blocks
- Navigate to the collator's custom endpoint 9942
- Select
Network->Explorer - New blocks are being created if the value of
bestandfinalizedare incrementing higher
Our proposal pallet consists of our core logic and facilitates the implementation through extrinsics (extrinsics can be thought of functions that can be called from outside, in this case from the frontend).
The crowdfunding of a project basically comprises of 6 steps from the submission of the proposal to withdrawing of the fund. Alternatively, the individual or team can decide to withdraw their projects proposal as well. The flow of creating a proposal and getting funded is shown below step by step using screenshots. You can follow along the same either using polkadotjs apps or the frontend (localhost:3001) that comes with our docker compose
- Creating a project: The first step is to create the project, i.e. submitting the proposal, the given signature of the extrinsic is shown below. From the UI select the pallet which is our imbueProposals pallet and then select the function below.
create_project(origin: OriginFor<T>, name: Vec<u8>, logo: Vec<u8>, description: Vec<u8>, website: Vec<u8>, proposed_milestones: Vec<ProposedMilestone>, required_funds: BalanceOf<T>)To create a project we need to pass the following parameters
- Origin: This is the account trying to call the extrinsic
- name: Name of the project you want to submit the proposal for
- logo: logo for the project
- description: description of the project
- website: provide the website of your project
- proposed_milestones: its list of milestones you want to add with each milestone having name and percentage allocated to it
- requiredFunds: amount requested for funding
please find the screenshot attached for the extrinsic call

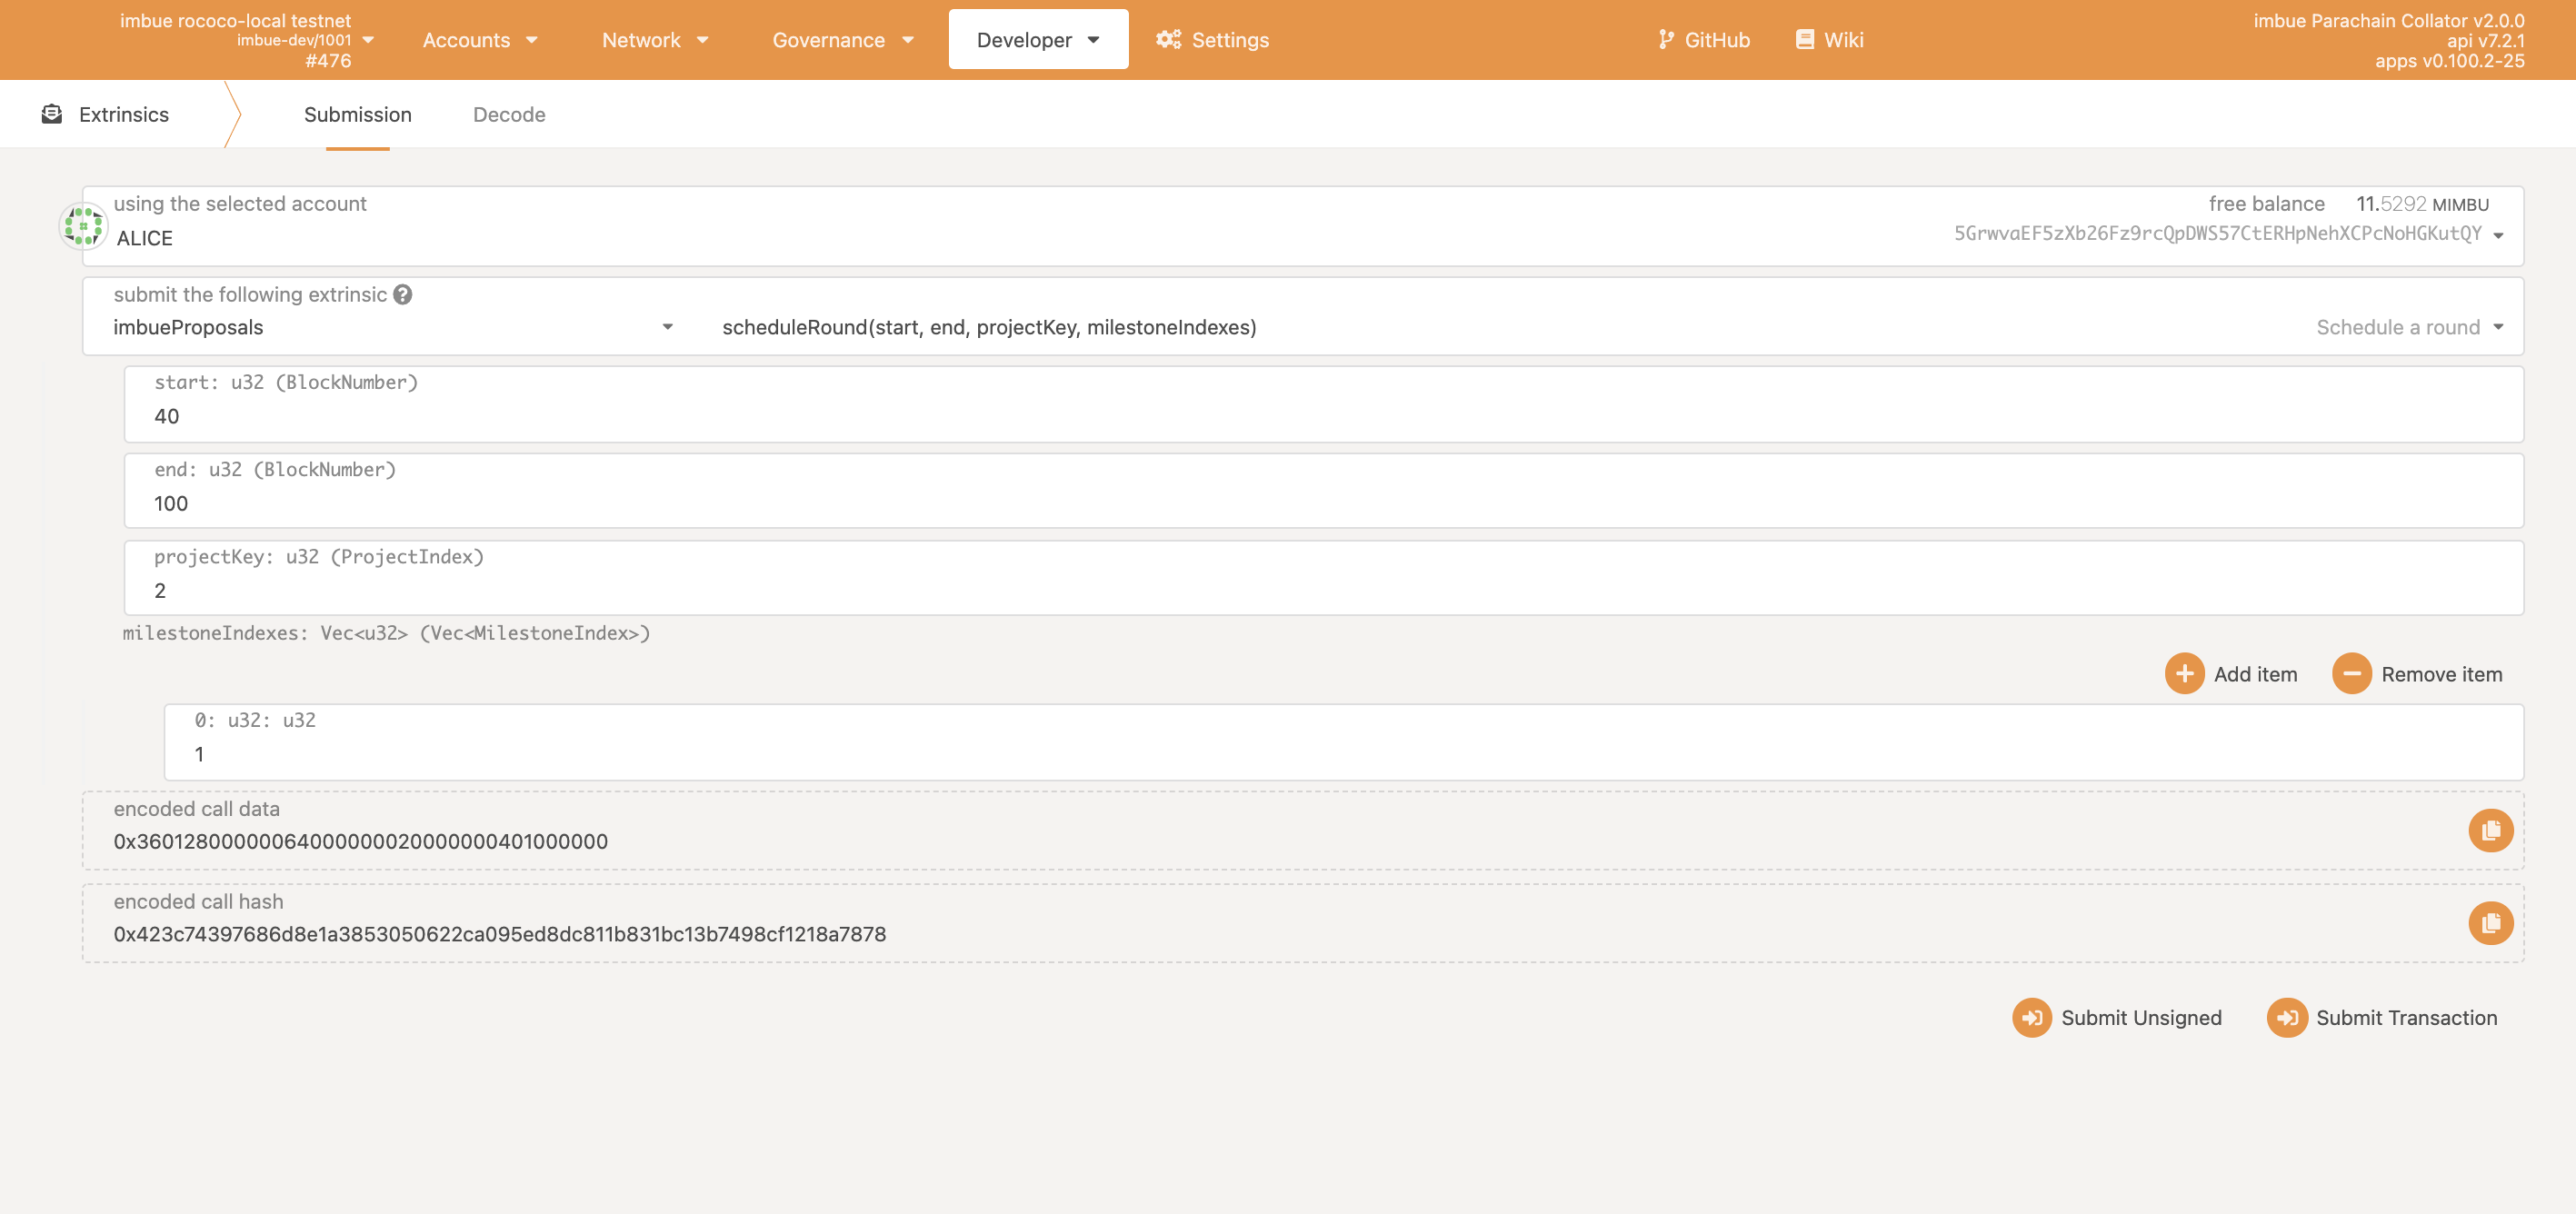
- (SUDO) Scheduling the round: Once the proposal for the project is submitted, the next step is to schedule the round for milestones.
From the UI select the our imbueProposals pallet and then select the function below.
Please note this is a Sudo call so you need to use an account with Sudo access. In the testnet this is the Alice account
```javascript
schedule_round(origin: OriginFor<T>, start: T::BlockNumber, end: T::BlockNumber, project_key: ProjectIndex, milestone_indexes: Vec<MilestoneIndex>)
```
To schedule a round for milestone/s we need to pass the following parameters to the extrinsics
- Origin: This is the account trying to call the extrinsic
- start : We need to pass the block number from when the round is valid and make sure it should be greater than the current block
- end: We need to pass the blocknumber till when the round should be valid for the given milestone/s. This number should be greater than both start number and the current block.
- project_key: This is basically a unique key that act as your project index
- milestone_indexes: The milestones need to be included in the round
please find the screenshot attached for the extrinsic call

- Contributing to the project: Using this extrinsic, the community can contribute to the proposals they think have good potential.From the UI select the our imbueProposals pallet and then select the function below.
contribute(origin: OriginFor<T>, project_key: ProjectIndex, value: BalanceOf<T>)To contribute to the proposal we need to pass the following parameters to the extrinsics
- Origin: This is the account trying to call the extrinsic
- project_key: unique key that act as your project index
- value: the value they want to contribute to the proposal
please find the screenshot attached for the extrinsic call

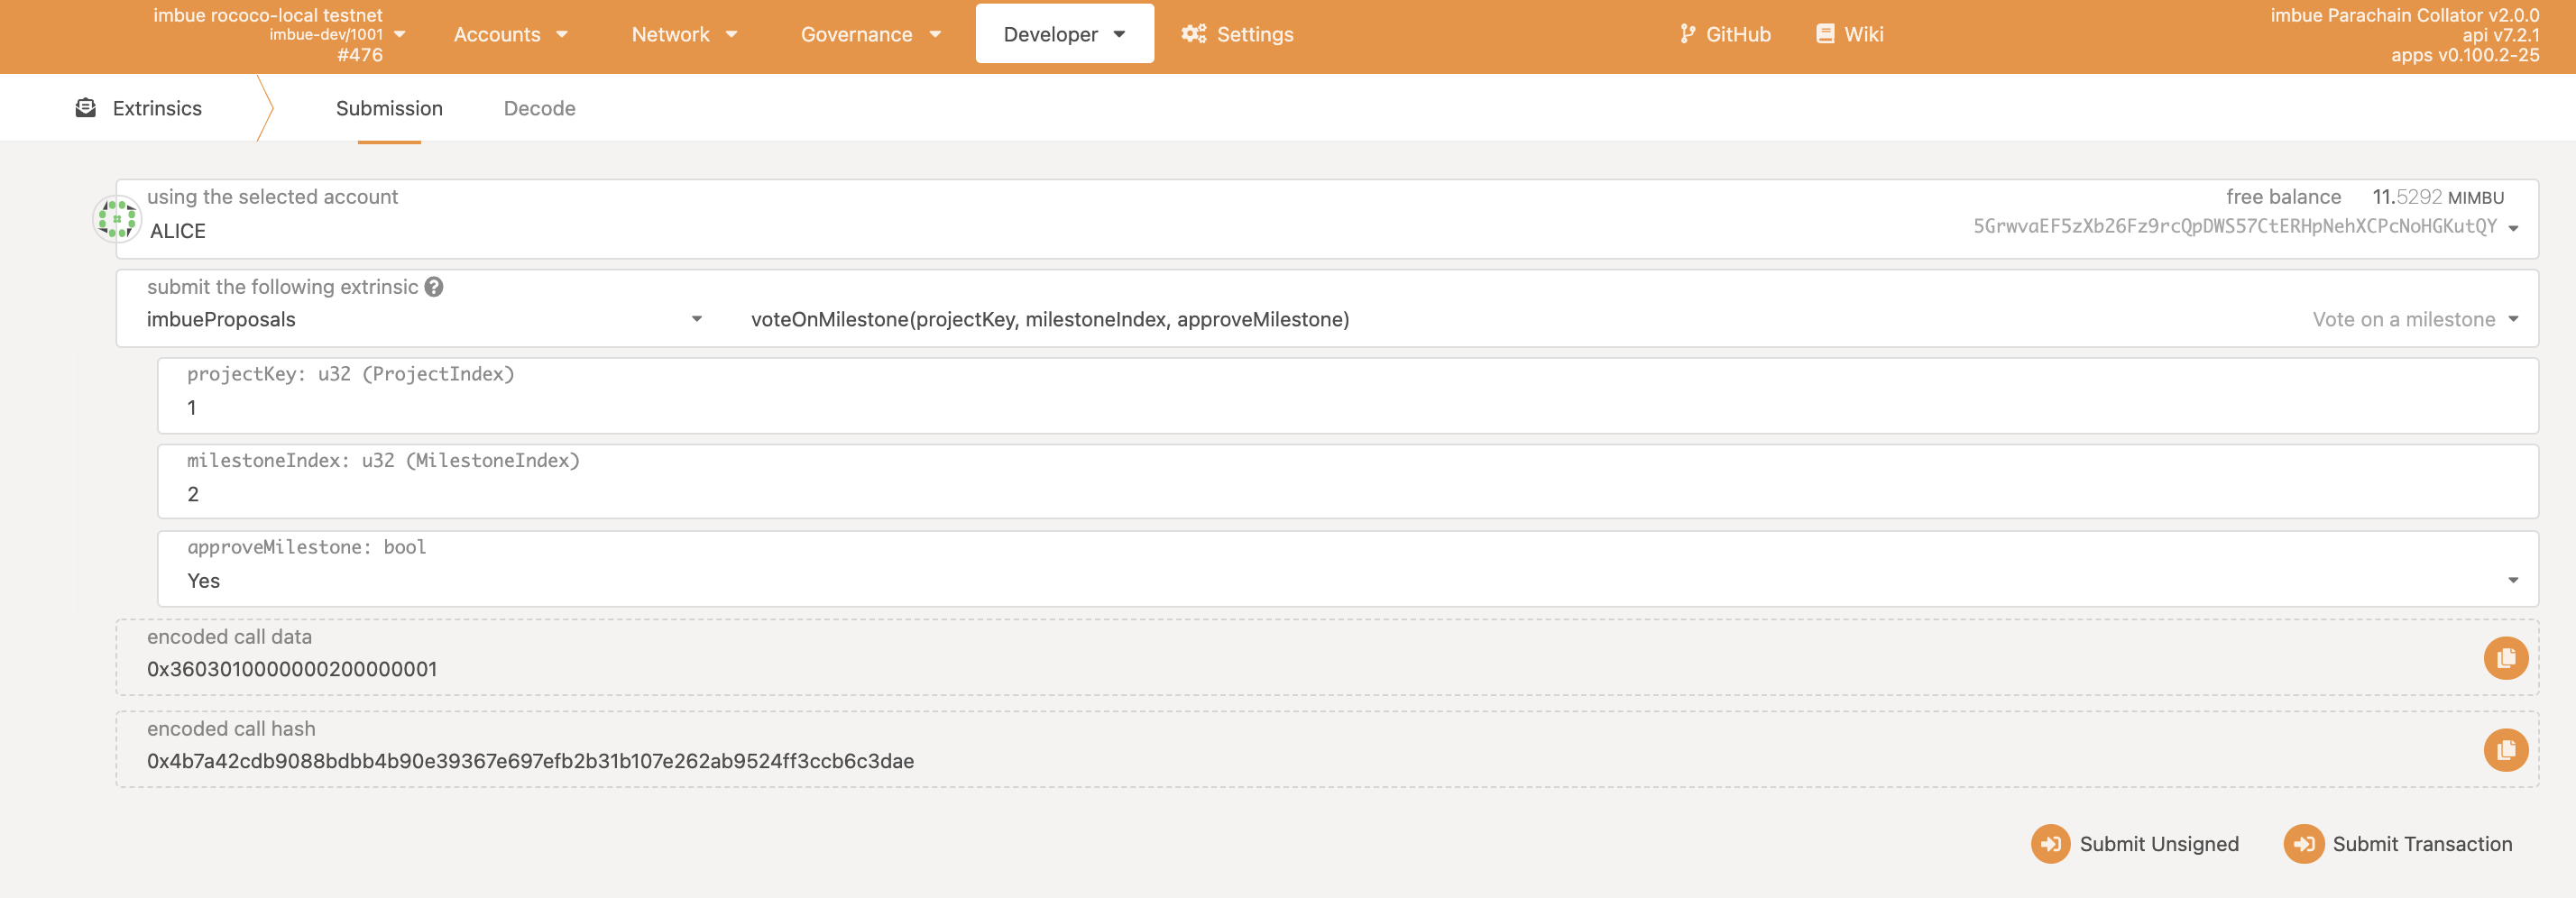
- Vote on a specific milestone: This extrinsic allows community members to vote for specific milestone for a given proposal. They can either approve or disapprove by passing yes or no. From the UI select the our imbueProposals pallet and then select the function below.
vote_on_milestone(origin: OriginFor<T>, project_key: ProjectIndex, milestone_index: MilestoneIndex, approve_milestone: bool)To vote on a milestone we need to pass the following parameters to the extrinsic
- Origin: This is the account trying to call the extrinsic
- project_key: unique key that act as your project index
- milestone_indexe: The milestone which you want to vote for
- approve_milestone: either yes or no
please find the screenshot attached for the extrinsic call

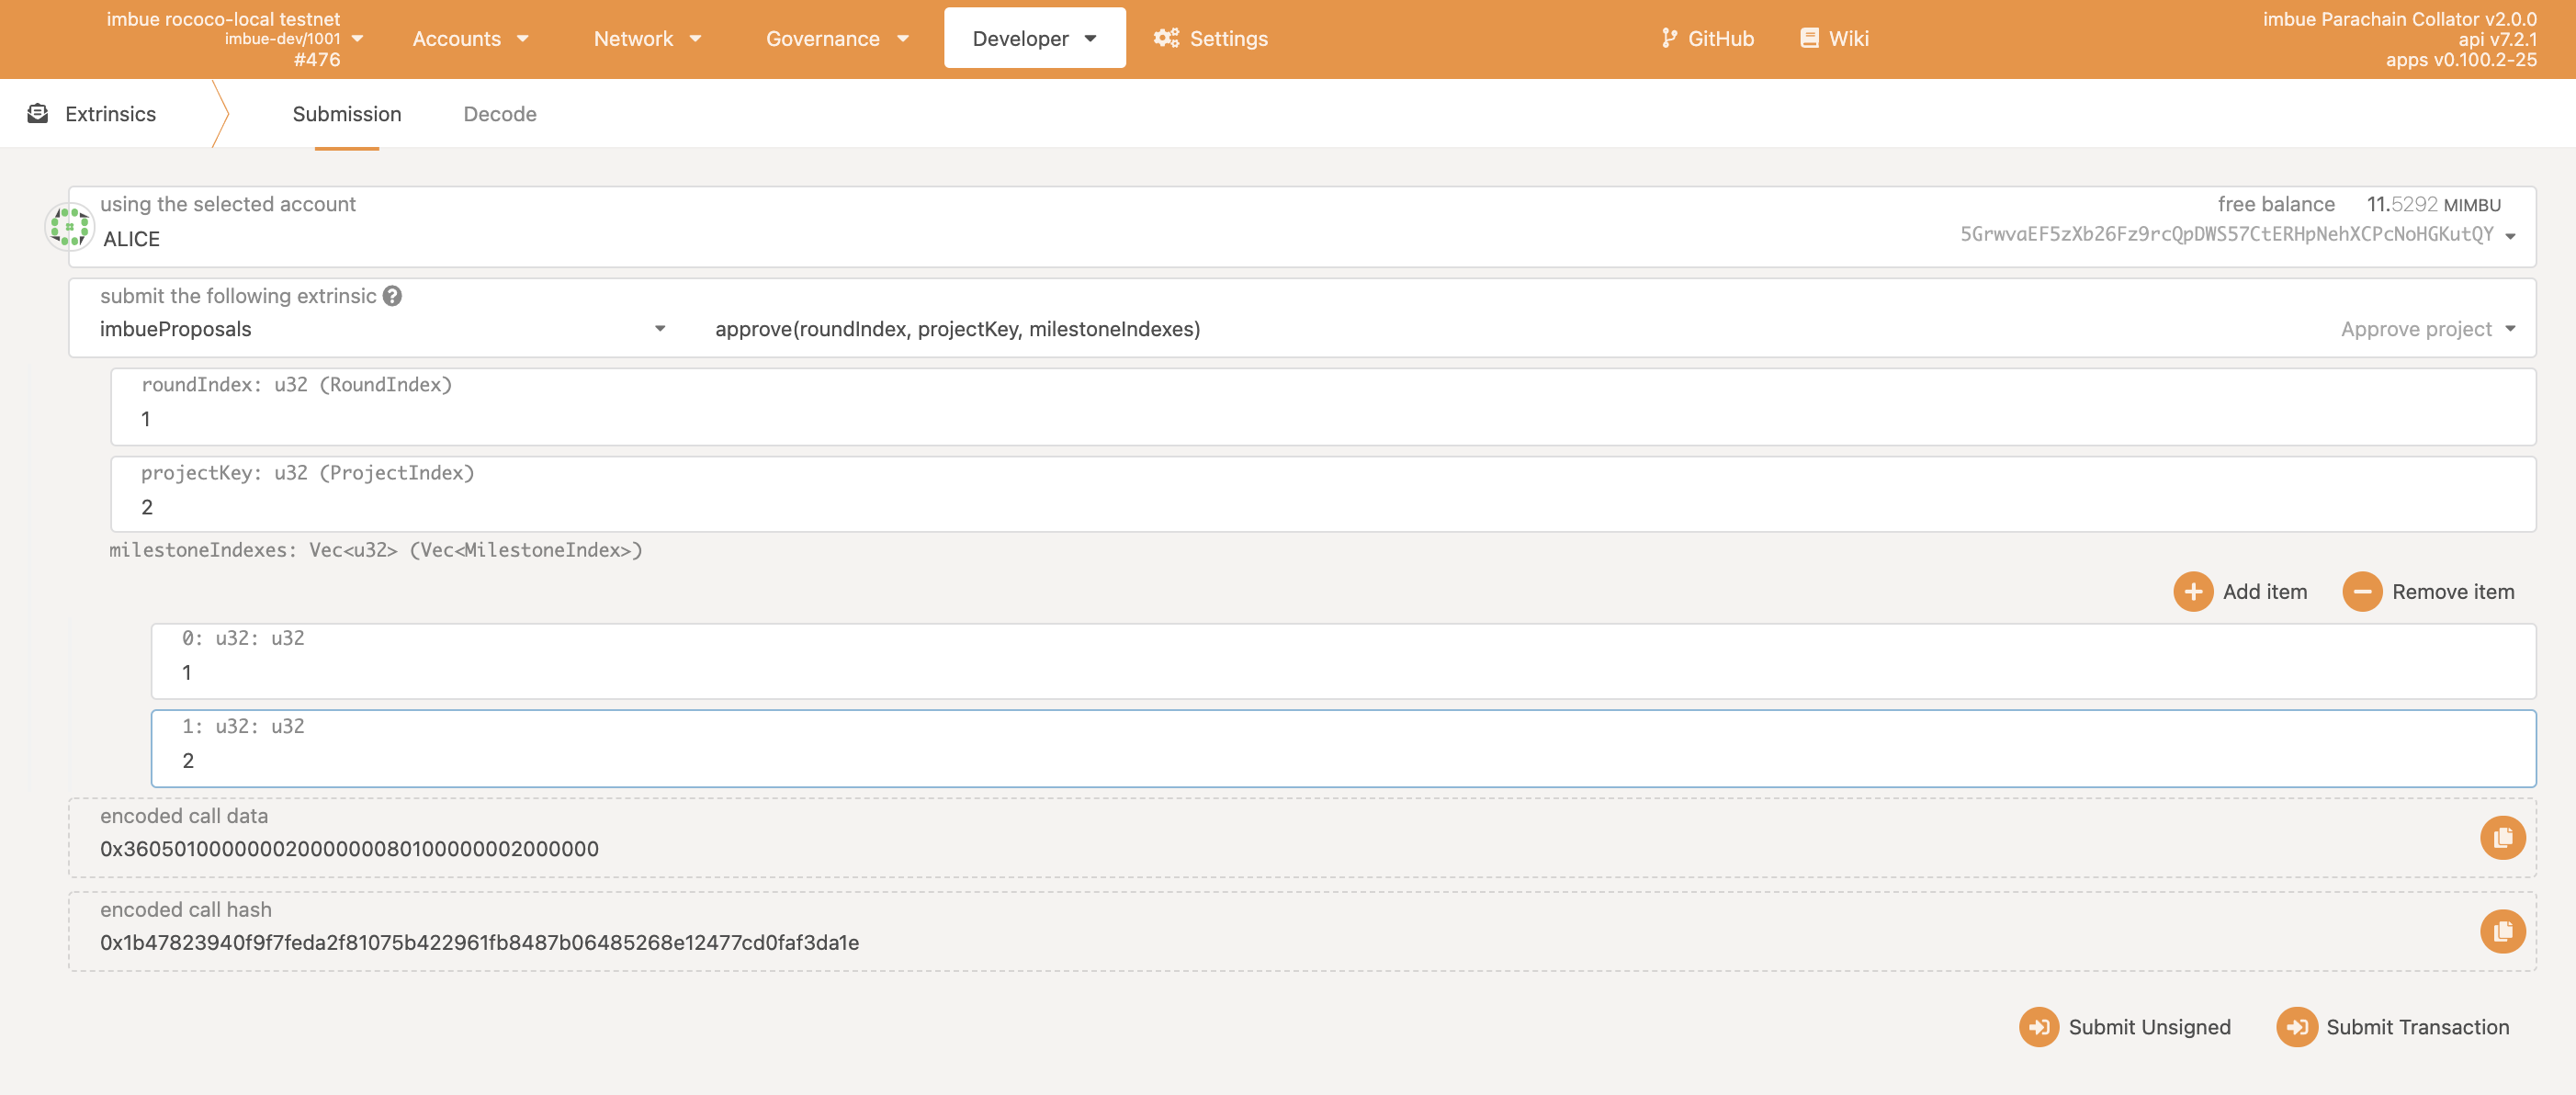
- Approve the project proposal: This extrinsic is called to approve a project proposal with the milestones that is being approved. From the UI select the our imbueProposals pallet and then select the function below.
approve(origin: OriginFor<T>, round_index: RoundIndex, project_key: ProjectIndex, milestone_indexes: Vec<MilestoneIndex>)To approve a project we need to pass the following parameters
- Origin: This is the account trying to call the extrinsic
- RoundIndex: the scheduled round's index
- project_key: unique key that act as your project index
- milestone_indexes: The list of milestones which you want to approve


