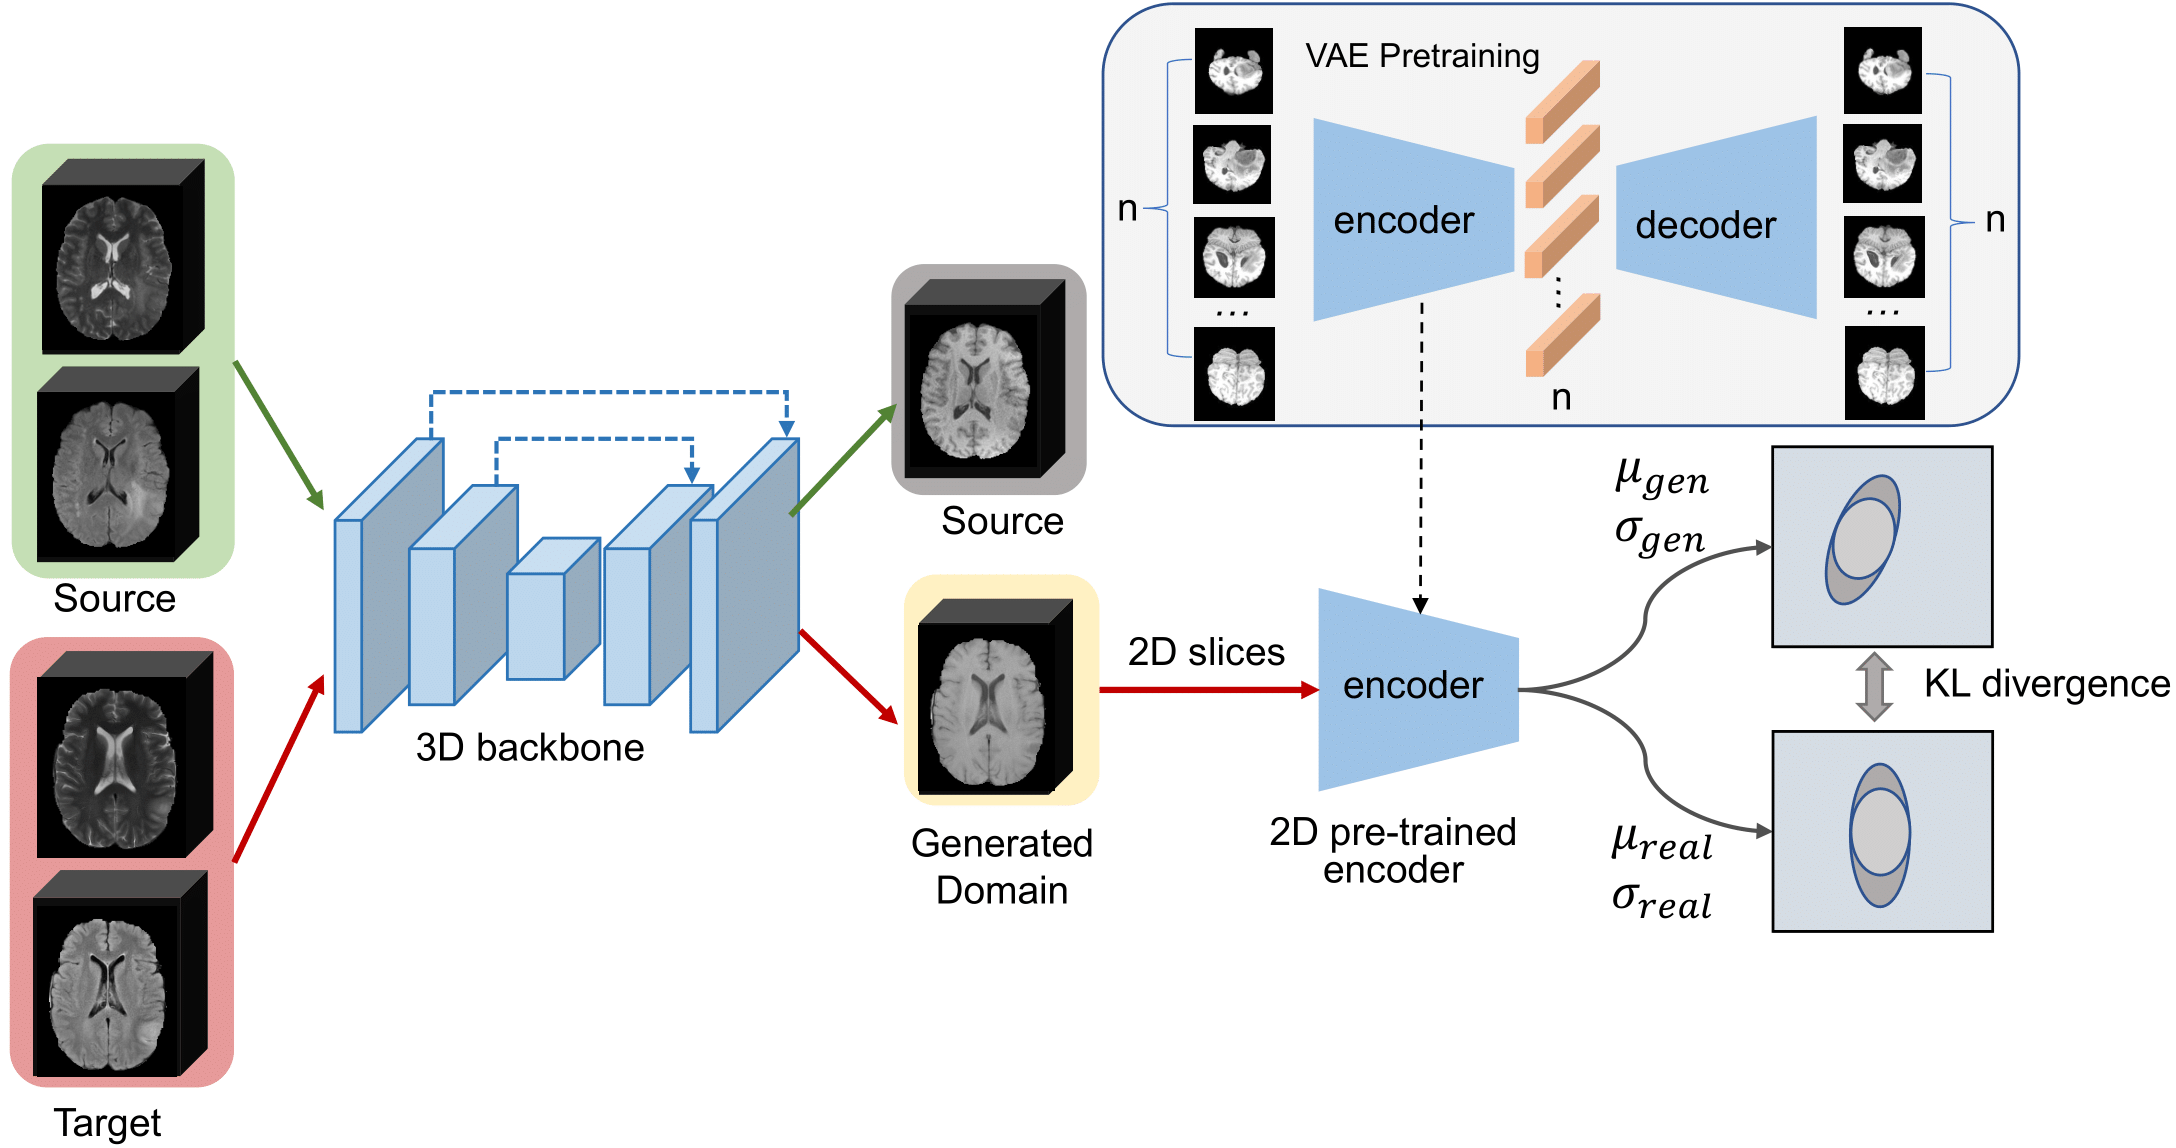
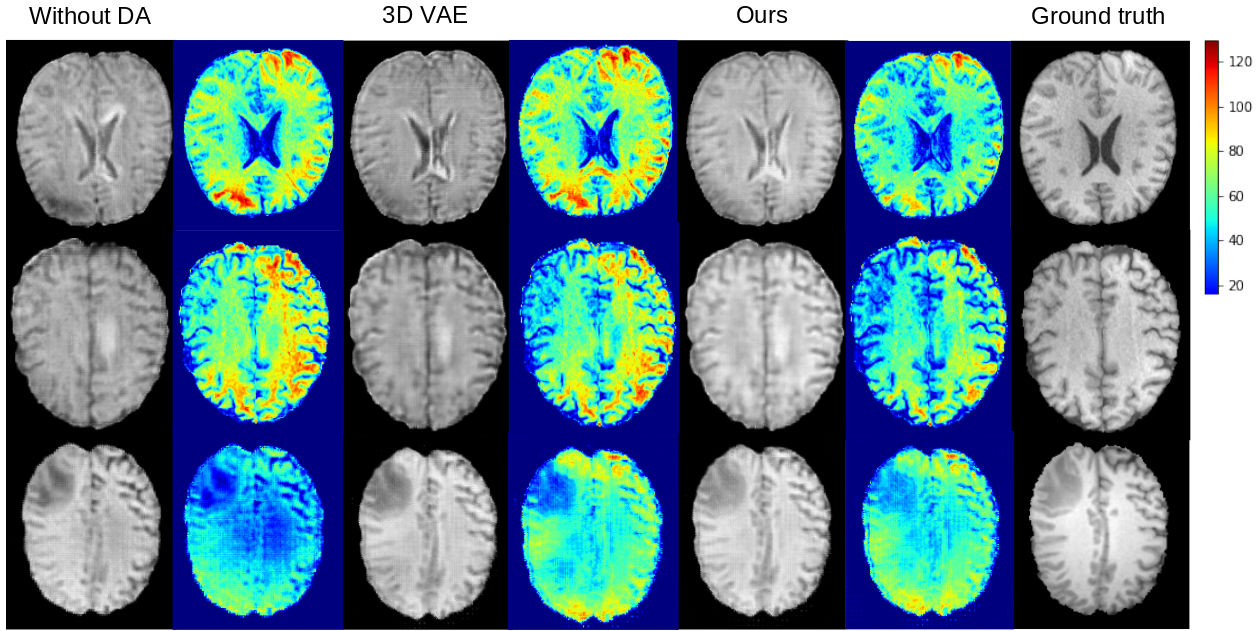
This is the offical Pytorch implementation of our MICCAI 2022 paper, Domain-adaptive 3D Medical Image Synthesis: An Efficient Unsupervised Approach.
Medical image synthesis has attracted increasing attention because it could generate missing image data, improving diagnosis and benefits many downstream tasks. However, so far the developed synthesis model is not adaptive to unseen data distribution that presents domain shift, limiting its applicability in clinical routine. This work focuses on ex- ploring domain adaptation (DA) of 3D image-to-image synthesis models. First, we highlight the technical difference in DA between classification, segmentation and synthesis models. Second, we present a novel efficient adaptation approach based on 2D variational autoencoder which approx- imates 3D distributions. Third, we present empirical studies on effects of the amount of data for adaptation and the key hyper-parameters. Our results show that the proposed approach can significantly improve the synthesis accuracy on unseen domains in a 3D setting.
To create a new virtual environment on your linux operating system, please use the following command:
conda env create -f environment.ymlTo train the network in the supervised manner, please make sure that your data is similiar to our structure:
domain1_train
├── BraTS19_CBICA_AAB_1
│   ├── BraTS19_CBICA_AAB_1_flair.nii.gz
│   ├── BraTS19_CBICA_AAB_1_seg.nii.gz
│   ├── BraTS19_CBICA_AAB_1_t1ce.nii.gz
│   ├── BraTS19_CBICA_AAB_1_t1.nii.gz
│   └── BraTS19_CBICA_AAB_1_t2.nii.gz
├── BraTS19_CBICA_AAG_1
│   ├── BraTS19_CBICA_AAG_1_flair.nii.gz
│   ├── BraTS19_CBICA_AAG_1_seg.nii.gz
│   ├── BraTS19_CBICA_AAG_1_t1ce.nii.gz
│   ├── BraTS19_CBICA_AAG_1_t1.nii.gz
│   └── BraTS19_CBICA_AAG_1_t2.nii.gz
├── BraTS19_CBICA_AAL_1
│   ├── BraTS19_CBICA_AAL_1_flair.nii.gz
│   ├── BraTS19_CBICA_AAL_1_seg.nii.gz
│   ├── BraTS19_CBICA_AAL_1_t1ce.nii.gz
│   ├── BraTS19_CBICA_AAL_1_t1.nii.gz
│   └── BraTS19_CBICA_AAL_1_t2.nii.gz
......
In order to train the network with 2D VAE in unsupervised manner, please manually split the target domain into validation set and testing set.
domain2_val
├── BraTS19_TCIA01_131_1
├── BraTS19_TCIA01_147_1
├── BraTS19_TCIA01_150_1
├── BraTS19_TCIA01_180_1
├── BraTS19_TCIA01_186_1
......
domain2_test
├── BraTS19_TCIA05_396_1
├── BraTS19_TCIA05_444_1
├── BraTS19_TCIA05_456_1
├── BraTS19_TCIA05_478_1
......
After processing data, your_dataset_path should look like this:
your_dataset_path
├── domain1_test
├── domain1_train
├── domain1_val
├── domain2_test
├── domain2_train
├── domain2_val
First,
cd 3D-MRI/
Then
python train.py \
     --dataroot your_dataset_path \
     --name t2_flair_2_t1_pix2pix_sit_192_CBICA_supervised \
     --model pix2pix --direction AtoB --dataset_mode brain_3D \
     --dataset_name domain1 \
     --n_epochs 50 --n_epochs_decay 70 \
     --lr 0.0001 --input_nc 2 --output_nc 1 \
     --paired --netG sit --netD n_layers --n_layers_D 1 \
--batch_size 1 --gpu_ids 0 \Note: in order to run the above command, your gpu memory size has to be at least 24 GB. If you want to save your memory size, you can add "--amp" flag to the above command. By doing so, 12 GB memory would be enough.
To train the 2D VAE for the unsupervised domain adaptation (UDA) process, please make sure that 3D volumes are cropped into 2D slices.
First,
cd slice-to-3d-brain-vae
Then, modify the "input_folder" in preproc_hcp/process_our_data.py to your 3D-volume path; modify the "precess_folder" in the same file to your 2D-slice path.
After the modification, please run:
python preproc_hcp/process_our_data.py
To train the 2D VAE, please run:
python experiments/main_experiment_256.py --batch-size 256 --save_epoch_interval 10 --mri_data_dir your_2D_slice_path --learning-rate 0.0001 --kl-latent-loss-weight 0.01
After the training is complete, you can get a 2D VAE's weight.
If your source domain is "CBICA", and your target domain is "TCIA" as we described in our paper, the training command can be:
 python fine_tune.py \
     --dataroot your_dataset_path \
     --name t2_flair_2_t1_pix2pix_sit_192_CBICA2TCIA_uda_amp_5_55 \
     --model pix2pix --direction AtoB --dataset_mode brain_3D_transfer \
     --dataset_name_1 domain1_train --dataset_name_2 domain2_val \
     --n_epochs 5 --n_epochs_decay 0 \
     --lr 0.000001 --input_nc 2 --output_nc 1 \
     --paired --netG sit  --batch_size 1 --gpu_ids 0 \
     --netVae_path your_2D_VAE_weight_path
     --amp --pretrained_name t2_flair_2_t1_pix2pix_sit_192_CBICA --continue_train --ele_percent 55
NOTE: even with "--amp" flag, you still needs at least 20 GB gpu memory for this UDA training process.
After your UDA training is complete, you can run the following command to test the performance of your 3D image-to-image model:
python test.py \
    --dataroot ../datasets/BraTS_3D_MICCAI/ \
    --name t2_flair_2_t1_pix2pix_sit_192_CBICA2TCIA_uda_amp_5_55 \
    --model pix2pix --direction AtoB \
    --dataset_mode brain_3D --dataset_name domain2 \
    --input_nc 2 --output_nc 1 --paired --netG sit \
    --batch_size 1 --gpu_ids 0 --num_test 139 --phase test
If you find our work is useful in your own research, please cite our work:
@misc{https://doi.org/10.48550/arxiv.2207.00844,
  author = {Hu, Qingqiao and Li, Hongwei and Zhang, Jianguo},
  title = {Domain-Adaptive 3D Medical Image Synthesis: An Efficient Unsupervised Approach},
  publisher = {arXiv},
  year = {2022},
}
Our work is released under the GPL-3.0 license. Please check the LICENSE for more information.
The image-to-image training code is from 3D-MRI-style-transfer.
The 2D VAE training code is build upon slices-to-3d-brain-vae.

