Woosmap’s Link Cartridge add to your Salesforce Commerce Cloud website an advanced Store Locator Widget.
To match your preferences and website’s graphic style, all the properties of your Store Locator Widget can be customised through the Salesforce Business Manager.
This document provides technical instructions for using the Woosmap SFCC Cartridges to integrate the Woosmap Store Locator Widget into the SFCC storefront.

| Term | Description |
|---|---|
| SFCC | SalesForce Commerce Cloud |
| Business Manager (BM) | The primary tool used to configure the SFCC platform and customer storefront |
| SFRA | StoreFront Reference Architecture |
The Woosmap cartridge allows the customer to connect to a customized Store Locator displaying stores on a map. Woosmap cartridge replaces the internal SFCC Store Locator with the Woosmap Store Locator Widget.
The following cartridges are available to integrate with your SFCC storefronts:
| Cartridge Name | Description |
|---|---|
| int_woosmap | Handles the display of the Woosmap Store Locator Widget in your SFCC website. |
| bm_woosmap | Allows you to customise the Woosmap Store Locator Widget look and feel to match your preferences and website’s graphic style. |
Use of the Woosmap cartridges requires keys from Woosmap. Please register on woosmap and contact Woosmap customer service.
The Woosmap cartridges does not collect and process user profile information. For additional privacy information, please contact your Woosmap Account Manager.
The CLI used here is sgmf-scripts. You could also upload
the cartridges using dw-utils or extensions for IntelliJ IDEA, VS code and
Eclipse.
- Download the cartridge source from the Partner Marketplace.
- Unzip the directory
- Install the dependencies from the unzipped directory.
cd /folder/SalesforceCommerceCloud-link_woosmap-...
npm install- Create a config file called
dw.jsonin the directory that contains the cartridges, and add the following content:
{
  "hostname": "<*.demandware.net (without https/http)>",
  "username": "<username>",
  "password": "<password>",
  "code-version": "<code-version>"
}hostnameis the hostname you use to access your sandbox, for example"zzte-003.sandbox.us02.dx.commercecloud.salesforce.com",usernameandpasswordare your account manager email and password,code-versionis the name of the active code version in Administration → Code Deployment. For example,"SFRA_UPC_05_04_2021".
- Upload the cartridges by executing the following command.
npm run uploadCartridge- Verify that the Woosmap cartridges are correctly uploaded by going to Administration → Development Setup → Folder Browser → Cartridges.
-
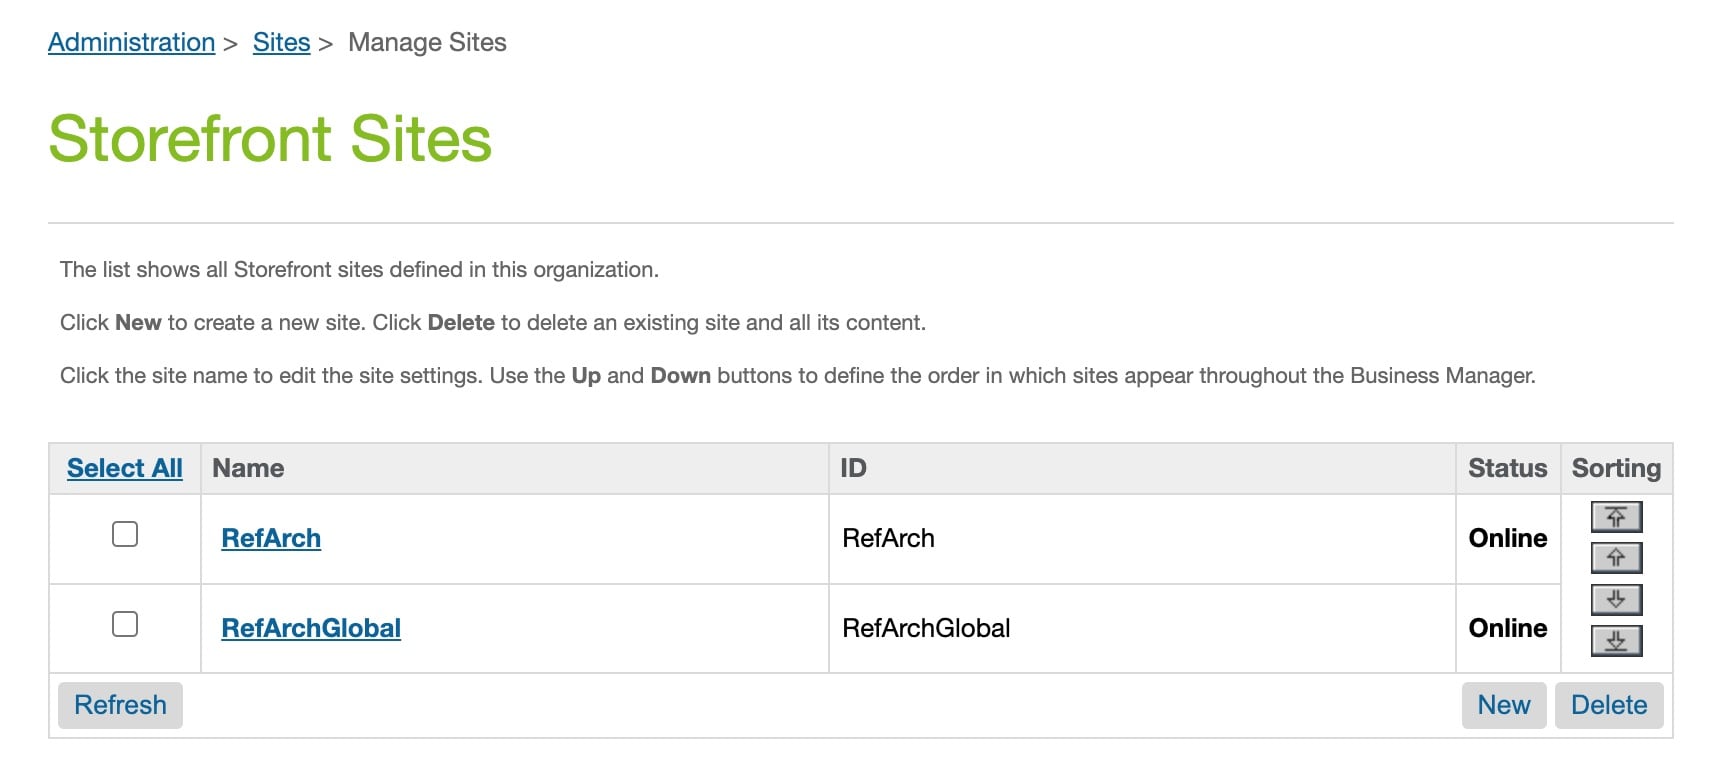
Go to Administration → Sites → Manage Sites and select your desired site from the Storefront Site list:
-
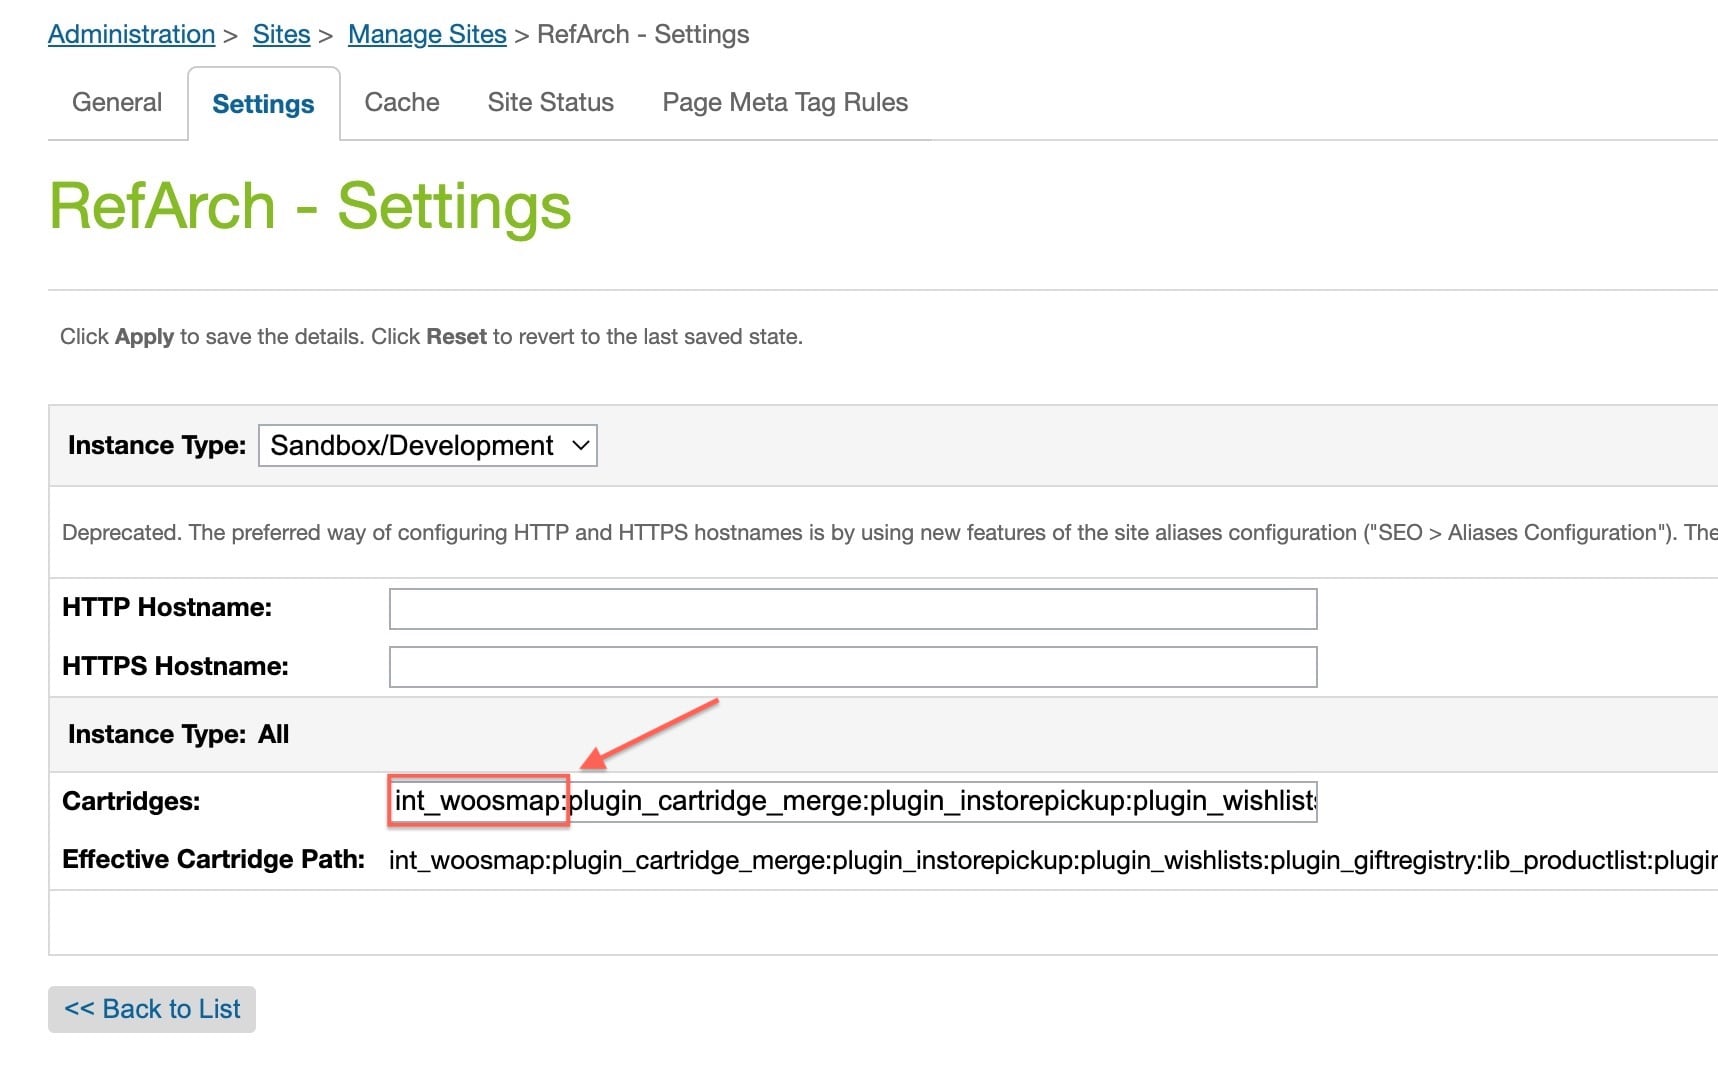
Go to the Settings tab. If your site is based on SFRA, add int_woosmap at the beginning of your cartridge path.


Next, add the cartridge to the Business Manager:
-
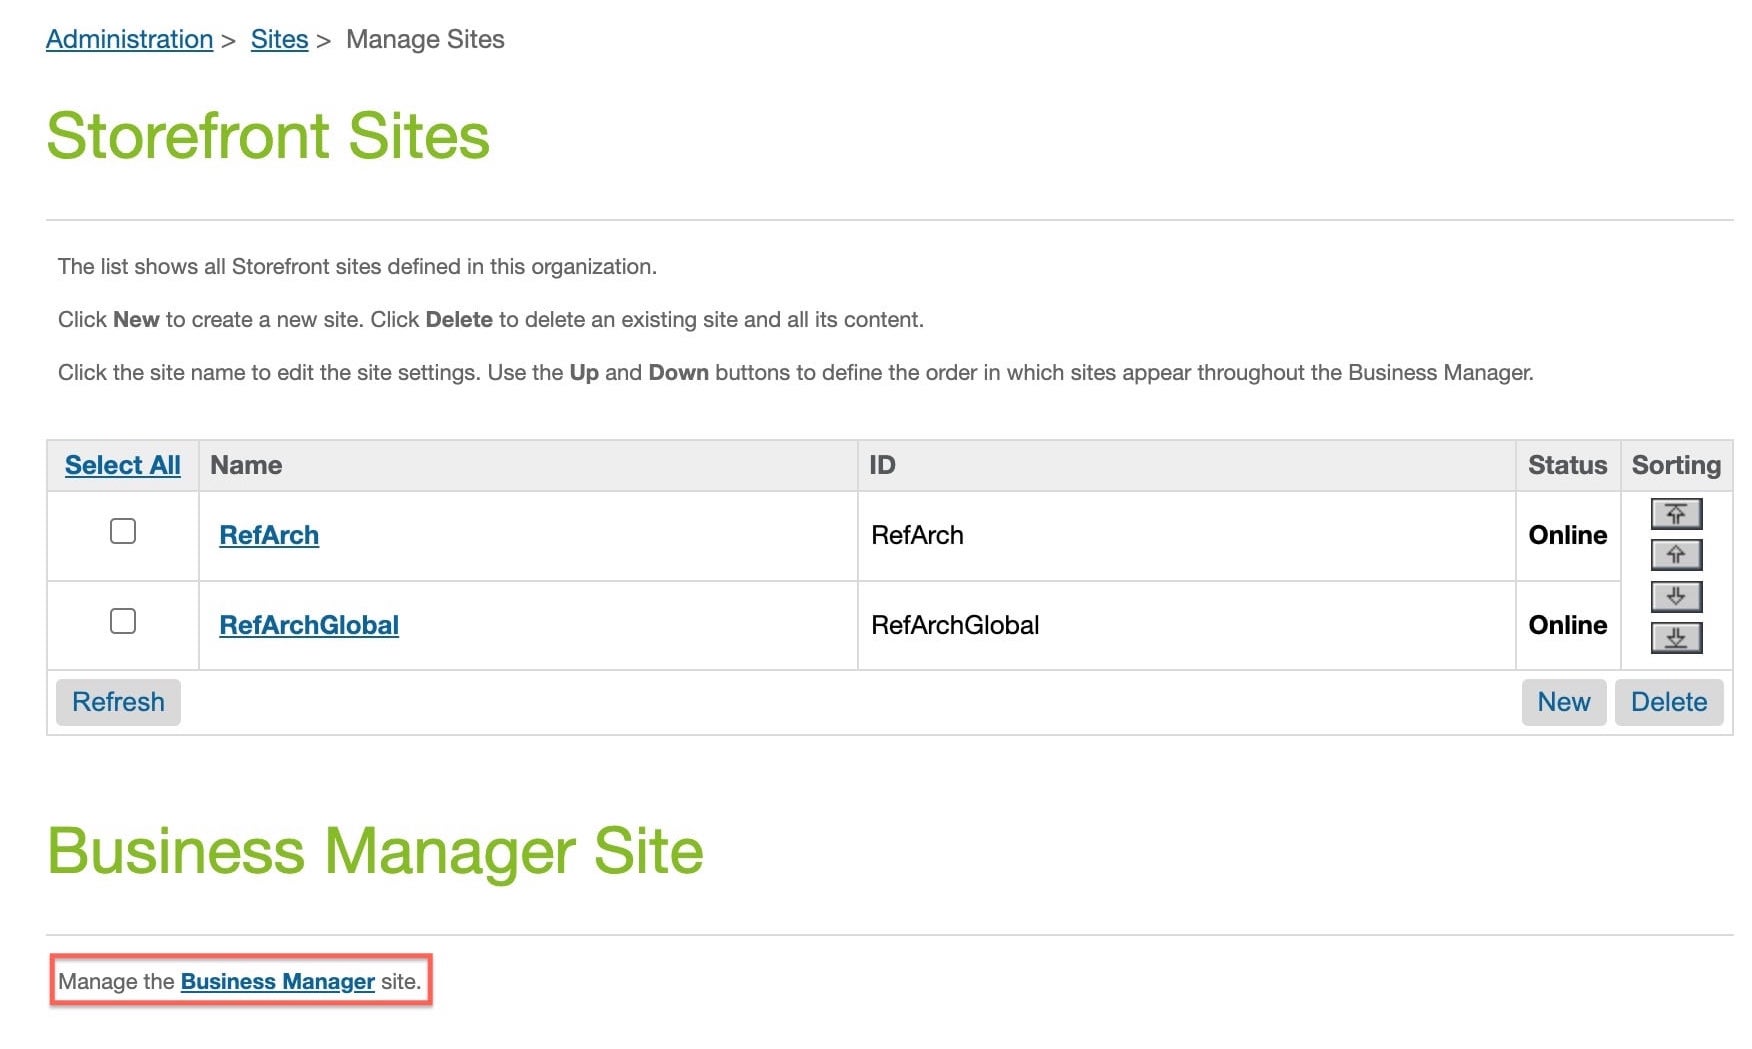
Go back to Administration → Sites → Manage Sites and click on Manage the Business Manager Site.
-
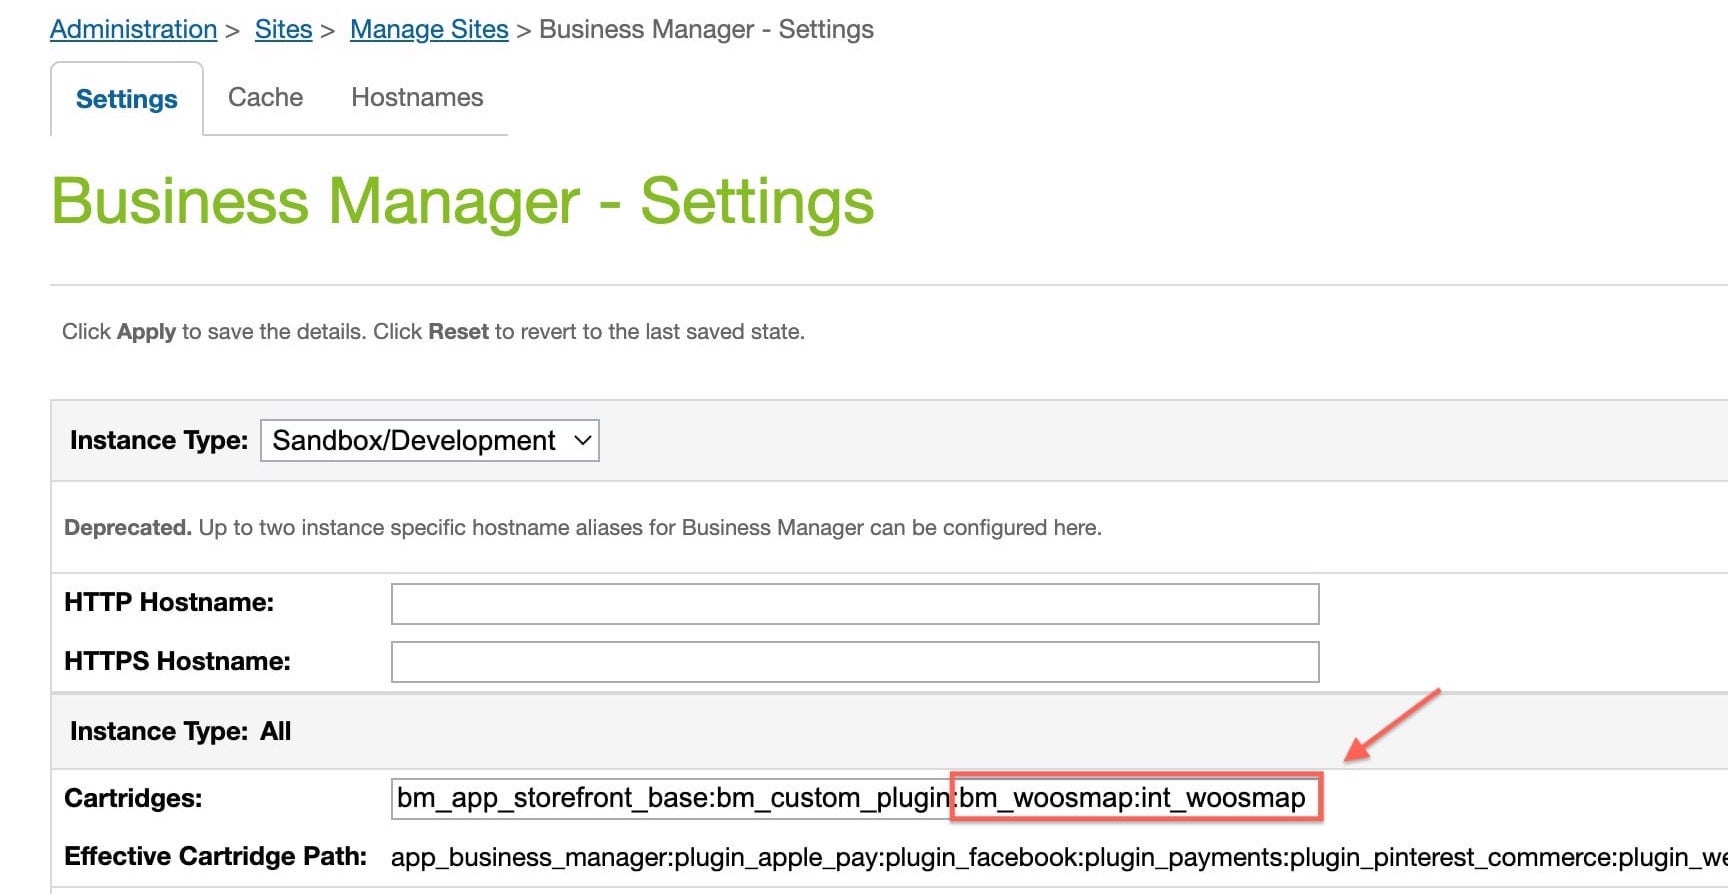
Go to the Settings tab, and add bm_woosmap:int_woosmap at the end of your cartridge path.


The metadata linked to the cartridge contain mandatory Custom Preferences for Woosmap as well as default behaviour to access the store locator page (a link in the footer).
Before uploading the metadata to your SFCC storefront, adapt the following to youir site:
- Under
metadata/woosmap/libraries, rename the folderRefArchSharedLibraryto match the ID of your library. - Open the
metadata/woosmap/libraries/RefArchSharedLibrary/library.xmlfile and rename thelibrary-idattribute to match your own. - Under
metadata/woosmap/sites, rename the folderRefArchto match the id of your site. - Compress as a Zip file the metadata folder
metadata/woosmap.
You can then upload your metadata.
-
Go to Administration → Site Development → Site Import & Export, and upload the
woosmap.ziparchive from the metadata folder. -
To import
woosmap.zip, select the radio button next to it and click the import button.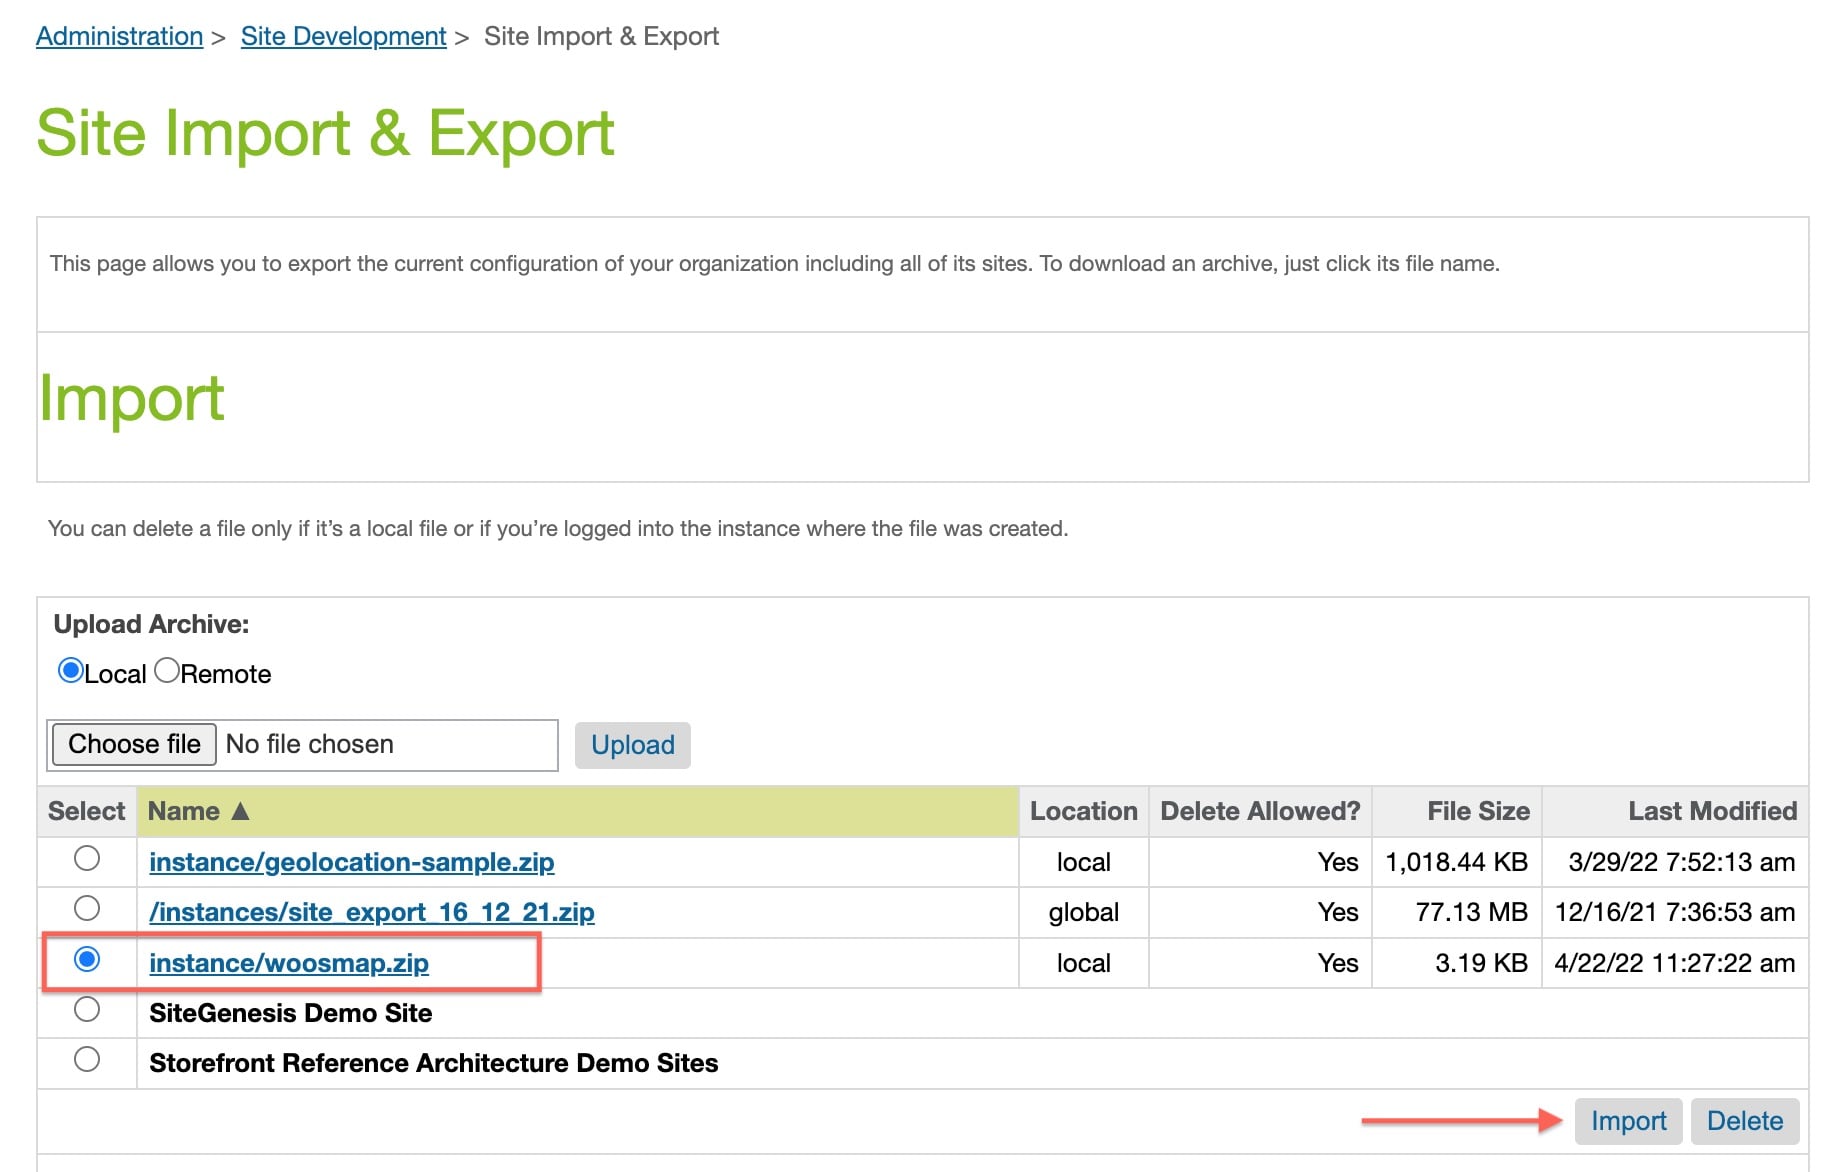
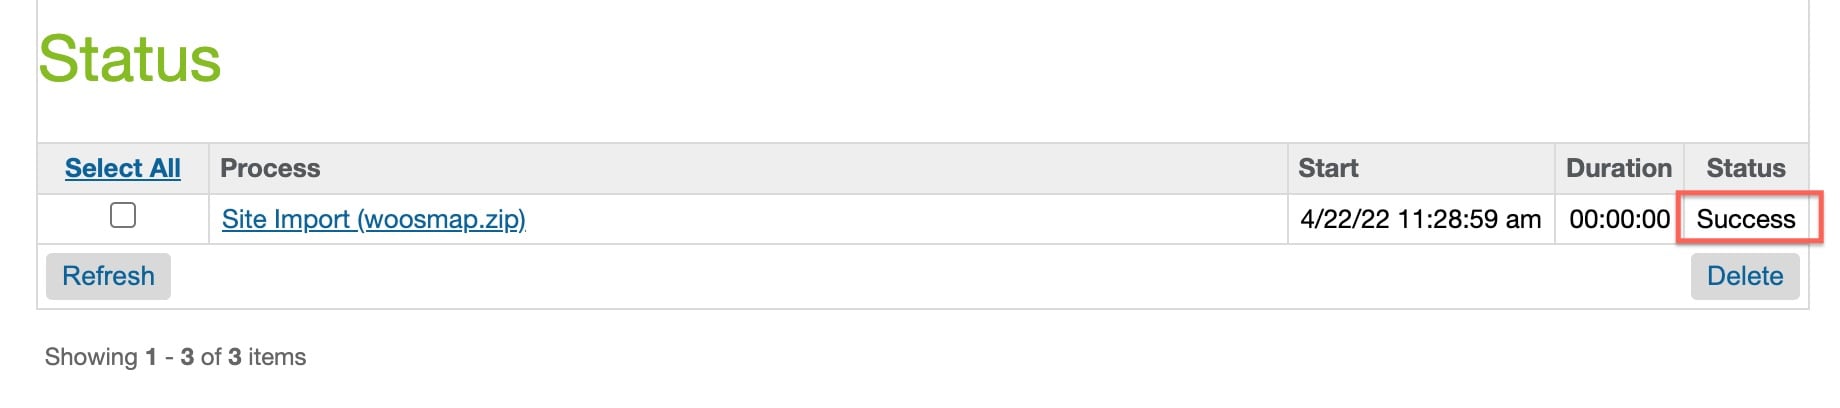
-
Check the import is successful.


After import is successfully done, you should see the new Woosmap Custom Preferences in Merchant Tools → Site
Preferences → Custom Preferences → Woosmap.

Select Woosmap and you should see fields for cartridge setup.

| Field | Description |
|---|---|
| Enable Woosmap Store Locator Widget | Activate Woosmap Store Locator Widget in your website |
| Woosmap Public Api Key* | Public Api Key for Woosmap |
| Mobile Break Point | Render Store Locator Widget in Mobile View when client screen is under this value (in pixel) |
| Store Locator Widget Configuration | JSON description of Store Locator Widget configuration |
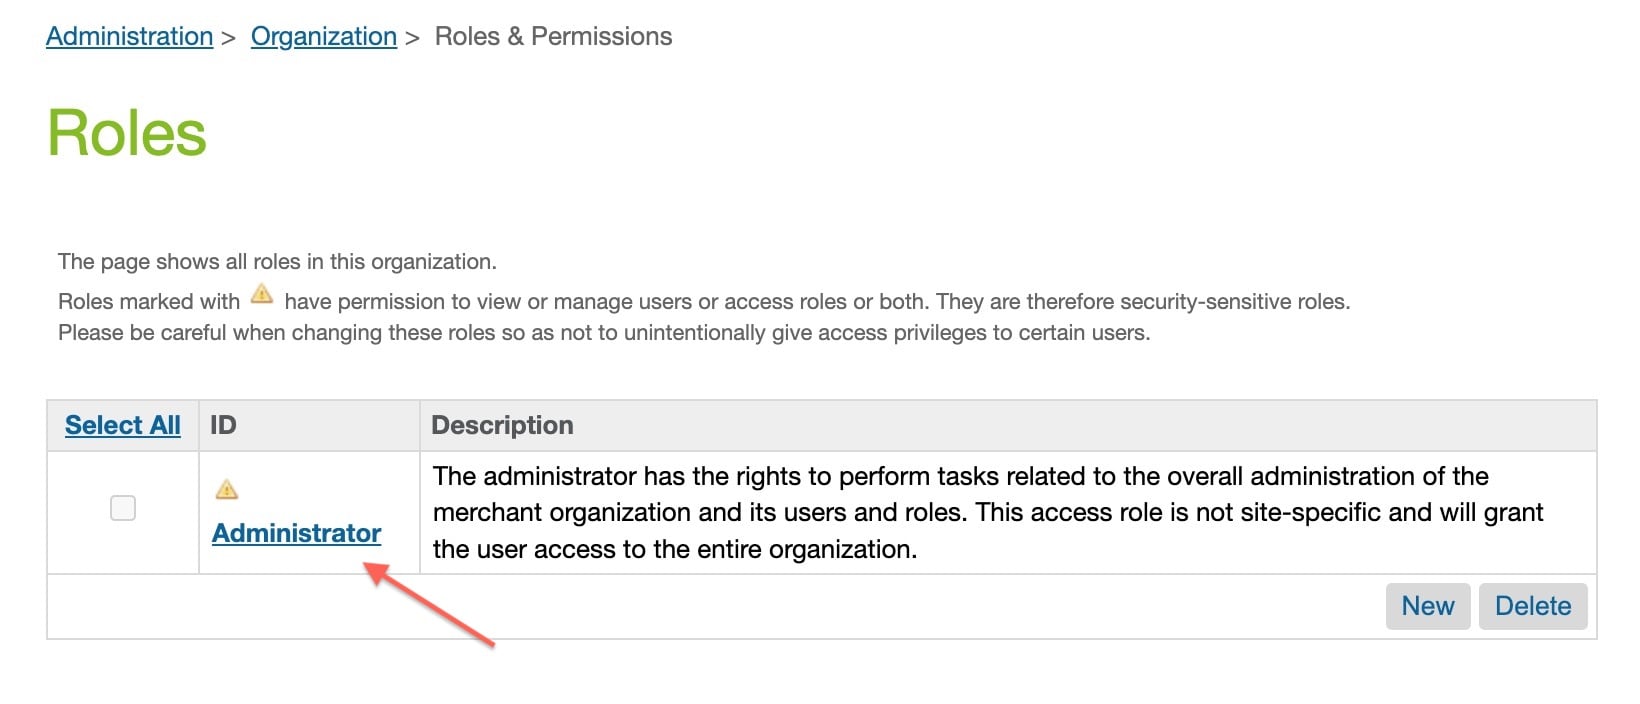
In order to access the BM Woosmap Extension and configure your preferences, you need to give administrator roles access to this module.
-
Go to Administration → Organization → Roles & Permissions, and click on the Administrator role.
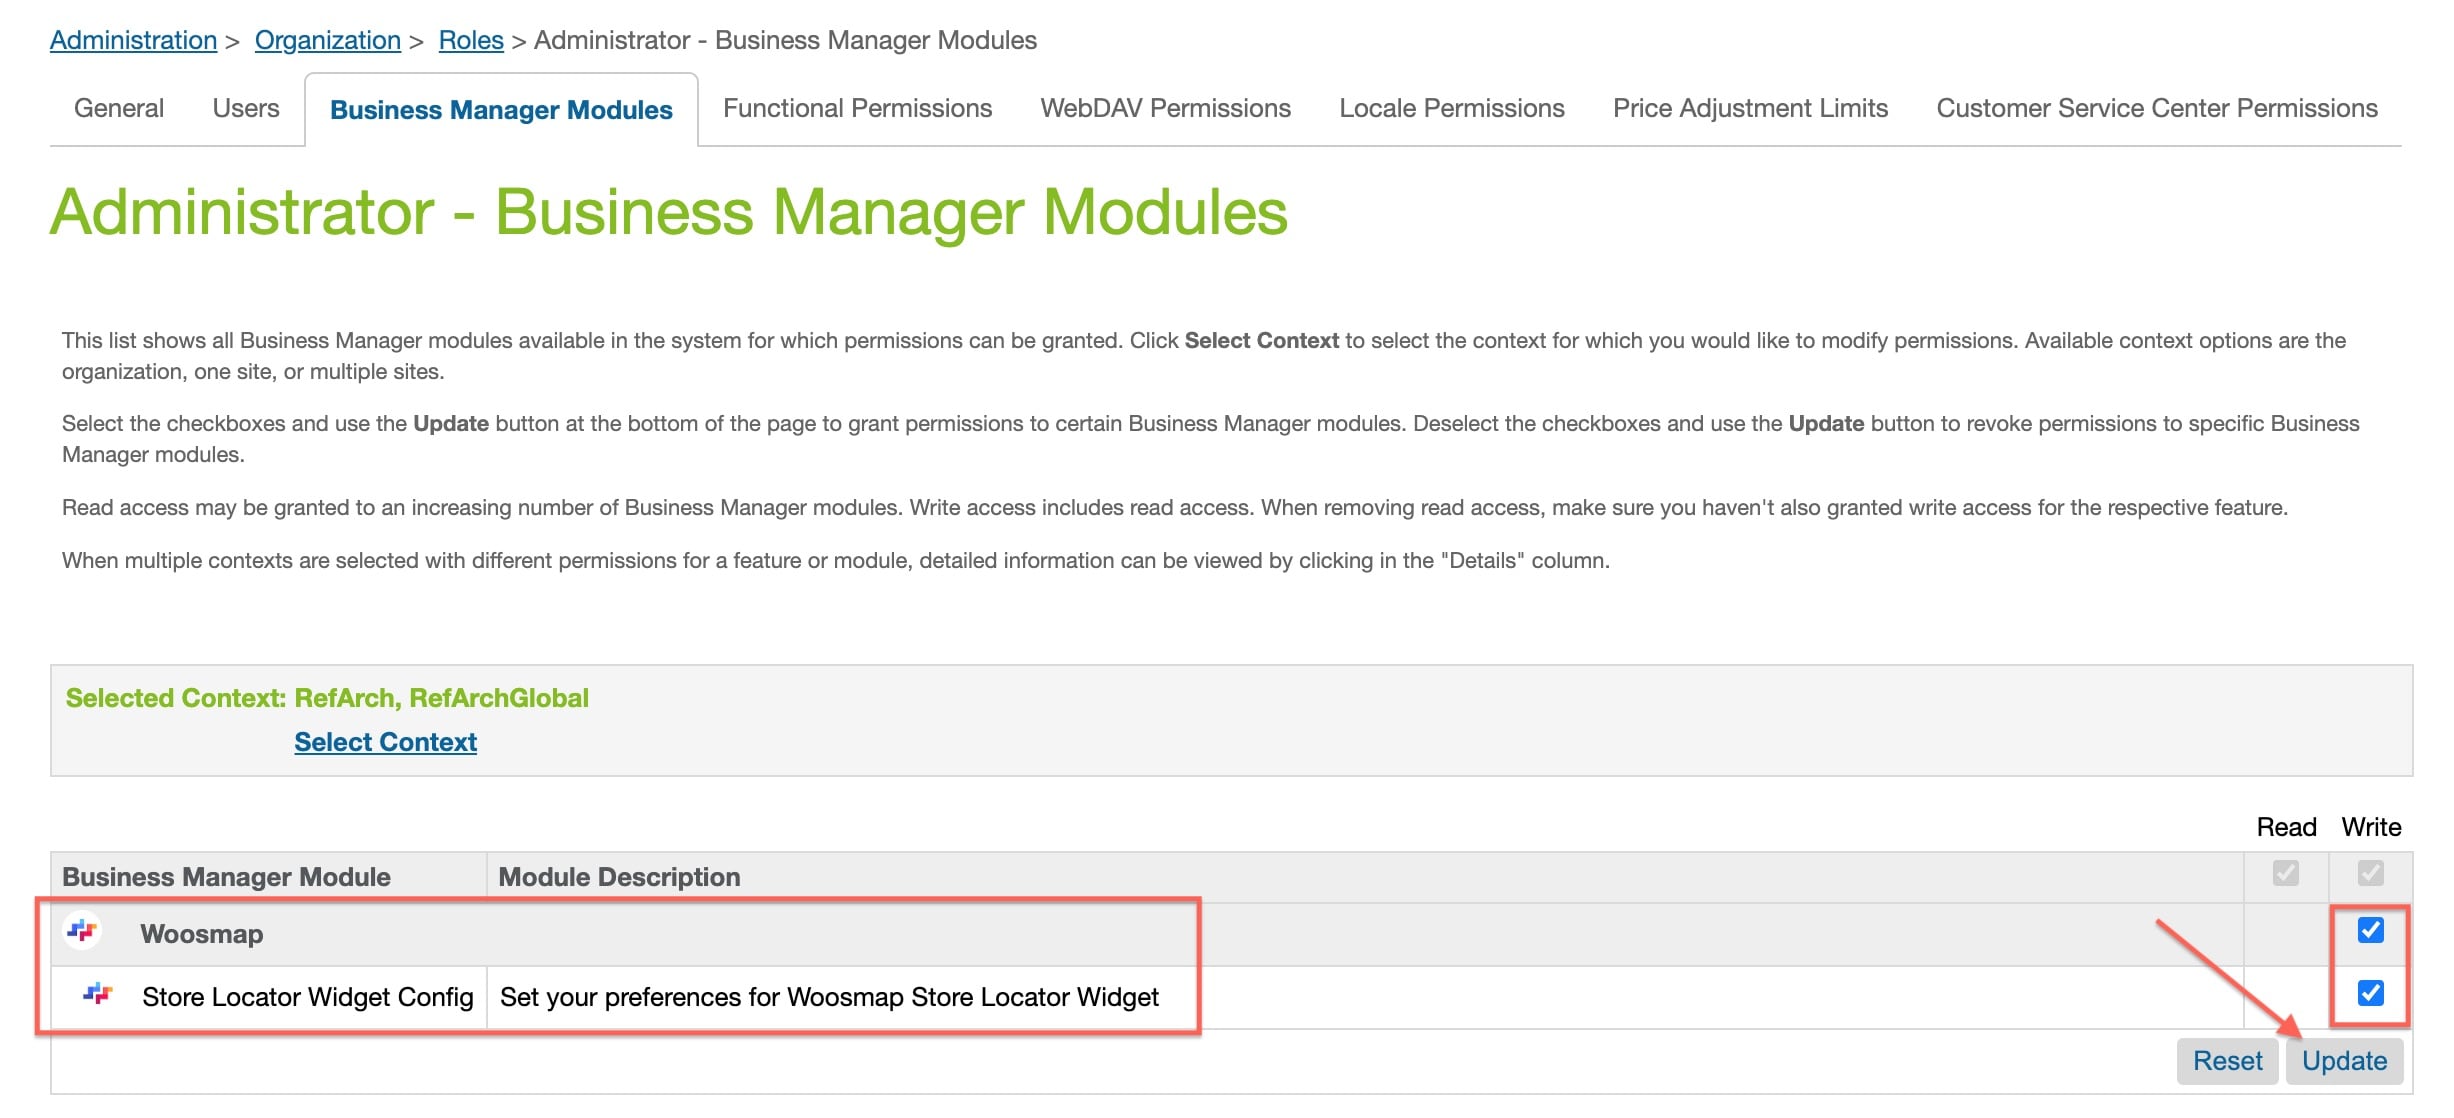
-
Switch to the Business Manager Modules tab, select your site name (e.g.
RefArchfor example), and click Apply. -
Check the checkbox for Woosmap and click Update button


A new menu should now appear in Merchants Tools.

To configure the Woosmap Store Locator Widget through the BM extension go to Merchants Tools → Woosmap → Store Locator
Widget Config.

Check integration test in folder test/integration/woosmap and unit test in folder test/unit/woosmap.
Stores data come from Woosmap APIs. No Stores Data are hosted on SFCC.
See Implementation Guide,
See Component Overview → Functional Overview section.
No known issues
| Version | Date | Change |
|---|---|---|
| 22.1.0 | 2022-04-22 | Initial release |