serve starts a simple temporary static file server in your current directory and prints your IP address to share with colleagues.
It's based on a Gist by Paul Mach.
We recommend installing serve with one of the following package managers, because they provide you with functionality such as automatic updates, instant availability as command in the PATH, easy removal, sandboxing etc.
But alternatively you can always install serve manually as well, see Manually.
The easiest way is to use the package manager Scoop:
scoop install serve
Another option is Chocolatey:
choco install serve
You can also have a look at the description in the Chocolatey Gallery on https://chocolatey.org/packages/serve/.
The easiest way is to use the package manager Homebrew:
brew tap philippgille/tap
brew install serve
Or in a single command:
brew install philippgille/tap/serve
The easiest way is to use the package manager Snap, which is installed by default on Ubuntu 16.04 and later:
sudo snap install serve
You can also have a look at the description in the Snap Store on https://snapcraft.io/serve.
Note: Due to restrictions by Snap,
servecan only serve files in the user's$HOMEdirectory.
go get github.com/philippgille/serve
Note: Requires your
$GOPATH/bindirectory to be in yourPATH, which is usually the case.
You can download the binary for your OS from the releases simply make it available as command in your PATH. See Manual Installation for details.
serve is also available as Docker image in the Docker Hub: https://hub.docker.com/r/philippgille/serve/
To start the Docker container, just run:
docker run -v ${PWD}:/share --network "host" philippgille/serve
-d "/share" is used as default flag, but you can overwrite it with any other flag. For all flags, see Usage below.
Note: When using Docker on Windows or macOS, it probably runs in a VM (Hyper-V on Windows Pro, VirtualBox on Windows Home). This means that the network interfaces and their IP addresses aren't the ones of your host machine, but the ones of the VM. These are usually not reachable from other peers in the network your host machine is in. You have to either change the VMs configuration or set up port forwarding on your host machine.
$ serve -h
Usage of serve:
  -d string
        The directory of static file to host (default ".")
  -p string
        Port to serve on (default "8100")
  -t    Test / dry run (just prints the interface table)
  -v    Print the version
Press Ctrl+C in the terminal to stop the server.
~/path/to/servable/files$ serve

Serving "." on all network interfaces (0.0.0.0) on HTTP port: 8100

Local network interfaces and their IP address so you can pass one to your colleagues:

      Interface      |  IPv4 Address   |              IPv6 Address
---------------------|-----------------|----------------------------------------
lo                   | 127.0.0.1       | ::1
eth0                 |                 |
wlan0                | 192.168.178.123 | fe80::e7b:fdaf:ae5d:3cfa
virbr0               | 192.168.122.1   |
br-8ef347e8a4e9      | 172.22.0.1      | fe80::42:c9ff:fed3:35a
docker_gwbridge      | 172.21.0.1      |
docker0              | 172.17.0.1      | fe80::42:c6cf:fe3d:a554
veth0d522f4          |                 | fe80::307a:7fcf:fe3d:cba4

You probably want to share:
http://192.168.178.123:8100
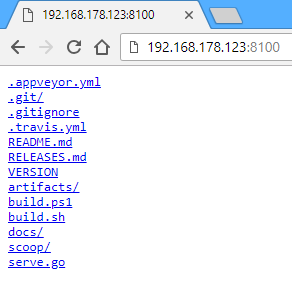
When opening the URL http://192.168.178.123:8100 in a browser you see the directory you're serving. For example:
To build serve by yourself:
- Install Go
cdinto the root directory of this repository- Execute:
go build
Note: The binaries in GitHub Releases are shrinked with additional Go linker flags and UPX
To also make serve available as command in other directories:
- Add
$GOPATH/binto yourPATHif you haven't done that already when installing Go - Execute:
go install
There are also build scripts for Windows and Linux for creating release artifacts (shrinked binaries for Windows, macOS and Linux):
- Windows:
build/build.ps1 - Linux:
build/build.sh
Note: They require Go and UPX to be installed
To build with a Docker container:
docker run --rm -v ${PWD}:/go/src/github.com/philippgille/serve -w /go/src/github.com/philippgille/serve golang build/build.sh noupx
Or with UPX:
docker run --rm -v ${PWD}:/go/src/github.com/philippgille/serve -w /go/src/github.com/philippgille/serve golang bash -c "apt update && apt install -y upx-ucl && build/build.sh"
For Scoop and Homebrew no packages need to be built. They use "manifests"/"formulae" and the binaries from GitHub Releases.
For releasing a new version, they need to be updated here:
- Scoop: https://github.com/lukesampson/scoop/blob/master/bucket/serve.json
- Homebrew: https://github.com/philippgille/homebrew-tap/blob/master/serve.rb
For Snap a Git hook is set up in the Snapcraft dashboard to automatically build a new Snap on every commit, so for releasing a new version the file in this repository needs to be updated:
The Snap package can also be built manually, for example with this script which utilizes Docker:
- Windows:
build\build-snap-with-docker.ps1 - Linux:
build/build-snap-with-docker.sh
The Chocolatey packages need to be uploaded manually to Chocolatey here. The package can be built with this script:
- Windows:
build\build-chocolatey.ps1
The Docker image can be built like this:
docker build -f docker/Dockerfile -t philippgille/serve .

