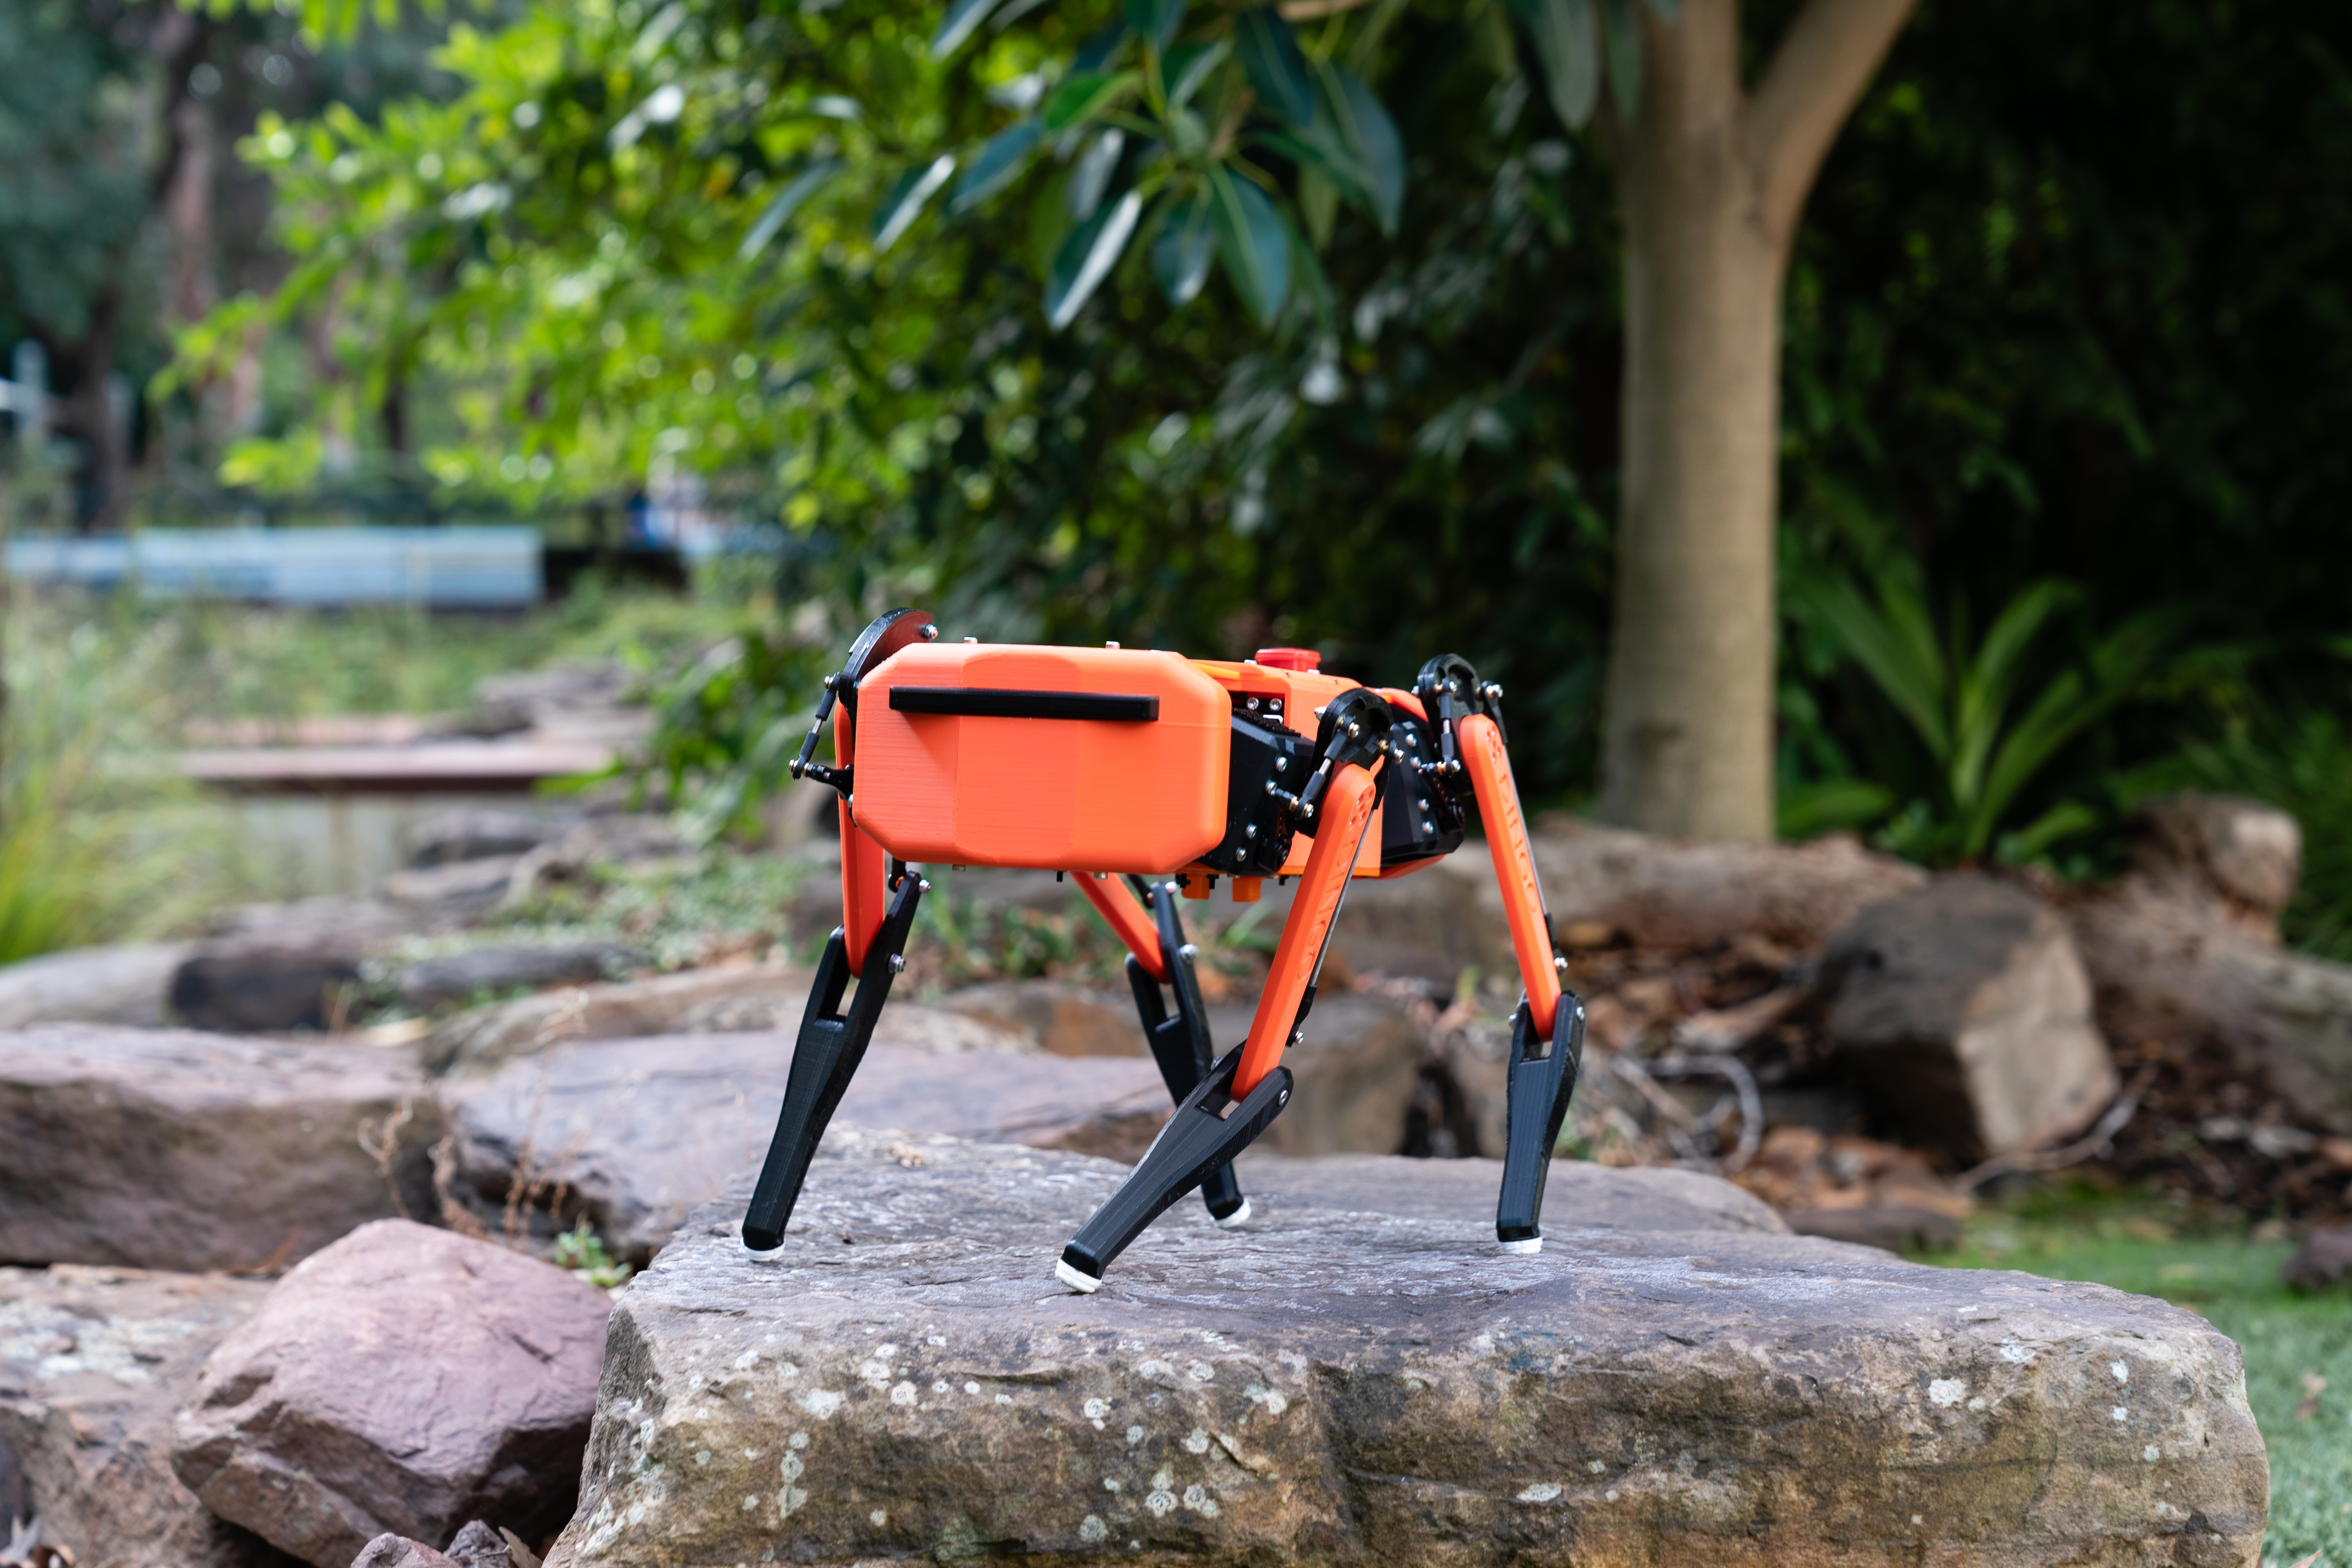
This repository hosts the code for the Dingo Quadruped, a robot designed to be low-cost but capable of conducting research and being extensively modified with additional actuators and sensors. CAD for the Dingo can be found here. A full Bill of materials for purchasable components can be found within this repo.
This code is based on the Stanford Pupper and notspot codebases, with extensive modifications, including integration into ROS 1 Noetic.
The repository includes a driver node, dingo_driver.py, which should be used anytime the code is run. This file enables joystick control of the Dingo, and allows joint and/or task space commands generated by any other code to be passed through the driver via the appropriate ROS command topics. The joystick can also be toggled on and off to override commands received via ROS command topics
The repo also includes a gazebo simulation of the Dingo, based on URDF file and meshes which are also provide.
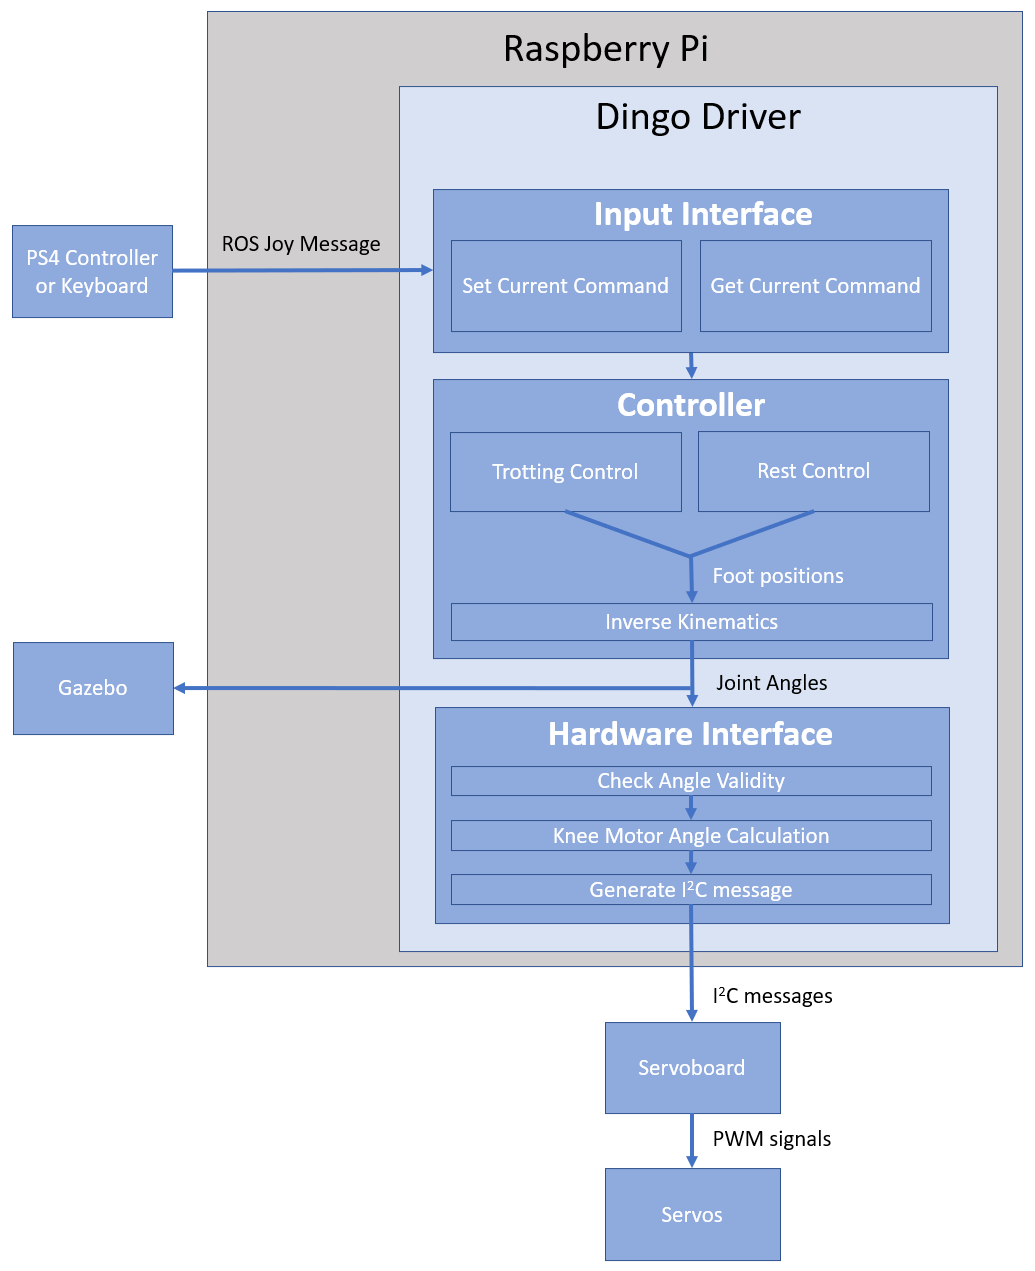
The following flow diagram shows a simplified overview of how a joystick command is handled by the driver to affect joint movements:
├── assets                                    Images used in the readme file
├── dingo_nano                                Code for the Arduino Nano V3 to read sensor data and send it to the Raspberry Pi
└── dingo_ws                                  ROS workspace containing all required packages
   └── src
     ├── dingo                                Package containing node and launch files for running the robot
     ├── dingo_control                        Package containing all files related to control, including kinematics and default trot controller
     ├── dingo_description                    Package containing simulation files (URDF file and meshes)
     ├── dingo_gazebo                         Package containing gazebo files
     ├── dingo_hardware_interfacing
     |  ├── dingo_input_interfacing           Package containing files for receiving and interpreting commands (From a joystick or keyboard)
     |  ├── dingo_peripheral_interfacing      Package containing files for interfacing with the Arduino Nano, LCD screen and IMU
     |  └── dingo_servo_interfacing           Package containing the hardware interface for sending joint angles to the servo motors
     └── dingo_utilities                      Package containing useful utilities
- Install Ubuntu 20.04
- Install ros-noetic
- Install git via
sudo apt-get install git - Create a new folder in your home folder:
mkdir ~/any_folder_name - Change directory to the new folder just created:
cd ~/any_folder_name - Clone this repository into the folder using git:
git clone ... - Move into the dingo_ws folder:
cd /dingo_ws - Initialise rosdep:
sudo rosdep init - Fetch dependencies with rosdep:
rosdep update - Build the workspace:
catkin build - Source the workspace:
source devel/setup.bash - (Optional) Add a line to .bashrc to automatically source the workspace:
echo "source ~/any_folder_name/DingoQuadruped/dingo_ws/devel/setup.bash" >> ~/.bashrc,source ~/.bashrc
The files inside the base directory enable a docker container to be built and the code to inspected and debugged in visual studio code. This is mostly for debugging purposes, and is best for an external device debugging or adding to the code, rather than being used on the quadruped itself. Note: These instructions assume a linux OS.
- Install docker
- Install vscode
- Open vscode and add the following extensions: C/C++ Extension Pack, Docker, Dev Containers, ROS
- close vscode once extensions are installed
- In terminal, open the base folder containing the dingo quadruped code:
cd ~/any_folder_name/DingoQuadruped - run
. codeto open the dingo quadruped base folder in vscode - A prompt will appear saying either to build the container or run it, click "build" or "run"
- Wait for the container to be built and initialised
- (First time only) Once the container is built, Check that "ROS1.noetic" appears in the bottom left to indicate that the ros extension has correctly detected the ros version inside the container. If it does not appear, follow these steps
The Dingo_Driver should be started before any other code is launched on the Dingo. It starts joystick control of the robot and allows joint and task space commands to be received from other code or controllers via command ROS topics, as long as joystick control is disabled. If enabled, joystick control will override any commands sent through the command topics. To launch it, run the following line:
roslaunch dingo dingo.launch
Arguments are:
- is_physical (0/1): Is the code being run on the Dingo itself? Default: "1" (Yes)
- is_sim (0/1): Should the code publish joint values to the simulator? Default: "0" (No)
- use_joystick (0/1): Is a joystick being used for control? Default: "1" (Yes)
- use_keyboard (0/1): Is the keyboard being used for control? Default: "0" (No)
- (currently not used) serial_port (name of port): The serial port that the nano is connected to. Default: "/dev/ttyS0"
- use_imu (0/1): Should IMU data be used to correct the robots joint angles? Default: "0" (No)
With no arguments specified, it will assume a joystick controller is used for control and it will launch the hardware interface with IMU feedback disabled. No joint data will be published for Gazebo to use to simulate the robot.
As an example of how the arguments can be used, if the code is to be run purely in simulation with joystick control, you would launch the driver with the following arguments:
roslaunch dingo dingo.launch is_physical:=0 is_sim:=1
Make sure dingo_driver is running first, then:
roslaunch dingo_gazebo simulation.launch
The ROS extension provides options to roslaunch and rosrun files inside vscode via the inbuilt terminal without needing to use the native linux terminal. The commands to do so are the same as natively.
To start/stop a roscore daemon inside vscode, you can type ctrl+shift+P in vscode, and then type ROS: Start to start and ROS: Stop to stop the roscore daemon.
To build or rebuild the ros workspace, type ctrl+shift+B. If this does not work, you may need to edit the tasks.json file which tells vscode how to build the container. Ensure that the catkin build task defined in tasks.json includes the option -DCMAKE_BUILD_TYPE=Debug, as without this the vscode debugger will not work correctly.
An important note, as the entire ros workspace is volume mounted, files can be edited inside the container and reflected in your native linux filesystem and vice versa. This means the code can be changed and debugged in the vscode container but run natively, with all changes being reflected.
The ROS extension has two options to enable debugging. The first is to attach to a running node which you start via the terminal with rosrun package_name node_name. The second is to debug from a launch file, where you use the debugger menu in vscode to launch a launch file and then set waypoints in any nodes which the launch file starts. To set this up, please watch this video
If the debugger is not stopping at breakpoints, you may need to edit the tasks.json file which tells vscode how to build the container. Ensure that the catkin build task defined in tasks.json includes the option -DCMAKE_BUILD_TYPE=Debug.

