Note: The Documentation is unfinished and still in work.
-
Flash your SD-Card for the Raspberry-pi.
I recommend using the Raspberry Pi Imager.
You can use the Raspberrypy pi os lite, because there is no need for a gui.
I used the Version "Raspberry Pi OS Lite (32-bit) Debian Bullseye"
By pressing Crtl + Shift + X you get a options menu, in which you can set the host-name and enable ssh.
(of course you can also use balena etcher, and create a ssh-file) -
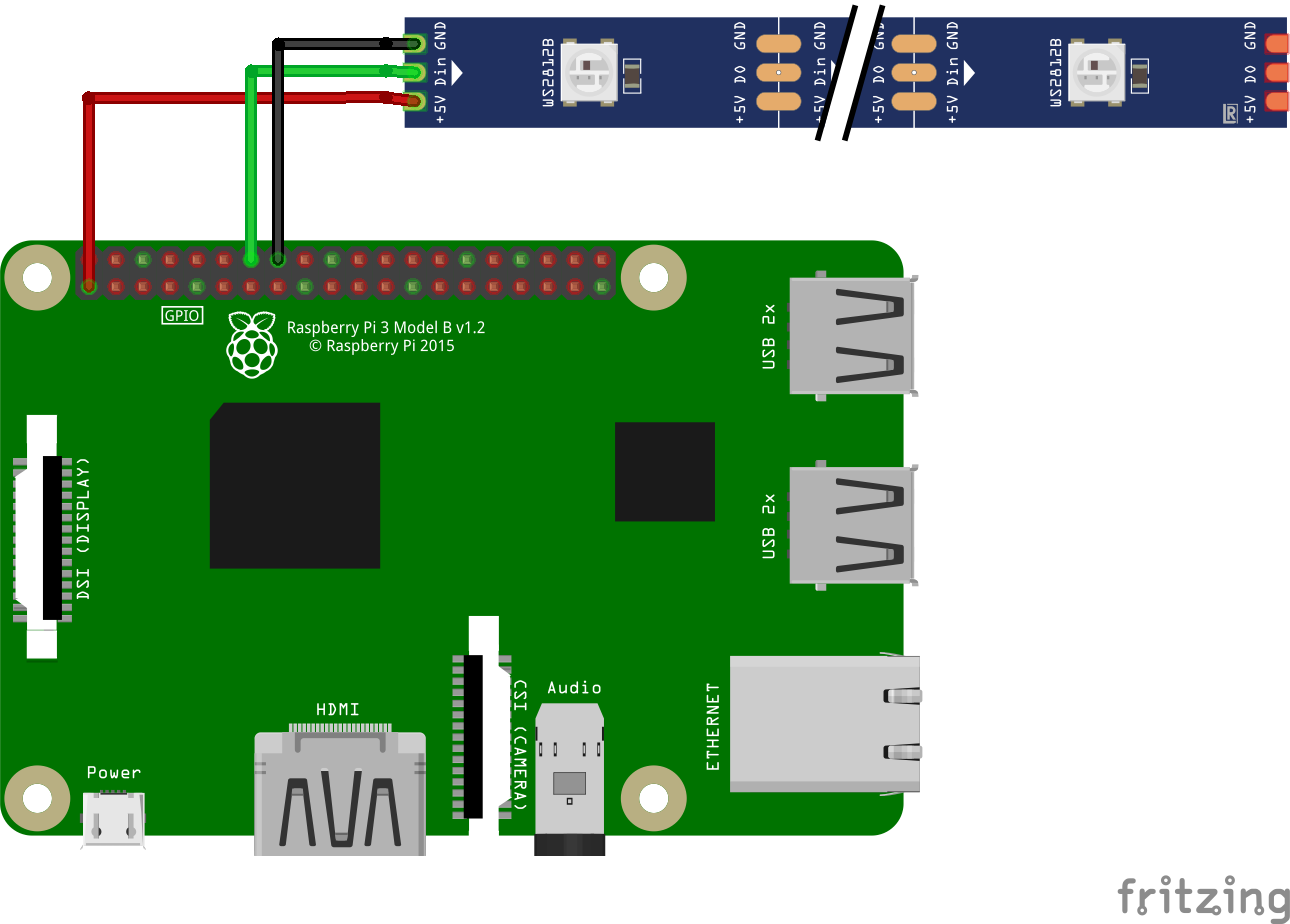
Connect the ws2812-Strip to the raspberry pi.
This is a very simple way to connect the ws2821-Strip:

ws2821-LED-Strip Raspberry-pi GND GND (e.g. pin14) Din GPIO 18 (pwm) (i.e. pin12) 5V +3,3 V (e.g. pin1) But this method may not work for long strips, for other connection methods see this article by Tony DiCola from Adafruit.
-
This is an optional step to improve the communication with the ws2812 LED-Strip
(This step is not necessary, and can also be done later)- open the file:
sudo nano /etc/modprobe.d/snd-blacklist.conf
- and add:
save and exit with Ctrl + O and Enter, and the Ctrl + X
blacklist snd_bcm2835 - open the next file:
sudo nano /boot/config.txt
- and change:
to:
# Enable audio (loads snd_bcm2835) dtparam=audio=onsave and exit with Ctrl + O and Enter, and the Ctrl + X# Enable audio (loads snd_bcm2835) #dtparam=audio=on - reboot the Raspberry pi using:
sudo reboot
- open the file:
-
Installing ws-2812-over-artnet
download the script:Needs to be updated
make the file executable and run it with sudo privileges:
chmod u+x installws2812-over-artnet.sh
sudo ./installws2812-over-artnet.sh
(for a manual installation go here)
-
Change the settings:
open the config.json file:sudo nano config.json
and set the desired Artnet Universe Id (artnet starts counting from 0)
As well as the number of pixels used. -
Test the ws2812-Strip:
sudo python3 ws2812.py
(It is important to run the script with Root-privileges, so that it can access the pwm-function)
The first LED should light up in red, and the last one in blue, all in between should light up in green.Debug:
- If no LEDs lights up, but there is no error message in the shell, check the wiring
- If the LEDs do not light up in the correct colour, but there is no error message in the shell, check the number of LEDs set in step 6 and/or do step 2.
- If you get an error message check the sudo privileges, the number of LEDs set in step 6, and/or do step 2.
-
Check the Artnet-Network:
-
Setup your DMX software.
(I used QLC+, for a tutorial how to set up QLC+ go here)
If you need the IP-Address of the Raspberry pi use:hostname -I
-
start the Artnet-test-script:
sudo python3 artnet.py
(Sudo must be used, because the library is installed in the Root-directory, to later function in combination with the ws2812-module)
-
stop the script, by pressing any key
-
-
Test the ws2818 over Artnet script:
sudo python3 ws2812Artnet.py
stop it with Ctrl + C (the script will then crash with an error message, which can be ignored)
-
Setup the auto-startup of the script:
will follow -
Setup a shutdown button:
will follow
will follow
- Update apt-get and install python3 and pip3:
confirm if necessary with y (yes)
sudo apt-get update
sudo apt-get install python3
sudo apt-get install python3-pip
- Install the following python modules:
(And Yes, the libraries need to be installed in the Root-directory, more on that later)
sudo pip3 install rpi_ws281x adafruit-circuitpython-neopixel
sudo python3 -m pip install --force-reinstall adafruit-blinka
sudo pip3 install stupidArtnet
- Copy the python files from the repo on your pi.