| Product | Combination | Resolution | Size |
|---|---|---|---|
| T-PicoPro | RP2040(264kB SRAM + 16MB Flash) + ESP32-C6(4M Flash) | 222x480 | IPS 2.33 Inch |
examples/
├── ATDebug                            # Serial AT debugging
├── AT_ESP_Gpio                        # RP2040 controls ESP32C6 GPIO
├── AdjustBacklight                    # Backlight adjustment example
├── Arduino_GFX_HelloWorld             # Arduino_GFX example
├── Arduino_GFX_HelloWorldGfxfont      # Arduino_GFX example
├── Arduino_GFX_ImgViewerAnimatedGIF   # Arduino_GFX example
├── Arduino_GFX_LvglBenchmark          # Arduino_GFX & lvgl example
├── Arduino_GFX_PDQgraphicstest        # Arduino_GFX example
├── CapacitiveTouch                    # Capacitive touch example
├── Factory                            # Factory hardware test example
├── LTR553ALS_Sensor                   # Lighting and Proximity Sensor Example
├── PMU                                # Onboard power management example
├── PWM                                # RP2040 PWM Example
├── QWIIC_GPS_Shield                   # QWIIC I2C Sensor Example
├── QWIIC_Sesnsor                      # QWIIC Uart GPS Module Example
├── SDCard                             # SD card read and write example
├── TFT_eSPI                           # TFT_eSPI example
├── TJpg_Decoder                       # TFT_eSPI & JPEG Decoder example
├── WiFi                               # WiFi usage example
│   ├── ChatServer
│   ├── PagerServer
│   ├── ScanNetworksAdvanced
│   ├── UdpSendReceiveString
│   ├── UdpSender
│   ├── WebClient
│   ├── WebServer
│   └── WiFiSSLClient
└── esp32c6_pins # ESP32-C6 Arduino Core Test Pin Example- For more examples of RP2040 chip functions, please refer to arduino-pico-libraries
- For more examples of ESP32-C6 chip functions, please refer to arduino-esp32-libraries
- ESP32-C6 AT command set
- For first time use, you need to use Zadig to replace the driver to correctly identify the port.
T-PicoProuses a reversible Type-C design, which corresponds to the port of RP2040 and the USB port of ESP32-C6 respectively.- How to identify the port of RP2040?
- Press and hold the BOOT button on the side of the
T-PicoPro, and then plug in the USB-C. If the computer recognizes it as a disk, then it is the port of the RP2040
- Press and hold the BOOT button on the side of the
- In addition to being a UART, the T-PicoPro
QWIICUART port can also be used as a normal IO - The
QWIICI2C port cannot be used for other purposes and can only be configured as an I2C interface because it is connected to the screen touch and PMU. - ESP32-C6 uses AT firmware by default. You can find the custom compilation method of AT firmware here.
- ESP32-C6 default AT firmware is compiled in
V3.3.0-dev. The firmware has been simply modified (GPIO control function added), the source code can be found here,Please see commit for specific changes - The T-PicoPro charging indicator light can be turned off through software. If the battery is not connected, the indicator light will flash.
- Install Visual Studio Code and Python
- Search for the
PlatformIOplugin in theVisualStudioCodeextension and install it. - After the installation is complete, you need to restart
VisualStudioCode - After restarting
VisualStudioCode, selectFilein the upper left corner ofVisualStudioCode->Open Folder-> select theT-PicoProdirectory - Wait for the installation of third-party dependent libraries to complete
- Click on the
platformio.inifile, and in theplatformiocolumn - Uncomment one of the lines
src_dir = xxxxto make sure only one line works - Click the (✔) symbol in the lower left corner to compile
- Connect the board to the computer USB
- Click (→) to upload firmware
- Click (plug symbol) to monitor serial output
- If it cannot be written, or the USB device keeps flashing, please check the FAQ below
- It is recommended to use platformio without cumbersome steps
- Install Arduino IDE
- Install Arduino Pico
- Download or clone
T-PicoProto any location - Copy all folders in lib folder to Arduino library folder (e.g. C:\Users\YourName\Documents\Arduino\libraries)
- Open ArduinoIDE ,
Tools, Look at the picture to choose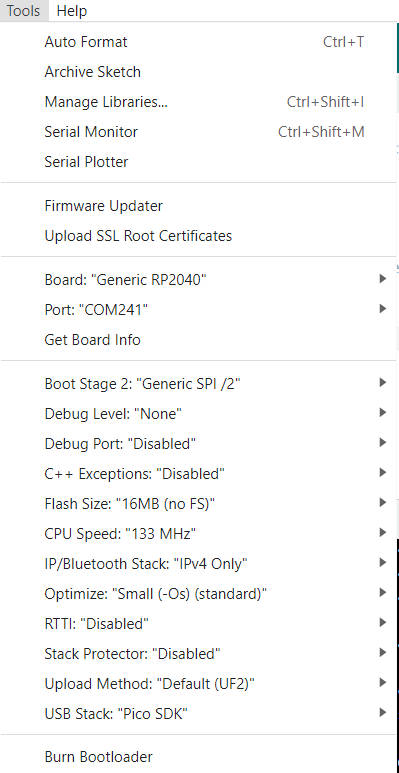
T-PicoProfolder ->examples->Any Examples- Select
Port - Click
upload, Wait for compilation and writing to complete - If it cannot be written, or the USB device keeps flashing, please check the FAQ below

-
If writing fails successfully,
- Connect the board via the USB cable
- Press and hold the (on the side)BOOT button , While still pressing the (on the side)BOOT button, press (on the side)RST
- Release the (on the side)RST
- Release the (on the side)BOOT button
- Upload sketch
-
How to write ESP32-C6?
- Since the
ESP32-C6reset pin is controlled byRP2040, when you need to update theESP32-C6firmware, please do not include the operation of controlling theESP32-C6reset pin in the program inRP2040. - Press and hold the
BOOTbutton near the bottom of theESP32-C6module, and then plug in the USB-C. Please make sure you are plugging in the USB port side of theESP32-C6. The computer should be able to write to theESP32-C6normally.
- Since the
-
How do I check if the hardware is OK?
- Please follow the first step of the FAQ and drag
firmware.uf2in the firmware directory into the disk. The program includes hardware self-test, which can determine whether the hardware is normal.
- Please follow the first step of the FAQ and drag
