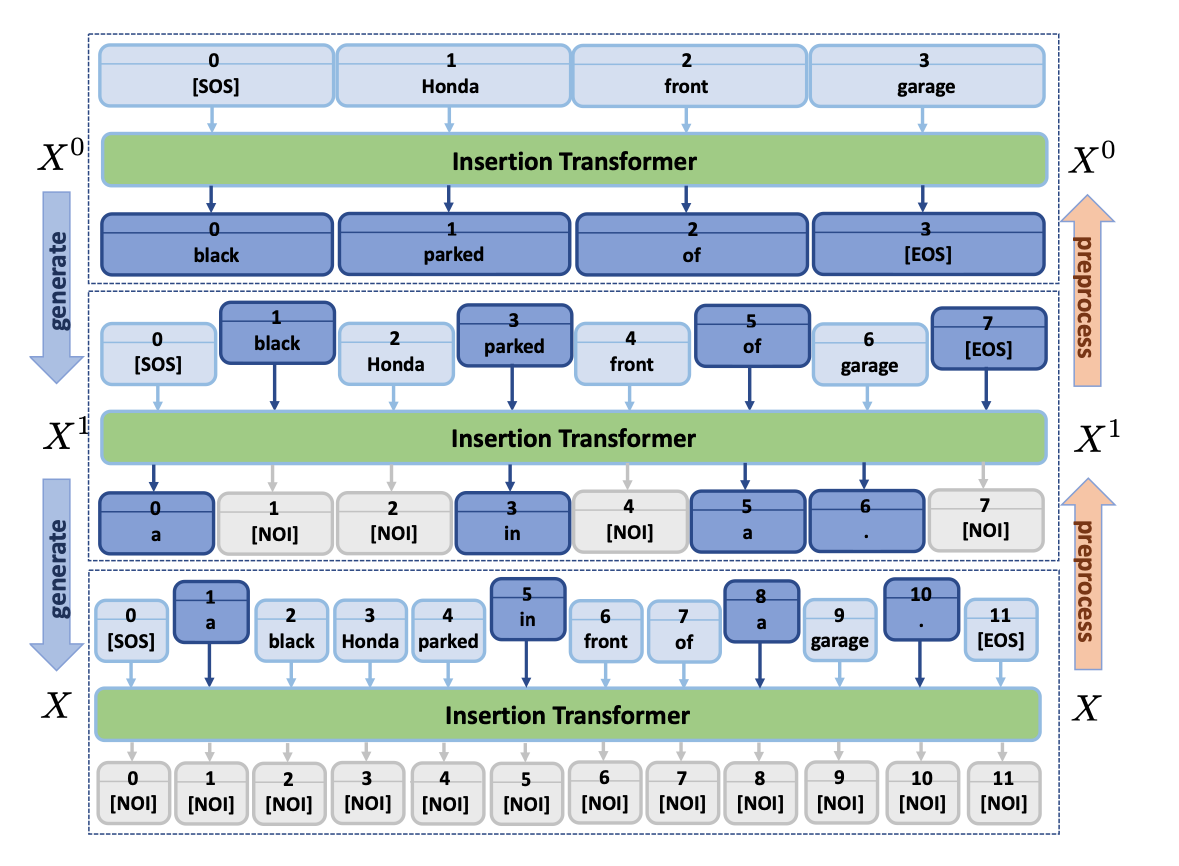
This repository contains the implementation of the EMNLP 2020 paper: "POINTER: Constrained Progressive Text Generation via Insertion-based Generative Pre-training", a progressive and non-autoregressive text generation pre-training approach. POINTER generates fluent text in a progressive and parallel manner. With empirical logarithmic time, POINTER outperforms existing non-autoregressive text generation approaches in hard-constrained text generation.
 Figure: Illustration of the generation process (blue arrow) of the proposed POINTER model. At each stage, the module generates either a
or a special
 NOI token
for each gap between two existing tokens . The generation stops when all the gaps predict NOI. The data preparation process (orange arrow) reverses the above generative process.
 Figure: Example of the progressive generation process
[Major Update 03/29/2021] The inference function and live demo now support phrases and short sentences as lexical constraints. When performing inference, an additional "--sep" command can be added to specific the a user-specific separating token such as ";", to identify the boundries of the constraints.
The live demo can be found at here. Please expect delay and crash as it is running on a single GPU machine.
Please use the below commandlines to clone, install the requirements and load the Conda environment (Note that Cuda 10 is required):
sudo apt-get install -y make wget gzip bzip2 xz-utils zstdWe provide 3 ways to setup the python environments:
- (Recommend) you can directly install the packages by running
bash env_setup.sh- or you can copy the exact same environment setup from us
conda create --prefix /pointer_env --file pointer-spec-file.txt- or using yaml file to reproduce the environment
conda env create -f pointer_env.yml -n pointer_env
conda activate pointer_envTo start, first install the docker and Nvidia-docker from their official repos. The image environment for running the code can be loaded as below:
Nvidia-docker v2.*
docker run --gpus all --ipc=host --rm -it -v $PWD:/workspace --network=host icaruszyz/large-scale-training:ins_v4 bashNvidia-docker v1.*
$ nvidia-docker --rm -it -v $PWD:/workspace --network=host icaruszyz/large-scale-training:ins_v4 bashLink to the data files can be downloaded as follows
| Dataset | Download link |
|---|---|
| News | [link] |
| Restaurant review | [link] |
Link to the model and config files can be downloaded as follows (345M models)
| Model | Download link |
|---|---|
| Wiki pretrained model | [link] |
| Restaurant review fine-tuned model | [link] |
| News fine-tuned model | [link] |
To continue, please decompress the file and move the ckpt folder into the main directory of this repo
tar -xzvf ckpt.tar.gzQuick start (TL;DR): Run the demo in our repo as
./demo.shDecoding script:
Please put an test.key.txt (see the input/test.key.txt in this repo for an example) into the input folder of this code, with \t seperating the constraints. The generation can be done using following command:
conda activate pointer_env
python inference.py \
--keyfile ./input/test.key.txt  \
--bert_model $model_path \
--output_dir $result_path \
The generation will be at the $result_path folder.
Data generation:
python ./generate_training_data.py \
--train_corpus ./data/training.dummy.txt \
--bert_model bert-base-uncased \
--output_dir ./data/yelp_processed/ \
--clean  \
--task_name yelpDependency requirement:
Please run bash ./requirement.sh to install the dependency required.
The bert-large-uncased model can be found at here.
Please also install apex from https://www.github.com/nvidia/apex to use distributed and fp16 training.
Pre-training: Below is an example of pretraining a model on wikipedia
python -m torch.distributed.launch  --nproc_per_node 16 training.py \
--pregenerated_data ./data/wikipedia_processed \
--bert_model bert-large-uncased \
--output_dir $WIKI_MODEL \
--epochs 40  \
--train_batch_size 64 \
--output_step 100000 \
--learning_rate 1e-5 Fine-tuning: Below is an example of finetuning a model with pretraining model ($WIKI_MODEL) here
python -m torch.distributed.launch  --nproc_per_node 16 training.py \
--pregenerated_data ./data/yelp_processed \
--bert_model $WIKI_MODEL \
--output_dir $finetune_model_path \
--epochs 40 \
--train_batch_size 64 \
--output_step 100000 \
--learning_rate 1e-5\Keywords extraction: First, you can use the following script to generate a bunch of keywords for the test file.
python keyword_extraction.py \
--n_keys 7 \
--file ./data/yelp_test.txt
The keywords file will be saved in the same folder as the input file (in this example, the keywords file will be ./data/yelp_test.key.txt)
Generating from the keywords With the trained model, you can generate a sentence from a give keywords file. The keywords file can be obtained by the previous keywords extraction step, or by a custom user input file. The following commands show an example of how to decode from the keywords file generated from last step:
python inference.py \
--keyfile ./data/yelp_test.key.txt  \
--bert_model $finetune_model_path \
--output_dir $result_path
NOTE THAT the input keywords file will be tokenized by a BERT tokenizer. A less common word will likely be parsed into subwords, for example, cheesecake will be split into cheese, ##cake. As a result the final generation may not contain the whole word cheesecake. This can be easily fixed by not letting the model to generate things before a subword token (start with ##), however in the current version we haven't implemented such a feature.
If you use this code in your research, you can cite our paper:
@inproceedings{zhang2020pointer,
  title={POINTER: Constrained Progressive Text Generation via Insertion-based Generative Pre-training},
  author={Zhang, Yizhe and Wang, Guoyin and Li, Chunyuan and Gan, Zhe and Brockett, Chris and Dolan, Bill},
  booktitle={EMNLP},
  year={2020}
}