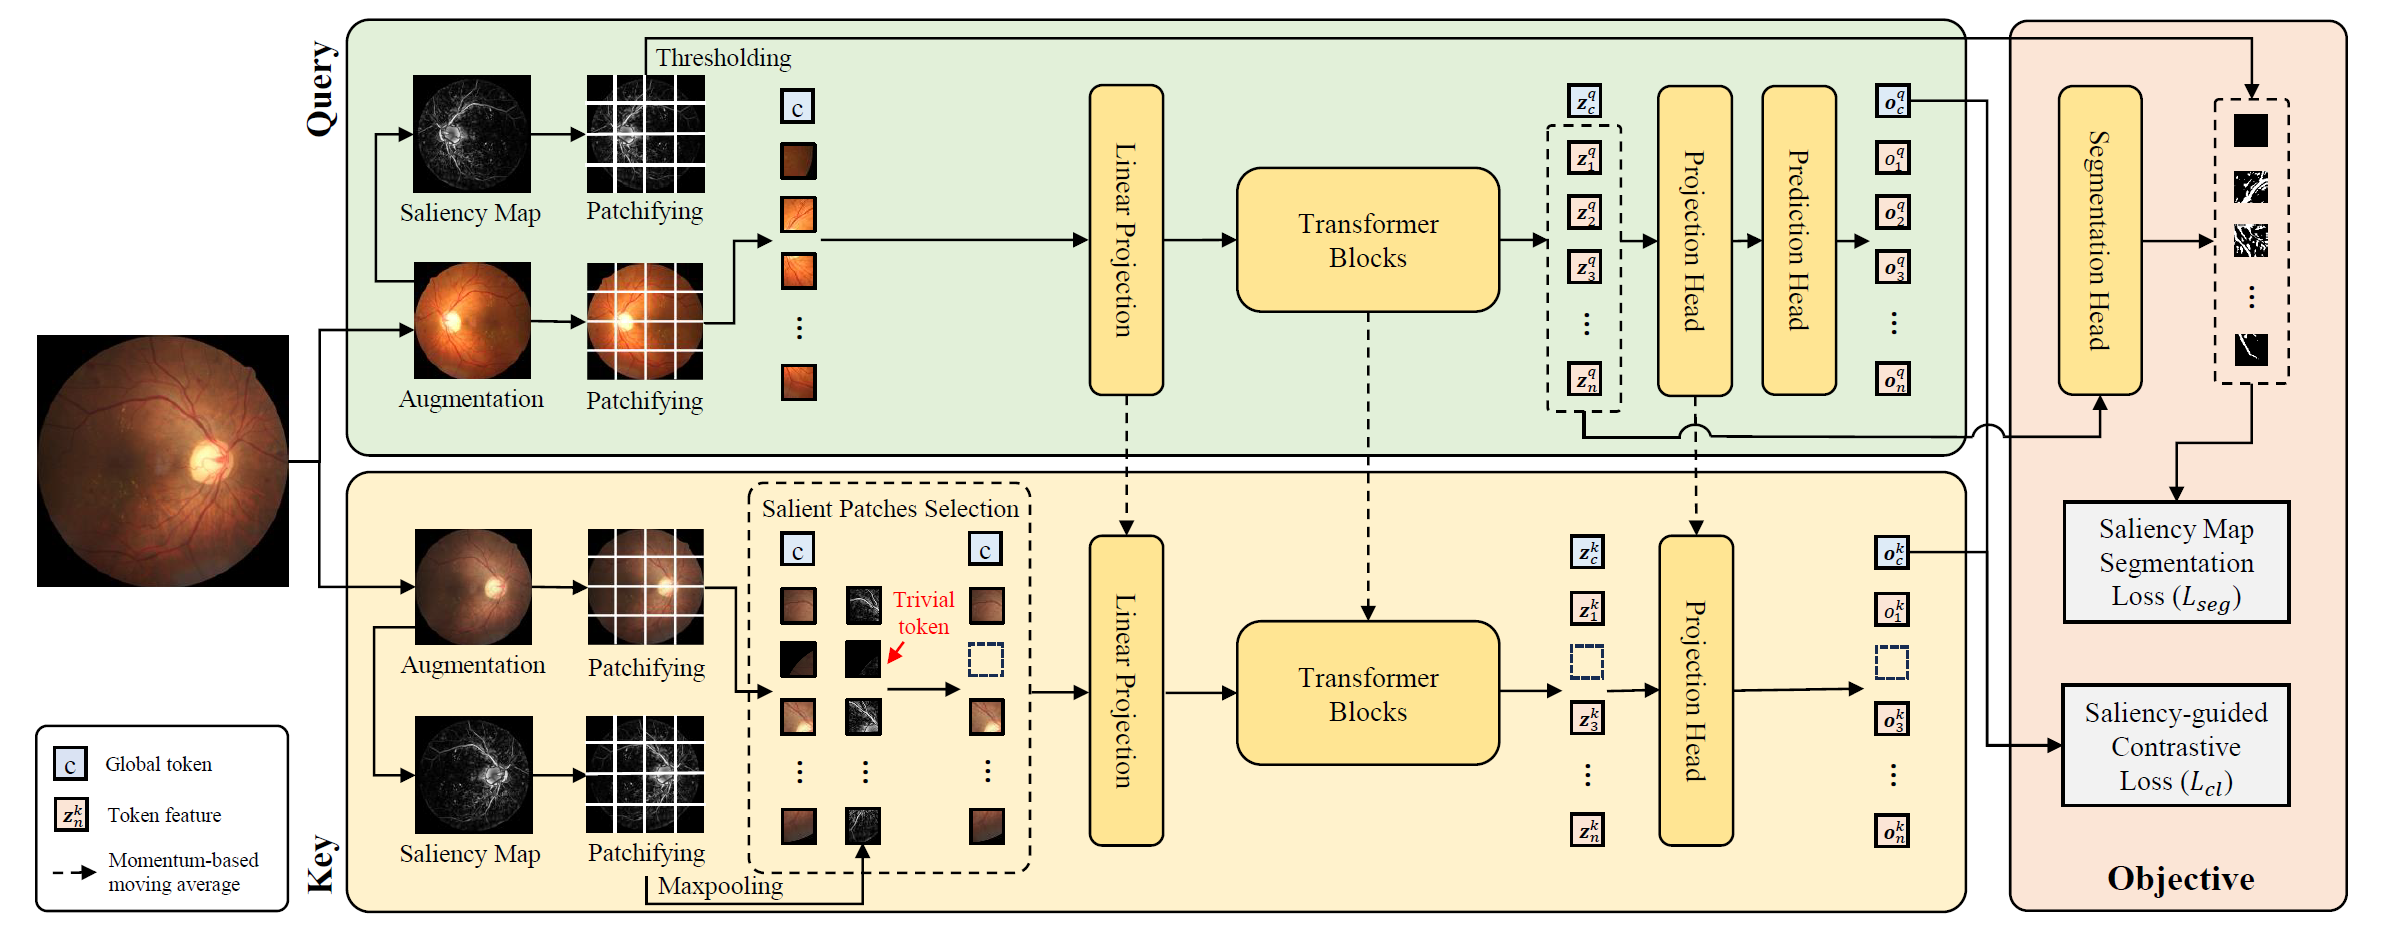
This is the pytorch implementation of the paper:
Y. Huang, J. Lyu, P. Cheng, R. Tam and X. Tang, "SSiT: Saliency-guided Self-supervised Image Transformer for Diabetic Retinopathy Grading", IEEE Journal of Biomedical and Health Informatics (JBHI), 2024. [arxiv] [JBHI]
The datasets used in this work are listed as follows:
Pretraining:
- EyePACS [homepage].
Evalutation for classification:
- DDR [homepage].
- APTOS 2019 [homepage].
- Messidor-2 [images] [labels].
- IChallenge-AMD [homepage]
- IChallenge-PM [homepage]
Evalutation for segmentation:
To install the dependencies, run:
git clone https://github.com/YijinHuang/SSiT.git
cd SSiT
conda create -n ssit python=3.8.0
conda activate ssit
pip install -r requirements.txt1. Organize each dataset as follows:
├── dataset
    ├── train
        ├── class1
            ├── image1.jpg
            ├── image2.jpg
            ├── ...
        ├── class2
            ├── image3.jpg
            ├── image4.jpg
            ├── ...
        ├── class3
        ├── ...
    ├── val
    ├── test
Here, val and test have the same structure of train. Note that we do not use image labels in the pretraining stage, so this folder structure is not required for the pretraining dataset (EyePACS in this work).
2. Data preprocessing for all datasets (crop and resize):
cd utils
python crop.py -n 8 --crop-size 512 --image-folder <path/to/image/dataset> --output-folder <path/to/processed/dataset>
cd ..
Here, -n is the number of workers. The processed dataset will be saved in the --output-folder.
3. Data preprocessing for the pretraining dataset (EyePACS) only:
cd utils
python saliency_detect.py -n 8 --image-folder <path/to/processed/dataset> --output-folder <path/to/saliency/folder>
python folder2pkl.py --image-folder <path/to/processed/dataset> --saliency-folder <path/to/saliency/folder> --output-file ../data_index/pretraining_dataset.pkl
cd ..
Pretraining with ViT-S on a single multi-GPUs node:
python main.py \
    --distributed --port 28888 --num-workers 32 \
    --arch ViT-S-p16 --batch-size 512 \
    --epochs 300 --warmup-epochs 40 \
    --data-index ./data_index/pretraining_dataset.pkl \
    --save-path <path/to/save/checkpoints>
Specify CUDA_VISIBLE_DEVICES to control the number of GPUs. To reproduce the results in the paper, at least 64GB GPU memory is required. (4 NVIDIA RTX 3090 GPUs with 24GB memory are used in our experiments.)
1. Fine-tuning evaluation on DDR dataset on one GPU:
python eval.py \
    --dataset ddr --arch ViT-S-p16 --kappa-prior \
    --data-path <path/to/DDR/dataset/folder> \
    --checkpoint <path/to/pretrained/model/epoch_xxx.pt> \
    --save-path <path/to/save/eval/checkpoints>
2. Linear evaluation on DDR dataset on one GPU:
python eval.py \
    --dataset ddr --arch ViT-S-p16 --kappa-prior \
    --linear --learning-rate 0.002 --weight-decay 0 \
    --data-path <path/to/DDR/dataset/folder> \
    --checkpoint <path/to/pretrained/model/epoch_xxx.pt> \
    --save-path <path/to/save/eval/checkpoints>
3. Perform kNN-classification on DDR dataset:
python knn.py \
    --dataset ddr --arch ViT-S-p16 \
    --data-path <path/to/DDR/dataset/folder> \
    --checkpoint <path/to/pretrained/model/epoch_xxx.pt> \
Note that the --checkpoint should be epoch_xxx.pt instead of checkpoint.pt in the pretraining save path. To evaluate on other datasets, update --dataset to messidor2 or aptos2019 and the --data-path to corresponding dataset folder.
1. Save the segmentation dataset as a pickle file:
data_index = {
    'train': [
        ('path/to/image1', 'path/to/mask_of_image1'),
        ('path/to/image2', 'path/to/mask_of_image2'),
        ...
    ],
    'test': [
        ('path/to/image3', 'path/to/mask_of_image3'),
        ...
    ],
    'val': [
        ('path/to/image4', 'path/to/mask_of_image4'),
        ...
    ]
}

import pickle
pickle.dump(your_data_dict, open('path/to/data_index', 'wb'))
The mask of the image should be a 255-based image, where the value 255 indicates the area of interest.
2. Perform segmentation on DRIVE dataset:
python eval_seg.py \
    --dataset drive --arch ViT-S-p16 \
    --data-index <path/to/data_index> \
--checkpoint <path/to/pretrained/model/epoch_xxx.pt> \To visualize self-attention maps from folder of images:
cd utils
python attn_visualize.py \
    --arch ViT-S-p16 --image-size 1024 \
    --image-folder <path/to/image/folder/to/visualize> \
    --checkpoint <path/to/pretrained/model/epoch_xxx.pt> \
    --output-dir <path/to/save/visualization>
cd ..If you find this repository useful, please cite the paper:
@article{huang2024ssit,
  title={Ssit: Saliency-guided self-supervised image transformer for diabetic retinopathy grading},
  author={Huang, Yijin and Lyu, Junyan and Cheng, Pujin and Tam, Roger and Tang, Xiaoying},
  journal={IEEE Journal of Biomedical and Health Informatics},
  year={2024},
  publisher={IEEE}
}
