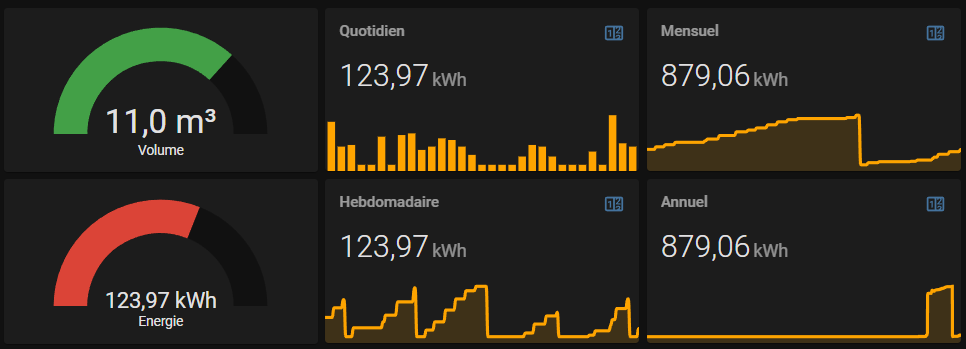
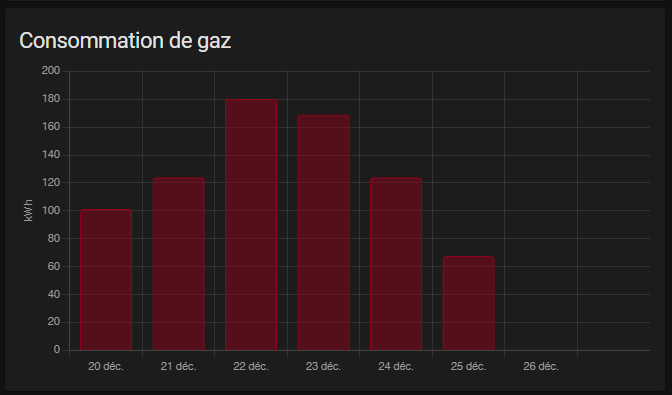
GrDF Gazpar integration permits to integrate in Home Assistant all your gas consumption data.
With that integration in place, you can display statistics by period:
GrDF Gazpar custom component is using PyGazpar library to retrieve GrDF data.
Follow the steps described below to add GrDF Gazpar integration with HACS:
-
From HACS (Home Assistant Community Store), open the upper left menu and select
Custom repositoriesoption to add the new repo. -
Add the address https://github.com/ssenart/home-assistant-gazpar with the category
Integration, and clickADD. The new corresponding repo appears in the repo list. -
Select this repo (this integration description is displayed in a window) and click on
INSTALL THIS REPOSITORYbutton on the lower right of this window. -
Keep the last version and click the button
INSTALLon the lower right. -
Do click on
RELOADbutton for completion! The integration is now ready. It remains the configuration.
Copy the gazpar directory in HA config/custom_components/gazpar directory.
Add to your Home Assistant configuration.yaml:
sensor:
- platform: gazpar
    username: ***
    password: ***
    pce_identifier: xxxxxxxxx
    tmpdir: /tmp
    scan_interval: 01:00:00
Ensure that tmpdir already exists before starting HA. It is used to store the downloaded files from GrDF.
Restart your HA application. In HA development panel, you should see the new Gazpar entities with their corresponding attributes:
- sensor.gazpar_daily_energy:
attribution: Data provided by GrDF
username: xxxxxxxxx
time_period: 19/04/2021
start_index_m3: 13708
end_index_m3: 13713
volume_m3: 4.7
energy_kwh: 52
converter_factor_kwh/m3: 11.268
temperature_degC: 12
type: MES
timestamp: 2021-04-21T07:50:09.505625
unit_of_measurement: kWh
friendly_name: Gazpar daily energy
icon: mdi:fire- sensor.gazpar_weekly_energy:
attribution: Data provided by GrDF
username: xxxxxxxxx
current:
  time_period: Du 19/04/2021 au 19/04/2021
  volume_m3: 4.7
  energy_kwh: 52
  timestamp: '2021-04-21T07:54:06.324645'

previous:
  time_period: Du 12/04/2021 au 18/04/2021
  volume_m3: 57.1
  energy_kwh: 643
  timestamp: '2021-04-21T07:54:06.324645'

unit_of_measurement: kWh
friendly_name: Gazpar weekly energy
icon: mdi:fire- sensor.gazpar_monthly_energy:
attribution: Data provided by GrDF
username: xxxxxxxxx
current:
  time_period: Avril 2021
  volume_m3: 135.4
  energy_kwh: 1525
  timestamp: '2021-04-21T07:58:01.392893'

previous:
  time_period: Mars 2021
  volume_m3: 261.1
  energy_kwh: 2937
  timestamp: '2021-04-21T07:58:01.392893'

unit_of_measurement: kWh
friendly_name: Gazpar monthly energy
icon: mdi:fireYou probably want to integrate GrDF data into the Home Assistant Energy module.
For that, I'm using the 2 steps configuration method:
- Step 1 : Create a dedicated meter sensor using template:
template:
  - sensor:
    - name: gas_volume
      unit_of_measurement: 'm³'
      state: >
        {% set sourceState = state_attr('sensor.gazpar_daily_energy', 'end_index_m3') %}
        {% set targetState = states('sensor.gas_volume') %}
        {% if is_number(sourceState) and sourceState | float(0.0) > targetState | float(0.0) %}
          {{ sourceState }}
        {% else %}
          {{ targetState }}
        {% endif %}
      icon: mdi:fire
      device_class: gas
      state_class: total_increasing
    - name: gas_energy
      unit_of_measurement: 'kWh'
      state: >
        {% set sourceState = states('sensor.gas_volume') %}
        {% set converter_factor = state_attr('sensor.gazpar_daily_energy', 'converter_factor_kwh/m3') | float(11.2) %}
        {% set targetState = states('sensor.gas_energy') %}
        {% if is_number(sourceState) and sourceState | float(0.0) * converter_factor > targetState | float(0.0) %}
          {{ sourceState | float(0.0) * converter_factor }}
        {% else %}
          {{ targetState }}
        {% endif %}
      icon: mdi:fire
      device_class: energy
state_class: total_increasing- Step 2 : Setup utility_meter to get consumptions by period:
utility_meter:
  total_gas_volume:
    source: sensor.gas_volume
  daily_gas_volume:
    source: sensor.gas_volume
    cycle: daily
  weekly_gas_volume:
    source: sensor.gas_volume
    cycle: weekly
  monthly_gas_volume:
    source: sensor.gas_volume
    cycle: monthly
  yearly_gas_volume:
    source: sensor.gas_volume
    cycle: yearly

  total_gas_energy:
    source: sensor.gas_energy
  daily_gas_energy:
    source: sensor.gas_energy
    cycle: daily
  weekly_gas_energy:
    source: sensor.gas_energy
    cycle: weekly
  monthly_gas_energy:
    source: sensor.gas_energy
    cycle: monthly
  yearly_gas_energy:
    source: sensor.gas_energy
    cycle: yearly
Then, in Home Assistant energy configuration panel,add the sensor 'sensor.total_gas_energy' in gas consumption section. Adding 'sensor.gas_energy' should be the same.
Step 2 is optional. It only permits to monitor by yourself the consumption by period, without relying on the HA energy module.
I would expect that adding volume sensor being available as well, but it is not for an unknown reason. I did not dig further since I prefer to monitor kWh rather than volume.

