A Powershell Module to produce eye-candy outputs in the terminal.
I used Charmbracelet/gum to enhance my powershell scripts, but some limitations / behaviours made it difficult to use for me.
So I decided to write my own visual library, 100% in powershell.
To install, use
Install-module -Name psCandy -Scope CurrentUserOf course, it work on any platform that support Powershell
5 classes are enable
Functions
Formatting tags
Here is little demo https://youtu.be/K88I4mK_OYQ
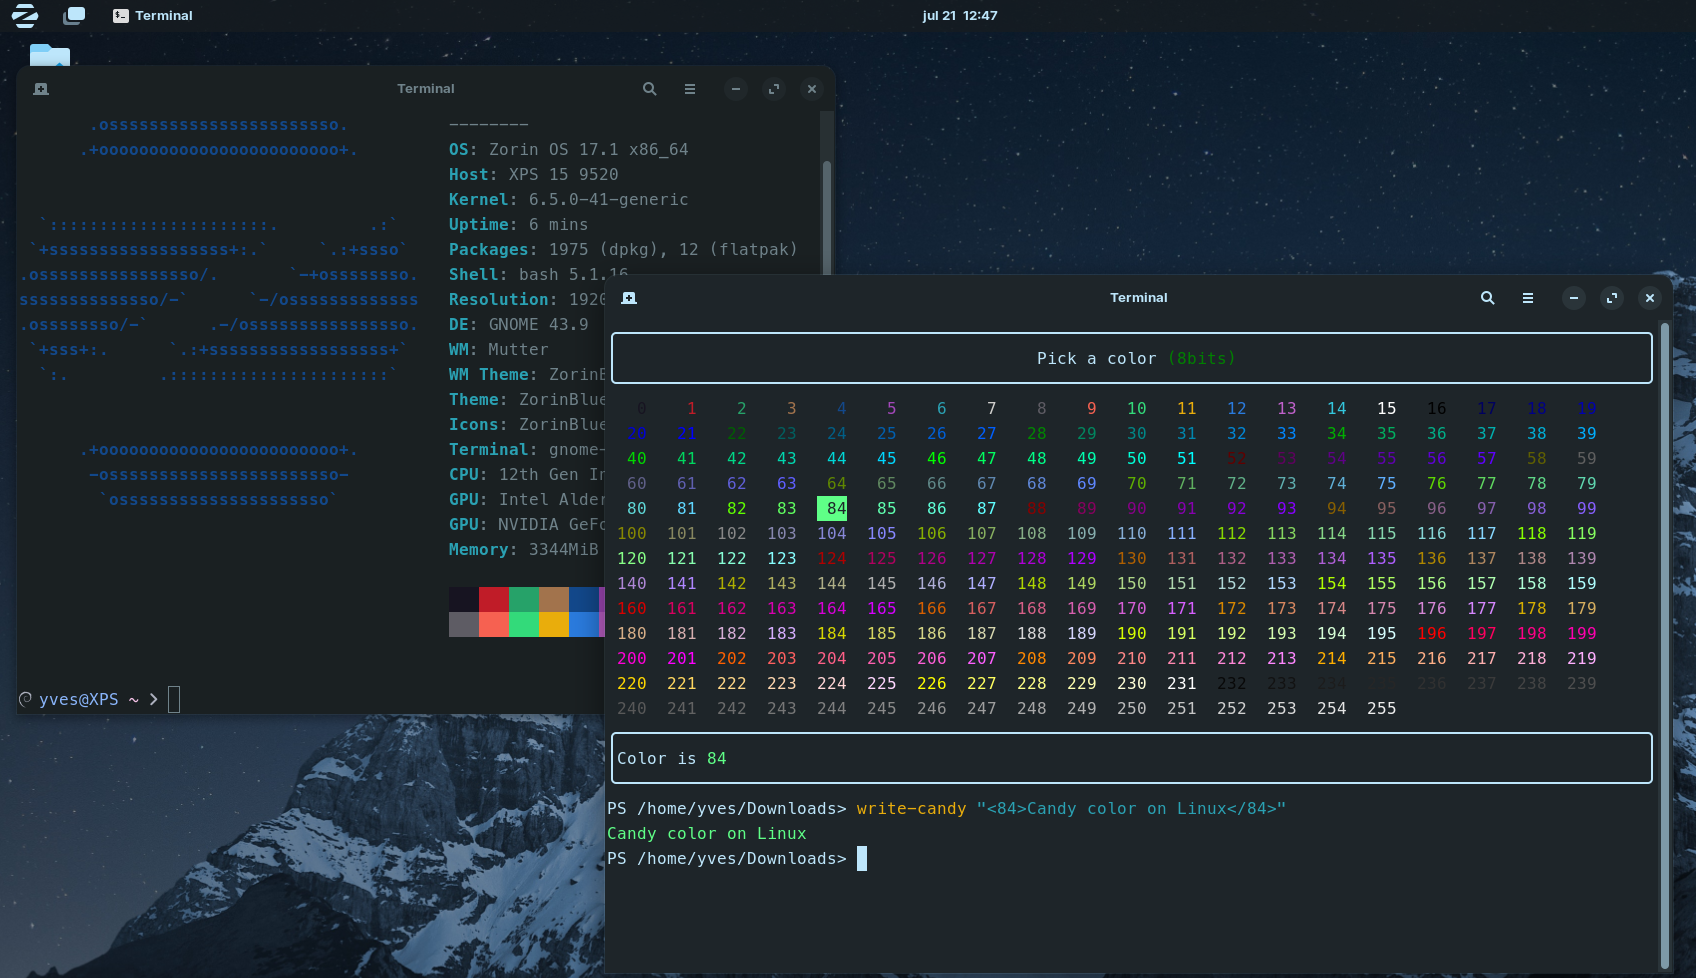
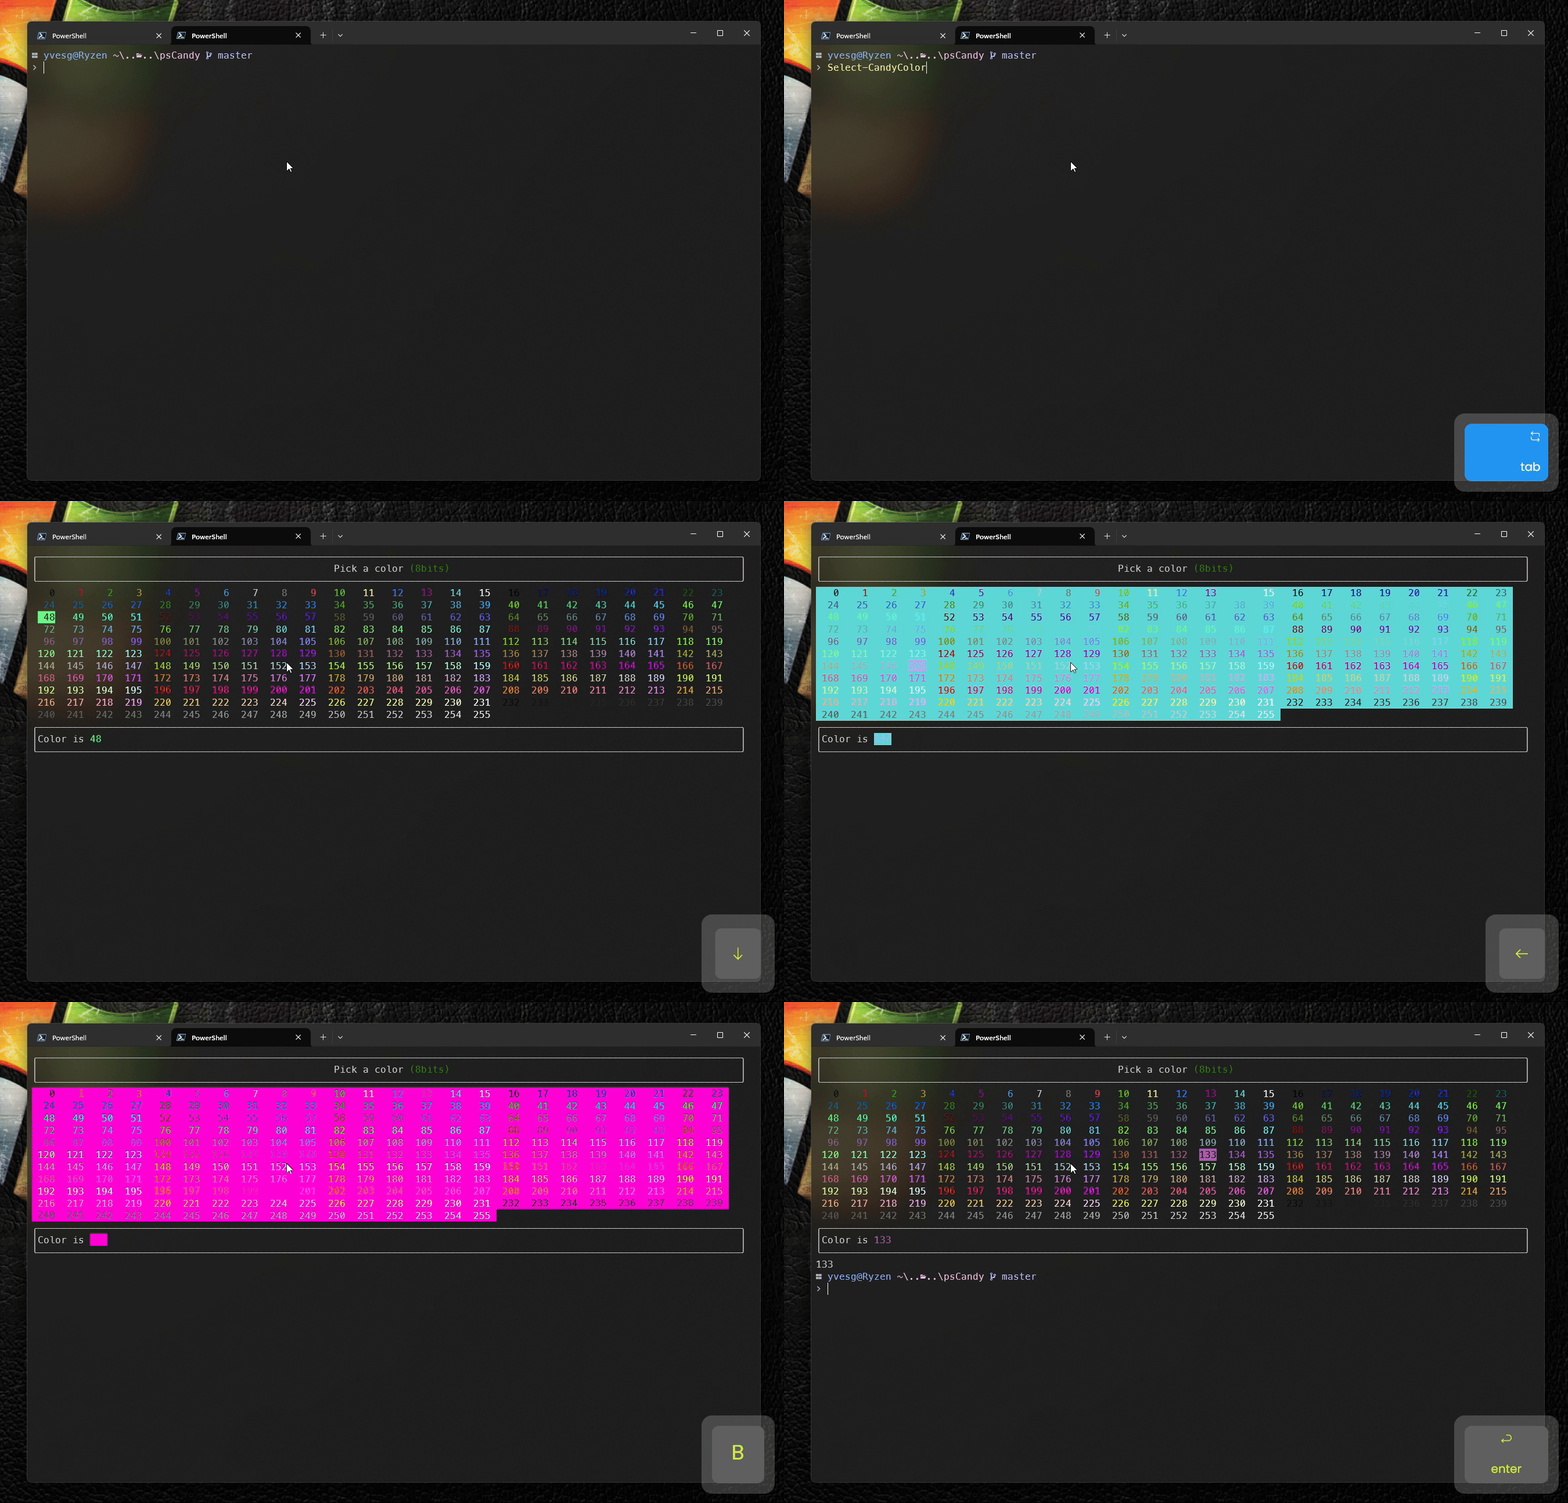
This function allow to visually choose a color name.
Select-candyColor [-clipboard]If the optional parameter -clipboard is mentioned, the name of the color will be stored in the clipboard, ready to be pasted in.
This function displays an 8bit color picking grid.
It makes easy to choose an 8bit color tag to use in write-candy strings
While selecting a color code, one can press "b" to switch the background of the grid to the selected color. Another press on "b" returns to normal background.
This function displays a little message and let the user choose between the available options
Confirm-Candy -Title "<Green>[White]Do you <U>confirm</U>[/White]</Green> ?" -choices "Yes`nNo"Result :
The behavior for the title is the same as for Write-Candy. The same tags can be used.
The function has a -width parameter. If it's not specified, half the screen width is used.
To force the fullwidth, there is a -Fullscreen parameter taht overrides the -width if both are presents.
The -Choices parameters is a string where the different options are separated by a "`n".
If the user pick a choice, the function return the value. If Esc is pressed, nothing is returned.
This class has 4 static methods :
  class candyString
  {
    static [int] GetDisplayWidth([string] $Str)
    static [int] GetDisplayLength([string] $Str)
    static [string] TruncateString([string]$InputString,[int]$MaxWidth)
    static [String] PadString ([string]$InputString,[int]$TotalWidth,[string]$PadCharacter,[Align]$PadDirection)
} [candyString]::GetDisplayWidth([String]$string)This method returns the real length of $string in bytes. It takes into account multi-byte characters.
Example :
[candyString]::GetDisplayWidth("Hello 世界")Returns 10
[candyString]::GetDisplayLength([String]$string)This method returns the visual length of $string in bytes. It does not takes into account multi-byte characters.
Example :
[candyString]::GetDisplayLength("Hello 世界")Returns 8
[candyString]::TruncateString([string]$InputString,[int]$MaxWidth)This method truncate a string at a certain width (if needed). If the real length of the string is greater than the MaxWidth parameter, the string is truncated and an "ellipsis" is added at the end.
Example :
[candyString]::TruncateString("Hello 世界,This is a very long string to truncate",15)Returns
Hello 世界,Thi.
[candyString]::PadString ([string]$InputString,[int]$TotalWidth,[string]$PadCharacter,[Align]$PadDirection)This method returns a string padded to the $TotalWidth with the $PadCharacter, in the $PadDirection direction.
As for TruncateString the $TotalWidth is calculated on then real length of the string.
The available directions are defined by an enum
  enum Align {
    Left
    Center
    Right
}The class provides 2 static metods :
- Color16
- ColorRBG
[Color]::Color16([String]$text,[Int]$ForegroundColor,[Int]$BackgroundColor,[Switch]$Underline,[Switch]$Strike)This function returns a string with ansi codes to format the text passed to the function.
The function will apply formatting based on the available parameters
Here is a table with the color values accepted by the function
Examples :
[color]::color16("this is a test",45,-1,$false,$false)Result :
[color]::color16("this is a test",127,-1,$true,$false)Result :
[color]::color16("this is a test",88,188,$true,$false)Result :
[color]::colorRGB ([string]$Text,[System.Drawing.Color]$Foreground,[System.Drawing.Color]$Background,[switch]$Underline,[switch]$Strike)Similar to the Color16 function, but takes 2 [System.Drawing.Color] in parameters. The output is pretty mych the same, except that it's not limiter to 256 colors.
Examples :
[color]::colorRGB("This is a RGB Test",[System.Drawing.Color]::DarkViolet,[System.Drawing.Color]::Empty,$False,$False)Result :
But the real deal is when the class is instanciated. The Render method, like the name suggests, reders an ansi colored string.
  $DeepPink = [Color]::new([System.Drawing.Color]::DeepPink)
  $DeepPink.render("Test from Object")
Result :
In addition, styles can be modified .....
  $DeepPink.style = [Styles]::Underline
  $DeepPink.render("Test from Object Underline :)")
Result :
Styles can be mixed :
  $DeepPink.style = ([Styles]::Underline -bor [Styles]::Strike)
  $DeepPink.render("Test from Object Underline and strike :)")
Result :
This method is geat to build a theme for your scripts. This is how the other classes of the module use the [color] Classe.
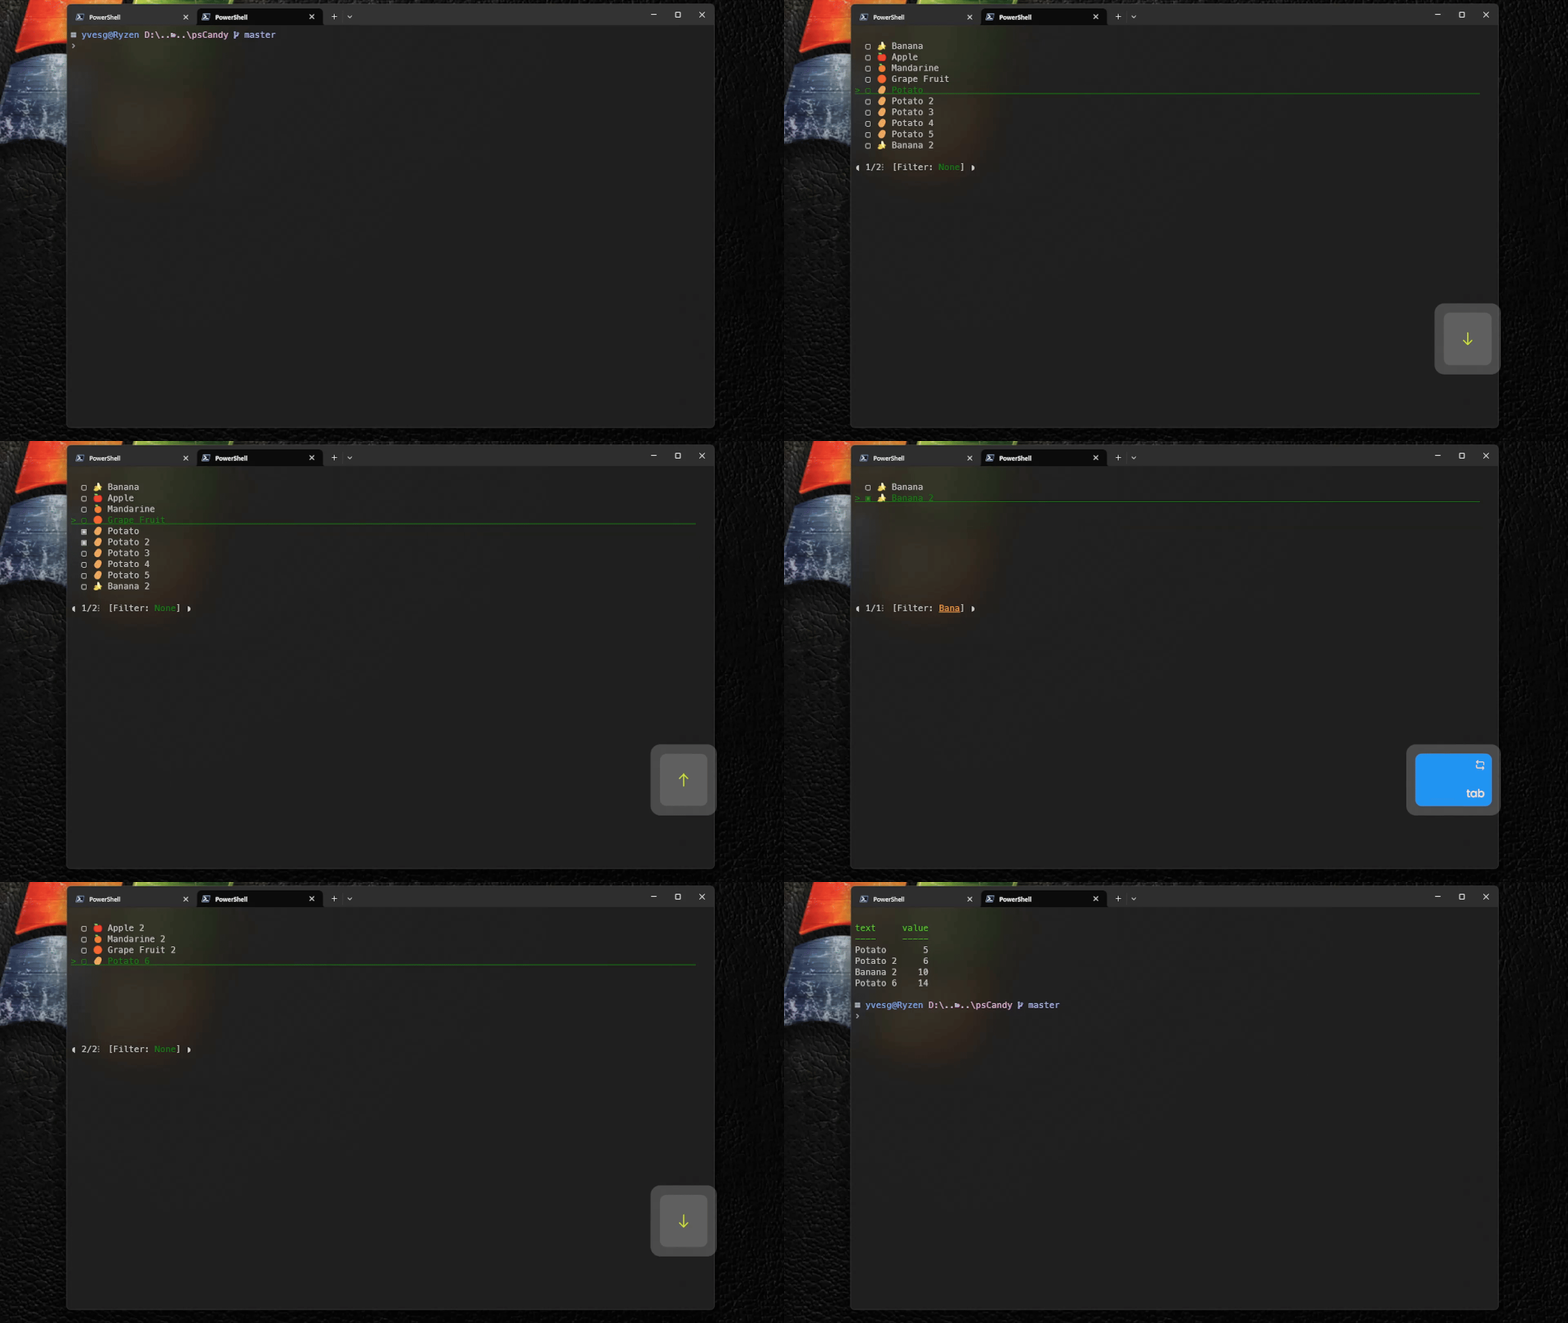
The list class is a generic list component that takes a [System.Collections.Generic.List[ListItem] in input and displays the items in a pretty way.
[ListItem]Is a class that allows [List] to display and processes the list.
[ListItem] has 4 constructor overloads :
ListItem([string]$text,[PSCustomObject]$value)The simpliest. Create a [ListItem] with only a [string]$Text and a [PSCustomObject]$Value. Even the $Value can be $null.
ListItem([string]$text,[PSCustomObject]$value,[string]$Icon)This constructor allows the use of an icon that will be draw at the beginning of the line.
Example :
using module psCandy
. .\themes.ps1

[Console]::OutputEncoding = [System.Text.Encoding]::UTF8
$items = [System.Collections.Generic.List[ListItem]]::new()
$items.Add([ListItem]::new("Banana", 1,"🍌"))
$items.Add([ListItem]::new("Apple", 2, "🍎"))
$items.Add([ListItem]::new("Mandarine", 3, "🍊"))
$items.Add([ListItem]::new("Grape Fruit", 4, "🟠"))
$items.Add([ListItem]::new("Grape Fruit(too)", @{"aString"="Test"; "aBool"=$true}, "🟠"))
$items.Add([ListItem]::new("Potato", 5,"🥔"))
$items.Add([ListItem]::new("Potato 2", 6,"🥔"))
$items.Add([ListItem]::new("Potato 3", 7,"🥔"))
$items.Add([ListItem]::new("Potato 4",8,"🥔"))
$items.Add([ListItem]::new("Potato 5", 9,"🥔"))
$items.Add([ListItem]::new("Banana 2", 10,"🍌"))
$items.Add([ListItem]::new("Apple 2", 11,"🍎"))
$items.Add([ListItem]::new("Mandarine 2", 12,"🍊"))
$items.Add([ListItem]::new("Grape Fruit 2", 13,"🟠"))
$items.Add([ListItem]::new("Potato 6", 14,"🥔"))

$list = [List]::new($items)
$list.LoadTheme($Theme)
$list.SetHeight(10)
# $list.SetLimit($True)
$list.Display()
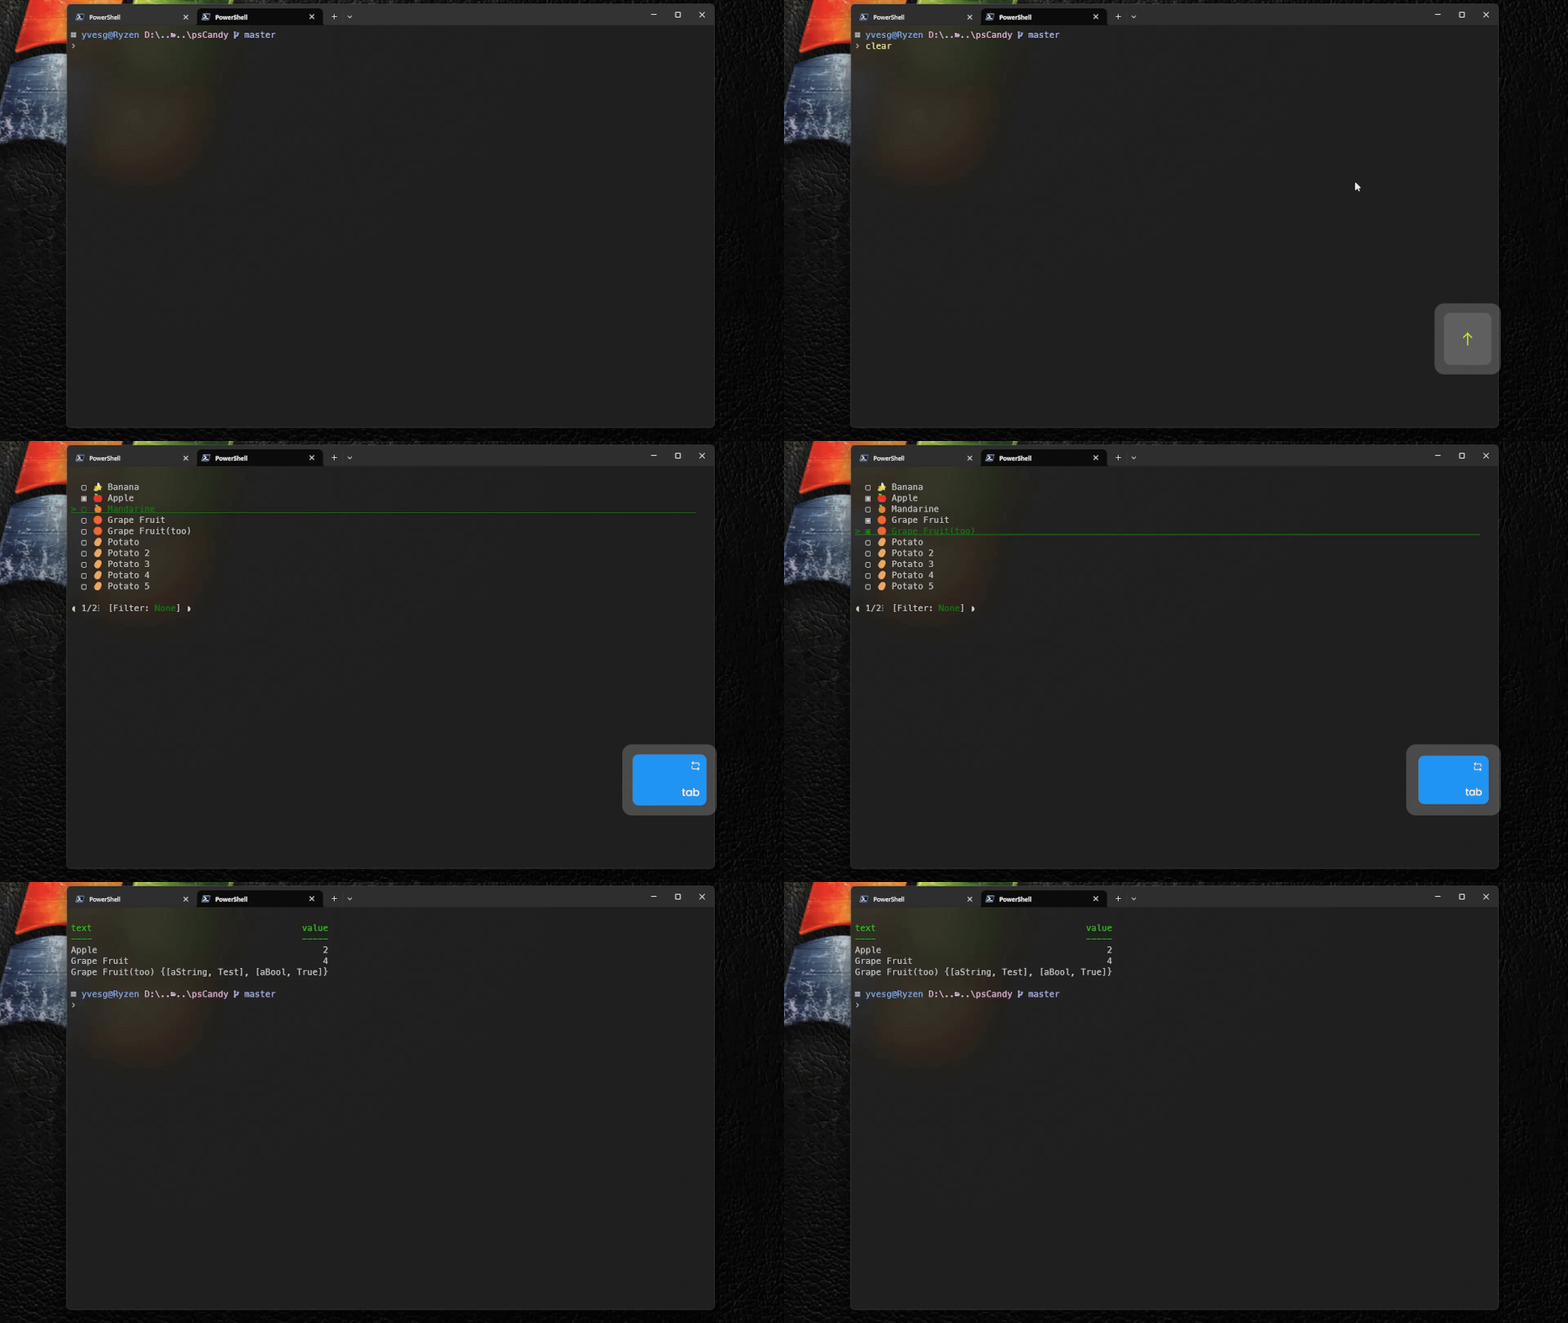
Result :
Remark The [ListItem] can contain mixed return value types.
Example :
using module psCandy


[Console]::OutputEncoding = [System.Text.Encoding]::UTF8
$items = [System.Collections.Generic.List[ListItem]]::new()
$items.Add([ListItem]::new("Banana", 1,"🍌"))
$items.Add([ListItem]::new("Apple", 2, "🍎"))
$items.Add([ListItem]::new("Mandarine", 3, "🍊"))
$items.Add([ListItem]::new("Grape Fruit", 4, "🟠"))
$items.Add([ListItem]::new("Grape Fruit(too)", @{"aString"="Test"; "aBool"=$true}, "🟠"))
$items.Add([ListItem]::new("Potato", 5,"🥔"))
$items.Add([ListItem]::new("Potato 2", 6,"🥔"))
$items.Add([ListItem]::new("Potato 3", 7,"🥔"))
$items.Add([ListItem]::new("Potato 4",8,"🥔"))
$items.Add([ListItem]::new("Potato 5", 9,"🥔"))
$items.Add([ListItem]::new("Banana 2", 10,"🍌"))
$items.Add([ListItem]::new("Apple 2", 11,"🍎"))
$items.Add([ListItem]::new("Mandarine 2", 12,"🍊"))
$items.Add([ListItem]::new("Grape Fruit 2", 13,"🟠"))
$items.Add([ListItem]::new("Potato 6", 14,"🥔"))

$list = [List]::new($items)
$list.SetHeight(10)
# $list.SetLimit($True)
$list.Display()
Result :
ListItem([string]$text,[PSCustomObject]$value,[string]$Icon,[System.Drawing.Color]$Color)This constructor takes a 4th parameter : The rendering color of the [ListItem]
Example :
using module psCandy

param (
  [string]$Path = "..\"
)

[Console]::OutputEncoding = [System.Text.Encoding]::UTF8

function getDirContent {
  param(
    [string]$path
  )
  $items = [System.Collections.Generic.List[ListItem]]::new()
  $items.Add([ListItem]::new("..", $path))
  Get-ChildItem -Path $path -File  | ForEach-Object {
    $Name = $_.Name
    $items.Add([ListItem]::new($Name, $_,"📄",[System.Drawing.Color]::Green))
  }
  Get-ChildItem -Path $path -Directory  | ForEach-Object {
    $Name = $_.Name
    $items.Add([ListItem]::new($Name,$_, "📂", [System.Drawing.Color]::OrangeRed))
  }
  return $items
}

$items = getDirContent -path $Path
$result = $null
if ($theme) {
  $Theme.list.SelectedColor = [System.Drawing.Color]::yellow
}
while ($true) {
  $List = [List]::new($items)
  $list.SetHeight(15)
  $list.SetLimit($True)
  $choice = $List.Display()
  if ($choice) {
    if ($choice.text -eq "..") {
      $p = [System.IO.Path]::GetDirectoryName($choice.Value)
    }
    else {
      if (Test-Path -Path $choice.Value.FullName -Type Container) {
        if ($choice.chained) {
          $result = $choice.Value
          break
        } else {
          $p = $choice.Value.FullName
        }
      }
      else {
        $result = $choice.Value
        break
      }
    }
    $items = getDirContent -path $p
    $List.setItems($items)
  }
  else {
    break
  }
}
$result
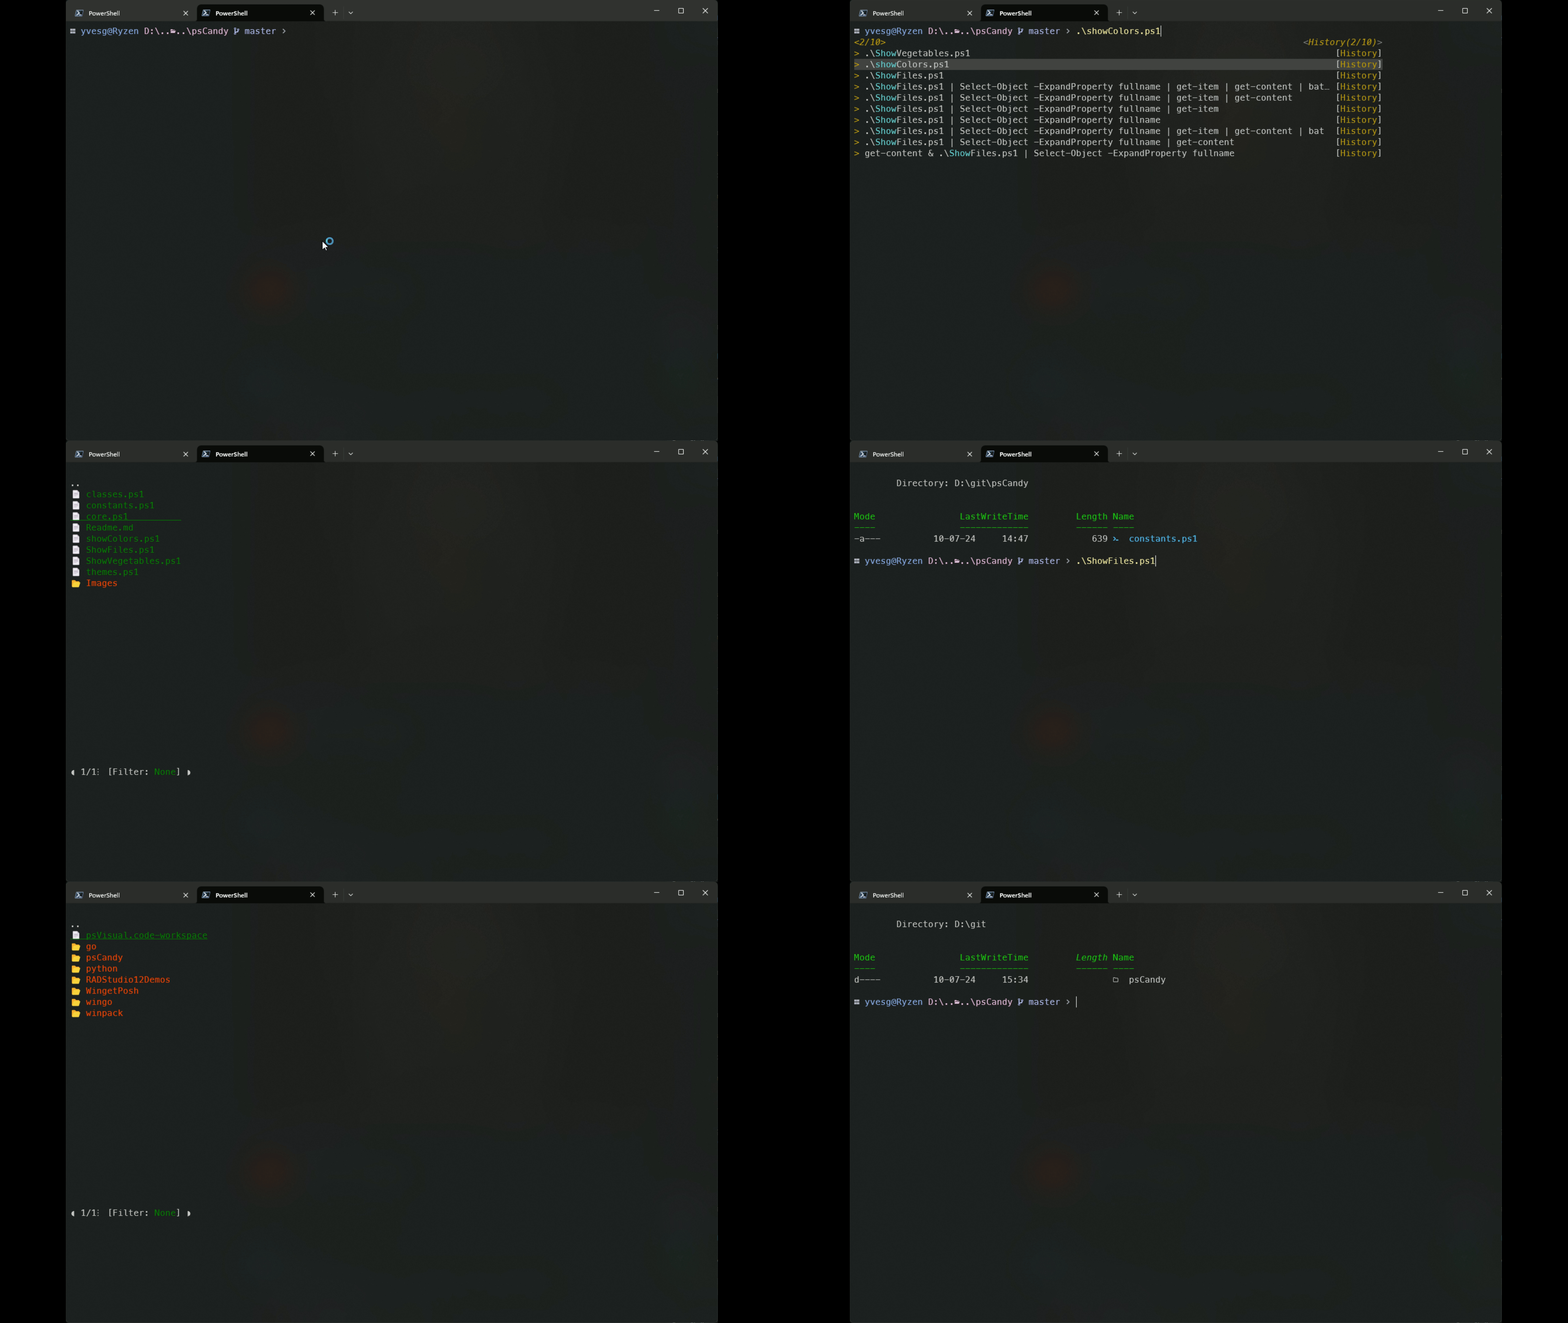
Result :
In this "mini" functionnal file explorer, the files are redered in green, with a icon "📄" and the Folders are in Orange with an icon "📂"
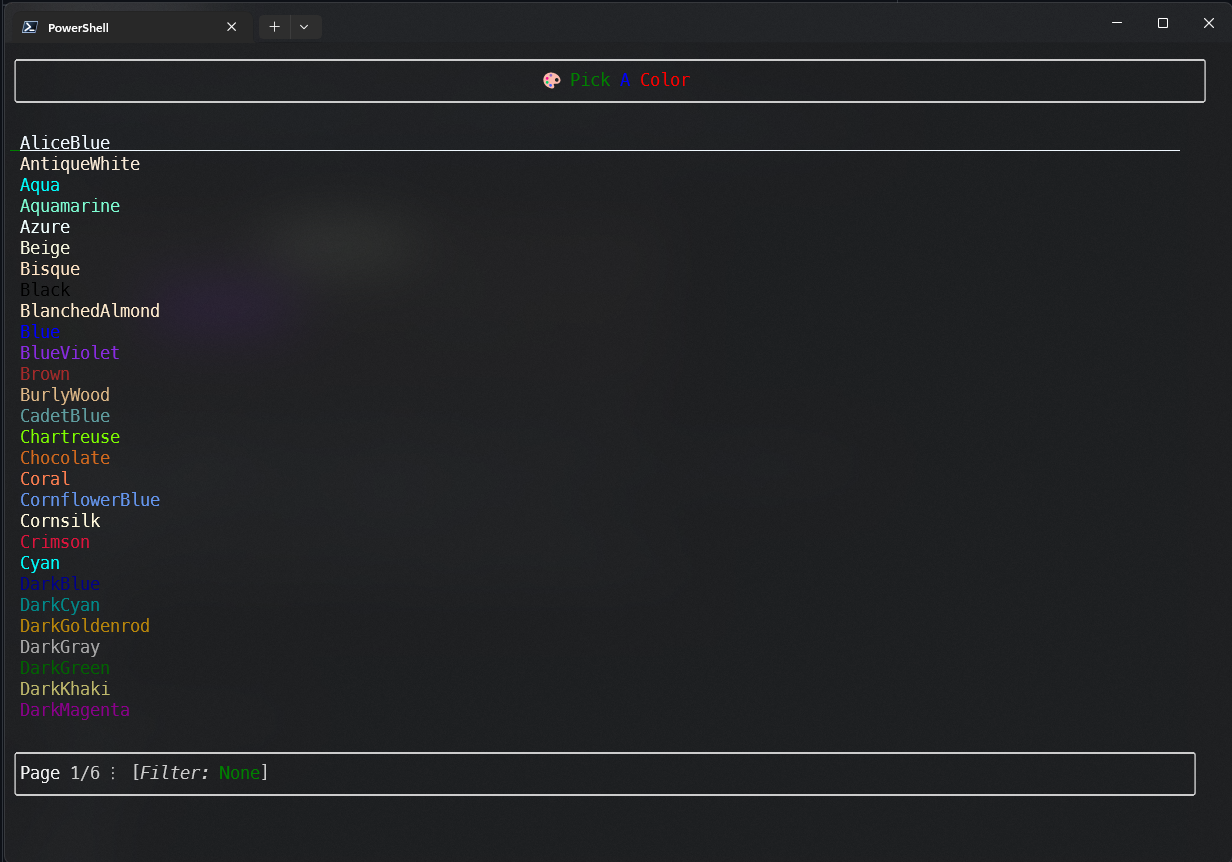
ListItem([string]$text,[PSCustomObject]$value,[System.Drawing.Color]$Color)This last constructor only take a [ListItem] color, but no icon.
Example :
using module psCandy
. .\themes.ps1


[Console]::OutputEncoding = [System.Text.Encoding]::UTF8
$items = [System.Collections.Generic.List[ListItem]]::new()
[system.Drawing.color] | Get-Member -Static -MemberType Properties | ForEach-Object {

  [psCustomObject]$color = [color]::new([System.Drawing.Color]::"$($_.Name)")
  $colorName = $_.Name
  $items.Add([ListItem]::new($colorName, $color,[System.Drawing.Color]::"$($_.Name)"))
}
$List = [List]::new($items)
$List.LoadTheme($Theme)
$list.SetHeight(25)
$List.Display()
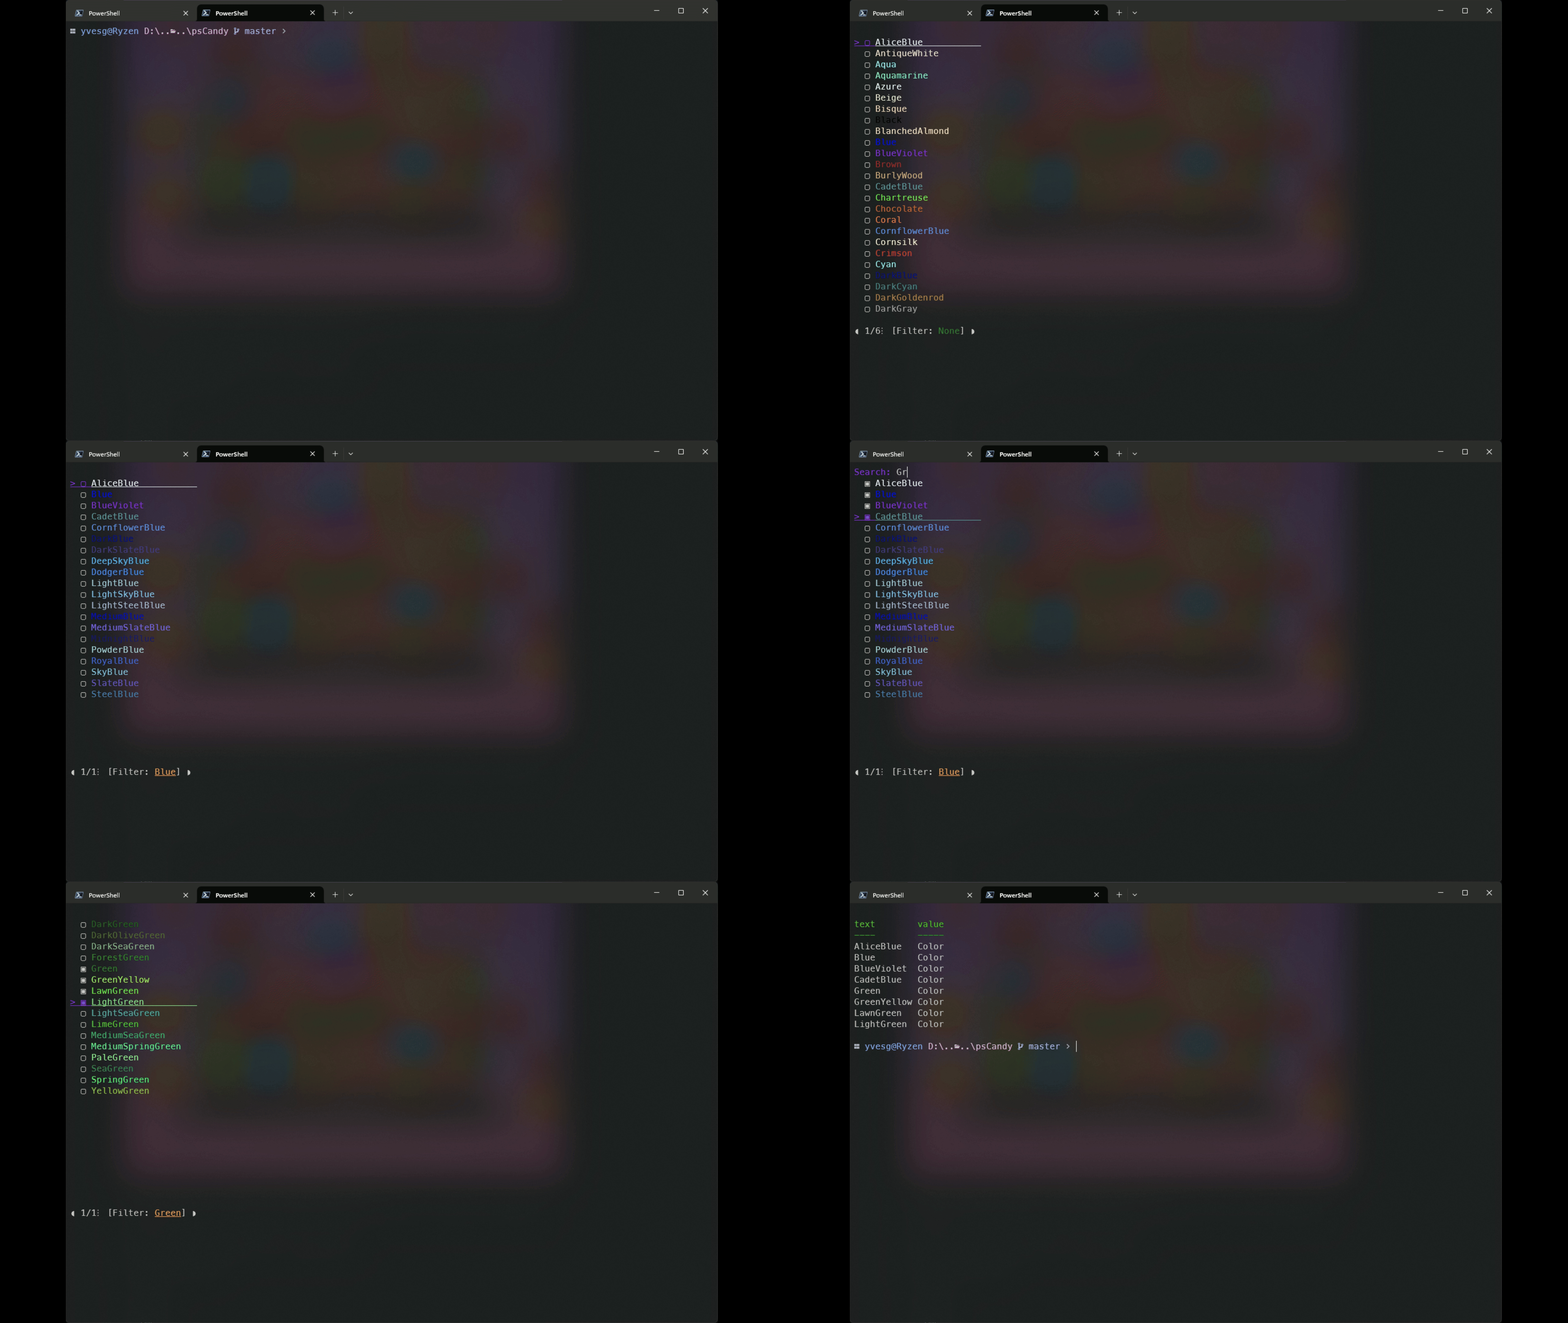
Result :
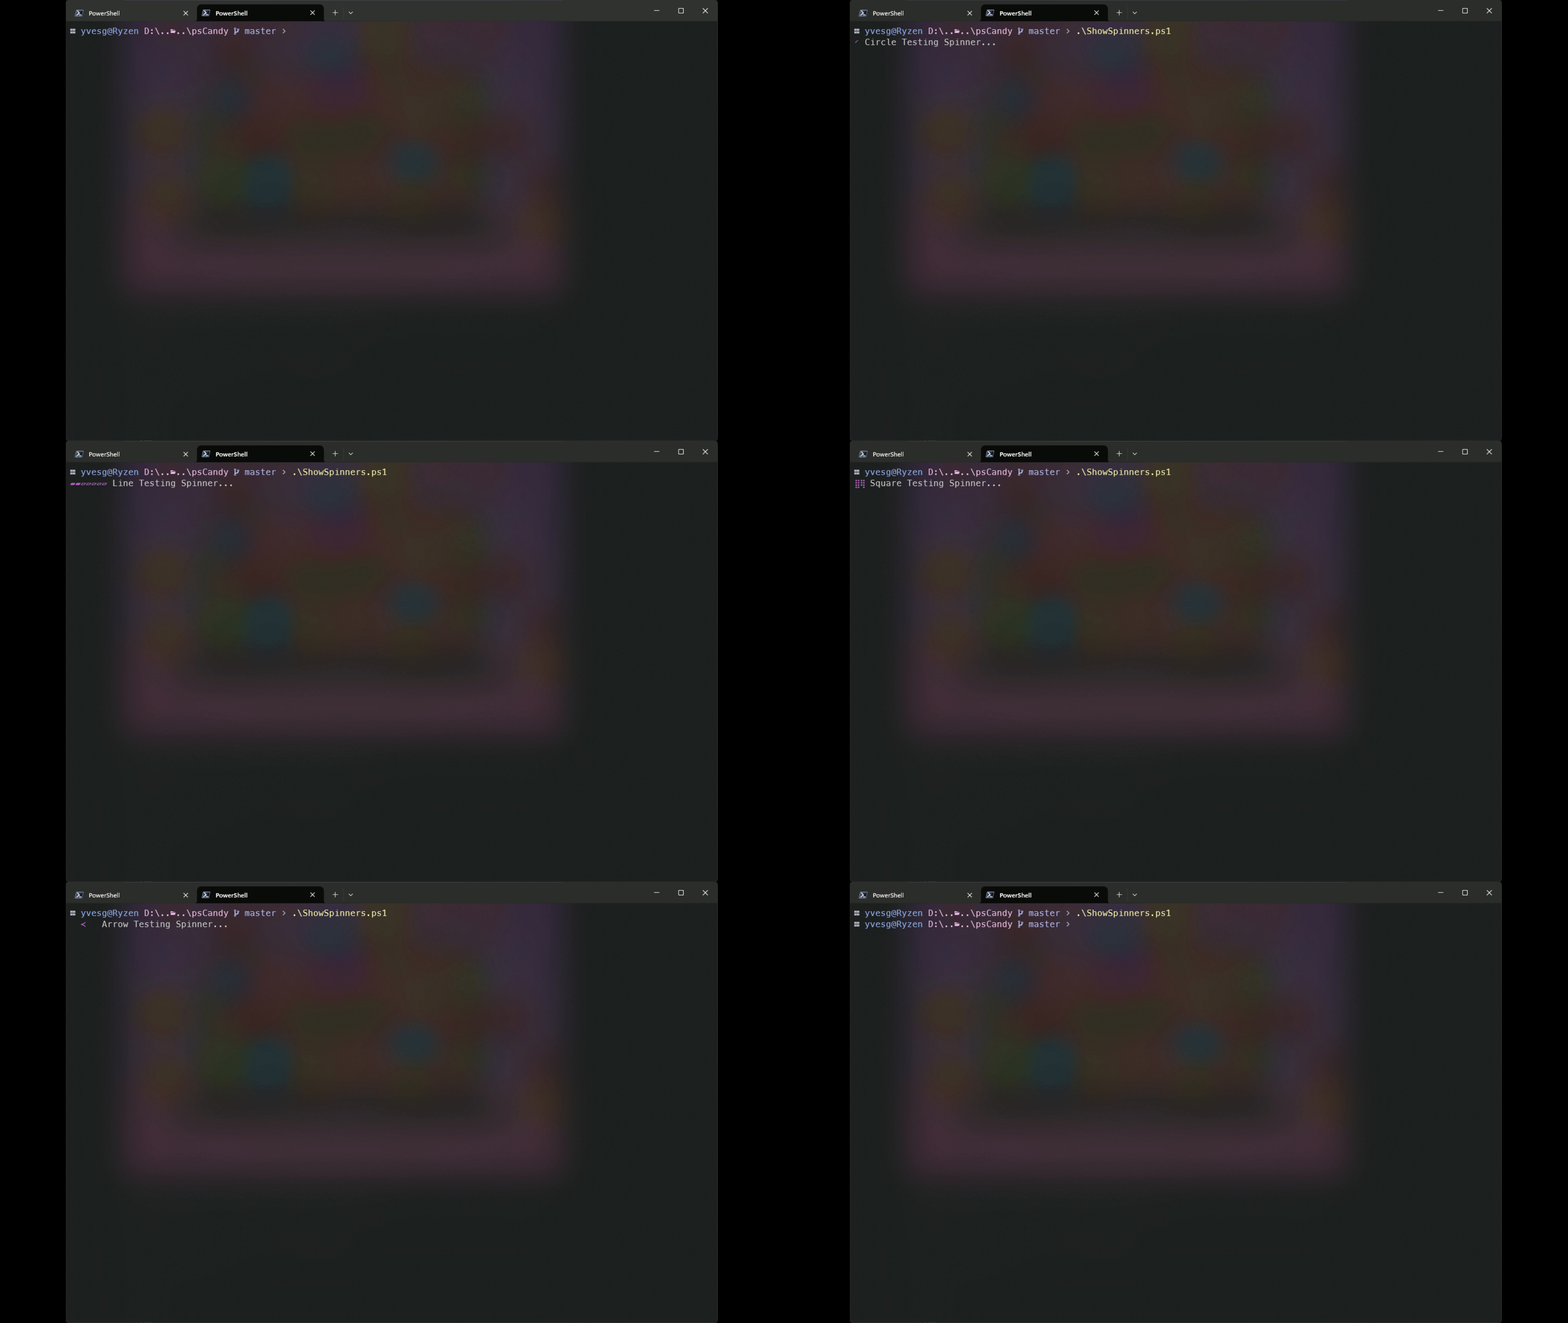
The Spinner is a class than can display an animated spinner while performing long tasks. There are 7 styles of Spinners (Circle,Dots,Line,Square,Bubble,Arrow,Pulse). By default, "Dots" is used. The Spinner can be "themed" with the [Color] class.
Example :
using module psCandy

("Circle","Dots","Line","Square","Bubble","Arrow","Pulse") | ForEach-Object {
  $spinner = [Spinner]::new($_)
  $spinner.Start("$($_) Testing Spinner for 5 seconds ...")
  start-sleep -Milliseconds 5000

  $Spinner.Stop()
}
Result :
The [Confirm] component is a simple confirmation component. It takes an array of [Option] in input as well as a [String]Title.
[Option] Has 2 constructor overloads :
Option([String]$text,[PSCustomObject]$value)Where [String]$Text is the label of the option and [PSCustomObject]$Value is the associated value that will be returned if the option is choosen.
Option([String]$text,[PSCustomObject]$value,[bool]$selected)The [Bool]$Selected parameter is added to tell that this option is the selected default.
If no [Option] has a Selected parameter, the first option of the array will be the default.
Exammple :
using module psCandy

$options = @(
  [Option]::new("Yes", "Yes"),
  [Option]::new("No", "No",$true),
  [Option]::new("Maybe", "?")
)
$confirm = [Confirm]::new("Do you want to continue?",$options,$true)
[console]::Clear()
$result = $confirm.Display()
[console]::WriteLine()
switch ($result.value) {
  "Yes" {
    Write-Host "You chose Yes"
  }
  "No" {
    Write-Host "You chose No"
  }
  "?" {
    Write-Host "You chose Maybe"
  }
  default {
    Write-Host "You chose nothing"
  }
}
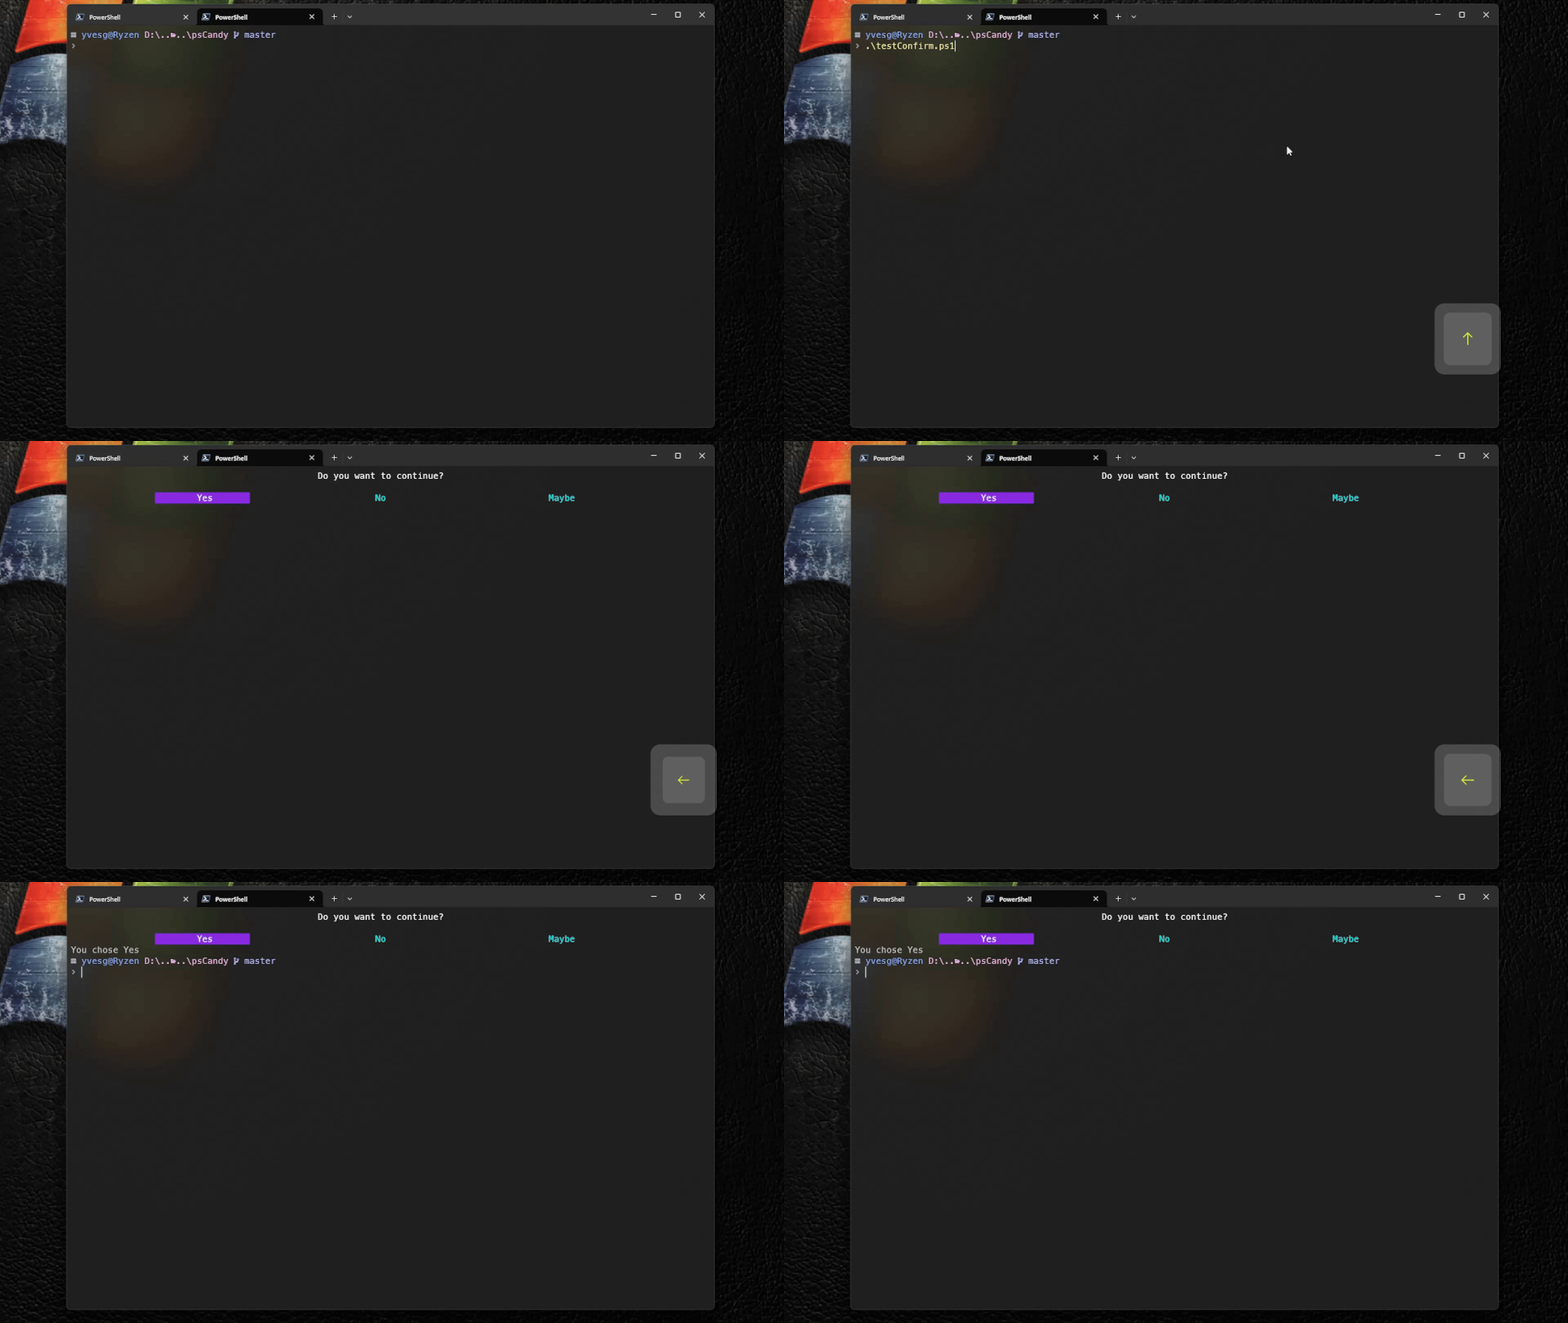
Result :
Now, psCandy supports "Theming". Here is an example of Theme file :
using module psCandy

$Theme = @{
  "list"= @{
    "SearchColor" = "BlueViolet"
    "SelectedColor" = "Yellow"
    "SelectedStyle" = [Styles]::Underline
    "FilterColor" = "Orange"
    "NoFilterColor" = "Orange"
    "FilterStyle" = [Styles]::Underline
    "Checked"="◉"
    "Unchecked"="○"
  }
  "spinner" = @{
    "spincolor"= "MediumOrchid"
    "spinType"= "Dots"
  }
  "choice" = @{
    "SelectedForeground" = "BlueViolet"
    "SelectedBackground" = "White"
    "OptionColor" = "SkyBlue"
    "MessageColor" = "IndianRed"
  }
}
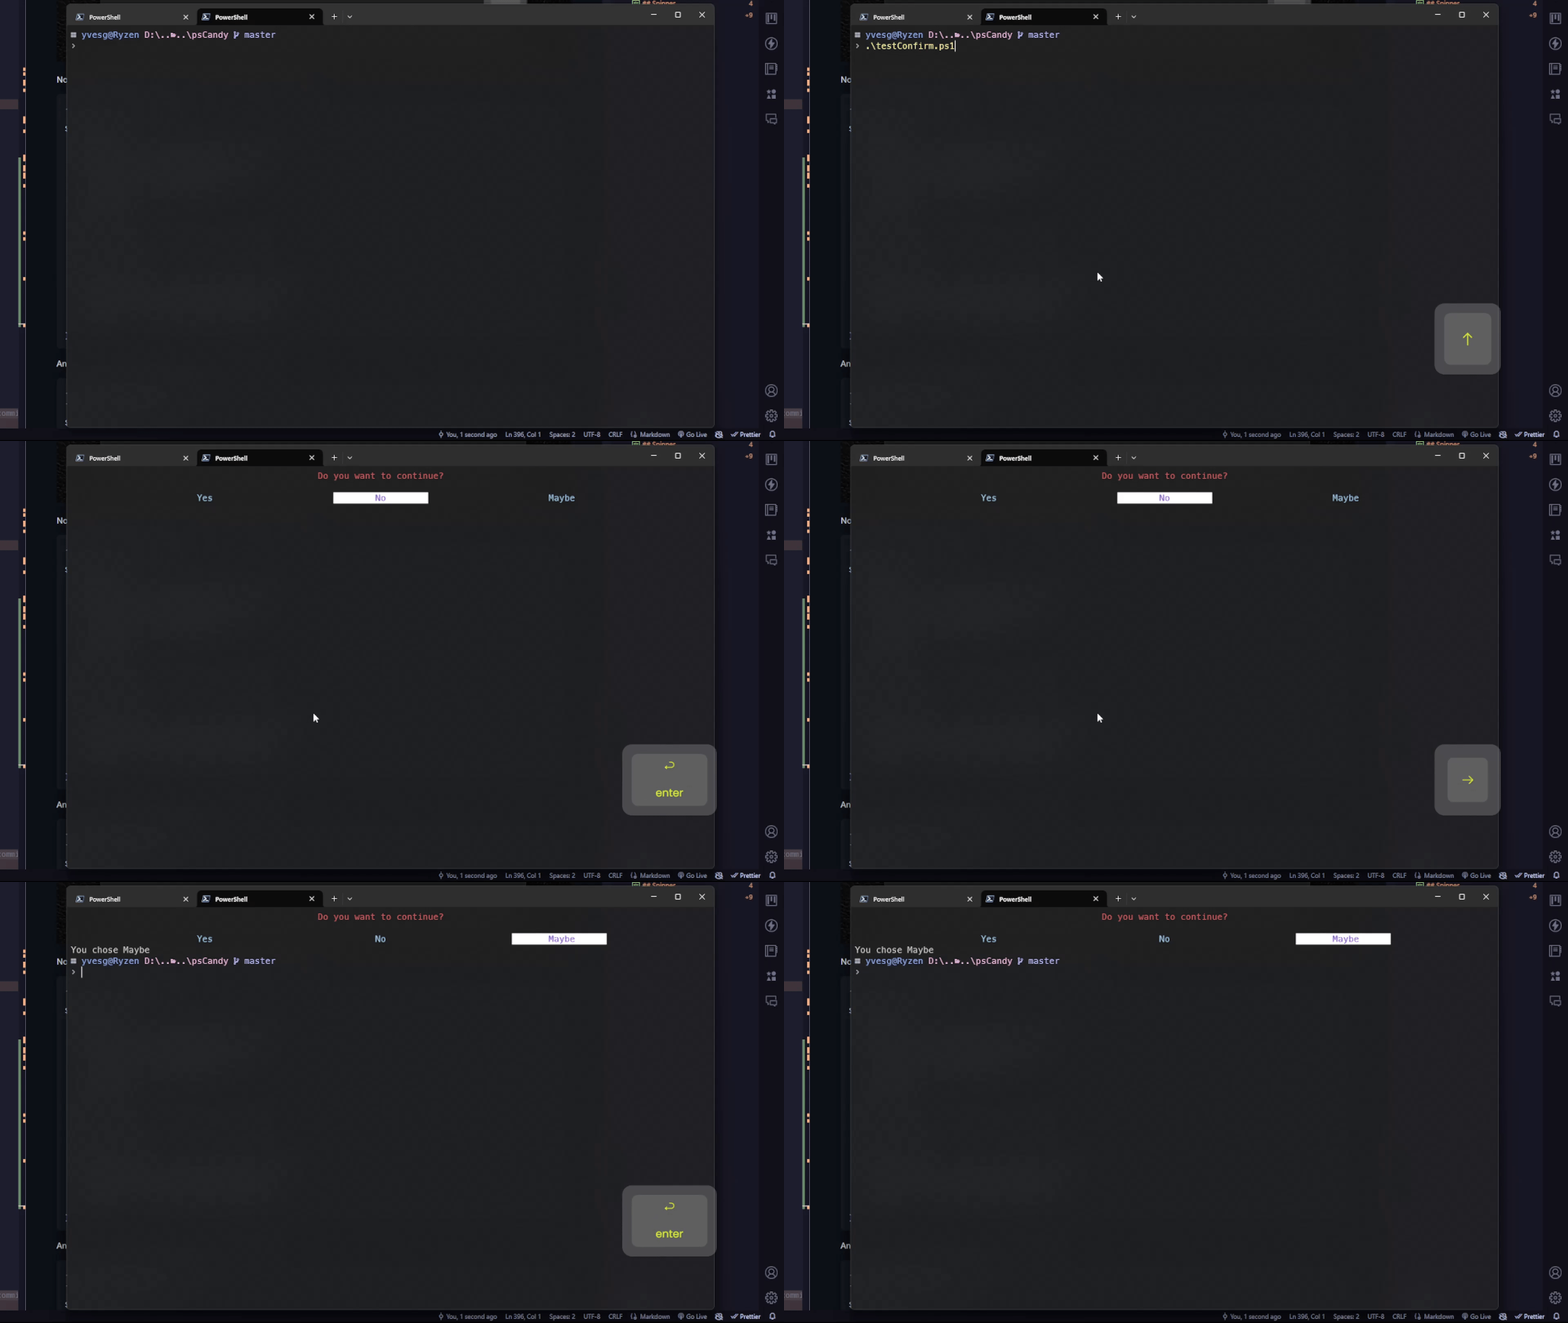
And Here is the "Confirm" example, with the Theme loaded :
using module psCandy

. .\themes.ps1

$options = @(
  [Option]::new("Yes", "Yes"),
  [Option]::new("No", "No",$true),
  [Option]::new("Maybe", "?")
)
$confirm = [Confirm]::new("Do you want to continue?",$options,$true)
[console]::Clear()
$result = $confirm.Display()
[console]::WriteLine()
switch ($result.value) {
  "Yes" {
    Write-Host "You chose Yes"
  }
  "No" {
    Write-Host "You chose No"
  }
  "?" {
    Write-Host "You chose Maybe"
  }
  default {
    Write-Host "You chose nothing"
  }
}
Result :
The "Theme" part is still experimental and may probably change in the future, using a JSON / YAML format.
The [Style] component allows to render text with colors, styles, alignment and borders. There is one constructor, that accept a [String]$Text.
Style([string]$text)Every other parameters are set by some setters.
- SetColor (2 overloads)
SetColor([System.Drawing.Color]$Foreground,[System.Drawing.Color]$Background)This overload sets the Foreground and the Background
SetColor([System.Drawing.Color]$Foreground)This overload sets only the Foreground
- SetStyle
SetStyle([Styles]$style)This method sets the Style of the label (Normal,Underline,Bold,Reversed,Strike). These values can be combined.
- SetBorder
SetBorder([bool]$border)This method sets the border drawing (True or False)
- SetAlign
setAlign([Align]$align)This method sets the alignment of the text. The possibles values are Left,Center or Right
- SetLabel
SetWidth([int]$width)This methods override the text to be redered.
-SetWidth
SetWidth([int]$width)This method changes the width of the redered text. By default, it's set to screen width.
Example :
using module psCandy

$label = [Style]::new("Label")
$Label.SetColor([System.Drawing.Color]::White, [System.Drawing.Color]::DarkGreen)
$Label.SetStyle([Styles]::Underline)
$lbl = $Label.Render()
$Style = [Style]::new("`n$($lbl)`n")
# $Style.SetStyle([Styles]::Underline)
$Style.SetBorder($true)
$Style.SetColor([System.Drawing.Color]::White, [System.Drawing.Color]::DarkBlue)
$Style.setAlign([Align]::Left)
$Style.Render()
$Style.SetLabel("Center`nSecond")
$Style.setAlign([Align]::Center)
$Style.Render()
# $Style.SetWidth(50)
$Style.SetLabel("Right")
$Style.setAlign([Align]::Right)
$Style.Render()
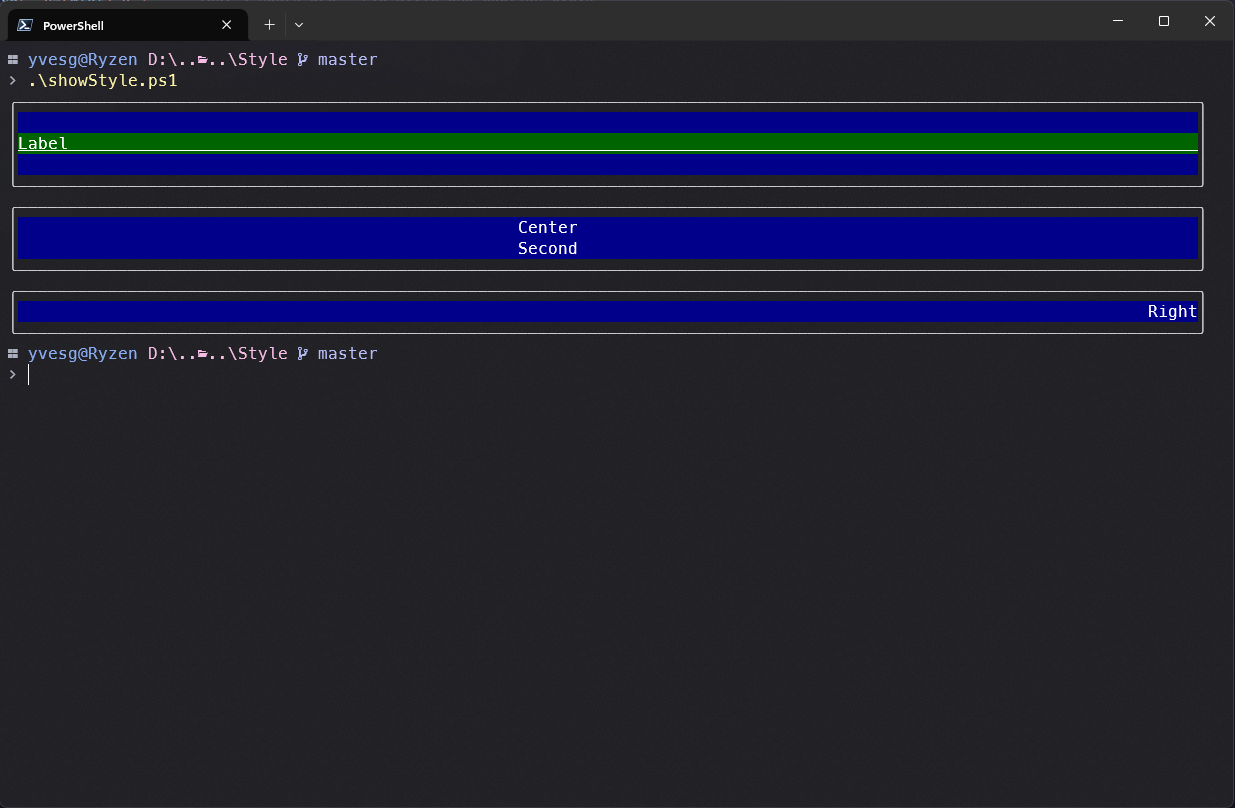
Result :
Write-Candy is inspired from https://github.com/SwissPowershell/SPS-Host

