Zhaochong An, Guolei Sun†, Yun Liu†, Fayao Liu, Zongwei Wu, Dan Wang, Luc Van Gool, Serge Belongie
Welcome to the official PyTorch implementation repository of our paper Rethinking Few-shot 3D Point Cloud Semantic Segmentation, accepted to CVPR 2024 [arXiv].
please ensure you are using our corrected setting for the development and evaluation of your 3D few-shot models.
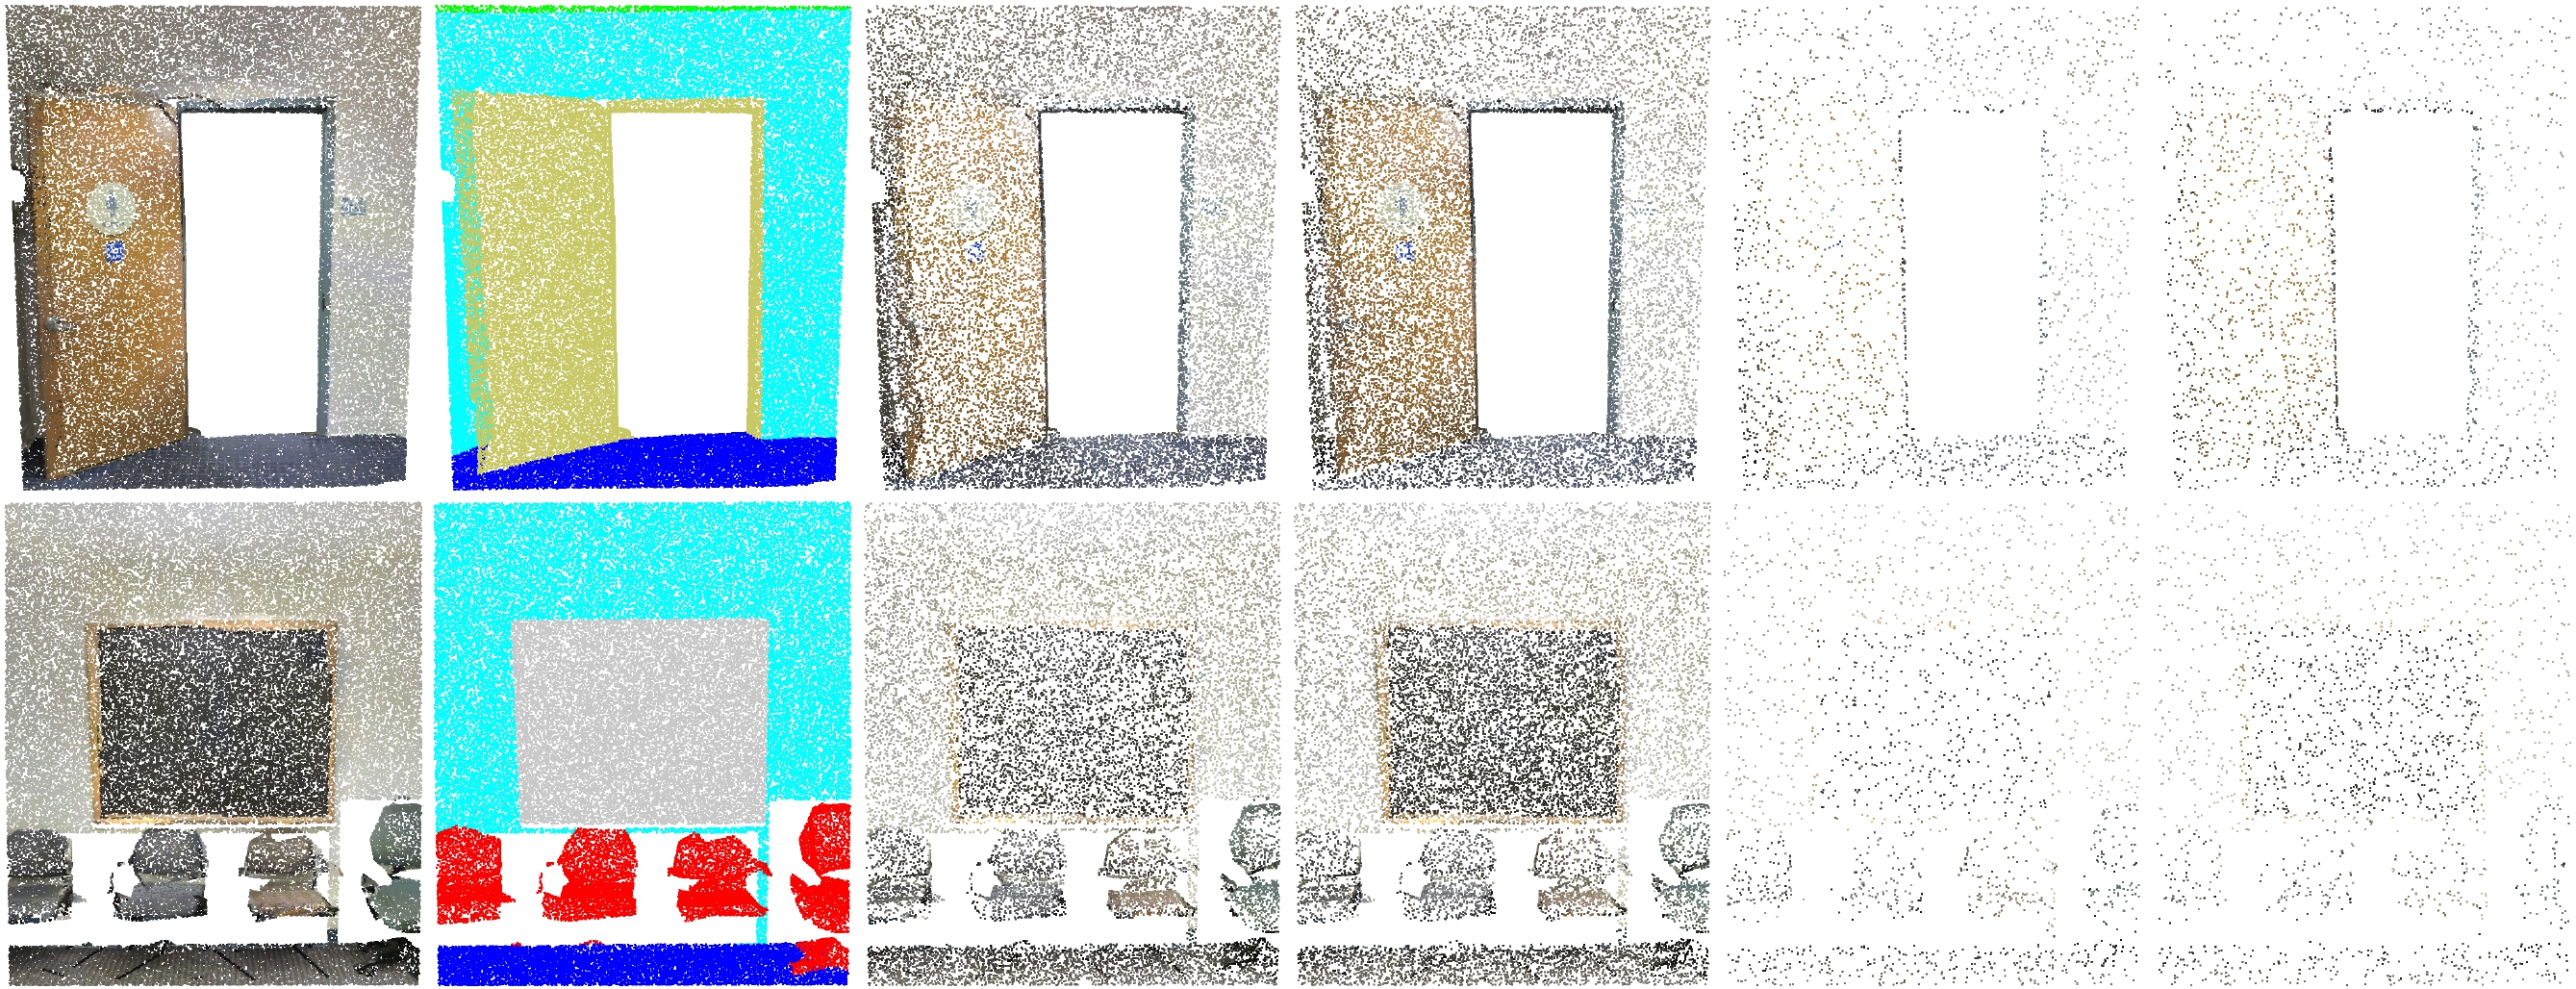
- Identification of Key Issues: We pinpoint two significant issues in the current Few-shot 3D Point Cloud Semantic Segmentation (FS-PCS) setting: foreground leakage and sparse point distribution. These issues have undermined the validity of previous progress and hindered further advancements.
- Standardized Setting and Benchmark: To rectify existing issues, we propose a standardized FS-PCS setting along with a new benchmark. This enables fair comparisons and fosters future advancements in the field. Our repository implements an effective few-shot running pipeline on our proposed standard FS-PCS setting, facilitating easy development for future researchers based on our code base.
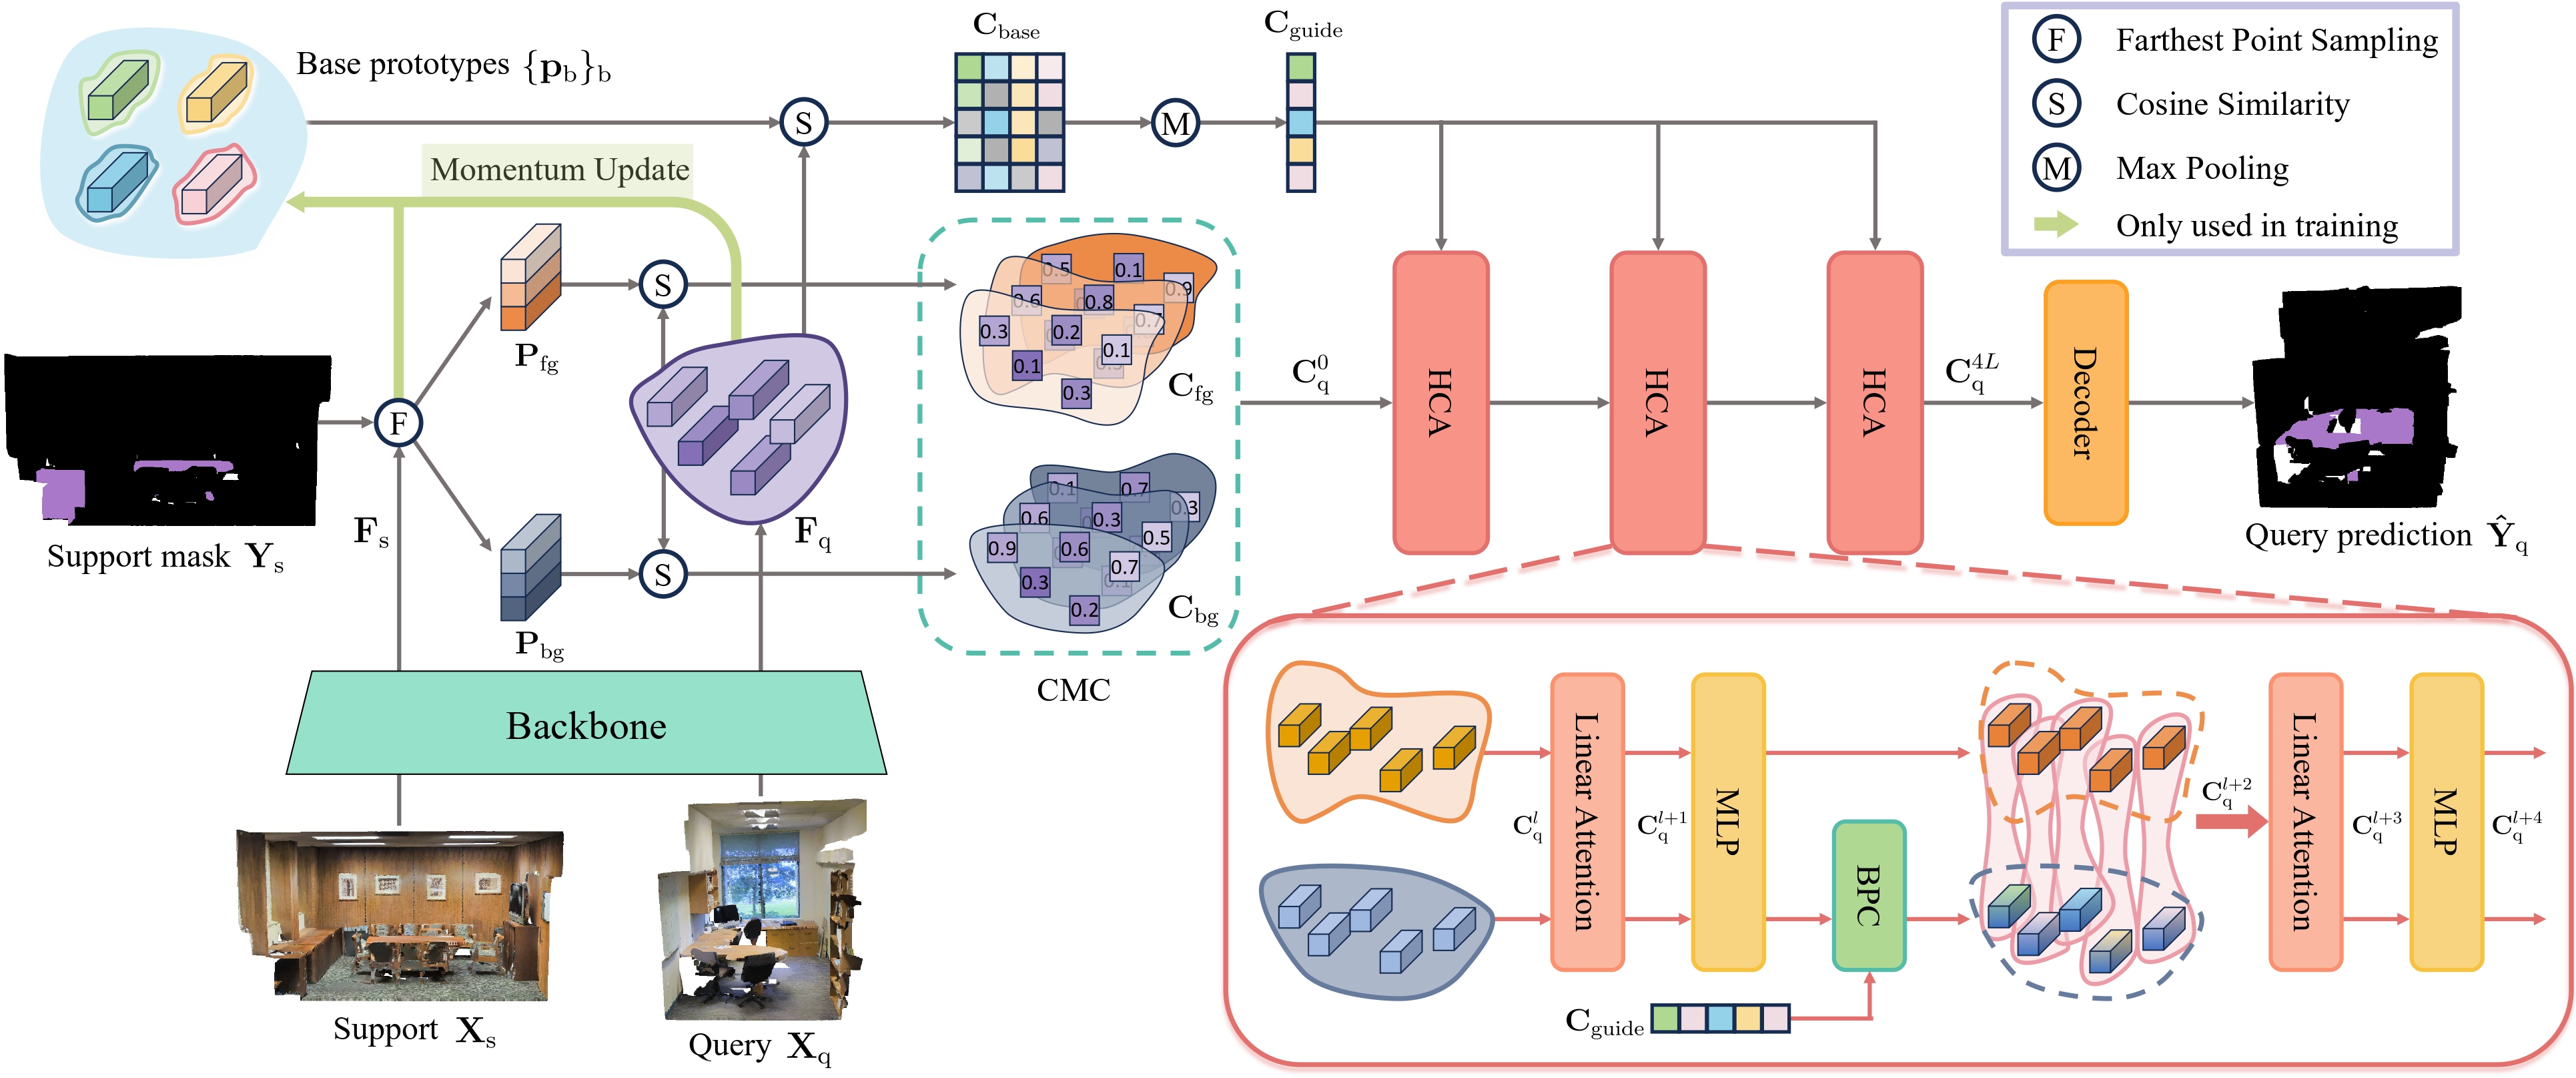
- Novel Method (COSeg): Our method introduces a novel correlation optimization paradigm, diverging from the traditional feature optimization approach used by all previous FS-PCS models. COSeg achieves state-of-the-art performance on both S3DIS and ScanNetv2 datasets, demonstrating effective contextual learning and background correlation adjustment ability.
The following environment setup instructions have been tested on RTX 3090 GPUs with GCC 6.3.0.
- Install dependencies
pip install -r requirements.txt
If you have any problem with the above command, you can also install them by
pip install torch==1.11.0+cu113 torchvision==0.12.0+cu113 torchaudio==0.11.0 --extra-index-url https://download.pytorch.org/whl/cu113
pip install torch_points3d==1.3.0
pip install torch-scatter==2.1.1
pip install torch-points-kernels==0.6.10
pip install torch-geometric==1.7.2
pip install timm==0.9.2
pip install tensorboardX==2.6
pip install numpy==1.20.3
For incompatiable installation issues, such as wanting a higher torch version (e.g., 2.1.0) but conflicts with torch_points3d, please refer to this thread: #16 or feel free to open a new discussion for further assistance.
- Compile pointops
Ensure you have gcc, cuda, and nvcc installed. Compile and install pointops2 as follows:
cd lib/pointops2
python3 setup.py install
You can either directly download the preprocessed dataset directly from the links provided below or perform the preprocessing steps on your own.
| Dataset | Download |
|---|---|
| S3DIS | Download link |
| ScanNet | Download link |
S3DIS
- Download: S3DIS Dataset Version 1.2.
- Preprocessing: Re-organize raw data into
npyfiles:The generated numpy files will be stored incd preprocess python collect_s3dis_data.py --data_path [PATH_to_S3DIS_raw_data] --save_path [PATH_to_S3DIS_processed_data]PATH_to_S3DIS_processed_data/scenes. - Splitting Rooms into Blocks:
python room2blocks.py --data_path [PATH_to_S3DIS_processed_data]/scenes
ScanNet
- Download: ScanNet V2.
- Preprocessing: Re-organize raw data into
npyfiles:The generated numpy files will be stored incd preprocess python collect_scannet_data.py --data_path [PATH_to_ScanNet_raw_data] --save_path [PATH_to_ScanNet_processed_data]PATH_to_ScanNet_processed_data/scenes. - Splitting Rooms into Blocks:
python room2blocks.py --data_path [PATH_to_ScanNet_processed_data]/scenes
After preprocessing the datasets, a folder named blocks_bs1_s1 will be generated under PATH_to_DATASET_processed_data. Make sure to update the data_root entry in the .yaml config file to [PATH_to_DATASET_processed_data]/blocks_bs1_s1/data.
We provide the trained model weights across different few-shot settings and datasets below. The training and testing are using 4 RTX 3090 GPUs. Please note that these weights have been retrained by us, which may have slight differences from reported results. You could directly load these weights for evaluation or train your own models following the training instructions.
| Model name | Dataset | CVFOLD | N-way K-shot | Model Weight |
|---|---|---|---|---|
| s30_1w1s | S3DIS | 0 | 1-way 1-shot | Download link |
| s30_1w5s | S3DIS | 0 | 1-way 5-shot | Download link |
| s30_2w1s | S3DIS | 0 | 2-way 1-shot | Download link |
| s30_2w5s | S3DIS | 0 | 2-way 5-shot | Download link |
| s31_1w1s | S3DIS | 1 | 1-way 1-shot | Download link |
| s31_1w5s | S3DIS | 1 | 1-way 5-shot | Download link |
| s31_2w1s | S3DIS | 1 | 2-way 1-shot | Download link |
| s31_2w5s | S3DIS | 1 | 2-way 5-shot | Download link |
| sc0_1w1s | ScanNet | 0 | 1-way 1-shot | Download link |
| sc0_1w5s | ScanNet | 0 | 1-way 5-shot | Download link |
| sc0_2w1s | ScanNet | 0 | 2-way 1-shot | Download link |
| sc0_2w5s | ScanNet | 0 | 2-way 5-shot | Download link |
| sc1_1w1s | ScanNet | 1 | 1-way 1-shot | Download link |
| sc1_1w5s | ScanNet | 1 | 1-way 5-shot | Download link |
| sc1_2w1s | ScanNet | 1 | 2-way 1-shot | Download link |
| sc1_2w5s | ScanNet | 1 | 2-way 5-shot | Download link |
To begin, you will need to pretrain the backbone either on the S3DIS or ScanNet dataset. For consistency and ease of reproduction, we highly recommend using our pretrained backbone weights directly. You can find the pretrained weights and their corresponding download links below:
| Model name | Dataset | CVFOLD | Model Weight |
|---|---|---|---|
| s3_s1pre | S3DIS | 1 | Download link |
| s3_s0pre | S3DIS | 0 | Download link |
| sc_s1pre | ScanNet | 1 | Download link |
| sc_s0pre | ScanNet | 0 | Download link |
Alternatively, you can perform the pretraining on your own. However, please note that doing so may result in more variability compared to the results reported in our paper.
To pretrain the backbone from scratch, run the following command, replacing [PRETRAIN_CONFIG] with the respective configuration file (s3dis_stratified_pretraining.yaml or scannetv2_stratified_pretraining.yaml), [PATH_to_SAVE_BACKBONE] with the desired path to save the backbone, and [CVFOLD] with either 0 or 1 depending on your few-shot setting:
python3 train_backbone.py --config config/[PRETRAIN_CONFIG] save_path [PATH_to_SAVE_BACKBONE] cvfold [CVFOLD]Next, let us start the few-shot training. Set the configs in config/[CONFIG_FILE] (s3dis_COSeg_fs.yaml or scannetv2_COSeg_fs.yaml) for few-shot training. Adjust cvfold, n_way, and k_shot according to your task:
# 1 way 1/5 shot
python3 main_fs.py --config config/[CONFIG_FILE] save_path [PATH_to_SAVE_MODEL] pretrain_backbone [PATH_to_SAVED_BACKBONE] cvfold [CVFOLD] n_way 1 k_shot [K_SHOT] num_episode_per_comb 1000
# 2 way 1/5 shot
python3 main_fs.py --config config/[CONFIG_FILE] save_path [PATH_to_SAVE_MODEL] pretrain_backbone [PATH_to_SAVED_BACKBONE] cvfold [CVFOLD] n_way 2 k_shot [K_SHOT] num_episode_per_comb 100
Note: By default, when n_way=1, num_episode_per_comb is set to 1000. When n_way=2, num_episode_per_comb is adjusted to 100 to maintain consistency in test set magnitude.
For testing, modify cvfold, n_way, k_shot and num_episode_per_comb accordingly, then run:
python3 main_fs.py --config config/[CONFIG_FILE] test True eval_split test weight [PATH_to_SAVED_MODEL]For visualization in wandb, you could simply add vis 1.
Note: It is common to observe fluctuations in the mIoU by approximately 1.0%. This variability may be attributed to the relatively small size of the training set. The variance in performance on ScanNetv2 tends to be smaller compared to S3DIS due to its larger size. Additionally, the mean performance across the two dataset splits is generally more stable than the performance of each split individually.
To generate the visualizations as in our paper:
-
Save Predicted Results
Run the following command to save all related results. You could specify the target class to visualize with
target_classaccording to your own interests. The current code supports visulizations for 1-way 1-shot setting on the S3DIS dataset:python3 main_fs.py --config config/[CONFIG_FILE] test True weight [PATH_to_SAVED_MODEL] cvfold [CVFOLD] train_gpu [0] vis_save_path ./vis forvis 1 data_root [PATH_to_DATASET_processed_data]/scenes/data target_class table -
Render Saved Results
Use Open3D tools (tested on Open3D==0.16.0) to render the saved results:
python3 util/visualize.py --targetclass table --vis_path ./vis
Since we store labels in the normals attribute as a walkaround for accessing the labels in the PointCloud object, you should press Ctrl+L in the rendering window to disable normals for correct color rendering. Our code allows you to crop the scene, adjust the view, resize, and more in the interactive window. Press Ctrl+P to save the final image when you find a satisfactory perspective. For more details, see the Open3D documentation.
If you find this project useful, please consider giving a star ⭐ and citation 📚:
@inproceedings{an2024rethinking,
  title={Rethinking Few-shot 3D Point Cloud Semantic Segmentation},
  author={An, Zhaochong and Sun, Guolei and Liu, Yun and Liu, Fayao and Wu, Zongwei and Wang, Dan and Van Gool, Luc and Belongie, Serge},
  booktitle={Proceedings of the IEEE/CVF Conference on Computer Vision and Pattern Recognition},
  pages={3996--4006},
  year={2024}
}
For any questions or issues, feel free to reach out!
Zhaochong An: anzhaochong@outlook.com
Communication Group (WeChat):


