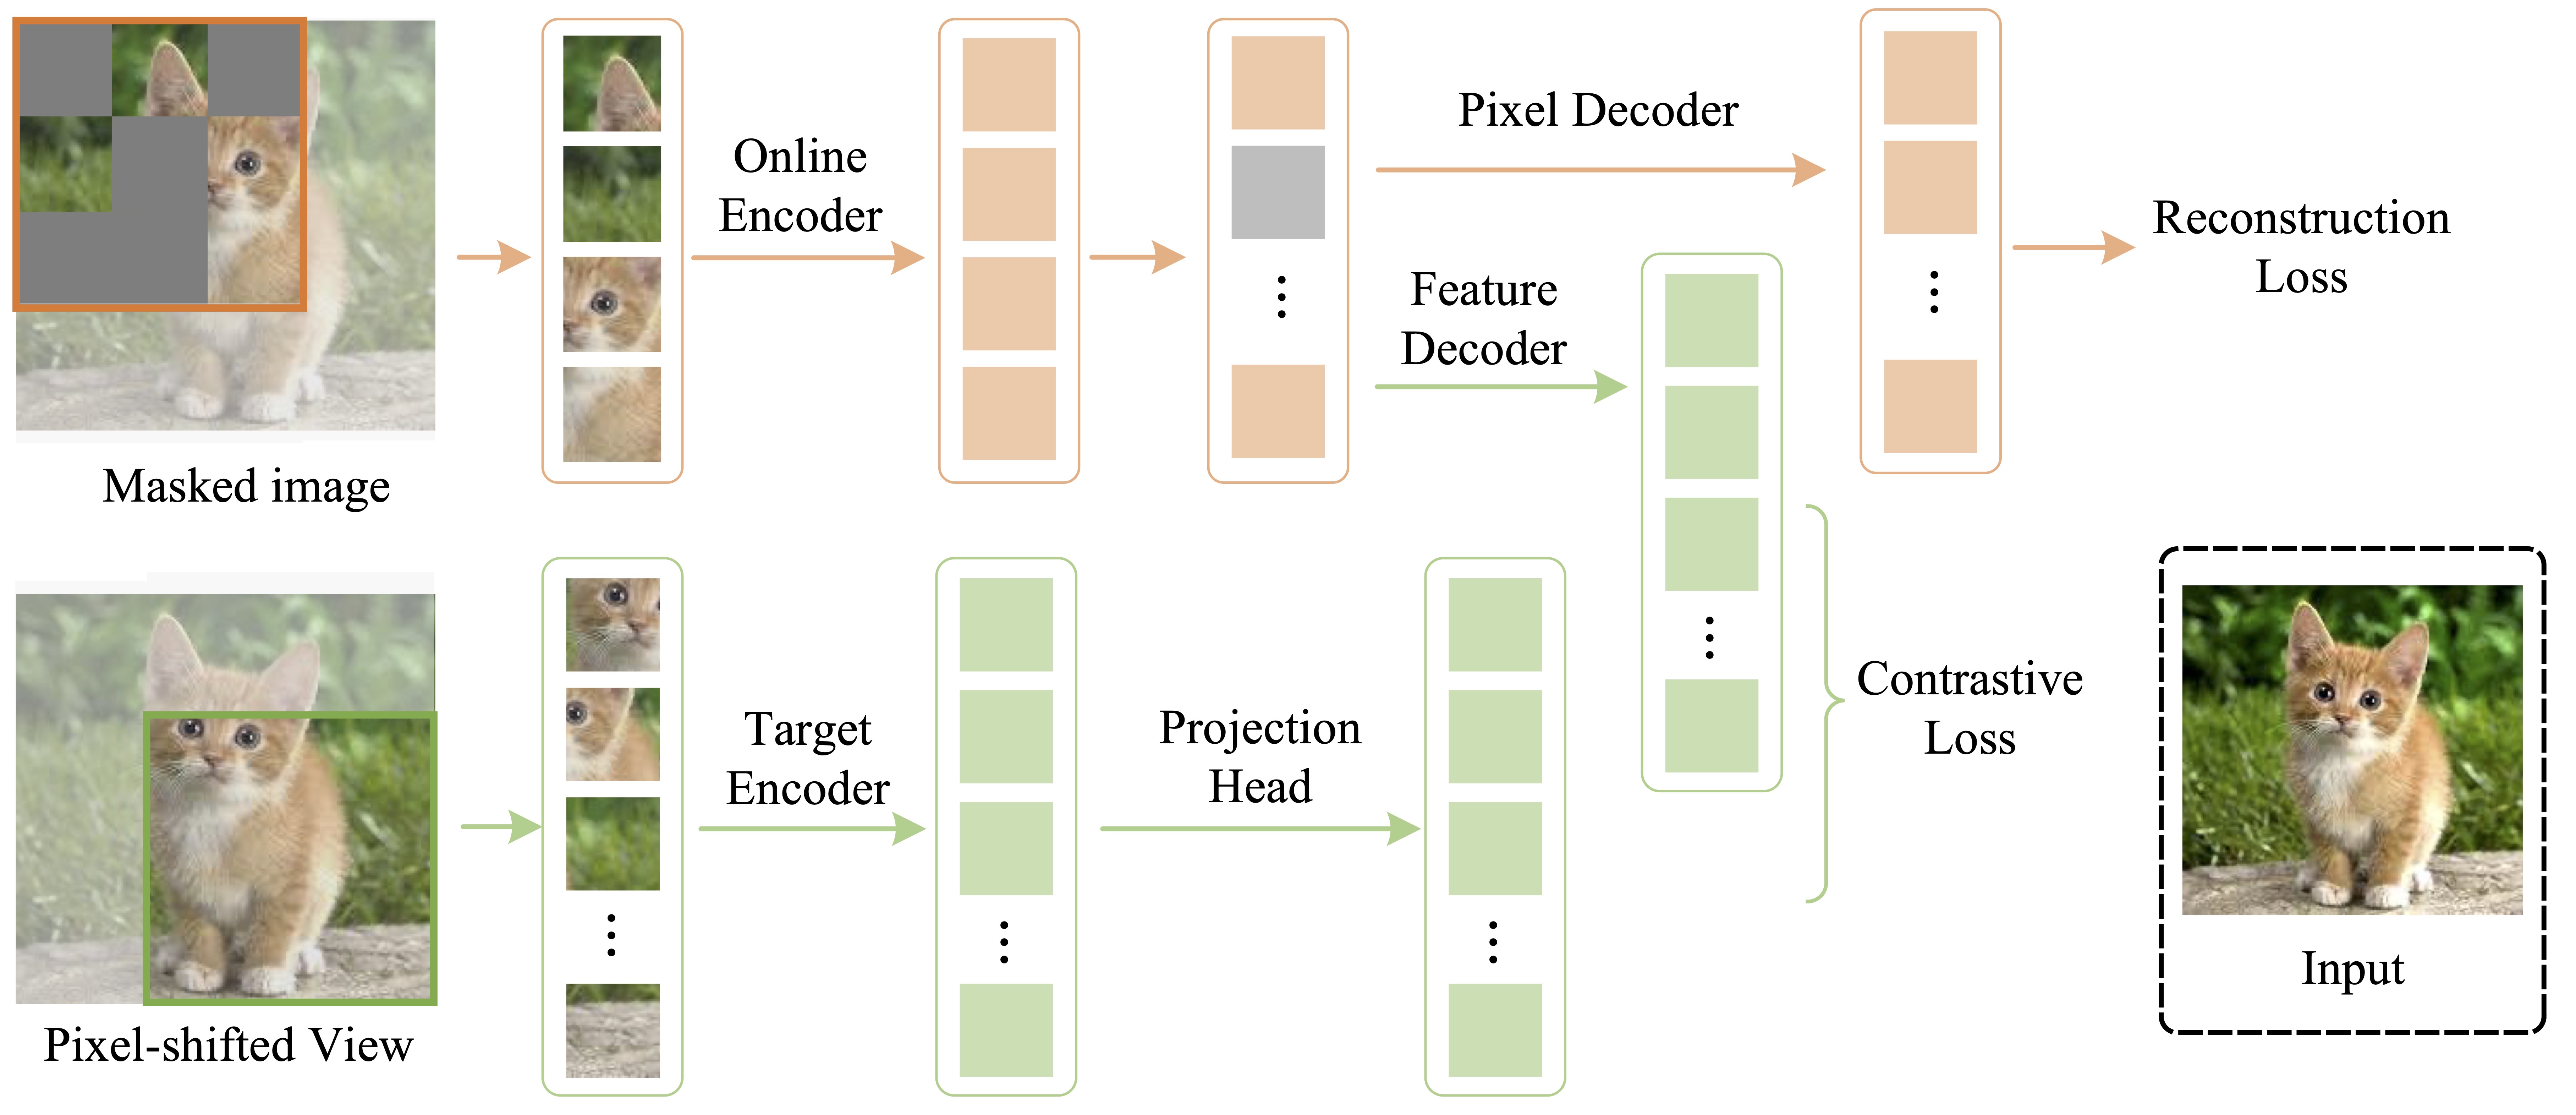
The official implementation of the paper Contrastive Masked Autoencoders are Stronger Vision Learners
@article{huang2023contrastive,
  title={Contrastive masked autoencoders are stronger vision learners},
  author={Huang, Zhicheng and Jin, Xiaojie and Lu, Chengze and Hou, Qibin and Cheng, Ming-Ming and Fu, Dongmei and Shen, Xiaohui and Feng, Jiashi},
  journal={IEEE Transactions on Pattern Analysis and Machine Intelligence},
  year={2023},
  publisher={IEEE}
}Step 0. Download and install Miniconda from official website
Step 1. Create a conda environment and activate it
conda create --name cmae python=3.9 -y
conda activate cmae
Step 2. Install PyTorch following official instructions, e.g.
conda install pytorch==2.1.0 torchvision==0.16.0 torchaudio==2.1.0 pytorch-cuda=12.1 -c pytorch -c nvidiaStep 3. Install MMCV
pip3 install boto3 addict tqdm regex pyyaml opencv-python opencv-contrib-python future tensorboard filelock yapf attrs einops opencv-python-headless numpy scipy mmcv==2.1.0 psutil mmengine timmStep 4. Install CMAE
git clone https://github.com/ZhichengHuang/CMAE
cd CMAE
pip3 install -v -e .-
Register an account and login to the download page
-
Find download links for ILSVRC2012 and download the following two files:
- ILSVRC2012_img_train.tar
- ILSVRC2012_img_val.tar
- ILSVRC2012_devkit_t12.tar.gz
-
Untar the download files
mkdir train && tar -xvf ILSVRC2012_img_train.tar -C train && for x in `ls train/*tar`; do fn=train/`basename $x .tar`; mkdir $fn; tar -xvf $x -C $fn; rm -f $fn.tar; done
# if success, then retrun 11,281,167
ls -lR|grep "^-"|wc -l

# unzip validation
mkdir val
tar xvf ILSVRC2012_img_val.tar -C ./val

tar -xzf ILSVRC2012_devkit_t12.tar.gz
-
The project has the following structures.
CMAE
├── cmae
├── tools
├── configs
├── docs
├── work_dirs
│   ├──init
├── data
│   ├── ImageNet
│   │   ├── ImageNet_train.json
│   │   ├── ImageNet_val.json
│   │   ├── train
│   │   ├── val
The following table provides the pre-trained checkpoints
| Size | Model | Epoch | PT | FT | ImageNet Acc. |
|---|---|---|---|---|---|
| ViT-Base | MAE | 300 | - | - | 82.9 |
| ViT-Base | MAE | 1600 | - | - | 83.6 |
| ViT-Base | CMAE | 300 | aws|ali | aws|ali | 83.8 |
| ViT-Base | CMAE | 1600 | aws|ali | aws|ali | 84.7 |
# download the pre-training weights to the "work_dirs/init/"
cd work_dirs/init/
wget https://cmae.s3.us-west-1.amazonaws.com/weight/cmae_vit-base-p16_32xb128-coslr-300e_in1k.pth
#run the fine-tuning script with 8 GPUs
bash tools/dist_train.sh configs/fine-tuning/cmae/cmae_base_pre300_8x128_100e_in1k_amp.py 8
# direct test without fine-tuning model
mkdir -p work_dirs/fine-tuning/cmae_base_pre300_8x128_100e_in1k_amp
cd work_dirs/fine-tuning/cmae_base_pre300_8x128_100e_in1k_amp
#download the fine-tuning weight
wget https://cmae.s3.us-west-1.amazonaws.com/weight/cmae_base_pre300_8x128_100e_in1k_amp_fine.pth
#test the model
bash tools/dist_test.sh configs/fine-tuning/cmae/cmae_base_pre300_8x128_100e_in1k_amp.py work_dirs/fine-tuning/cmae_base_pre300_8x128_100e_in1k_amp/cmae_base_pre300_8x128_100e_in1k_amp_fine.pth 8# pre-training the model with 4*8 GPUs,
# node 0
bash tools/dist_train.sh configs/pre-training/cmae/cmae_vit-base-p16_32xb128-coslr-1600e_in1k.py 8 4 0
# node 1
bash tools/dist_train.sh configs/pre-training/cmae/cmae_vit-base-p16_32xb128-coslr-1600e_in1k.py 8 4 1
# node 2
bash tools/dist_train.sh configs/pre-training/cmae/cmae_vit-base-p16_32xb128-coslr-1600e_in1k.py 8 4 2
# node 3
bash tools/dist_train.sh configs/pre-training/cmae/cmae_vit-base-p16_32xb128-coslr-1600e_in1k.py 8 4 3
# when you finish the pre-training you can use the script to extract the backbone weight for downstream tasks fine-tuning
python3 tools/extract_backbone_weights.py pre-training.pth init_weight.pth
more details for training model with multiple machines, you can refer to mmengine.
Our previous code was based on mmcv. Due to the upgrade of some external libraries, some areas were incompatible. Therefore, we redesigned all the code based on mmengine, and the pytorch version was also upgraded to torch2.1.
Thanks to mmengine and mmselfsup, the code organization structure and part of the code in this project refer to these two open source projects.
