Fork the repo and clone it to your machine. Make sure to install all of the prerequisites
- node.js
- Ionic
- Cordova
- Java JDK
- Android SDK
Before installing anything, update your computer.
$ sudo apt-get update
$ sudo apt-get install nodejs
$ sudo apt-get install npm
$ npm install -g ionic
$ npm install -g cordova
These are only needed for Android development and deployment.
- Download Android Studio from here
- Choose standard for the installation type and Finish
- Open Android Studio and go to File -> Settings -> System Settings -> SDK Tools and install Google USB Driver
- Set the ANDROID_HOME variable to the location where your android sdk is located. For me (working in ubuntu virtual environment) it was in /home/user/Android/Sdk
$ export ANDROID_HOME=/home/user/Android/Sdk
- Now add the tools and platform tools to your path
$ export PATH=$ANDROID_HOME/platform-tools:$ANDROID_HOME/tools:$PATH
You can check your path variable with
$ echo $PATH
- First update your package index
$ sudo apt-get update
- Next install the Java Runtime Environment
$ sudo apt-get install default-jre
- Now install the JDK
$ sudo apt-get install default-jdk
- Set the JAVA_HOME path variable. Mine was located at /usr/lib/jvm/java-8-oracle
$ export JAVA_HOME=/usr/lib/jvm/java-8-oracle
To check if the environment paths are set up correctly run these
$ echo $JAVA_HOME
$ echo $ANDROID_HOME
- Go to your settings
- Scroll all the way to the bottom and tap on About Phone
- Repeatedly tap on Build Number until your phone is in developer mode
- Go back to settings, you should now have a new option called Developer options
- Go into Developer options and make sure that USB debugging is turned on. I also have OEM unlocking turned on but I don’t think you need it.
In a different directory run this command to produce a prebuilt Ionic tutorial project
$ ionic start MyIonicProjectName tutorial --type=ionic-angular
Now move into that directory and run the application.
$ cd MyIonicProject/
$ ionic serve
Ionic will automatically open the application in your browser. Go ahead and look around to see what's provided by the tutorial. We will be starting from a blank project and adding everything ourselves.
Return to your terminal and stop the tutorial application with Ctrl+C. Now move back into the learning-ionic/ directory. Start this application and see what we have to start off with.
Currently we start the application with ionic serve but there are more ways to run the application. Running with ionic serve will automatically run the application in the browser but we can specify what platform we want to run it on.
First we need to add what platform we want to run on. We'll just add browser for now but you can also add android and ios.
$ ionic cordova platform add browser
Now run the application
$ ionic cordova run browser
As you can see, Ionic will behave that same as running ionic serve. There is one big difference though, ionic serve will run the application with live reload whereas ionic cordova run browser does not, for development it is much faster to run the application with ionic serve.
Now it's time to start building an application. Go ahead and start by running the application.
Let's start off looking at the project folder structure in the src/ directory and understanding what does what.
src/
	app/
		app.component.ts
		app.html
		app.module.ts
		app.scss
		main.ts
	assets/
		icon/
			favicon.ico
		imgs/
			logo.png
	pages/
		home/
			home.html
			home.scss
			home.ts
	theme/
		variables.scss
	index.html
	manifest.json
	service-worker.js
The manifest.json file has some basic startup configuration but you can leave all that alone.
Most of the files in the app/ directory can pretty much be ignored as you will rarely touch them. The only file you will need to understand is the app.module.ts file. This file configures the applications pages, imports, and providers that we use.
The assets/ directory is pretty straight forward, it has all the images and any other static files.
The pages/ directory is what the name says, it's got all the pages of our application. Each page will have its own folder with html, scss, and ts files. The html file is the front-end portion of the page and the scss file is the styling for that page, though there are not many cases when you will need special styling for a specific page. The ts is the back-end functionality of the page, here you can configure how buttons act and how the page interacts with providers but more on that later.
The theme/ directory has one file called variables.scss. The variables in this file are used for in-line color styling with Ionic's syntax. Take a look through the file and take note of the colors variable.
Let's start modifying the home page. Open up the home.html, change the page title to Home and add a welcome message for the home page.
Now all this is really bland so let's change up the colors. In home.scss, change the background color to something else by adding the appropriate css.
page-home {
  background-color: blue;
}
Notice how the background didn't change. Inspect the page elements and find out why the background color isn't working.
Task: Fix the scss file so that the background color displays a different color. Hint: What class is overriding the background color for page-home? What css can be added to override that class?
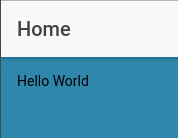
You should end up with somethiing like this.

Now let's add a button. This is the syntax for an Ionic button.
<button ion-button color="primary">Do a thing</button>
Notice the color="primary" portion of this line. This is Ionic's in-line color styling. The theme/variables.scss file can be modified to change the default colors and add additional colors. Change the primary color to something else.
Now let's make the button actually do something. To make the button do something when clicked we add (click)="doThing()" to the button tag.
<button ion-button color="primary" (click)="doThing()">Do a thing</button>
If we test this you will just get an error because we haven't implemented doThing() on the backend. In the home.ts file we need to have a function to handle the doThing() call. Make a function below the constructor that will alert a message on the screen.
doThing(){
	alert("I've done a thing!");
}
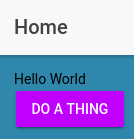
Now when you press the button we have it alert to the screen!

Our navbar is very boring and we don't even have any pages yet. First let's add some buttons to our navbar.
Task: Add two new pages to the navbar.

Now that we have buttons that we want to go to other pages we should probably make those pages. Making pages in Ionic is fairly simple, we just generate one from the terminal and let Ionic build a page for us.
$ ionic generate page About
$ ionic generate page Another
Now we have an additional two pages. If you try to navigate to the url for these pages they will not appear and you will get an error. Notice how the newly generated pages have a module.ts file in their folders, we need to make one for the home page. Create a new file pages/home/home.module.ts and setup the module.ts page following the other pages module.ts files.
Now we need to edit the app.module.ts file. We need to import the home page module and remove HomePage from declarations as it is already declared in home.module.ts. Add the imported home page module to the imports section. Your added code should look like this.
import { HomePageModule } from '../pages/home/home.module';


imports: [
	HomePageModule,
	BrowserModule,
	IonicModule.forRoot(MyApp)
]
Now if we navigate to http://localhost:8100/#/about we should see the about page. Now let's make the the buttons on the home page actually go to the pages we want. Add code to the buttons to call a function, passing in the parameter of what page you want to go to as a string. We also need to add the function to the HomePage class.
<button ion-button (click)="goTo('HomePage')">Home</button>

goTo(page){
	// code to navigate to page
}
There are two options to navigating to a page with Ionic, push(page) and setRoot(page) but first you need to understand the navigation stack. Ionic's navigation stack works just like it sounds, it's a stack that keeps track of where you've been. The root of the stack starts as the first page loaded, for our application that is the home page. Using push(page) will add that page to the stack and so on. Using setRoot(page) clears the stack and sets the root of the stack to the page that was passed in. Try using each one to see what the difference is.
this.navCtrl.push(page);
this.navCtrl.setRoot(page);
More on the NavController https://ionicframework.com/docs/v3/api/navigation/NavController/
Now that that's working we have a problem, only the home page has the navbar with the links. We need to build a navbar component. First let's generate one.
$ ionic generate component MyNavbar
This creates a new components folder and creates the my-navbar component files. Now Ionic is stupid and doesn't generate a module.ts file for components so we have to write one ourselves. It looks pretty similar to what a page module looks like, here's what my-navbar.module.ts should look like.
import { NgModule } from '@angular/core';
import { IonicPageModule } from 'ionic-angular';

import { MyNavbarComponent } from './my-navbar';

@NgModule({
  declarations: [
    MyNavbarComponent,
  ],
  imports: [
    IonicPageModule.forChild(MyNavbarComponent),
  ],
  exports : [ MyNavbarComponent ]
})
export class MyNavbarComponentModule { }
Now in order to use the component we need to import it into whatever pages module we wan to use it in. Import the module for each of the pages.
import { MyNavbarComponentModule } from '../../components/my-navbar/my-navbar.module';


imports: [
	MyNavbarComponentModule,
Now we can add our component to home.html.
<button ion-button (click)="goTo('AnotherPage')">Another Page</button>
<my-navbar></my-navbar>
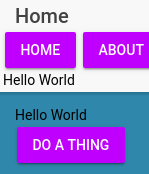
Now we should get something like this.

Now let's move the navbar code from home.html to my-navbar.html and remove it from change it so it's just our custom navbar. Change the other two pages to match home.
my-navbar.html
<ion-navbar>
  <button ion-button (click)="goTo('HomePage')">Home</button>
  <button ion-button (click)="goTo('AboutPage')">About</button>
  <button ion-button (click)="goTo('AnotherPage')">Another Page</button>
</ion-navbar>
home.html, about.html, another.html
<ion-header>
  <my-navbar></my-navbar>
</ion-header>
...
Move the goTo function from HopePage to MyNavbarComponent. Make sure to import NavController and add it to the constructor. We can also remove the text variable as we don't need it.
Yay now we have a navbar on each page but now we have no title. Let's make our navbar component take a title variable and display the title.
To use variables in components we need to use Ionic's @Input(). Import Input from @angular/core. Make a new title variable using @Input within the navbar class.
@Input() title: string;
To access variables from the html we have to use double curly brackets. Add this to our navbars html.
<ion-navbar>
  <ion-title>
    {{title}}
  </ion-title>
...
Now all we need to do is send the title value from our components tag.
<my-navbar title="Home"></my-navbar>
Yay we did it!

