Course: A Computational Introduction to Robotics, Fall 2023
Professor: Paul Ruvolo
The goal of this project was to explore computer vision within the context of sign language translation. I wanted to focus on real-time sign language translation, as opposed to doing image recognition on static photos; this is effectively action recognition, where all of the actions are words in sign language.
Part of the framing of this project was to learn at a high level and implement a new machine learning algorithm. I took ML a couple years ago, where I worked with multilayer perceptrons (MLPs), generative adversarial networks (GANs), and convolutional neural networks (CNNs). For this project, I implemented a long short-term memory (LSTM) algorithm, which differs from all of the above models in the sense that it is a type of recurrent neural network (RNN), and thus has “memory” and can make decisions based on sequential data, which is good for analyzing a real-time feed of data.
Additionally, I planned to do some reading about where this kind of tool is already being used, its benefits, and its negatives. I see this as a tool with a lot of potential to assist communication between those who use sign language and those who do not. I aimed to look into the social implications of this technology and what should be done to make sure that it is implemented equitably.
As a stretch goal, I planned to learn at a low level how LSTMs work, such that I can write out and/or describe the math and implement the model from scratch.
As a minimum viable product (MVP) for this project, I planned to follow along and implement the sign language recognition algorithm outlined in this YouTube tutorial. I was successful in implementing the MVP early on in the project, but I got hung on on implementation details and model-training quirks when making improvements to the algorithm; as a result, I was not quite able to explore social context or learn how the model works at a low level, as outlined by my strech goals.
Make sure to install the following dependencies for Python before running the code in this repository. Add the files in the Google Drive folder to the root level of the repository to avoid collecting data and training the model (unzip files with a .zip extensions), which are time-consuming processes.
- TensorFlow
- OpenCV-Python
- MediaPipe
- scikit-learn
- Matplotlib
- Files in this Folder
The code is split into three classes that have a distinct role, and a driver file called main.py, which is a python script that instantiates each of the classes and runs the appropriate methods to collect data, train a sign language recognition model, and make real-time predictions with the trained model. The classes and their responsibilities are the following:
- dataProcessor
- loop through video samples in the video folder, map them to a class (the word/action that the video is showing), and create a directory called
WLASLDatato hold data extracted from the video samples
- loop through video samples in the video folder, map them to a class (the word/action that the video is showing), and create a directory called
- keypointExtractor
- loop through video samples in the video folder and for each of 30 sequential frames of the video, collect keypoints (locations in space for many points on face and hands) and save to file
- given a trained model, open a camera feed or a video and analyze sign language in real time
- trainedModel
- format keypoint data into training and testing sets and set up, build, and train a Keras LSTM
Below is a deeper dive into how each class was implemented, including which technologies are used. Furthermore, although this was initially based on a tutorial, the code has been almost entirely restructured to be my own; I will point out when code is not mine. The tutorial was done in a Jupyter notebook, with a global variable space and some functions. I refactored the code completely to be class-based with a very clean driver file and docstrings for each class and all of its methods.
The video data comes from this Kaggle dataset, which came as a folder of videos with numerical ids, and a JSON file with information on each video. The JSON file had the classes as the upper level of the JSON structure, but I needed a way to get the class of the video based on its id, so I wrote a method to traverse the whole JSON file and create a new dictionary with video ids as the top level key. A smaller job of this class was to create a directory structure to hold the video keypoints and a list of class labels based on the videos present in the videos folder.
Because the tutorial did not use video data and created its dataset manually, this was not part of the tutorial; I wrote this code on my own.
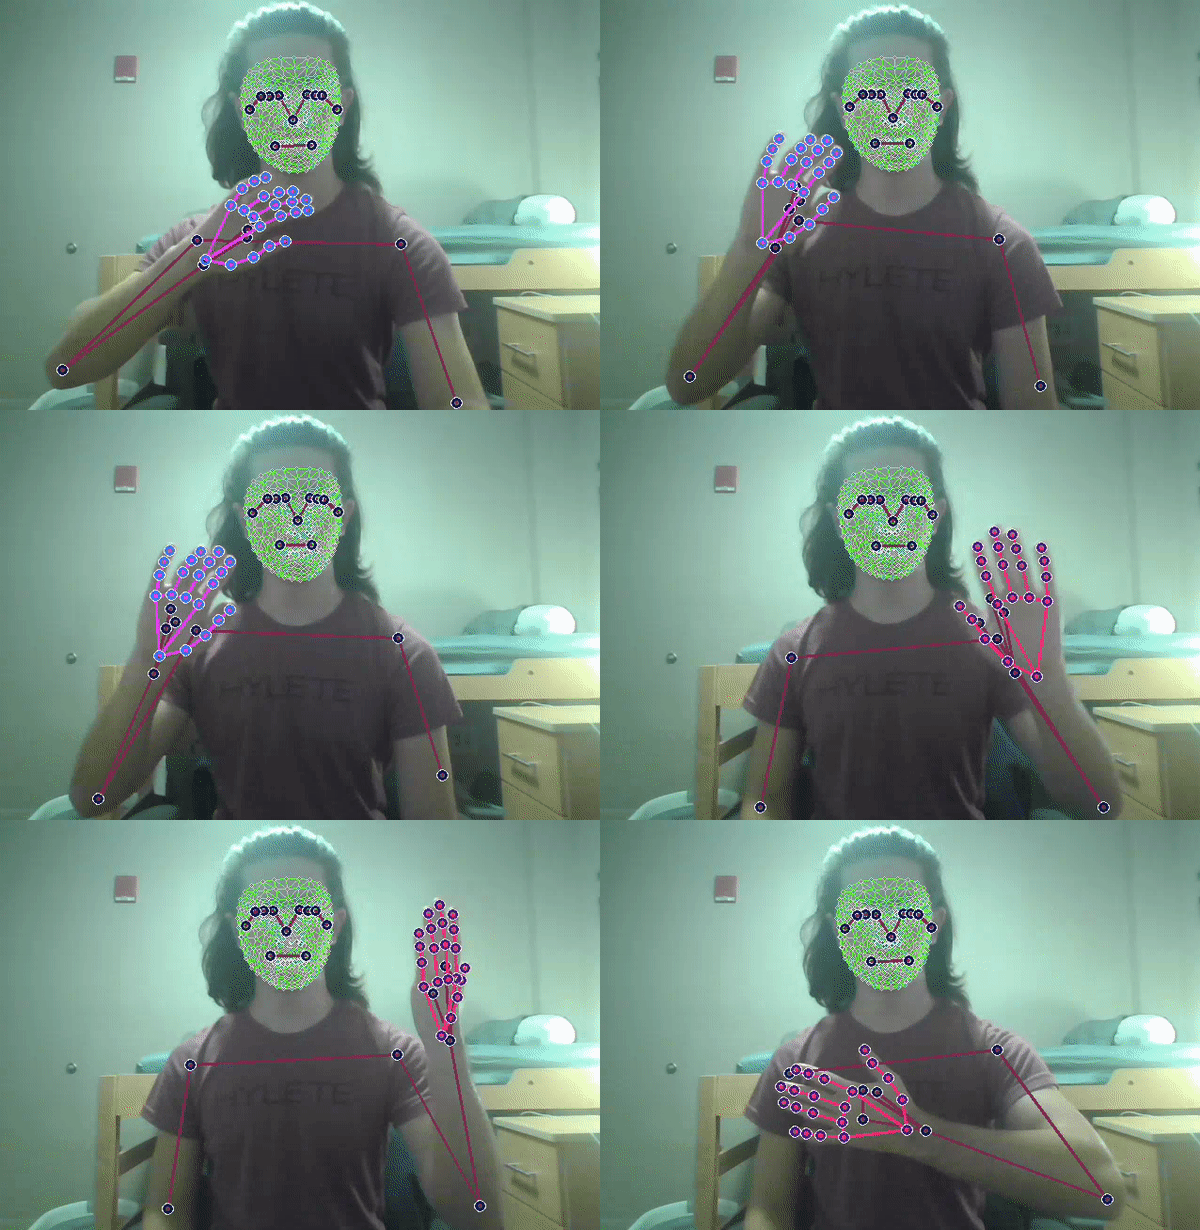
The keypointExtractor class relies heavily on two packages, OpenVC and MediaPipe. MediaPipe is a Google-developed product that allows anyone to use machine learning products on their devices. Specifically, I utilized the MediaPipe Holistic Landmarker, which detects 33 pose, 468 face, and 21 hand (each) landmarks, as shown in the image below. OpenCV was used in conjuntion with this technology to allow it to run on a live feed or a video. More specifically, I used OpenCV to play each video and set the video to 30 evenly-spaced frames in order to collect data on the whole action. For each of the 30 frames for each video sample, I used MediaPipe to detect the keypoints. The model was trained on the sequential keypoint data.
Most of the methods in this class are very similar to the implementation in the tutorial video. The major difference is that I modified the data collection method to work on videos rather than a live feed.
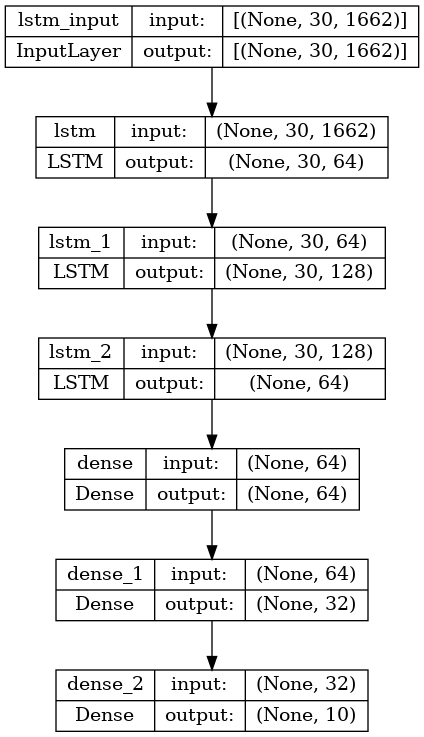
This class is responsible for training the machine learning model. Because I did not build the model from scratch, this class utillizes Keras from the TensorFlow package to build and train the model (architecture show below). The model contains three LSTM layers and three dense layers. The input to an LSTM layer is a 2D array because the layer processes sequential data; in this case it is 1662 keypoints from each of the 30 frames. Dense layers are fully connected neural network layers that consolidate the information into a 1D output vector whose length is the number of classes.
I used the same architecture that was provided in the tutorial video; however, I made modifications to the training parameters in order to train more optimally. Most notably, I added functionality to decrease the model's learning rate if the loss stops decreasing for a certain amount of time, and I also have the model quit training early if it hits a plateau. If the model quits early, it will save the weights from the epoch where the loss was the lowest.
Early on, I tried training the model on all of the data that I have available, which is 2000 classes (actions), with an average of 5 video samples per class. The training was incredibly slow, and the final accuracy of the model was only about 1%. I think there are a couple reasons for this. The first is simply that I do not have enough training data; however, data processing and training is already incredibly time and space intensive, so I did not want to look for more data. The second is that the architecture of the model is not optimized for this type of classification; I did not change the overall architecture, but as mentioned above, I did change how the model trains.
The best solution that I ended up with was to limit the amount of training data to a subset of all the available classes; I ended up choosing the alphabet, as there are only 26 classes, and the motions are easy to learn. Training went much better, with accuracy on the training data reaching close to 100%, as shown in the accuracy and loss plots below; however, the model likely overfit to the training data, as real-time prediction performs very badly, as if it was guessing each time.
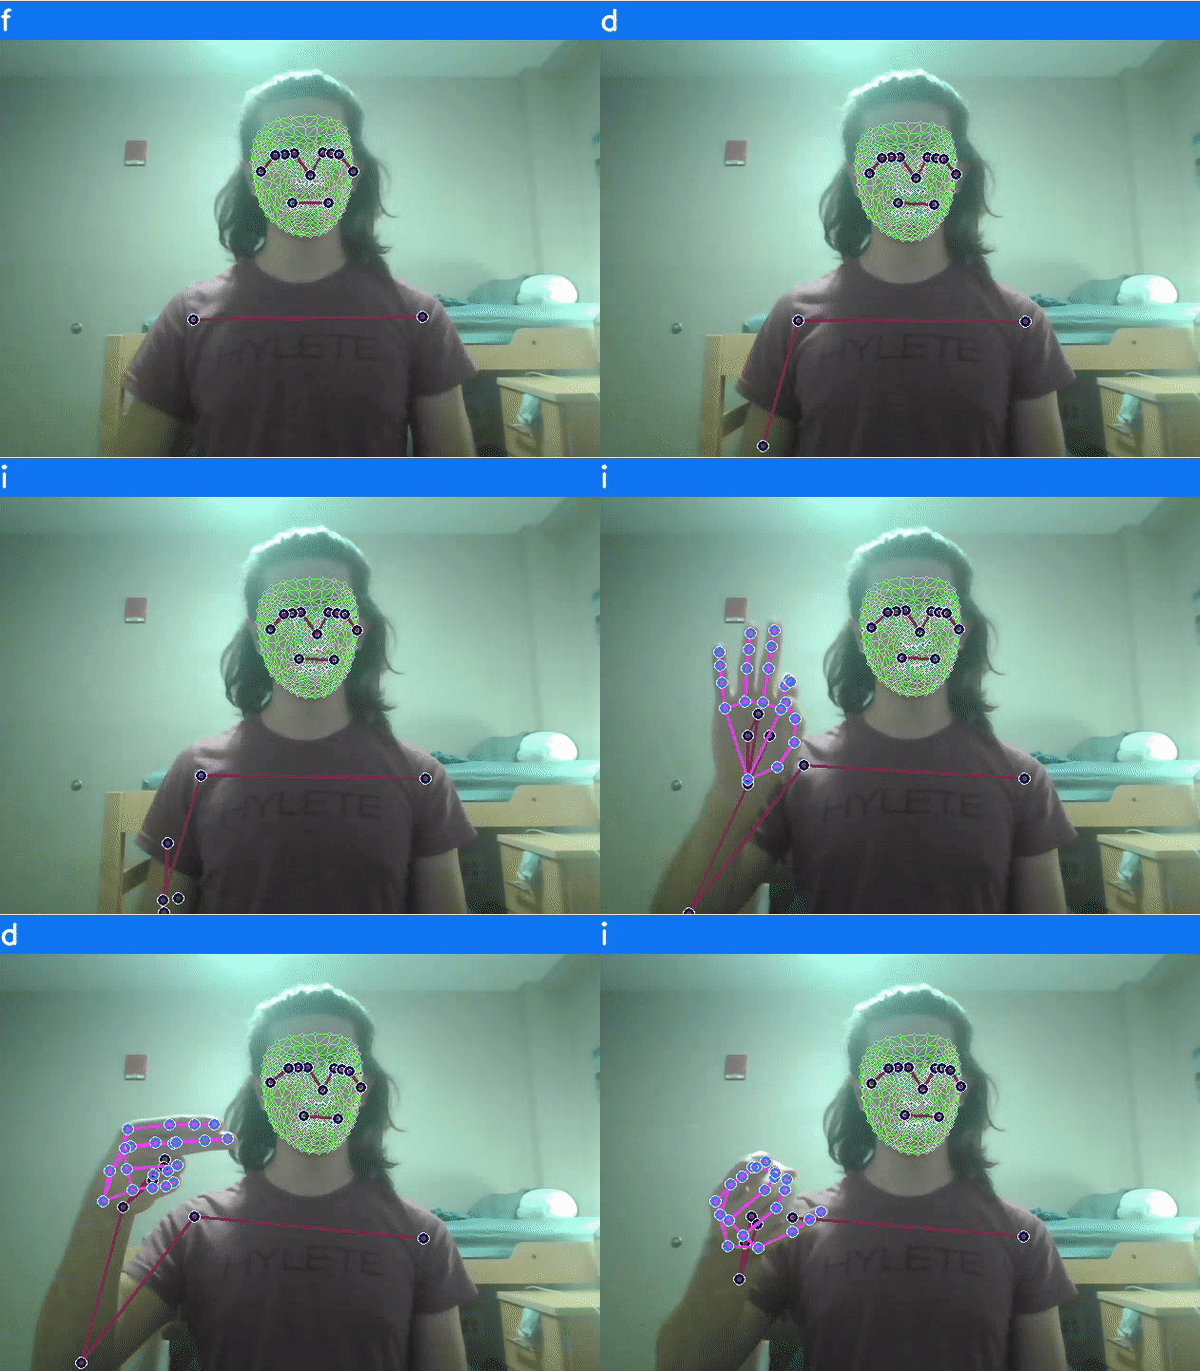
Shown below is a gif of me iterating through the letters a to j. The prediction is shown at the top of the frame in blue.
Because I was basing my initial code off of a tutorial, the overarching flow of the code and the packages used were already predetermined; however, even with this, I was able to exercise a lot of freedom in how the code was written and how I adapted the code after hitting the MVP.
For example, a big design decision was the choice to use class-based architecture. As mentioned above, the tutorial was done in a Jupyter Notebook, meaning that everything was run in the same place as if it was a single script with some functions. After getting the main ideas from the tutorial, I decided to completely refactor the implementation and use classes for distinct parts of the implementation. This greatly improves readability and helps keep variables in the proper scope. Methods relating to model training don't need access to variables used only for extracting data from the videos. Furthermore, this allows the main file to be very short and readable, with the option to dive deeper into the code if more information is needed. Because I thoroughly documented my classes and methods with docstrings, hovering over class names in the main file gives some insight into how they work without needing to open the action code.
Furthermore, after completing the tutorial and seeing the model work well on the three manually-created classes, I moved on to reformatting the code to take in data from videos; this allows for a larger dataset to be collected with minimal work. Upon training on the entire dataset, I saw that the model would train well for about 60 epochs, and then the accuraccy would plummet and plateau at a lower point. In order to remedy this, I modified the given model to track its loss at each step of the training process using callback functions. This way, the model can adjust its learning rate or quit learning automatically. What this means is that a model will end early but still save its weights, which is an improvement from quitting the process halfway, losing the progess, and wasting time.
- Using OpenCV effectively.
- At first, I was following along with tutorial code, so I did not need to think too deeply about how the data was being captured from an OpenCV feed; however, when I got to building on the MVP, I struggled a lot to modify the existing code to take in an alternate type of data. This was mostly a challenge in reading and understanding documentation. Furthermore, I was running into strange OpenCV issues where the last few frames of the video would not load, derailing data extraction; this meant that I had to make my code more robust and incorporate good error handling, as having the script break in the middle of collecting data would be a huge waste of time.
- Understanding the pitfalls of training complex machine learning models.
- As mentioned above, I added ways to deal with plateaus in training, and this was done as a result on doing research on the issues that I was running into. I spend time learning about terminology related to training machine learning models, and I ran into optimization strategies that were too complex for me to try and implement in the scope of this project. Part of this challenge was understanding the issue I am running into well enough to research it, and the other part was understanding which techniques were appropriate to try and use.
- Finding a useful training dataset.
- For my first pass at this project, I created my dataset from scratch, with only three classes; however, for each class I had 30 video samples, and the model performed quite well. I think that a large part of why I had trouble getting the model to work well with the new dataset is that there are simply not enough examples of each action. It seems like there's a tradeoff between number of classes and number of training samples per class, but I think that to be an effective translator, the model needs to know at minimum enough words to be fluent in the language it is translating to. That is why I prioritized a larger dataset up front.
- Learn lower-level details about how LSTMs work and how to optimize them.
- I think that the training of the machine learning model suffered because I did not know enough about which parameters to tune to maximize its performance. If I had more time, I would take steps to be able to use my large data set to its maximum potential.
- Research current uses of this technology.
- As one of the learning goals that I didn't get to, I think it would be a good use of time to see how this type of technology is currently being implemented and use that to inform my own design. Furthermore, it would be helpful to look at this technology from a social standpoint and investigate the pros and cons of this type of action detection.
- Improve the UI of how the model makes predictions and allow predictions to be made on videos.
- Currently, the trained model is run on a live feed that OpenCV initializes using the computer's camera. The way the prediction is delivered is by printing the current action to the top of the screen. I think it would be nice if the video feed displayed a running caption and saved a transcript at the end. I would also like to be able to optionally pass in a video to do detection on instead of a live feed.
- Time management and project scoping.
- I think I did a much better job on project scoping. A large part of that was having a clearly defined and manageable MVP. However, I did not get to some of the stretch goals that I intended to, and I think this is due to poor time management towards the beginning of the process. I did not realize how time intensive it would be to learn how to use OpenCV in conjunction with a new machine learning model.
- Data collection and heuristics for action detection.
- Going into the project, I had the idea that the machine learning model would run on the pixels of each frame of the video feed and make predictions based off of the pixel values. I think it was really interesting to go up a level of abstraction and run a model over the video feed to first extract the important features as keypoints, which serve as proxies for the action and will be used to train the model. I think that there's a potential speed tradeoff, as each frame requires running two models: the keypoint extractor and the action predictor.
- Sign Language Detection using ACTION RECOGNITION with Python | LSTM Deep Learning Model
- WLASL (World Level American Sign Language) Video
- 12k processed videos of Word-Level American Sign Language glossary performance


