This stack is composed with :
- ADC Monitor provide an API to get all input values for Widgetlords Pi-SPi-8AI boards with MCP3008 chip. Monitor is written in C,
with two tasks:
- A reading loop to update internally all inputs values,
- A TCP socket API server available on port 3000 to expose all inputs values in JSON for external service,
- A basic WebSocket Gateway available on port 8888, written in JavaScript and runnable with node.JS,
- A lightweight Web Server, with only one page to expose the HTML/Javascript and WebSocket Client interface.
The TCP socket API server accepts only one client: the WebSocket Gateway which more easily provides multi-client mode.
The API provide only two methods:
get/allto get all values:
| Query | Response |
|---|---|
{
    "topic": "get/all",
    "payload": {}
} |
{
    "status": 200,
    "timestamp": <timestamp>
    "payload": {
        "adc": {
            "i": [<index>],
            "v": [<value>]
        },
        "io": {
            "i": [<index>],
            "v": [<value>]
        },
        "sw_version": "<version>"
    }
} |
set/outto enable an output:
| Query | Response |
|---|---|
{
    "topic": "set/out",
    "payload": {
        "i": [<index>],
        "v": [<value>]
    }
} |
{
    "status": 201,
    "timestamp": <timestamp>
    "payload": {
        "io": {
            "i": [<index>],
            "v": [<value>]
        },
    }
} |
The field payload takes an object with the i and v fields, which are two arrays:
- Array
icontains all the variables indexes - Array
vcontains all the variables values
Once connected, the TCP socket API server automatically sends all (but only) updated inputs. Then, you have to associate the indexes with the values contained in the two arrays.
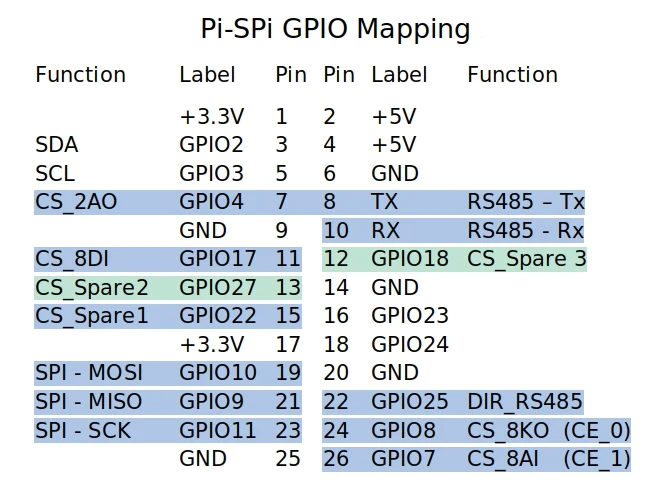
For io, for the moment, only 2 outputs are driven (see the mapping in adc-monitor/src/drivers/gpio.c):
GPIO23asO_KA1with the index0GPIO24asO_KA2with the index1
- Enable the SPI interface, with the command:
$ sudo raspi-configThen, select Interface Options > SPI > Yes
- Install the
libwidgetlordspackage
$ wget https://github.com/widgetlords/libwidgetlords/releases/download/v2.1.1/libwidgetlords_2.1.1_arm64.deb
$ sudo dpkg -i libwidgetlords_2.1.1_arm64.deb
NOTE: If you have previously installed the library you must remove it first using
$ sudo apt remove libwidgetlordsFor more information, see https://widgetlords.com/pages/getting-started-with-pi-spi-libraries
- Edit the
/boot/config.txtfile add to dtoverlay:
dtoverlay=pi-spi:extra_cs=true
Then reboot your Raspberry
- Check if the SPI devices are properly mounted with the command:
$ ls /dev | grep spidev- Address the chips
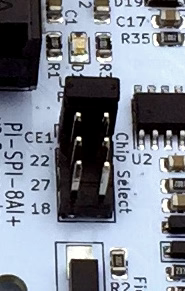
The four chip selects are shown here:
Only 1 jumper should be installed at a time.
Typically, the jumpers are installed as follows:
| Jumper | Module | Interface | Address | JSON index |
|---|---|---|---|---|
| CE1 | 1 | /dev/spidev0.1 | ADC_DEV_0_CHAN_0 .. ADC_DEV_0_CHAN_7 | 0 .. 7 |
| 22 | 2 | /dev/spidev0.4 | ADC_DEV_1_CHAN_0 .. ADC_DEV_1_CHAN_7 | 8 .. 15 |
| 27 | 3 | /dev/spidev0.5 | ADC_DEV_2_CHAN_0 .. ADC_DEV_2_CHAN_7 | 16 .. 23 |
| 18 | 4 | /dev/spidev0.6 | ADC_DEV_3_CHAN_0 .. ADC_DEV_3_CHAN_7 | 24 .. 31 |
Run the following commands:
$ git clone https://github.com/a-tortevois/widgetlords-pi-spi-8ai.git
$ cd widgetlords-pi-spi-8ai
$ chmod +x run.sh
$ ./run.sh --install
$ systemctl start adc_monitor.service
$ systemctl start adc_monitor_websocket_gateway.service
$ systemctl start adc_monitor_web_server.service
$ systemctl list-units --type=service | grep adc_monitorRun the following commands:
$ cd widgetlords-pi-spi-8air
$ git fetch --all
$ git reset --hard
$ git pull --all
$ systemctl stop adc_monitor*
$ chmod +x run.sh
$ ./run.sh --install

