- Prerequisites
- A brief note on security
- 1 Provision an Ubuntu EC2
- 2 Installing QTUM
- 3 Encrypt your wallet
- 4 Backup your wallet file
- 5 Set up for staking
- 6 Send QTUM to your wallet
- 7 Wait for your QTUM to mature
- 8 Maintenance
- 9 Security Checklist
- 10 Other references
-
An AWS account. If you aren't already a customer, every new account (with a valid credit card that hasn't been used for a previous account) is valid for 12 months of the AWS Free Tier, which includes 750 hours a month of EC2 resources, which can keep your node staking 24/7.
-
Familiarity with Linux and terminal usage. This guide will be using an Ubuntu image as the remote EC2 instance, and Ubuntu 16.04 desktop as a client to connect to the EC2 server (instructions will work for any recent Debian-based system as well).
-
Understand how the
rootandubuntuusers are managed in Ubuntu EC2 instances
This guide isn't to discuss the relative benefits of any security software, password store, or patterns. The weakest link is always us. Do some reading and evaluate the tools that work for you. The best security pattern is one you understand and use consistently.
Password managers like LastPass are not perfect, but provide a good balance of usability and security. Consider the fantastic KeePass as an offline password manager.
From here on I'll assume you know how to secure passwords. This means not storing private keys in plain text in Evernote.
- Create an AWS account - use the Free Tier if you aren't already an account holder.
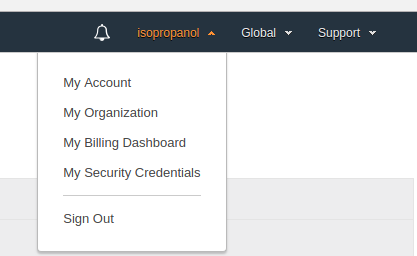
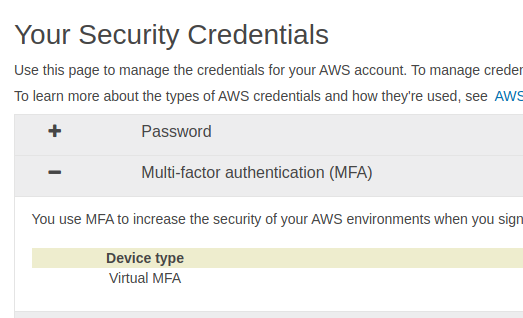
- Recommended - add a multi-factor authentication method to login to AWS. Find the My Security Credentials section in your account:
Add the MFA of your choice:
- Create a SSH keypair on your client system so we can remote to AWS securely later on.
$ ssh-keygen -t rsa
- You will be asked to enter a location for your key. The default is
~/.ssh/id_rsa. - Recommended - enter a passphrase for the private key and store it securely. If your file system is compromised on your client system, the attacker will have to additionally know your passphrase to be able to read the file. The downside is that you have to enter the passphrase each time you access the file. A reasonable compromise.
Output will look similar to:
Generating public/private rsa key pair.
Enter file in which to save the key (/home/user/.ssh/id_rsa):
Enter passphrase (empty for no passphrase):
Enter same passphrase again:
Your identification has been saved in /home/user/.ssh/id_rsa.
Your public key has been saved in /home/user/.ssh/id_rsa.pub.
The key fingerprint is:
SHA256:kHXeJZtDbsb5AsWLmJfQqhkFJ+sHQiqWgaeiMGIT0SM user@ubuntu-evo850
The key's randomart image is:
+---[RSA 2048]----+
|.oo . o.o...+ .  |
|.E+=   *oo.*.*   |
|.=+ o =. =oo@.   |
|B+   o.o+ ++.o   |
|*..   .+S.  . .  |
|.     o.     .   |
|                 |
|                 |
|                 |
+----[SHA256]-----+
Alternatively, you can use the native keypair generation inside AWS and store the PEM encoded private key on your client system. The downside is that you have to transfer the private key across the wire. It's somewhat better to create a keypair yourself and only have the public key leave your system
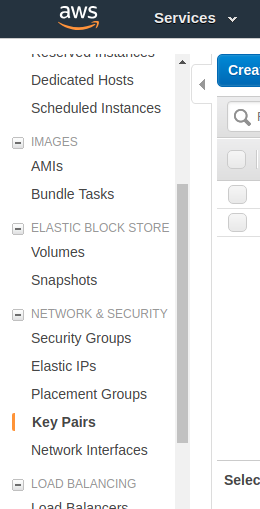
- Select EC2 from the Services top menu. Scroll to the Key Pairs section under the Network and Security sub-heading on the left navigation pane:
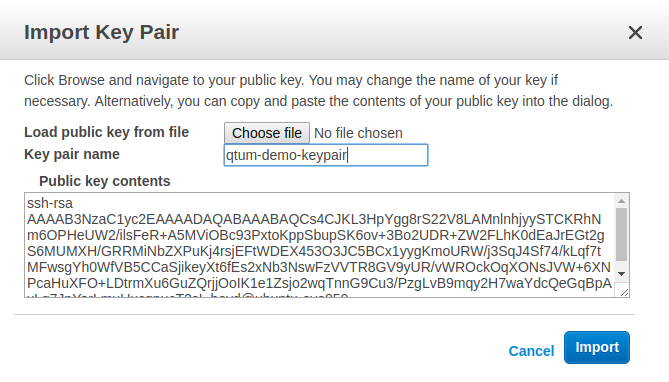
Select the Import Key Pair and paste in the contents of the public SSH keyfile (ending in .PUB) you created earlier. This will be used in our security configuration while setting up the EC2 instance.
- Select EC2 from the Services top menu.
- Click Launch Instance (Under the Free Tier you may be forced to use the US East availability region)
- Select the Ubuntu Server AMI:
Actual image used as of May 2018 is: ubuntu/images/hvm-ssd/ubuntu-xenial-16.04-amd64-server-20180306 (ami-43a15f3e), however any recent Ubuntu AMI will match these instructions going forward.
On the next screen - you can select a t2.micro instance. This is more than enough resources to run a full QTUM node. Note - it uses EBS storage so if you delete your instance you will lose your data. Restarting the instance however, is fine.
-
Click on Next: Configure Instance Details, leave the defaults as they are for this section.
-
Click on Next: Add Storage, leave the defaults as they are for this section.
-
Click on Next: Add Tags, leave the defaults as they are for this section.
-
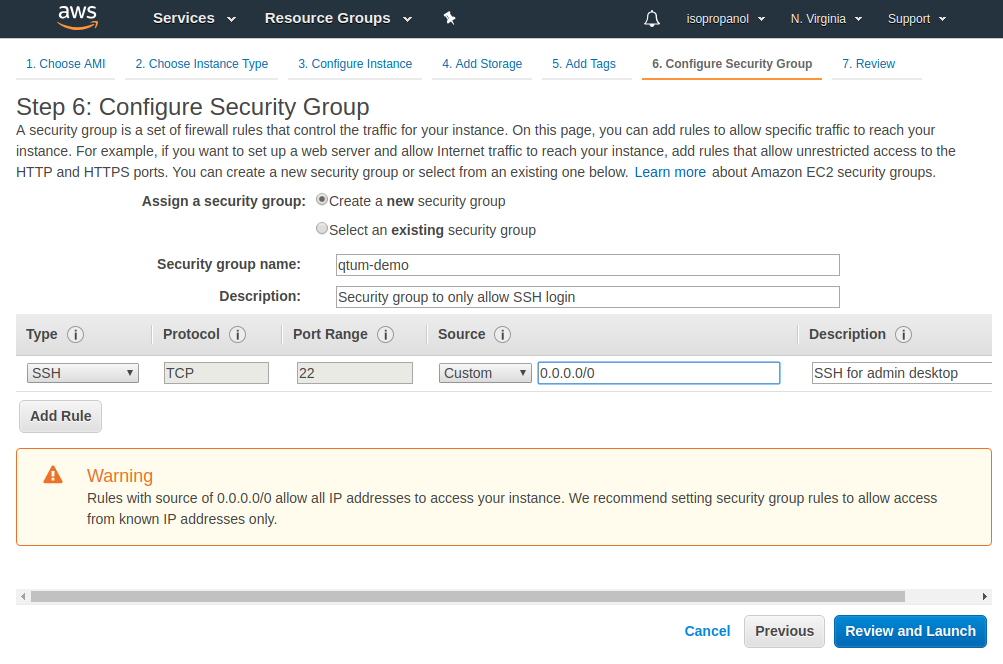
Configure Security Group - this part is important.
Create a new security group for SSH access with some meaningful name and description.
Recommended - if you leave the Source section open to 0.0.0.0/0 this means all IP ranges will be able to login to this security group. You may want to restrict this to a single IP (or range) of the client system you will use to manage the QTUM node. This might seem restricting, and it is - deliberately, but you are going to manage the QTUM node via SSH, and the private key will probably only reside on a single system. So if that has a dedicated IP (or range), then lock it down for improved security.
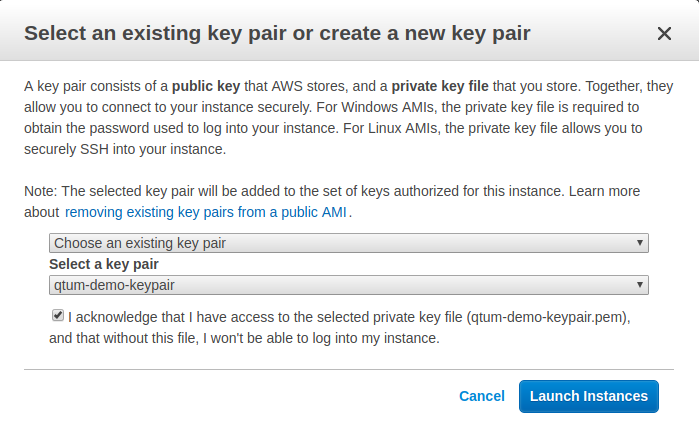
- Click Review and Launch and review your settings. Click Launch, and you will be prompted to select a key pair for this instance
Choose an existing key pair - the one you created earlier. Tick the acknowledgement you control the private key for this pair, and hit Launch Instances. Your instance will start initialising.
- Return to the EC2 Dashboard, under the Resources heading click the ... Running Instances link. You will then see your EC2 instance up and running. You are now ready to login via SSH from your client machine.
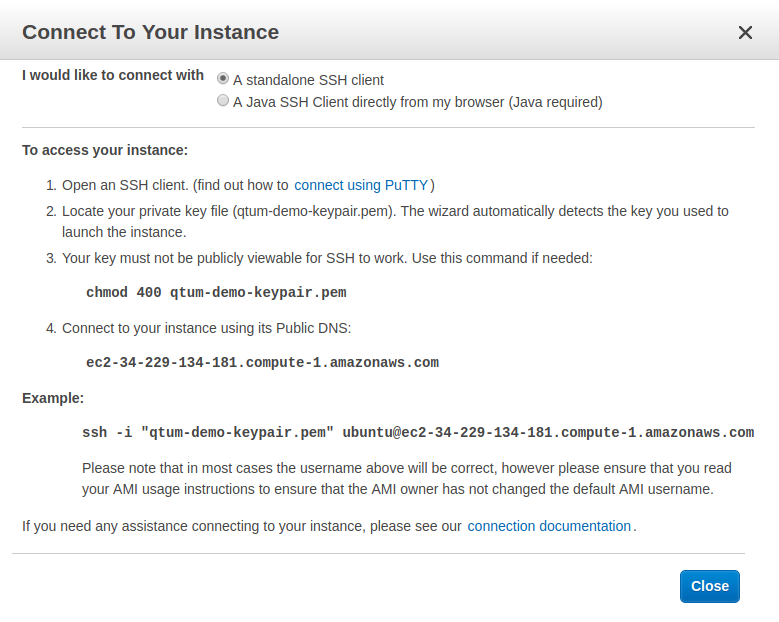
Right click the line-item for your instance and click the Connect item. Example instructions shown below:
Follow the instructions for your private keyfile name and IP address noted for your EC2 instance. Remember you may need to change the file attributes of the private key as shown. Using the default keystore location and keypair created earlier, the command will be (replacing with whatever hostname your instance is, of course):
$ ssh -i /home/user/.ssh/id_rsa ubuntu@ec2-34-229-134-181.compute-1.amazonaws.com
(You may need unlock using the passphrase if you created one and the file is not already unlocked)
- Obtain the QTUM signing key:
$ sudo apt-key adv --keyserver keyserver.ubuntu.com --recv-keys BF5B197D
- Best practice: verify this is correct and this page is not to serve you malicious software. QTUM project reference: https://github.com/qtumproject/qtum/wiki/Setting-up-QTUM-Ubuntu,-Debian-and-Mint-repository
- Add QTUM repository to your APT sources:
$ sudo tee -a /etc/apt/sources.list.d/qtum.list <<EOF
deb http://repo.qtum.info/apt/ubuntu/ $(lsb_release -c | cut -f2) main
EOF
- Update your sources and install QTUM:
$ sudo apt update && sudo apt install qtum
- Create a service to restart qtumd on reboot:
$ sudo tee -a /etc/systemd/system/qtumd.service <<EOF
[Unit]
Description=QTUM daemon
After=network.target

[Service]
Type=forking
User=ubuntu
WorkingDirectory=/home/ubuntu/.qtum
ExecStart=/usr/local/bin/qtumd -daemon=1 -par=2 -onlynet=ipv4 -noonion -listenonion=0 -maxconnections=24 -rpcbind=127.0.0.1 -rpcallowip=127.0.0.1
PIDFile=/home/ubuntu/.qtum/qtumd.pid
Restart=always
RestartSec=1
KillSignal=SIGQUIT
KillMode=mixed
EOF
- Enable the service
$ sudo systemctl daemon-reload
Followed by:
$ sudo systemctl enable qtumd.service
- Now reboot the system and login again from your local machine
$ sudo reboot
- Start the service
$ sudo systemctl start qtumd.service
- To verify everything is working, you can now check:
$ qtum-cli getwalletinfo
You'll get some output like:
{
  "walletversion": 130000,
  "balance": 0.00000000,
  "stake": 0.00000000,
  "unconfirmed_balance": 0.00000000,
  "immature_balance": 0.00000000,
  "txcount": 0,
  "keypoololdest": 1526566081,
  "keypoolsize": 100,
  "paytxfee": 0.00000000,
  "hdmasterkeyid": "9b8a7adf48844e501f730a3a99fbfee0508b83f3"
}
- Run
$ qtum-cli -stdin encryptwallet
Using -stdin silently prompts you for sensitive information. Enter your passphrase followed by Enter and then Ctrl-D to end the input stream.
Output
wallet encrypted; Qtum server stopping, restart to run with encrypted wallet. The keypool has been flushed and a new HD seed was generated (if you are using HD). You need to make a new backup.
- Stop the
qtumdservice (just to be safe to ensure the wallet isn't being written to):
$ sudo systemctl stop qtumd.service
-
Open a new terminal window on your local system
-
Now use
scpto securely transfer your now encrypted wallet to your client system as backup. Update this command below to match your SSH private key file, remote host, and location to store the wallet.
$ scp -i /home/user/.ssh/id_rsa ubuntu@ec2-18-206-236-46.compute-1.amazonaws.com:/home/ubuntu/.qtum/wallet.dat ~/path_to_backup/location
- Confirm
wallet.datexists in your backup location. Make multiple redundant backups.
- Back on the remote EC2, unlock your wallet for staking (for the maximum time)
Restart the service first, with $ sudo systemctl start qtumd.service, then:
$ qtum-cli -stdin walletpassphrase
Again, using -stdin for input here instead of typing directly. Enter the following information, followed by Enter after each line:
<your passphrase>
99999999
true
Finally Ctrl-D after the final Enter to end the standard input.
- 99999999 - means the unlock for the maximum time
- true - means unlock your wallet for staking
The passphrase will be displayed on your terminal briefly while you enter this, so always be aware of shoulder-surfing attacks, however it wont be stored in your bash history.
- Reveal your addresses to send QTUM to:
$ qtum-cli getaccountaddress "account_name"
In this command the string at the end is the account nickname. For simplicity I would simply name them numerically:
$ qtum-cli getaccountaddress "0" \
&& qtum-cli getaccountaddress "1" \
&& qtum-cli getaccountaddress "2" \
&& qtum-cli getaccountaddress "." \
&& qtum-cli getaccountaddress "n"
Why bother sending your QTUM to more than one address for staking?
Because of the way staking works. When an account in the wallet is chosen to receive a staking reward, the QTUM in that account needs to be re-matured for another 500 blocks before it contributes to your staking weight again. To maximise your staking weight over time you would want this address to be as small a portion of your total balance as possible.
This may not make seem to make difference if you have 10 QTUM, as your average time to generate any rewards is huge, 500 blocks will have a very small effect on your returns. But if you're staking 10,000 QTUM, this could make a significant difference to your returns as rewards are far more frequent.
- Send your QTUM to your newly revealed address. Perhaps send small first to verify everything is in order.
- Calling
$ qtum-cli getstakinginfowill show your staking status:
Example output while QTUM are still maturing:
{
  "enabled": true,
  "staking": false,
  "errors": "",
  "currentblocksize": 0,
  "currentblocktx": 0,
  "pooledtx": 10,
  "difficulty": 4199703.023112798,
  "search-interval": 0,
  "weight": 0,
  "netstakeweight": 1962997063489867,
  "expectedtime": 0
}
Come back in 500 blocks after you've sent your QTUM. If the "staking" keypair shows "true", you've set everything up and it's working correctly.
Example output from qtum-cli getstakinginfo once you are staking correctly:
{
  "enabled": true,
  "staking": true,
  "errors": "",
  "currentblocksize": 1000,
  "currentblocktx": 0,
  "pooledtx": 22,
  "difficulty": 1854951.792217433,
  "search-interval": 245893,
  "weight": 304797843913,
  "netstakeweight": 1438788469304710,
  "expectedtime": 12235451
}
The expectedtime key shows your estimated time to win the staking lottery, in seconds, based on your current staking weight against the entire network's staking weight. It is a probalistic estimate only, and will not "time down" to zero as time progresses.
To get a list of the CLI commands:
$ qtum-cli help
To to unlock your wallet for staking again after a reboot:
$ qtum-cli -stdin walletpassphrase
To keep the QTUM daemon (and the entire system) up to date:
$ sudo apt-get update && sudo apt-get install
To reload the service after a system or QTUM upgrade, or if you make changes to the qtum.service:
$ sudo systemctl daemon-reload
$ sudo systemctl enable qtumd.service
$ sudo systemctl start qtumd.service
To review qtumd.service status:
$ sudo systemctl status qtumd.service
Double-check you have access and control of everything listed.
AWS
- AWS login password
- AWS multfactor device or method
If someone can access your AWS account they still shouldn't be able to either change your Security Group for the running instance or get into the EC2 (as they don't have the private keyfile for SSH).
On the EC2 instance
- QTUM wallet.dat file
- QTUM wallet encryption password
Losing the wallet.dat file is fine, even if you accidentally tear down the EC2 instance, as you have a backup(s) on your local machine, which you can instantly fire up with a local QTUM install.
Losing the wallet encryption password is catastrophic, as you will never be able to open the wallet for sending again.
On the local system you manage the QTUM node from
- Backup of the QTUM wallet.dat
- SSH private keyfile to SSH into the QTUM remote node
- Passphrase for file access to your SSH keyfile
Losing your wallet.dat backups is OK, you can always repeat the scp commands on a new system to get another backup. Keep a few backups in different locations regardless. They are encrypted with your password so even if someone has access to the file it will be useless to them.
https://steemit.com/qtum/@cryptominder/qtum-staking-tutorial-using-qtumd-on-a-raspberry-pi-3 https://github.com/qtumproject/qtum/wiki/How-to-Stake-QTUM-using-a-Linux-Virtual-Private-Server-%28VPS%29
