Ambari service for easily installing and managing NiFi in clustered mode on HDP.
Features:
- Downloads the current GA version - HDF 1.2.0.0 package (nifi 0.6.0)
- Exposes nifi.properties, bootstrap.conf, logback.xml in Ambari UI (so you can configure port, memory, log dir etc)
- Sets up initial flow.tar that sets up Ambari reporting task to send Ambari metrics
- Includes metrics widgets from here
Limitations:
- This is not an officially supported service and is not meant to be deployed in production systems. It is only meant for testing demo/purposes
- It does not support Ambari/HDP upgrade process and will cause upgrade problems if not removed prior to upgrade
- Not tested on secured clusters
Metrics integration WIP
Authors:
- Ali Bajwa: Nifi Install/start/stop via Ambari
- Bryan Bende: Ambari metrics integration
- Download HDP 2.4 sandbox VM image (Hortonworks_sanbox_with_hdp_2_4_vmware.ova) from Hortonworks website
- Import Hortonworks_sanbox_with_hdp_2_4_vmware.ova into VMWare and set the VM memory size to 8GB
- Now start the VM
- After it boots up, find the IP address of the VM and add an entry into your machines hosts file. For example:
192.168.191.241 sandbox.hortonworks.com sandbox
-
Note that you will need to replace the above with the IP for your own VM
-
Connect to the VM via SSH (password hadoop)
ssh root@sandbox.hortonworks.com
-
(Optional) To see Nifi metrics in Ambari, login to Ambari (admin/admin) and start Ambari Metrics service http://sandbox.hortonworks.com:8080
-
To download the NiFi service folder, run below
VERSION=`hdp-select status hadoop-client | sed 's/hadoop-client - \([0-9]\.[0-9]\).*/\1/'`
rm -rf /var/lib/ambari-server/resources/stacks/HDP/$VERSION/services/NIFI
sudo git clone https://github.com/abajwa-hw/nifi-service-clustered.git   /var/lib/ambari-server/resources/stacks/HDP/$VERSION/services/NIFI
- Restart Ambari
#sandbox
service ambari restart

#non sandbox
sudo service ambari-server restart
- Then you can click on 'Add Service' from the 'Actions' dropdown menu in the bottom left of the Ambari dashboard:
On bottom left -> Actions -> Add service -> check NiFi -> Next -> Scroll down to Nifi node and click + to add Nifi nodes -> Next -> Change any config you like (e.g. install dir, port or values in nifi.properties) -> Next -> Deploy
-
By default:
- Port is set to 9090
- Max JVM memory size is 512mb
- Run schedule for Nifi's Ambari reporting task is 1 min
-
On successful deployment you will see the NiFi service as part of Ambari stack and will be able to start/stop the service from here:
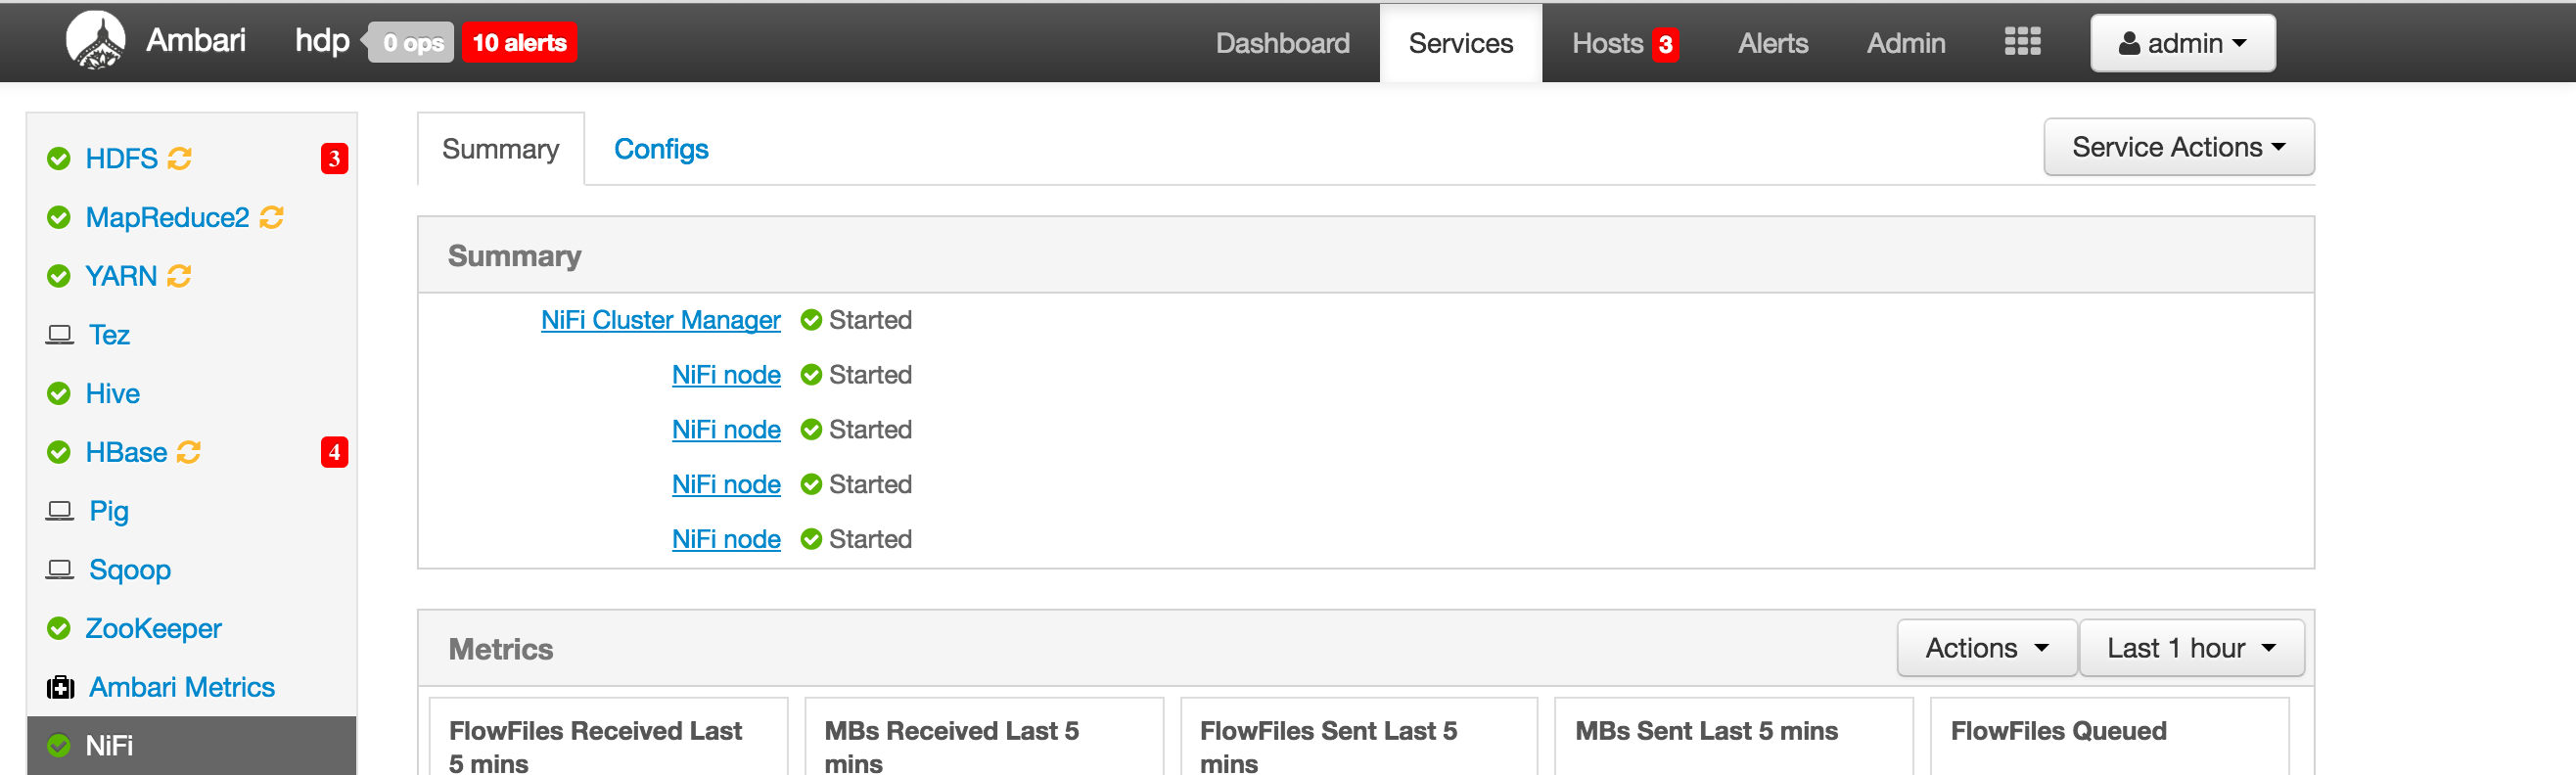
- Notice that a single Nifi master and multiple Nifi nodes were started. Also notice that Nifi node can also run on host running Nifi master
-
You can see the parameters you configured under 'Configs' tab. There are a number of config sections exposed here:
- nifi-ambari-config:
- high level set of configs - most users would only need to update the properties in this accordion (would be good to eventually expose these via enhanced config widgets)
- nifi-bootstrap-env:
- Template for bootstrap.conf
- nifi-flow-env:
- Initial template for flow.xml. Only used during initial install of Nifi service. Post-install this can be reconfigured from Nifi UI under Controller Settings
- nifi-master-properties-env:
- template for nifi.properties file for Nifi master
- nifi-master-logback-env:
- template for logback for Nifi master
- nifi-node-properties-env:
- template for nifi.properties file for Nifi node
- nifi-node-logback-env:
- template for logback for Nifi master
- nifi-ambari-config:

TODO add screenshot
- One benefit to wrapping the component in Ambari service is that you can now monitor/manage this service remotely via REST API
export SERVICE=NIFI
export PASSWORD=admin
export AMBARI_HOST=localhost
export CLUSTER=Sandbox

#get service status
curl -u admin:$PASSWORD -i -H 'X-Requested-By: ambari' -X GET http://$AMBARI_HOST:8080/api/v1/clusters/$CLUSTER/services/$SERVICE

#start service
curl -u admin:$PASSWORD -i -H 'X-Requested-By: ambari' -X PUT -d '{"RequestInfo": {"context" :"Start $SERVICE via REST"}, "Body": {"ServiceInfo": {"state": "STARTED"}}}' http://$AMBARI_HOST:8080/api/v1/clusters/$CLUSTER/services/$SERVICE

#stop service
curl -u admin:$PASSWORD -i -H 'X-Requested-By: ambari' -X PUT -d '{"RequestInfo": {"context" :"Stop $SERVICE via REST"}, "Body": {"ServiceInfo": {"state": "INSTALLED"}}}' http://$AMBARI_HOST:8080/api/v1/clusters/$CLUSTER/services/$SERVICE
-
Bring up 4 VMs imaged with RHEL/CentOS 6.x (e.g. node1-4 in this case)
-
On non-ambari nodes, install ambari-agents and point them to ambari node (e.g. node1 in this case)
export ambari_server=node1
curl -sSL https://raw.githubusercontent.com/seanorama/ambari-bootstrap/master/ambari-bootstrap.sh | sudo -E sh
- On Ambari node, install ambari-server
export install_ambari_server=true
curl -sSL https://raw.githubusercontent.com/seanorama/ambari-bootstrap/master/ambari-bootstrap.sh | sudo -E sh
yum install -y git
sudo git clone https://github.com/abajwa-hw/nifi-service-clustered.git   /var/lib/ambari-server/resources/stacks/HDP/2.4/services/NIFI
- Ensure Nifi is only started after Zookeeper (not currently needed...but future version of Nifi will require Zookeeper)
- Edit the
/var/lib/ambari-server/resources/stacks/HDP/2.4/role_command_order.jsonfile to include below:
- Edit the
"NIFI_MASTER-START" : ["ZOOKEEPER_SERVER-START"],
"NIFI_NODE-START" : ["ZOOKEEPER_SERVER-START"],
- Ensure that by default, Nifi nodes are started on multiple nodes (3 in this example)
- Edit the
/var/lib/ambari-server/resources/stacks/HDP/2.0.6/services/stack_advisor.pyfile from:
- Edit the
  def getMastersWithMultipleInstances(self):
    return ['ZOOKEEPER_SERVER', 'HBASE_MASTER']
  def getCardinalitiesDict(self):
    return {
      'ZOOKEEPER_SERVER': {"min": 3},
      'HBASE_MASTER': {"min": 1},
      }
to:
  def getMastersWithMultipleInstances(self):
    return ['ZOOKEEPER_SERVER', 'HBASE_MASTER','NIFI_NODE']
  def getCardinalitiesDict(self):
    return {
      'ZOOKEEPER_SERVER': {"min": 3},
      ’NIFI_NODE': {"min": 3},
      'HBASE_MASTER': {"min": 1},
      }
- Restart Ambari
service ambari-server restart
service ambari-agent restart
- Confirm 4 agents were registered and agent remained up
curl -u admin:admin -H  X-Requested-By:ambari http://localhost:8080/api/v1/hosts
service ambari-agent status
- Generate blueprint: you can generate BP and cluster file using Ambari recommendations API using these steps. For more details on the bootstrap scripts, see bootstrap script github
yum install -y python-argparse
git clone https://github.com/seanorama/ambari-bootstrap.git

#Select the services to be deployed

#option A: for only NIFI
#export ambari_services="NIFI"

#option B: for minimal services
#export ambari_services="HDFS MAPREDUCE2 YARN ZOOKEEPER HIVE NIFI"

#option C: for most services
#export ambari_services="ACCUMULO FALCON FLUME HBASE HDFS HIVE KAFKA KNOX MAHOUT OOZIE PIG SLIDER SPARK SQOOP MAPREDUCE2 STORM TEZ YARN ZOOKEEPER NIFI"

bash ./ambari-bootstrap/deploy/deploy-recommended-cluster.bash
- You can monitor the progress of the deployment via Ambari (e.g. http://node1:8080).
-
Once installed, wait 60-120s before logging in to Nifi to ensure all the Nifi nodes have enough time to register with master. In the meantime....
-
Check Nifi logs appearing under /var/log:
- Master logs would be under /var/log/nifi_master on host where master was installed
- Node logs would be under /var/log/nifi_node on host where node was installed
-
Check Nifi pid files appearing under /var/run/nifi:
- Master pid will be under /var/run/nifi/nifi-master.pid on host where master was installed
- Node pid will be under /var/run/nifi/nifi-node.pid on host where node was installed
-
The NiFi webUI login page should come up at the below link: http://sandbox.hortonworks.com:9090/nifi
- On VirtualBox you will need to manually forward port 9090 before you can do this. This is not required on VMWare
-
You can also open it from within Ambari via iFrame view
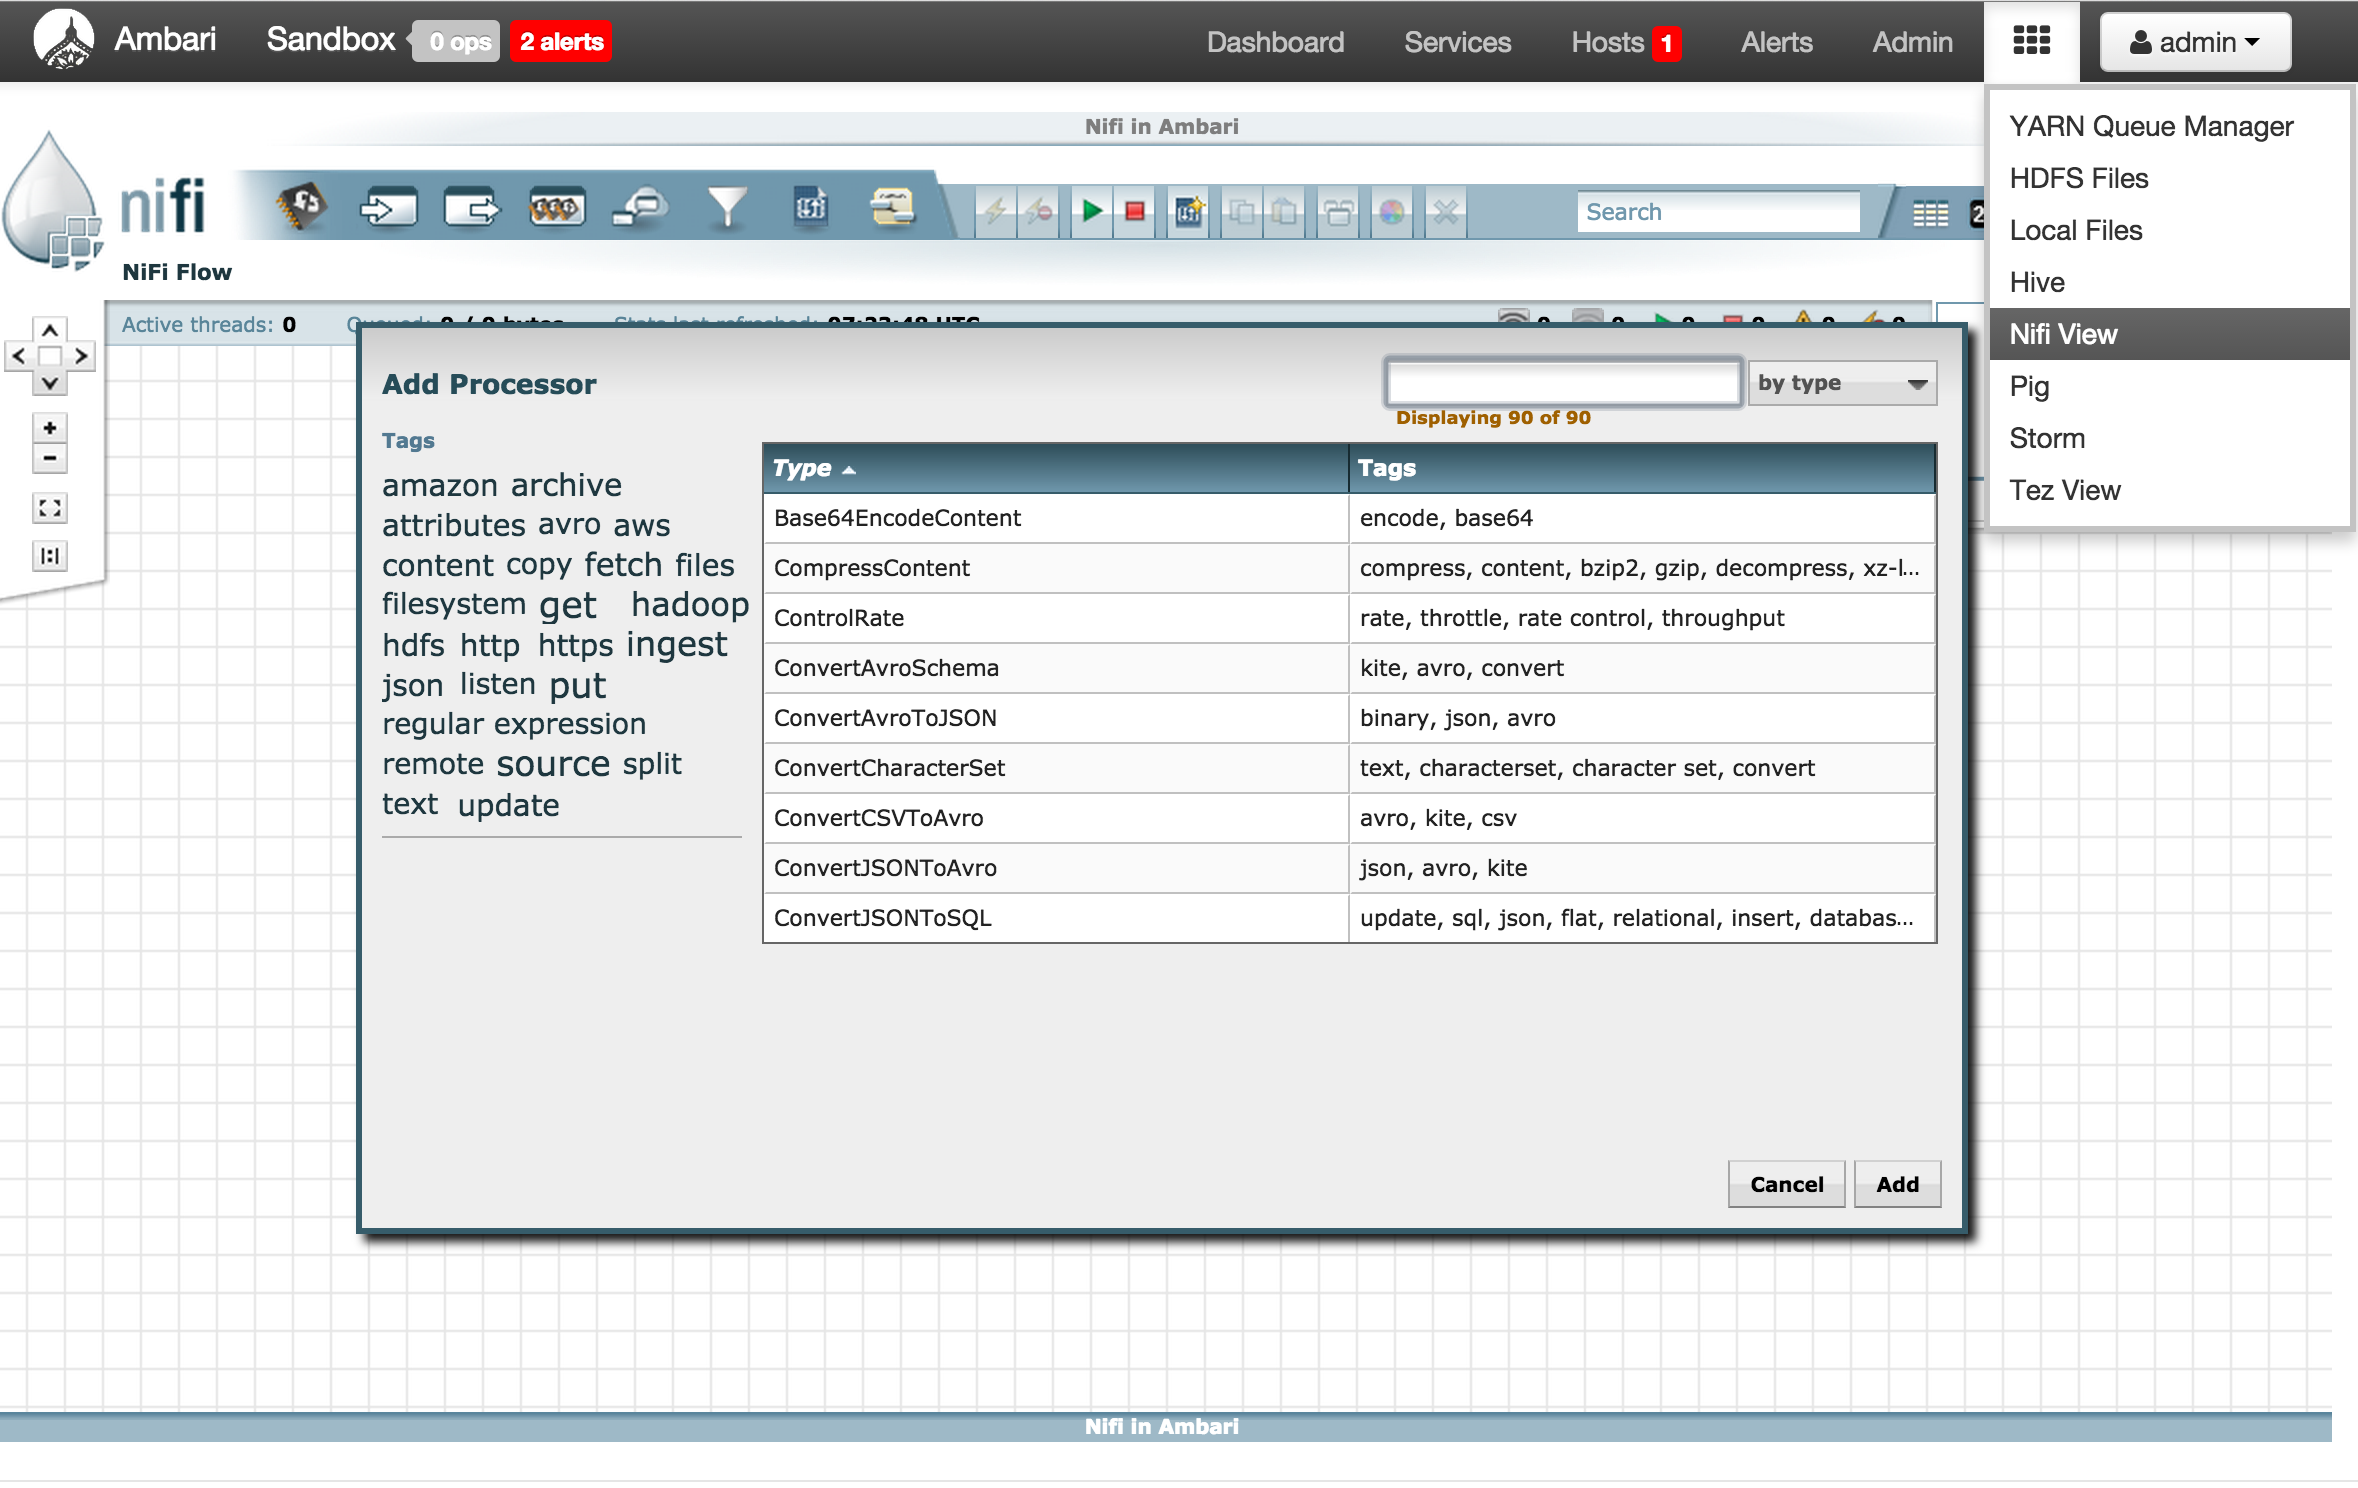
- Sample steps to automate this (requires maven):
git clone https://github.com/abajwa-hw/iframe-view.git
sed -i "s/IFRAME_VIEW/NIFI_VIEW/g" iframe-view/src/main/resources/view.xml
sed -i "s/iFrame View/Nifi View/g" iframe-view/src/main/resources/view.xml
sed -i "s#sandbox.hortonworks.com:6080#sandbox.hortonworks.com:9090/nifi/#g"  iframe-view/src/main/resources/index.html
sed -i "s/iframe-view/nifi-view/g" iframe-view/pom.xml
sed -i "s/Ambari iFrame View/Nifi View/g" iframe-view/pom.xml
mv iframe-view nifi-view
cd nifi-view
mvn clean package

cp target/*.jar /var/lib/ambari-server/resources/views
ambari-server restart

-
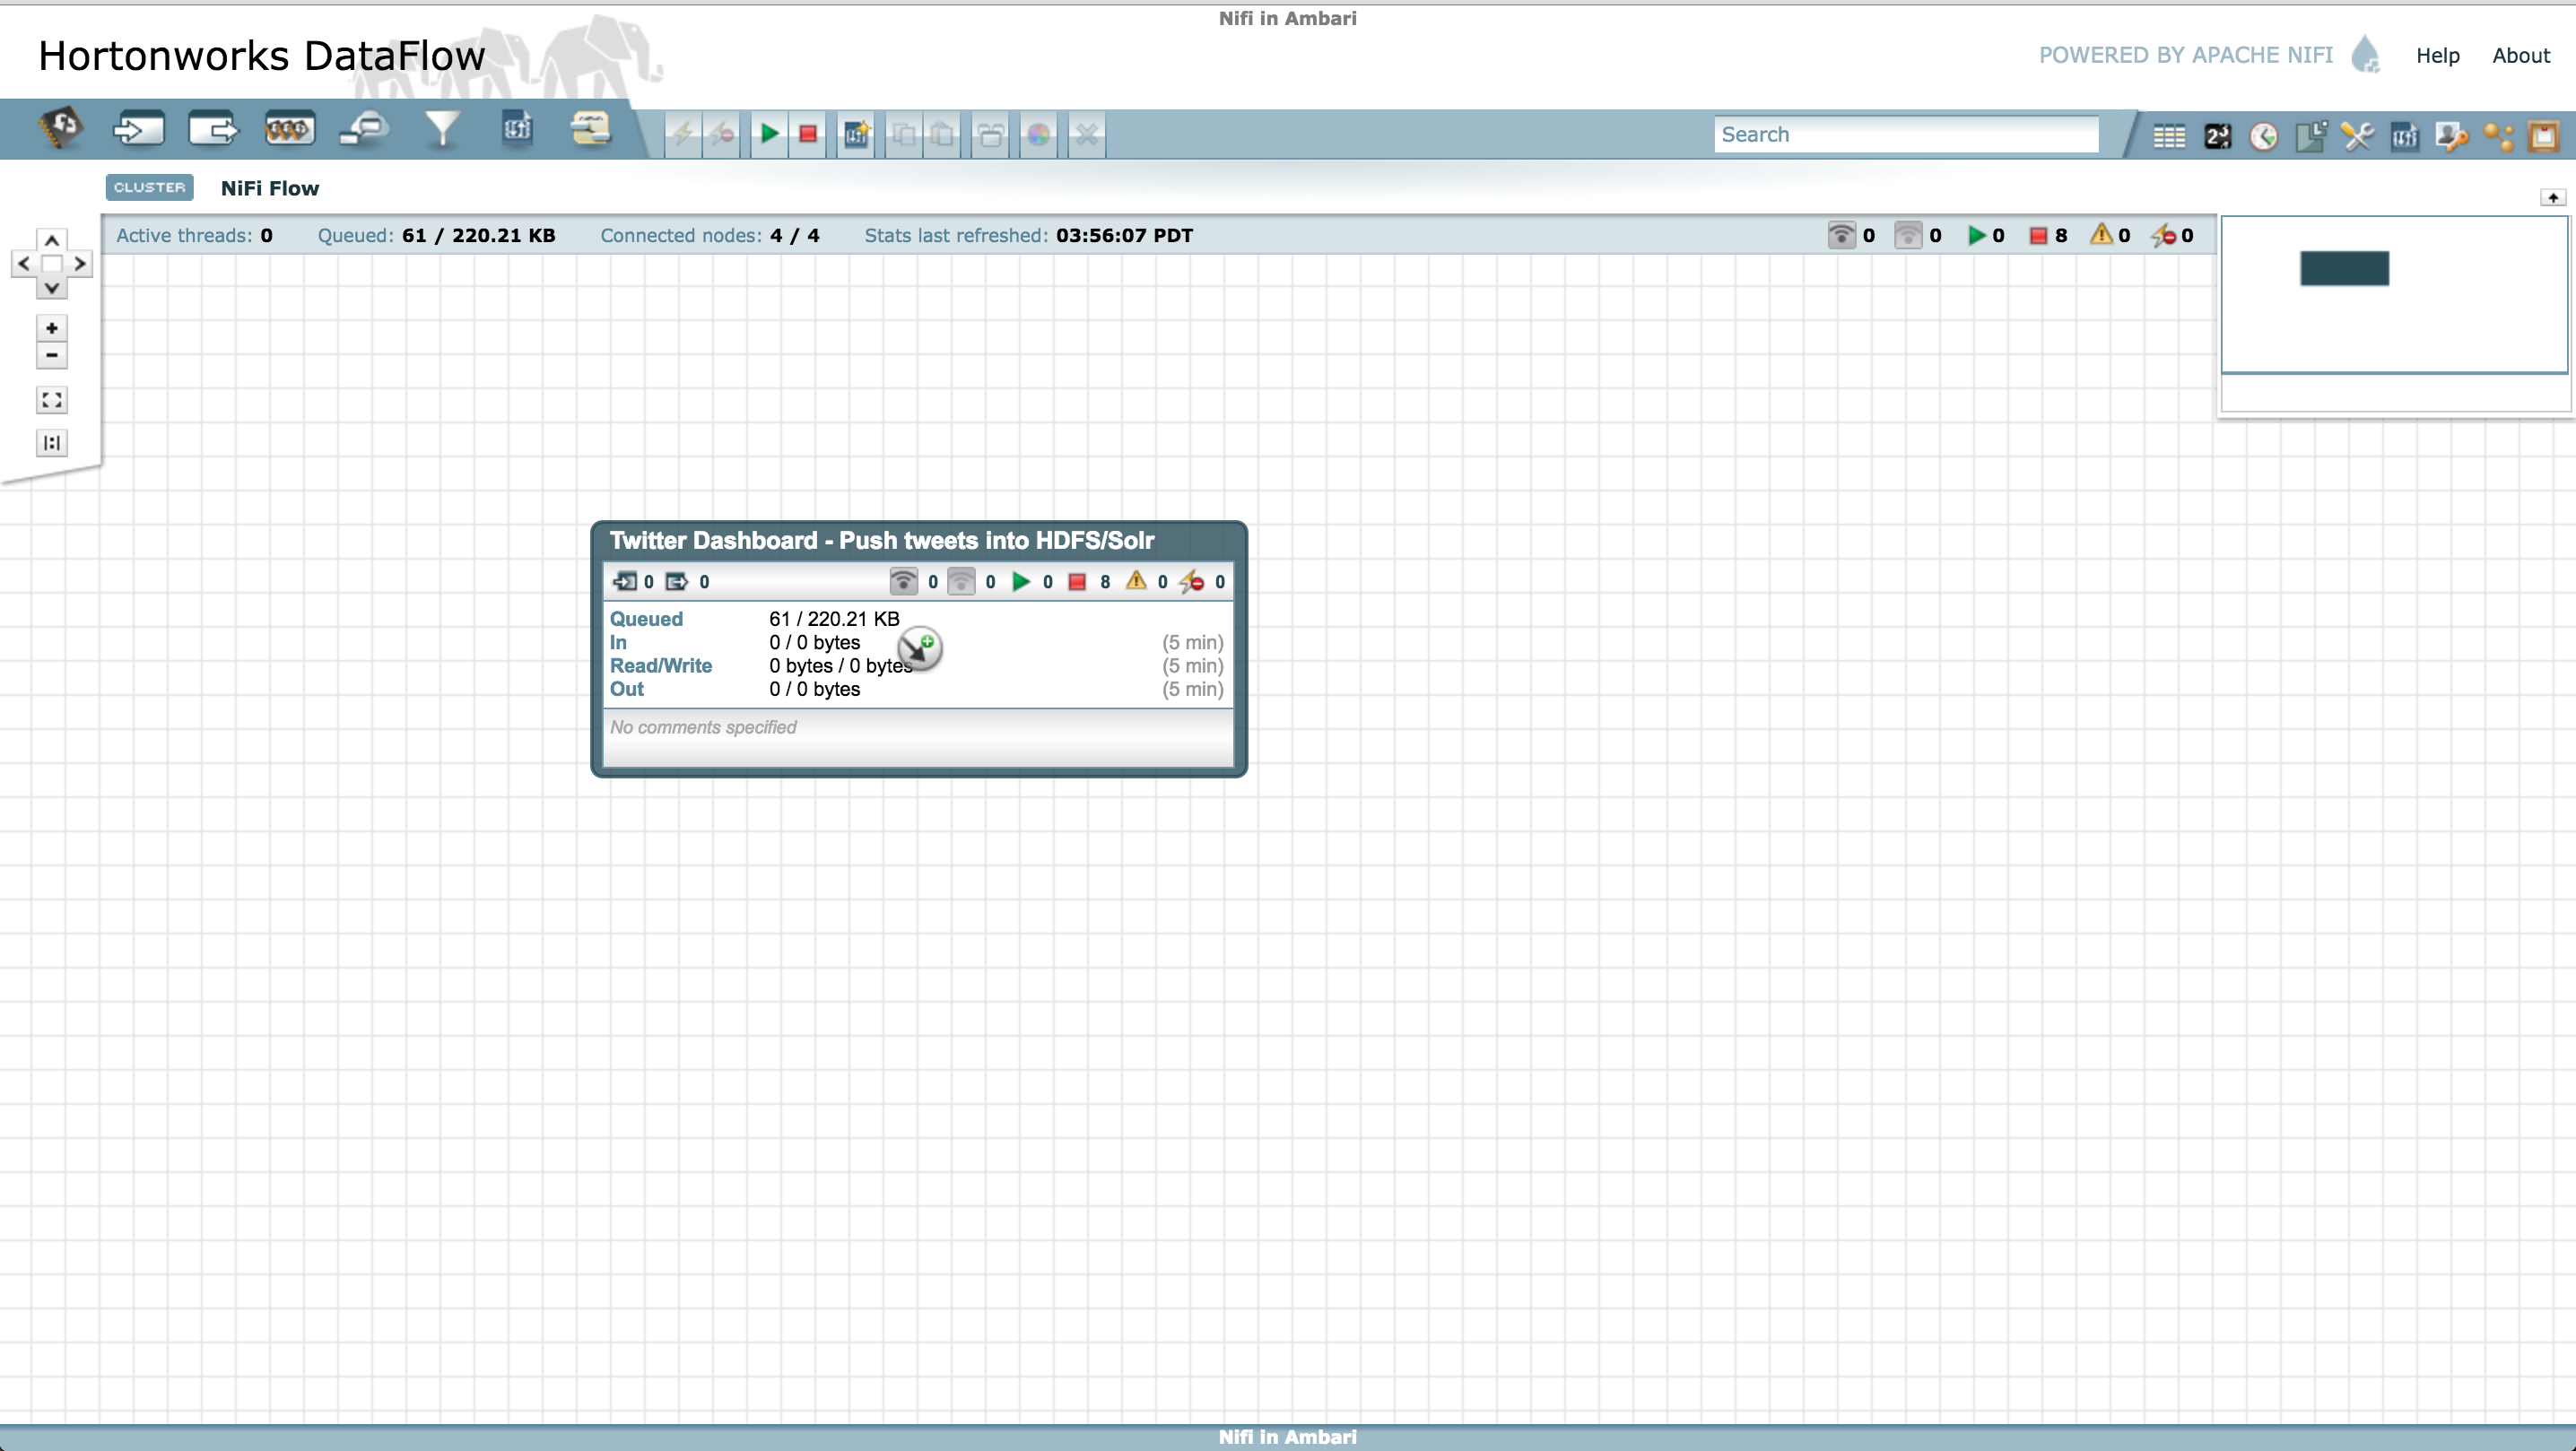
Check that Nifi is running in clustered mode
-
Open the 'Cluster' view (2nd icon from the right, near the top) and confirm all nodes connected

-
Once Nifi is up and running you can run below test flow to check its all working
-
Import simple flow to read Tweets into HDFS/Solr and visualize using Banana dashboard
-
HDP sandbox comes LW HDP search. Follow the steps below to use it to setup Banana, start SolrCloud and create a collection
- If running on an Ambari installed HDP 2.4 cluster (instead of sandbox), run the below to install HDPsearch first. These are not needed on sandbox.
yum install -y lucidworks-hdpsearch sudo -u hdfs hadoop fs -mkdir /user/solr sudo -u hdfs hadoop fs -chown solr /user/solr- Ensure no log files owned by root
chown -R solr:solr /opt/lucidworks-hdpsearch/solr #current sandbox version has files owned by root here which causes problems- Run remaining setup steps as solr user
su solr- Setup the Banana dashboard by copying default.json to dashboard dir
cd /opt/lucidworks-hdpsearch/solr/server/solr-webapp/webapp/banana/app/dashboards/ mv default.json default.json.orig wget https://raw.githubusercontent.com/abajwa-hw/ambari-nifi-service/master/demofiles/default.json- Edit solrconfig.xml by adding
<str>EEE MMM d HH:mm:ss Z yyyy</str>underParseDateFieldUpdateProcessorFactoryso it looks like below. This is done to allow Solr to recognize the timestamp format of tweets.
vi /opt/lucidworks-hdpsearch/solr/server/solr/configsets/data_driven_schema_configs/conf/solrconfig.xml<processor class="solr.ParseDateFieldUpdateProcessorFactory"> <arr name="format"> <str>EEE MMM d HH:mm:ss Z yyyy</str>- Start Solr in cloud mode and create a collection called tweets
export JAVA_HOME=<JAVA_HOME used by Ambari> /opt/lucidworks-hdpsearch/solr/bin/solr start -c -z localhost:2181 /opt/lucidworks-hdpsearch/solr/bin/solr create -c tweets \ -d data_driven_schema_configs \ -s 1 \ -rf 1- Exit to run remaining steps as root
exit- Ensure the time on your sandbox is accurate or you will get errors using the GetTwitter processor. To fix the time, run the below:
yum install -y ntp service ntpd stop ntpdate pool.ntp.org service ntpd start -
-
Now open Nifi webui and run the remaining steps there:
-
Download prebuilt Twitter_dashboard_(clustered).xml template to your laptop from here
-
Import flow template info Nifi:
-
Import template by clicking on Templates (third icon from right) which will launch the 'Nifi Flow templates' popup
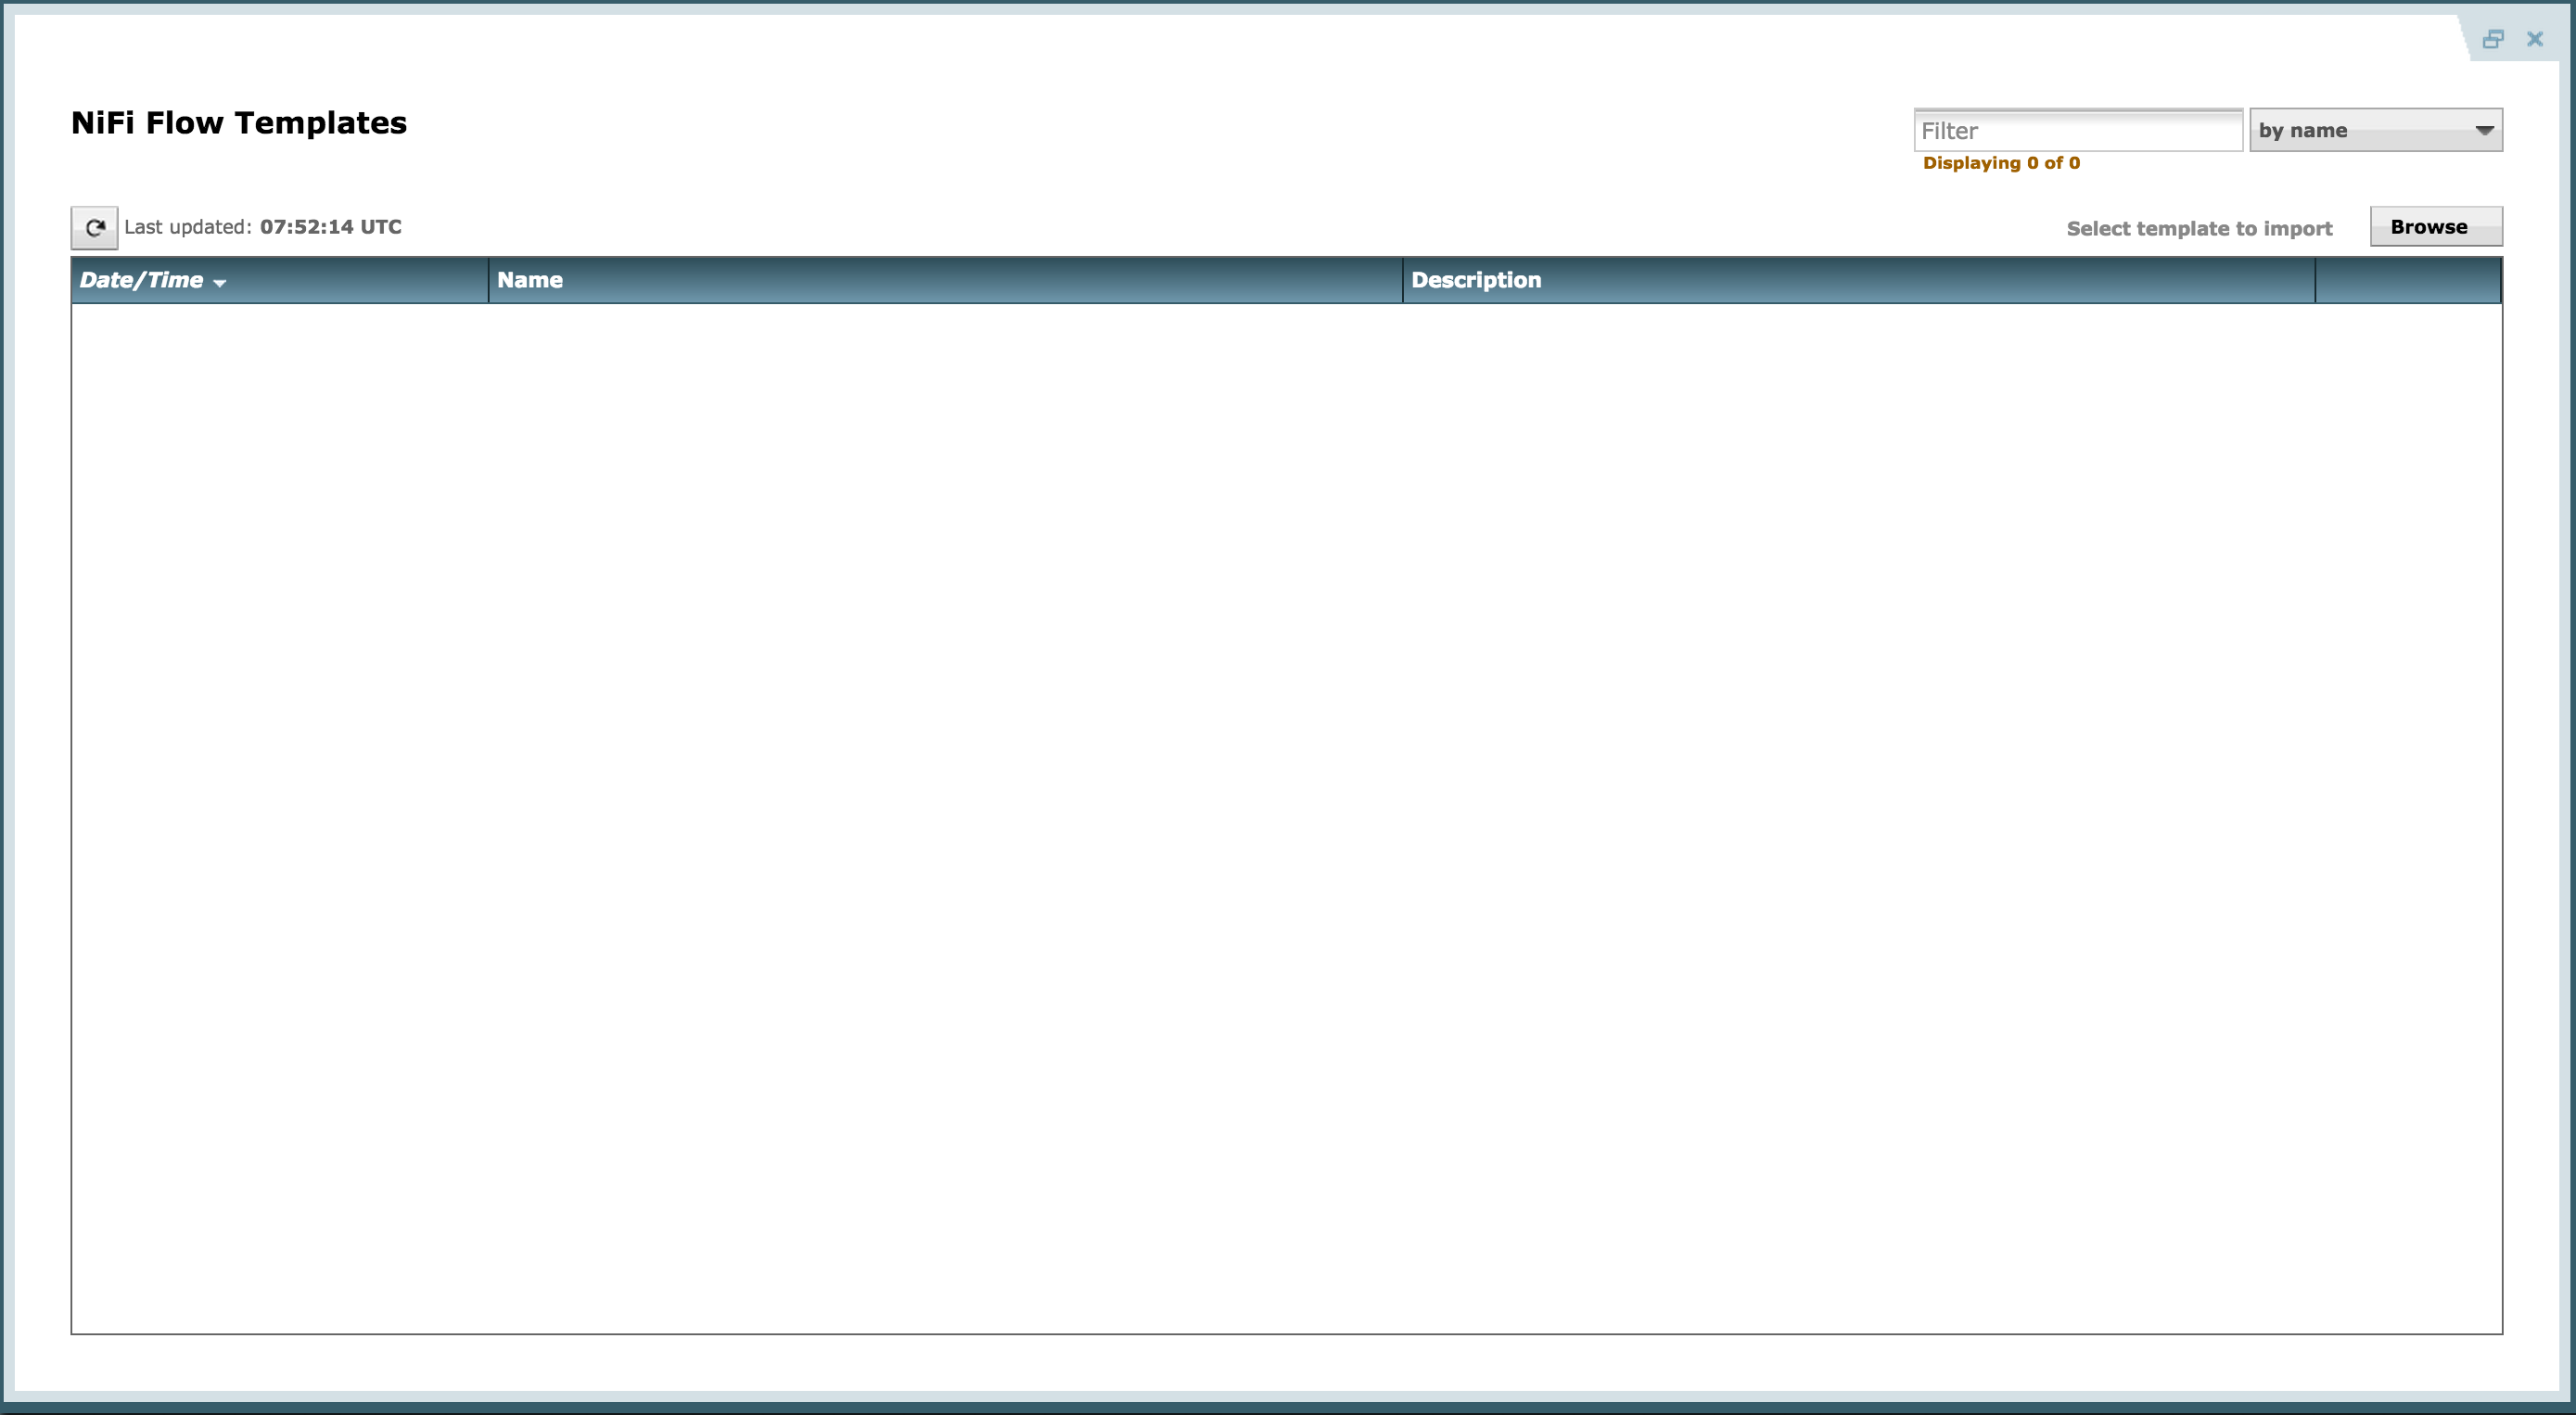
-
Browse and navigate to where ever you downloaded Twitter_Dashboard.xml on your local machine
-
Click Import. Now the template should appear:

-
Close the popup
-
-
Instantiate the Twitter dashboard template:
-
Drag/drop the Template icon (7th icon form left) onto the canvas so that a picklist popup appears
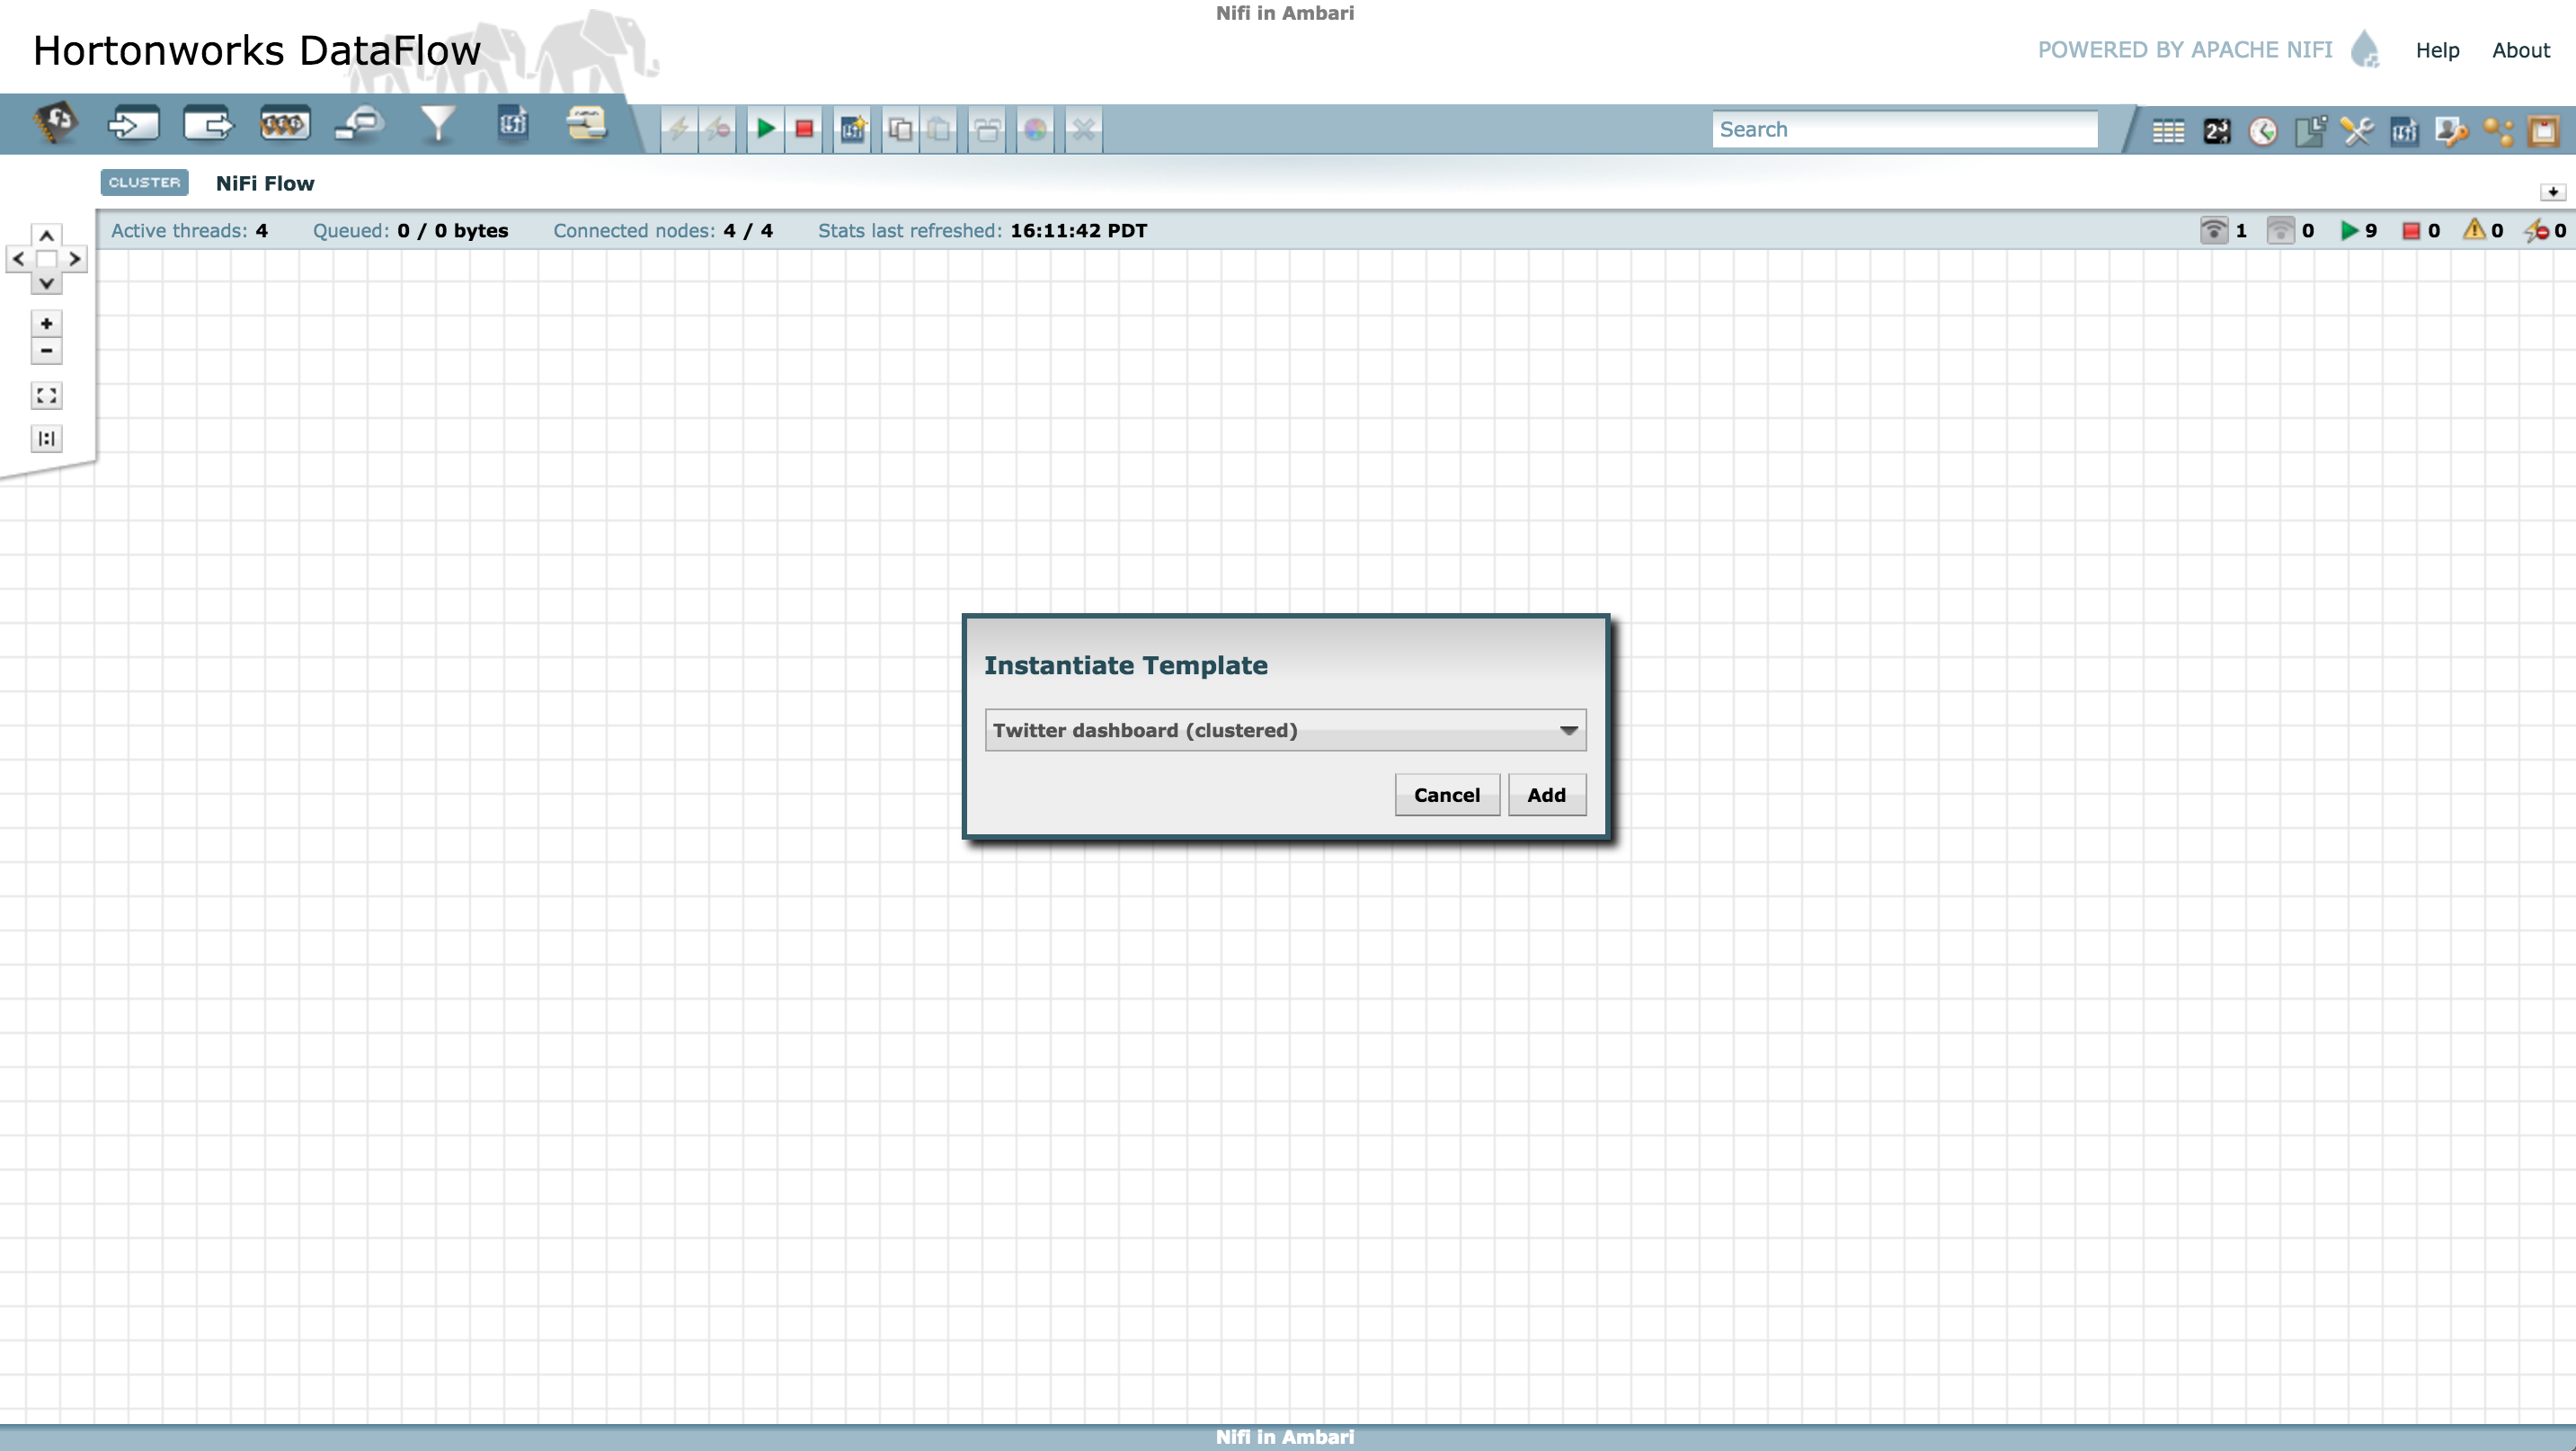
-
Select 'Twitter dashboard' and click Add
-
-
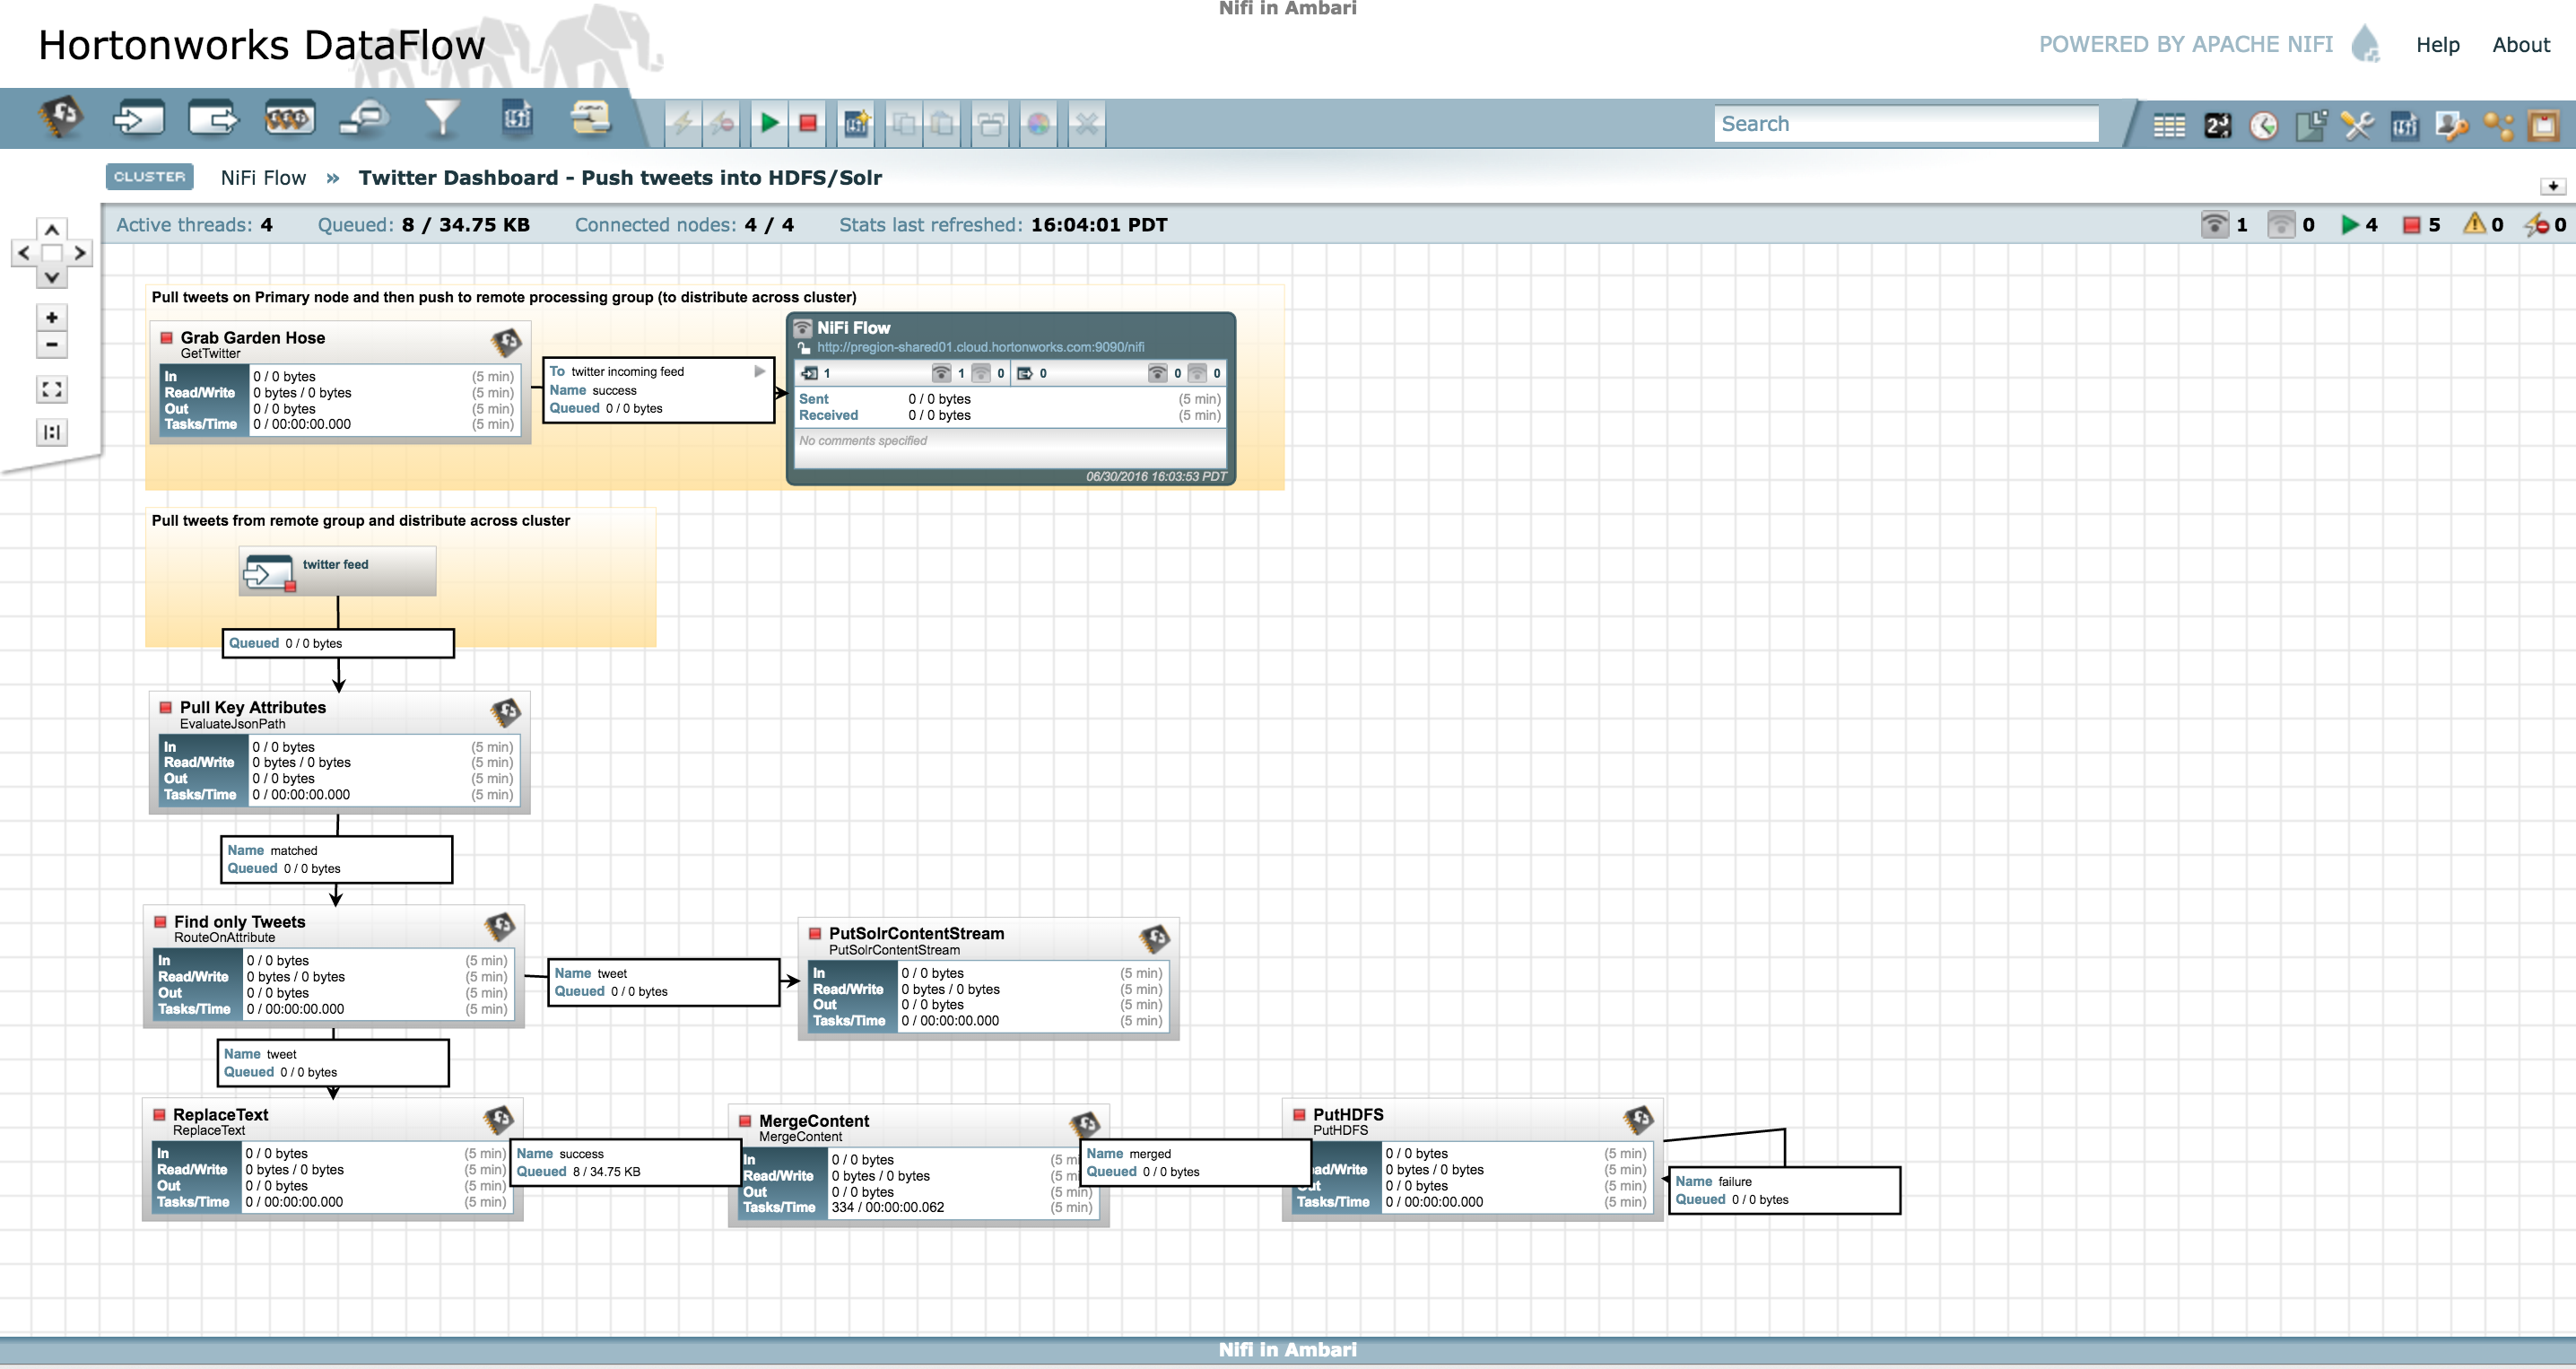
Open the process group by double clicking on the box that appeared on the canvas with title "Twitter Dashboard"
-
This will open up the flow for the template we just imported.
-
Notice the flow is currently stopped. Before we can start it, we need to perform additional steps.
-
Configure GetTwitter processor
- Right click on 'GetTwitter' processor (near top) and click Configure
- Under Properties:
- Enter your Twitter key/secrets
- ensure the 'Twitter Endpoint' is set to 'Filter Endpoint'
- enter the search terms (e.g. AAPL,GOOG,MSFT,ORCL) under 'Terms to Filter on'
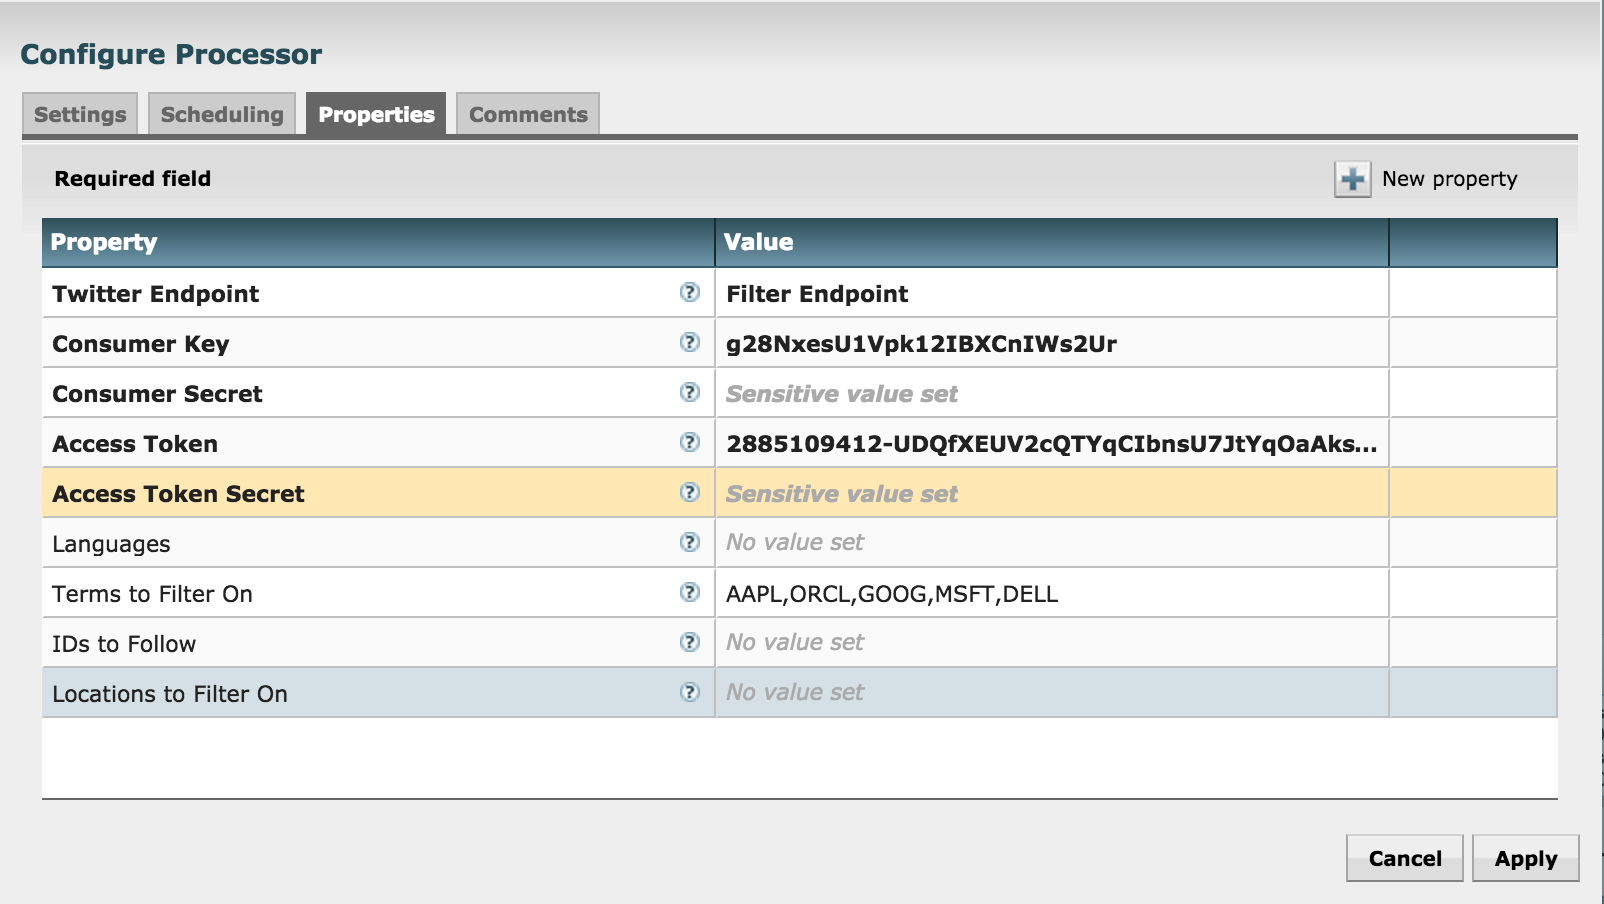
- Under Properties:
- Right click on 'GetTwitter' processor (near top) and click Configure
-
Review the other processors and modify properties as needed:
- EvaluateJsonPath: Pulls out attributes of tweets
- RouteonAttribute: Ensures only tweets with non-empty messages are processed
- PutSolrContentStream: Writes the selected attributes to Solr. In this case, assuming Solr is running in cloud mode with a collection 'tweets'
- ReplaceText: Formats each tweet as pipe (|) delimited line entry e.g. tweet_id|unixtime|humantime|user_handle|message|full_tweet
- MergeContent: Merges tweets into a single file (either 20 tweets or 120s, whichever comes first)
- PutFile: writes tweets to local disk under /tmp/tweets/
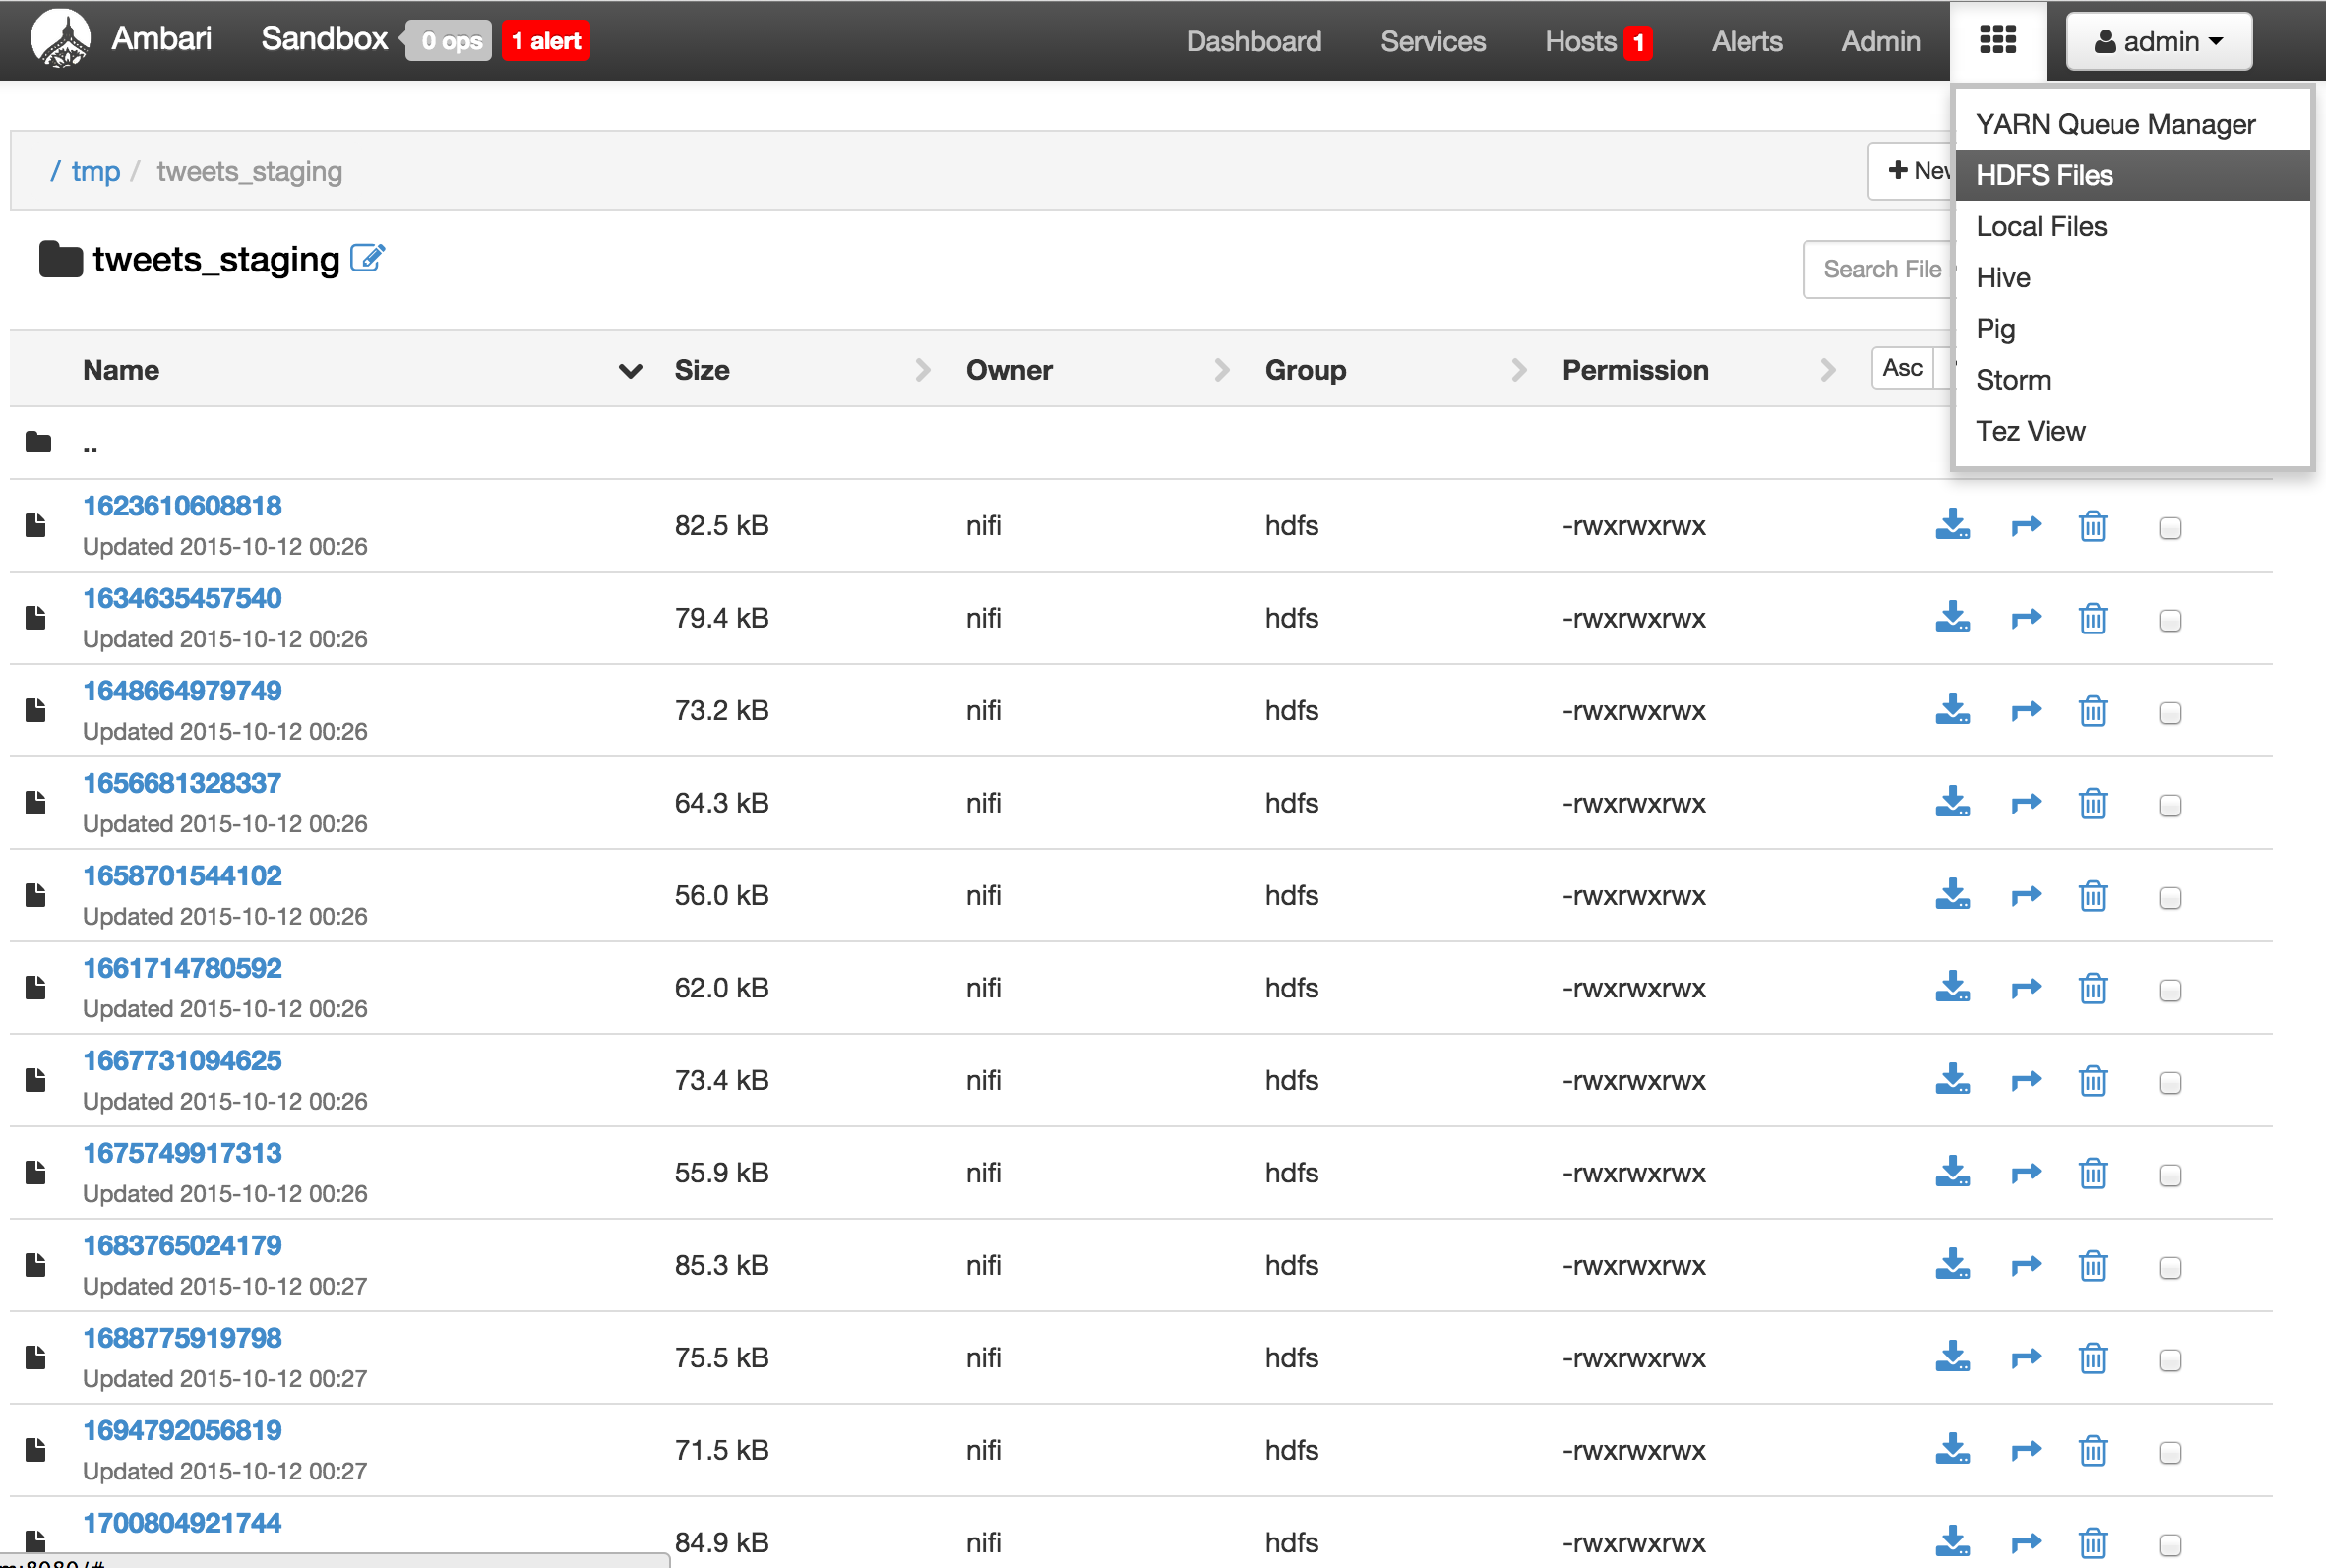
- PutHDFS: writes tweets to HDFS under /tmp/tweets_staging
-
If setup correctly, the top left hand of each processor on the canvas will show a red square (indicating the flow is stopped)
-
Click the Start button (green triangle near top of screen) to start the flow
-
The state of each processor should change to started. After few seconds you will see the processor statistics updating which shows that data is flowing

-
Create Hive table to be able to run queries on the tweets
sudo -u hdfs hadoop fs -chmod -R 777 /tmp/tweets_staging hive> create table if not exists tweets_text_partition( tweet_id bigint, created_unixtime bigint, created_time string, displayname string, msg string, fulltext string ) row format delimited fields terminated by "|" location "/tmp/tweets_staging";-
Verify that:
-
tweets appear under /tmp dir in HDFS. You can see this via Files view in Ambari:
-
tweets appear in Solr:
-
-
tweets appear in Banana:
-
Tweets appear in Hive:
-
-
Other Nifi features
-
Flow statistics/graphs:
-
Right click on one of the processors (e.g. PutHDFS) and select click 'Stats' to see a number of charts/metrics:
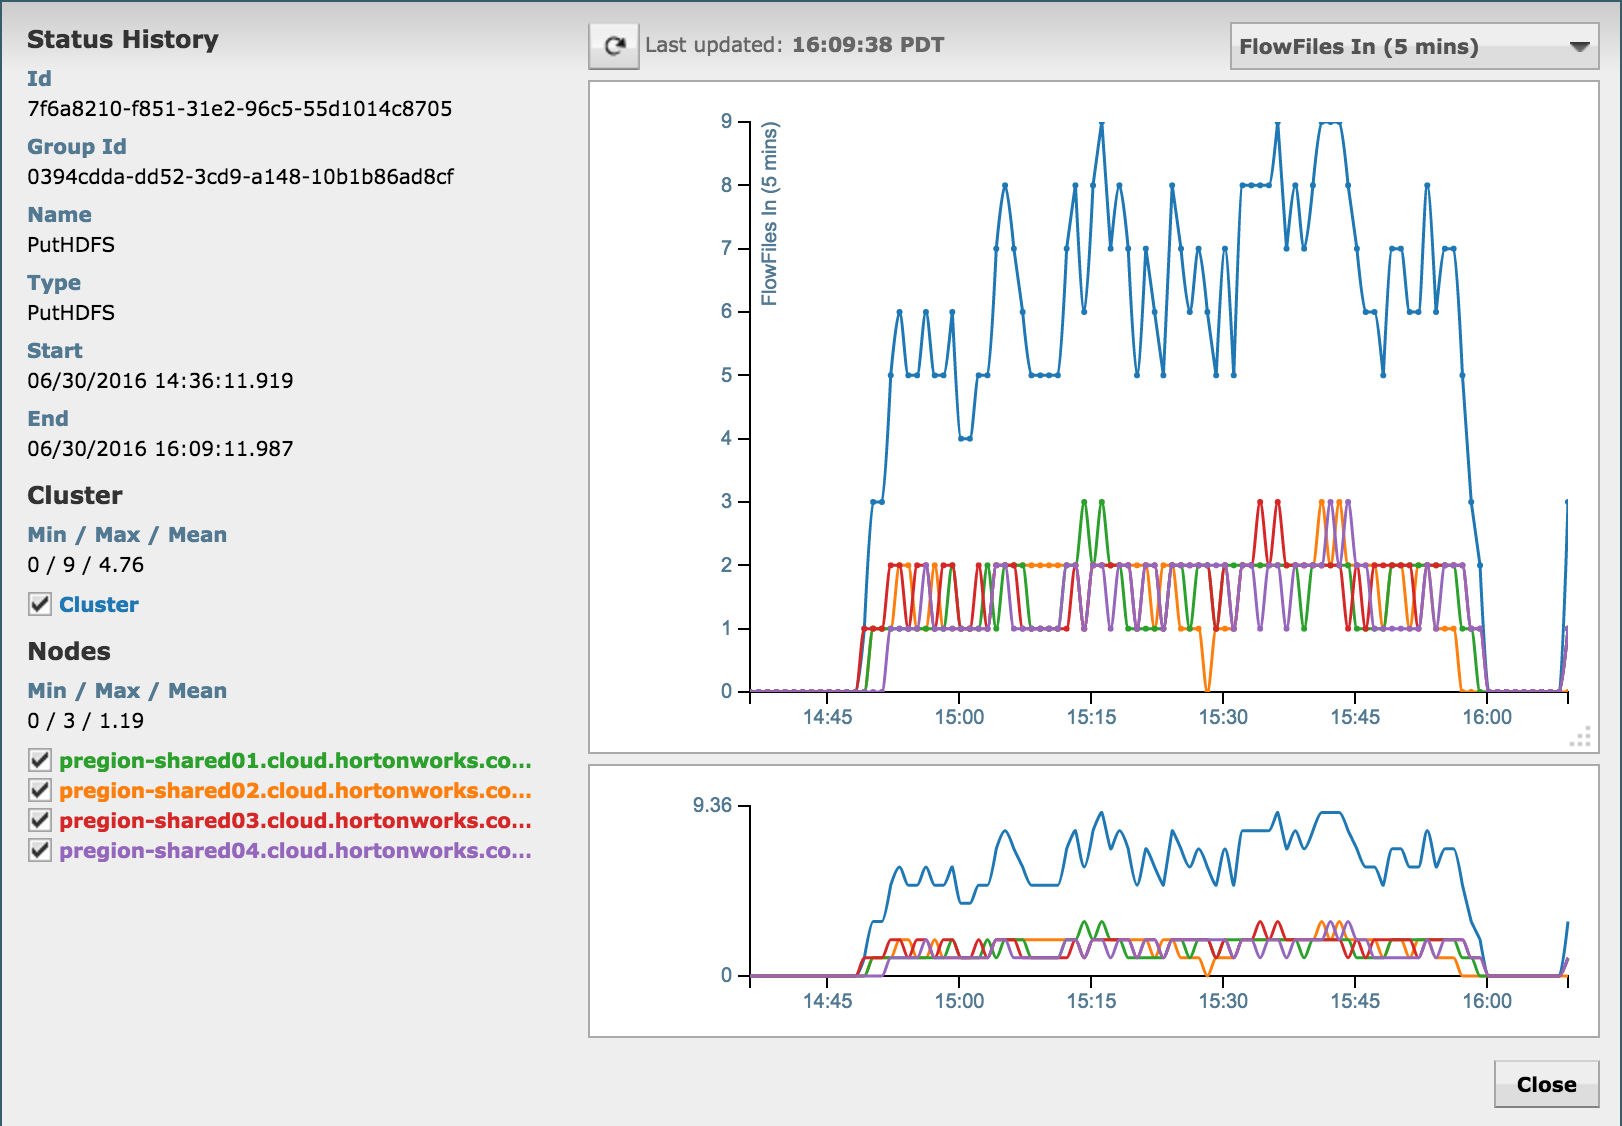
-
You should also see Nifi metrics in Ambari (assuming you started Ambari metrics earlier)
-
-
Data provenance in Nifi:
- In Nifi home screen, click Provenance icon (5th icon from top right corner) to open Provenance page:
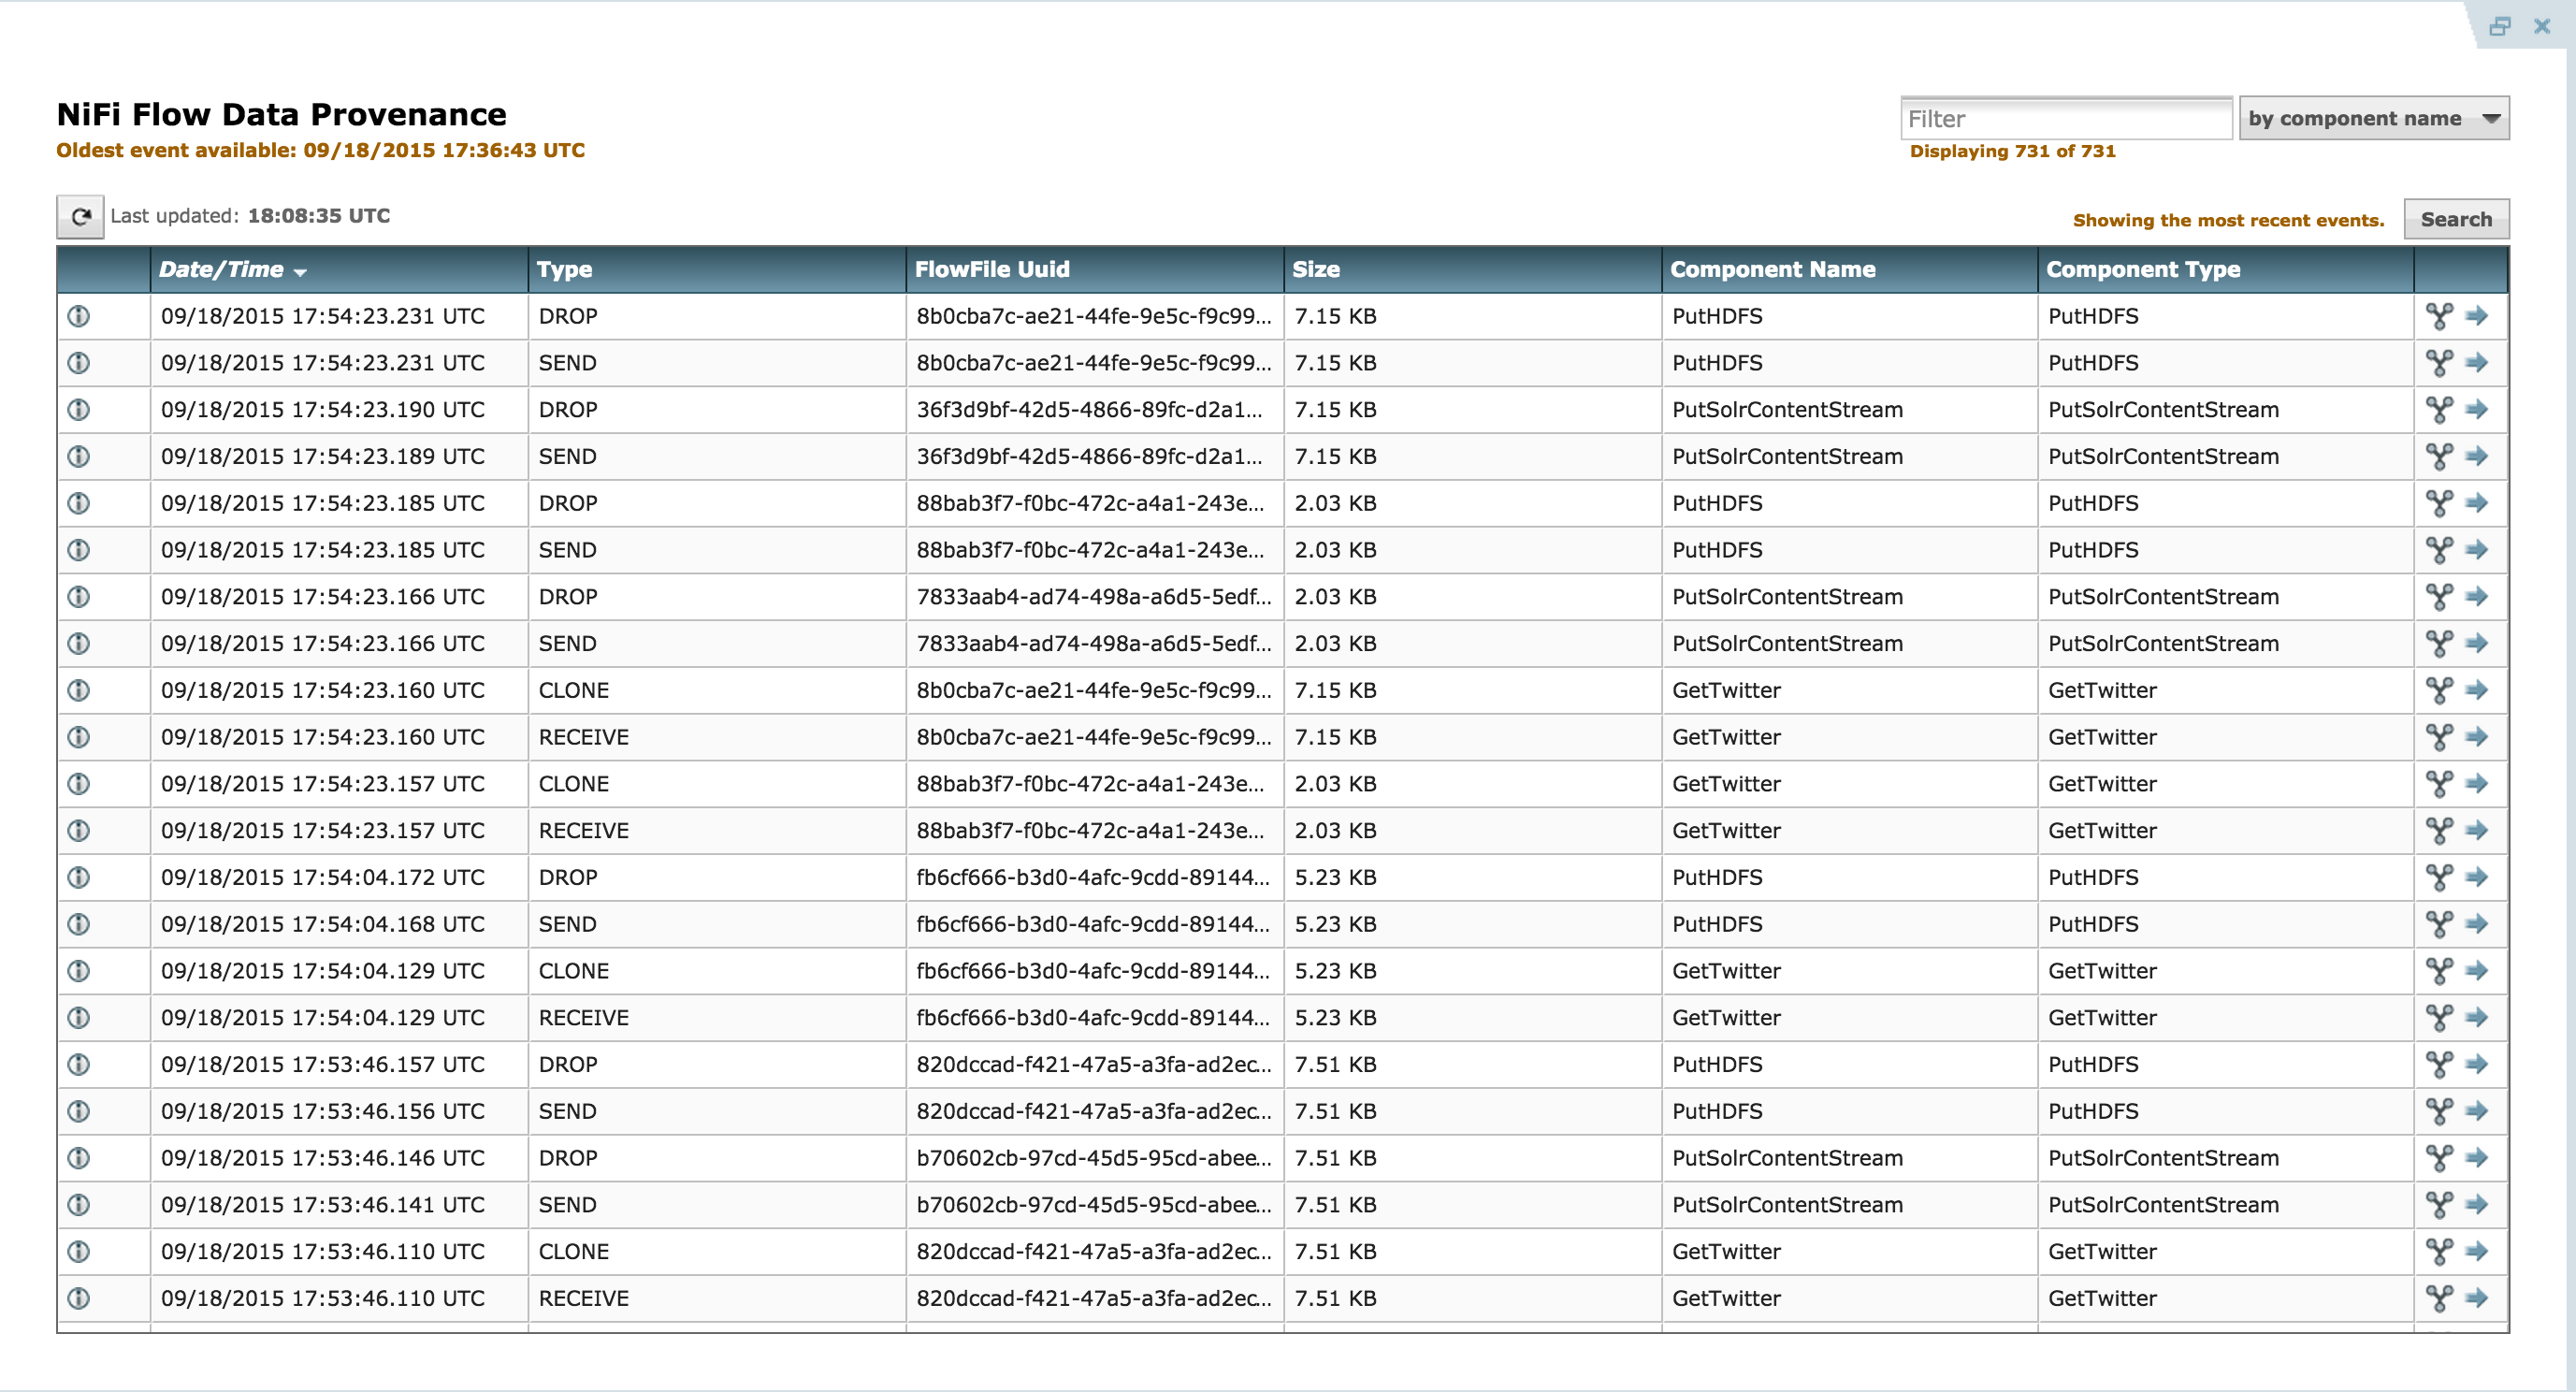
- Click Show lineage icon (2nd icon from right) on any row
- Right click Send > View details > Content
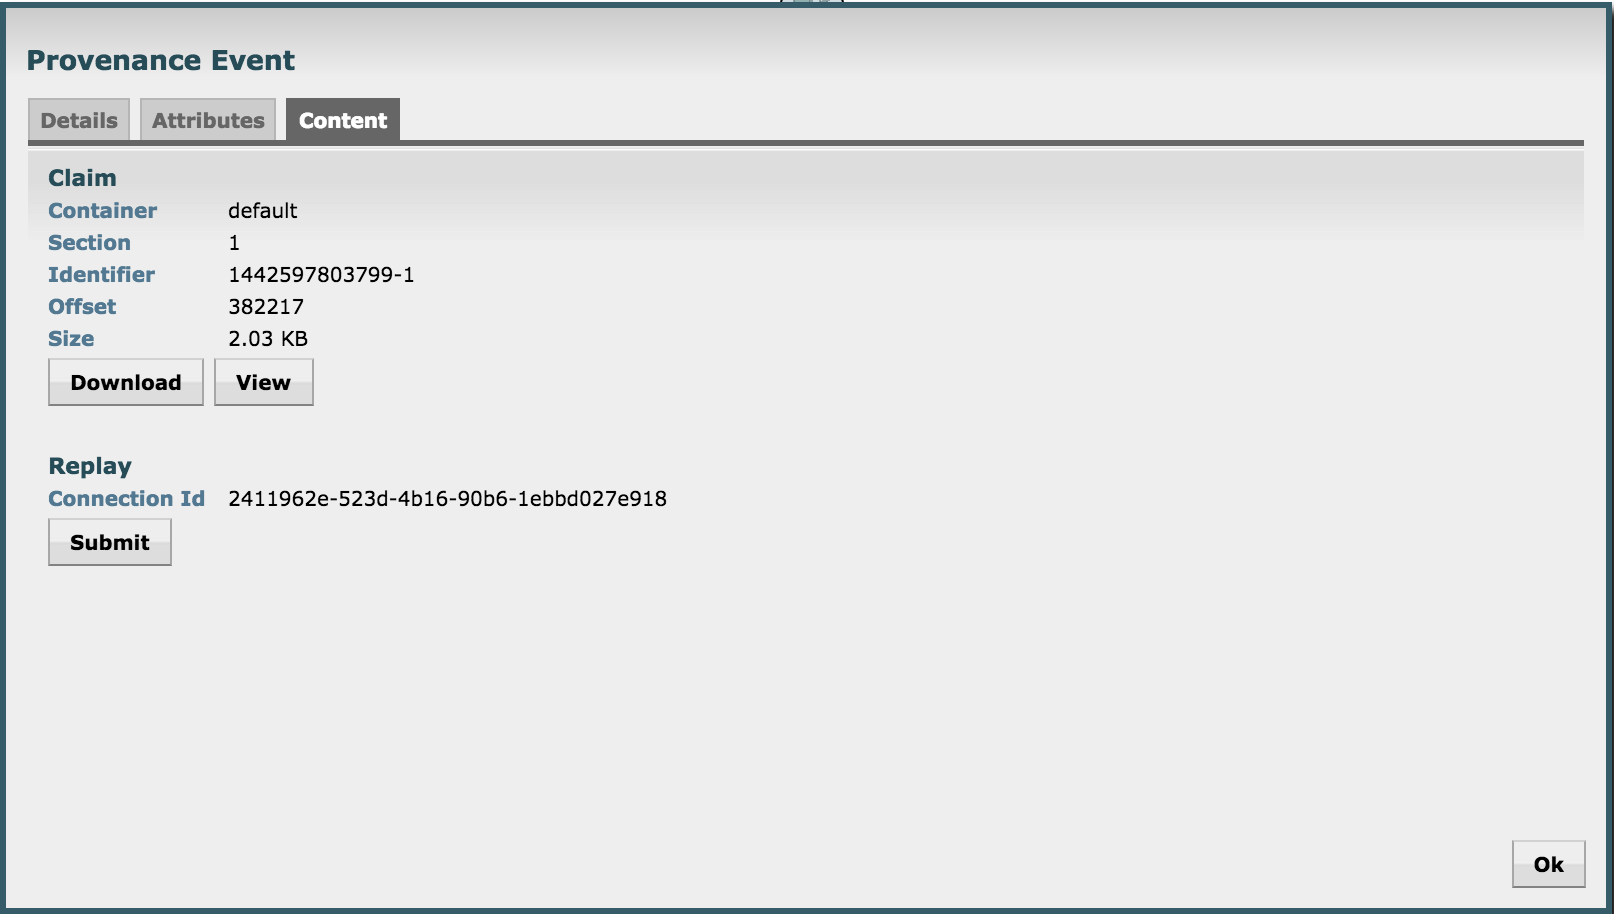
- From here you can view the tweet itself by
- Clicking Content > View > formatted
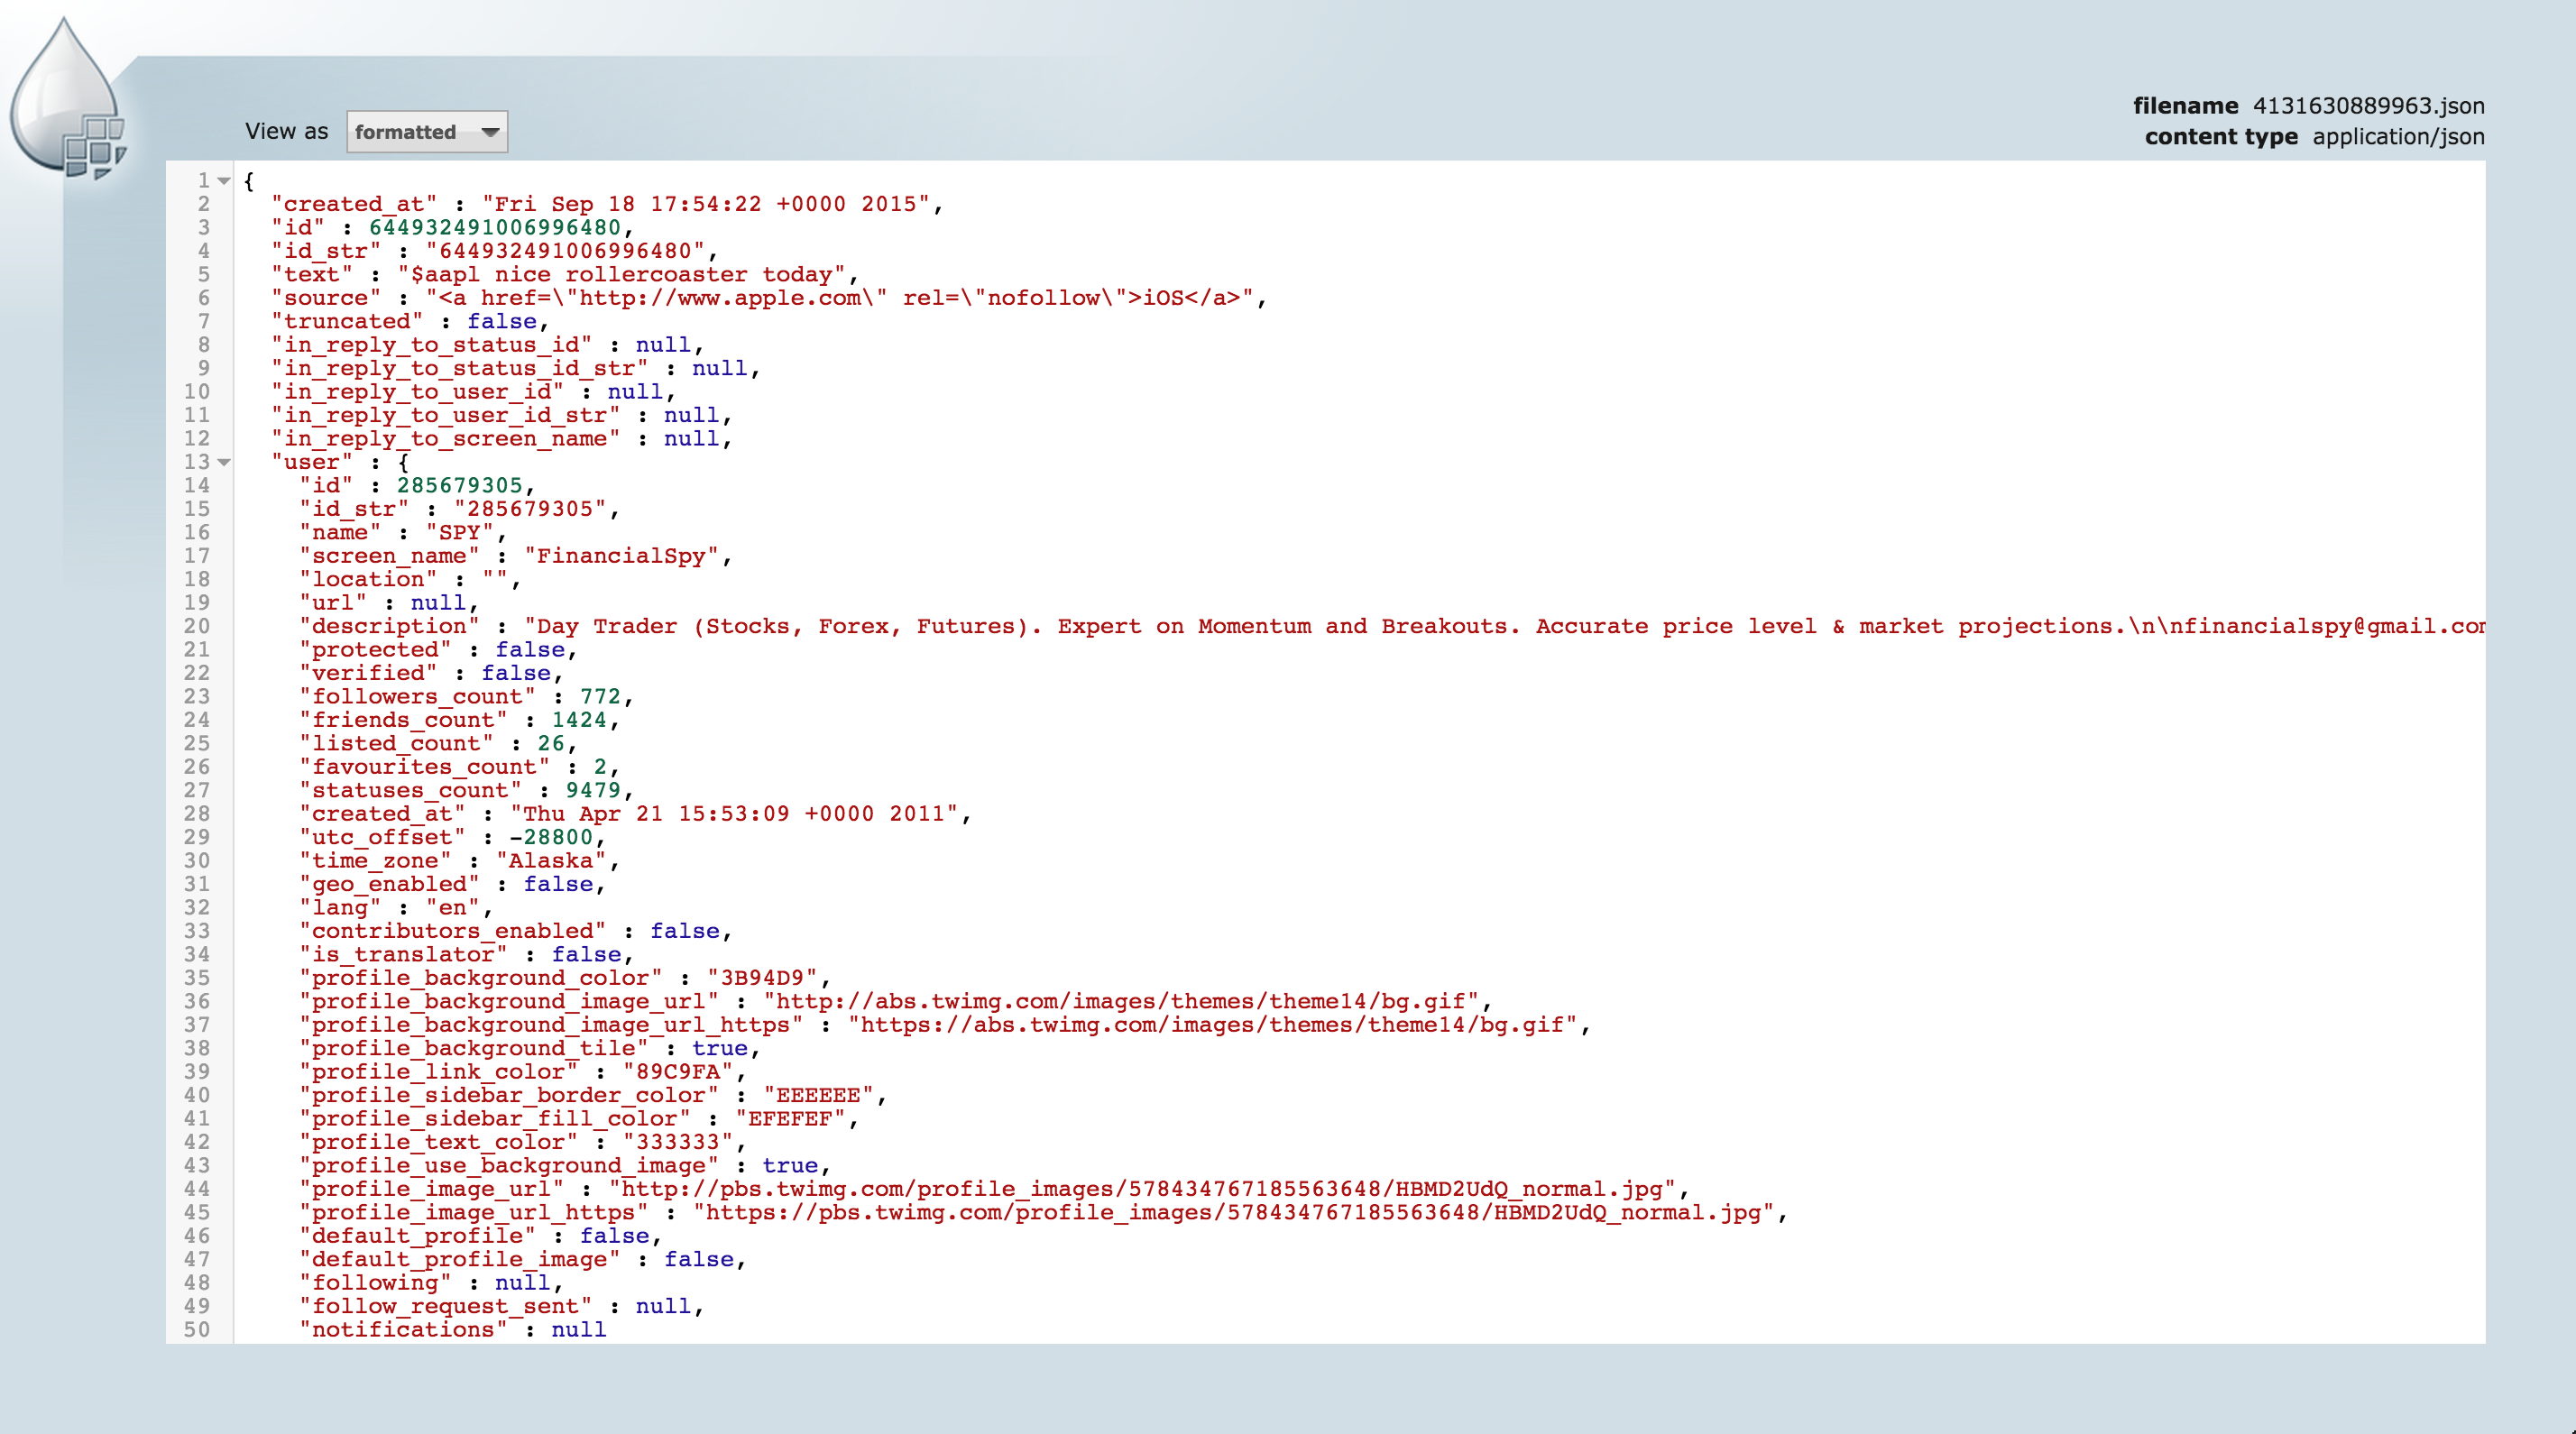
- Clicking Content > View > formatted
- You can also replay the event by
- Replay > Submit
- Close the provenance window using x icon on the inner window
- Notice the event was replayed

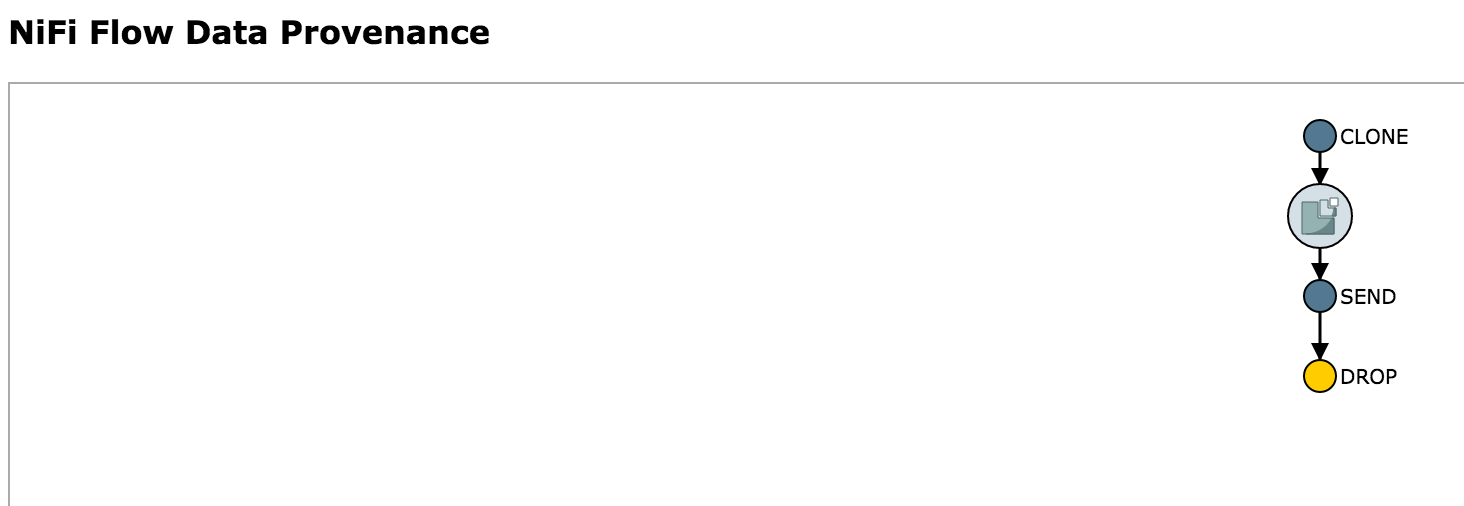
- Re-open the the provenance window on the row you you had originally selected
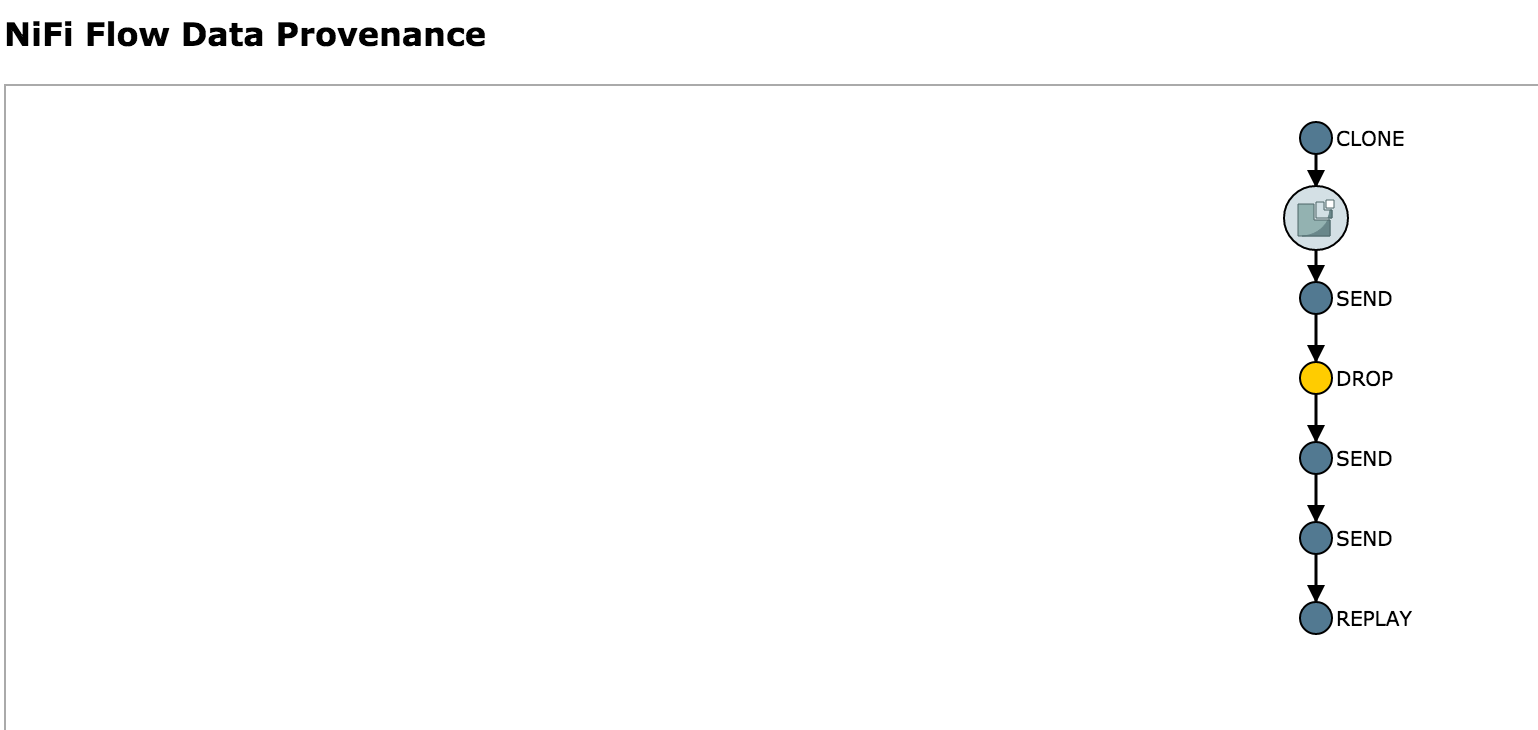
- Notice that by viewing and replaying the tweet, you changed the provenance graph of this event: Send and replay events were added to the lineage graph
- Right click on the Send event near the bottom of the flow and select Details
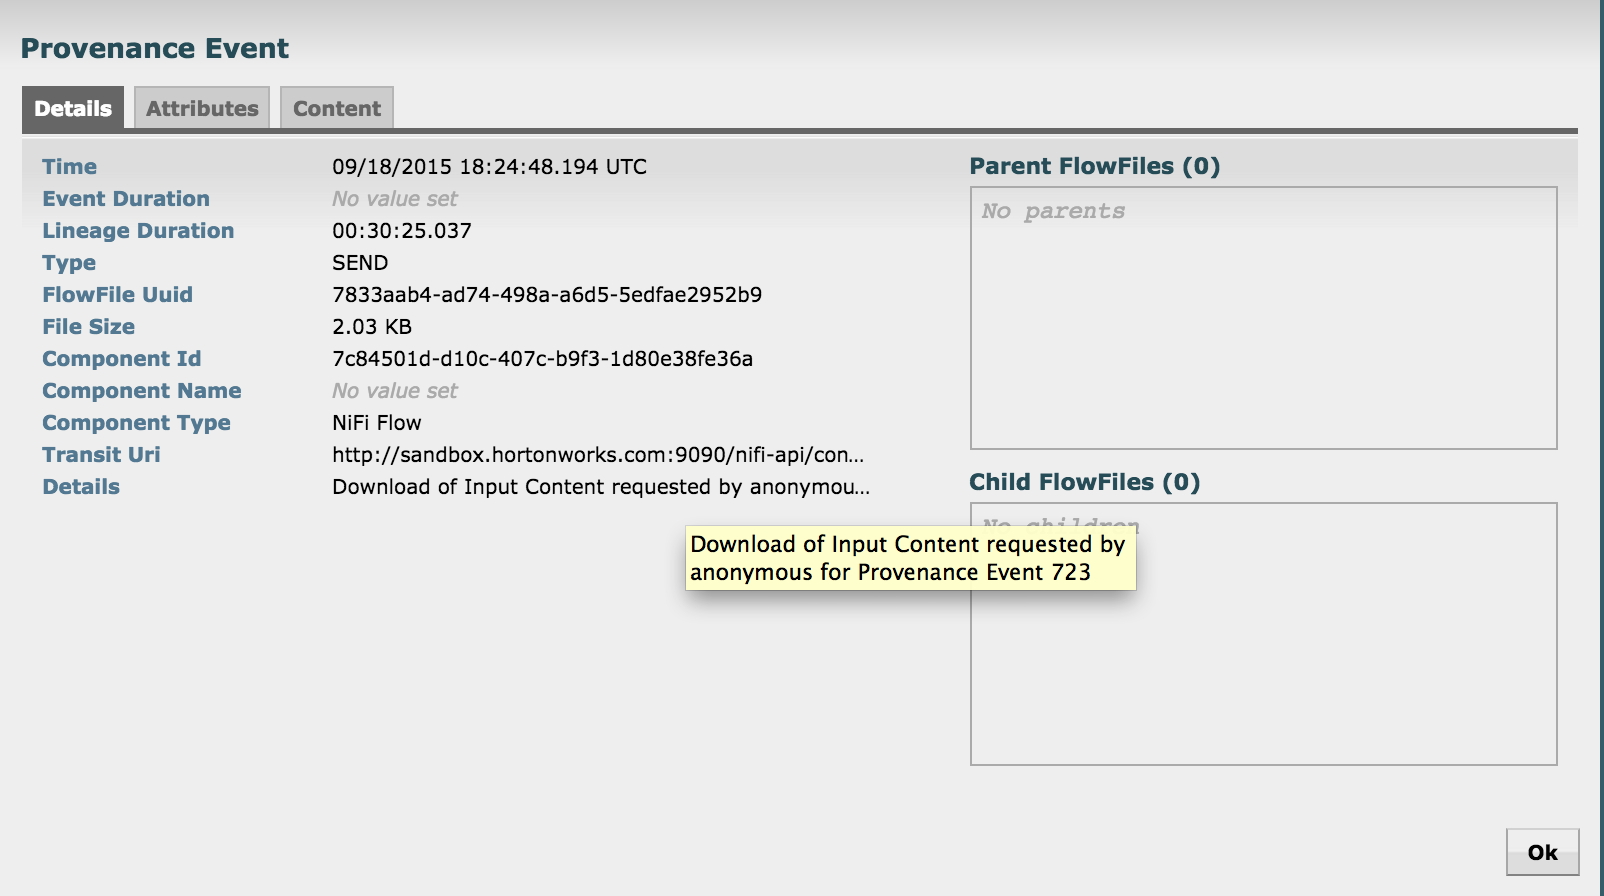
- Notice that the details of request to view the tweet are captured here (who requested it, at what time etc)
- Exit the Provenance window but clicking the x icon on the outer window
- In Nifi home screen, click Provenance icon (5th icon from top right corner) to open Provenance page:
-


- To remove the Nifi service:
-
Stop the service via Ambari
-
Unregister the service by running below from Ambari node
-
export SERVICE=NIFI export PASSWORD=admin export AMBARI_HOST=localhost
#detect name of cluster
output=curl -u admin:$PASSWORD -i -H 'X-Requested-By: ambari' http://$AMBARI_HOST:8080/api/v1/clusters
CLUSTER=echo $output | sed -n 's/.*"cluster_name" : "\([^\"]*\)".*/\1/p'
#unregister service from ambari curl -u admin:$PASSWORD -i -H 'X-Requested-By: ambari' -X DELETE http://$AMBARI_HOST:8080/api/v1/clusters/$CLUSTER/services/$SERVICE
#if above errors out, run below first to fully stop the service #curl -u admin:$PASSWORD -i -H 'X-Requested-By: ambari' -X PUT -d '{"RequestInfo": {"context" :"Stop $SERVICE via REST"}, "Body": {"ServiceInfo": {"state": "INSTALLED"}}}' http://$AMBARI_HOST:8080/api/v1/clusters/$CLUSTER/services/$SERVICE ```
- Remove artifacts
rm -rf /opt/HDF-* rm /tmp/HDF-*.zip