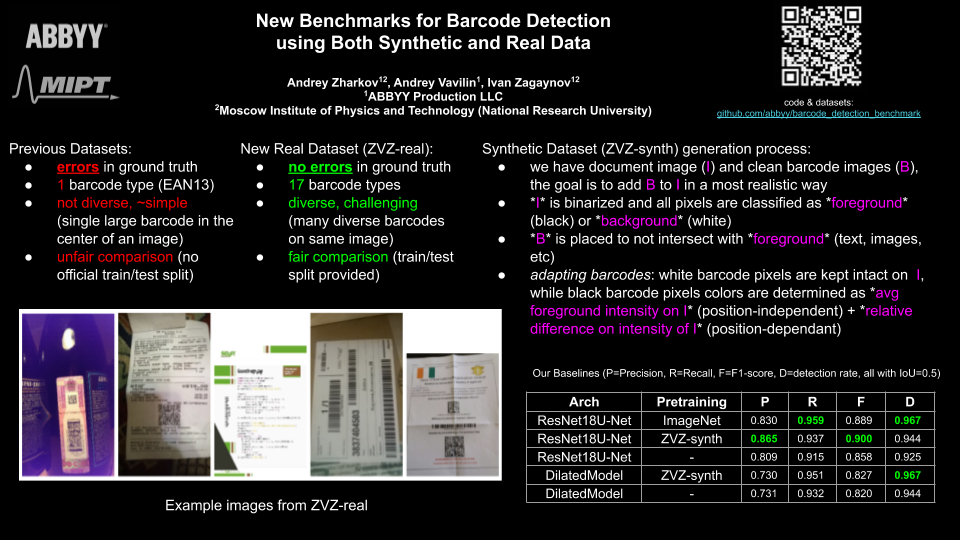
Code for paper New Benchmarks for Barcode Detection using both Synthetic and Real Data
You can download datasets ZVZ-synth & ZVZ-real from here.
Code is written on PyTorch & Catalyst. You will probably have to take a look on how Catalyst pipeline is organised (maybe useful link) before starting to go deeper with this project.
-
detection of multiple object classes and their further classification
-
lots of metrics & losses in tensorboard
-
changing your pipeline via config instead of the code
-
for each experiment your code and config will be saved in logdir just in case
-
full reproducibility (run with CUDNN_DETERMINISTIC=True and CUDNN_BENCHMARK=False)
# create new environment
conda create -n odvss python==3.7.*
# activate environment
source activate odvss
# install pytorch (proved to be working with 1.3.1)
conda install pytorch torchvision cudatoolkit=10.1 -c pytorch
# for cudatoolkit==10.0 you may need to install future (pip install future)

# install packages
# (if shapely is not installing from pip download .whl and install manually)
pip install catalyst==19.11.6 albumentations shapely jinja2 'pillow<7.0'-
Download the datasets ZVZ-synth & ZVZ-real from here (you may consider to download smaller dataset versions where every image is resized to max side 512)
-
Set working directory to this project root, then run in console
# register the datasets
# this command will create (or update) file `logs/datasets/all_datasets.json`
REAL_DATA=/path/to/downloaded/real/dataset \
SYNTH_DATA=/path/to/downloaded/synth/dataset \
bash scripts/benchmark/register_datasets.sh

# render the configs (inference only)
bash scripts/benchmark/prepare_config_real.sh  # for real dataset
bash scripts/benchmark/prepare_config_synth.sh  # for synth dataset
# alternatively run the following commands to generate training configs
#TRAIN="ZVZ-real_train" \
#VALID="ZVZ-real_valid" \
#bash scripts/benchmark/prepare_config_real.sh  # for real dataset
#TRAIN="ZVZ-synth_train" \
#VALID="ZVZ-synth_valid" \
#bash scripts/benchmark/prepare_config_synth.sh  # for synth dataset

# after this you will have rendered configs in the following file structure:
# configs/
#        class_trees/...
#        generated/
#                  ZVZ-real/
#                           dilated_model/
#                           resnet18_unet/
#                  ZVZ-synth/
#                           dilated_model/
#                           resnet18_unet/
Then you will be able to run training/inference with the following command
catalyst-dl run -C configs/generated/ZVZ-real/resnet18_unet/config.yml configs/generated/ZVZ-real/resnet18_unet/class_config.yml --baselogdir logs/runsIf you want to download pretrained models, all of the models from our experiments can be downloaded from here
To run inference with pretrained model run with --resume path/to/checkpoint.pth, e.g.
catalyst-dl run -C configs/generated/ZVZ-real/resnet18_unet/config.yml configs/generated/ZVZ-real/resnet18_unet/class_config.yml --logdir logs/inference --resume path/to/checkpoint.pthCustom Experiment class will read your dataset, but first you have to prepare it
and save description in csv format.
This repo has scripts/prepare_dataset.sh which does exactly this job. Assuming that you have dataset in the same format as ZVZ-synth & ZVZ-real you should run this script like
DATA_DIR=... \
DATASET_DIR=... \
DATASET_NAME="my_dataset" \
NO_NEED_SPLIT=false \
bash scripts/prepare_dataset.sh
The above command will prepare all the metadata about your dataset and split it into train/validation
The dataset is now accessible in config generation script by names "my_dataset" (the entire dataset), "my_dataset_train" and "my_dataset_valid" (train and valid subsets).
The most important part of your experiment is YAML config. There are a lot of different datasets losses and parameters which you can specify, so to avoid errors in manual overriding you can use rendering script.
WORKDIR=/path/to/this/project/root \
NUM_WORKERS=4 \
BATCH_SIZE=4 \
IMAGE_SIZE=512 \
TRAIN="my_dataset_train" \
VALID="my_dataset_valid" \
INFER="" \
bash scripts/prepare_config.sh
It will render your YAML config from template. Note that TRAIN, VALID and INFER should be set to
the dataset names registered by scripts/prepare_dataset.sh or empty strings
catalyst-dl -C your/rendered/config.yml your_class_config.ymlYou can also specify here --logdir, --baselogdir, --seed and some other arguments. If you want to check that everything will be going OK use --check (it will run each stage for 3 epochs of 3 batches)
To make reproducible results specify CUDNN_BENCHMARK=False and CUDNN_DETERMINISTIC=True
First of all take a look at Catalyst, you should understand the concepts of Experiment,
Runner and config experiments.
We define "detection classes" for classes which would be detected via separate detection channels. We define "classification classes" for subclasses of detection classes.
Let's assume you have detection classes - stamps, barcodes and tables. Then your classification classes may be QR and 1D for barcodes, and no subclasses for stamps and tables.
You can often meet these two defenitions in the code as d_classes and c_classes
Target maps are of same shape as prediction maps: (batch, C, H, W). Where C, the
number of channels, equals to the total of d_classes and c_classes sum,
meaning that each of this channels is related to the one specific class.
The exact format (target map id <-> class_id) is determined based on your class_config.yml where
you specify all of the classes. This mapping and pretty much every information about your target map
configuratio is specified at TargetMapInfo class. It is assumed to be a singleton and is built
from your class_config.
You can modify the configs to change losses/reduction metrics/visualization/etc. You may need to write custom callbacks for this purpose or use the default ones from catalyst. Some examples of custom callbacks may be found in src/callbacks
@incollection{Zharkov_2020,
	doi = {10.1007/978-3-030-57058-3_34},
	url = {https://doi.org/10.1007%2F978-3-030-57058-3_34},
	year = 2020,
	publisher = {Springer International Publishing},
	pages = {481--493},
	author = {Andrey Zharkov and Andrey Vavilin and Ivan Zagaynov},
	title = {New Benchmarks for Barcode Detection Using Both Synthetic and Real Data},
	booktitle = {Document Analysis Systems}
}
Copyright © 2019 ABBYY Production LLC
Licensed under the Apache License, Version 2.0 (the "License"); you may not use this file except in compliance with the License. You may obtain a copy of the License at
http://www.apache.org/licenses/LICENSE-2.0
Unless required by applicable law or agreed to in writing, software distributed under the License is distributed on an "AS IS" BASIS, WITHOUT WARRANTIES OR CONDITIONS OF ANY KIND, either express or implied. See the License for the specific language governing permissions and limitations under the License.
