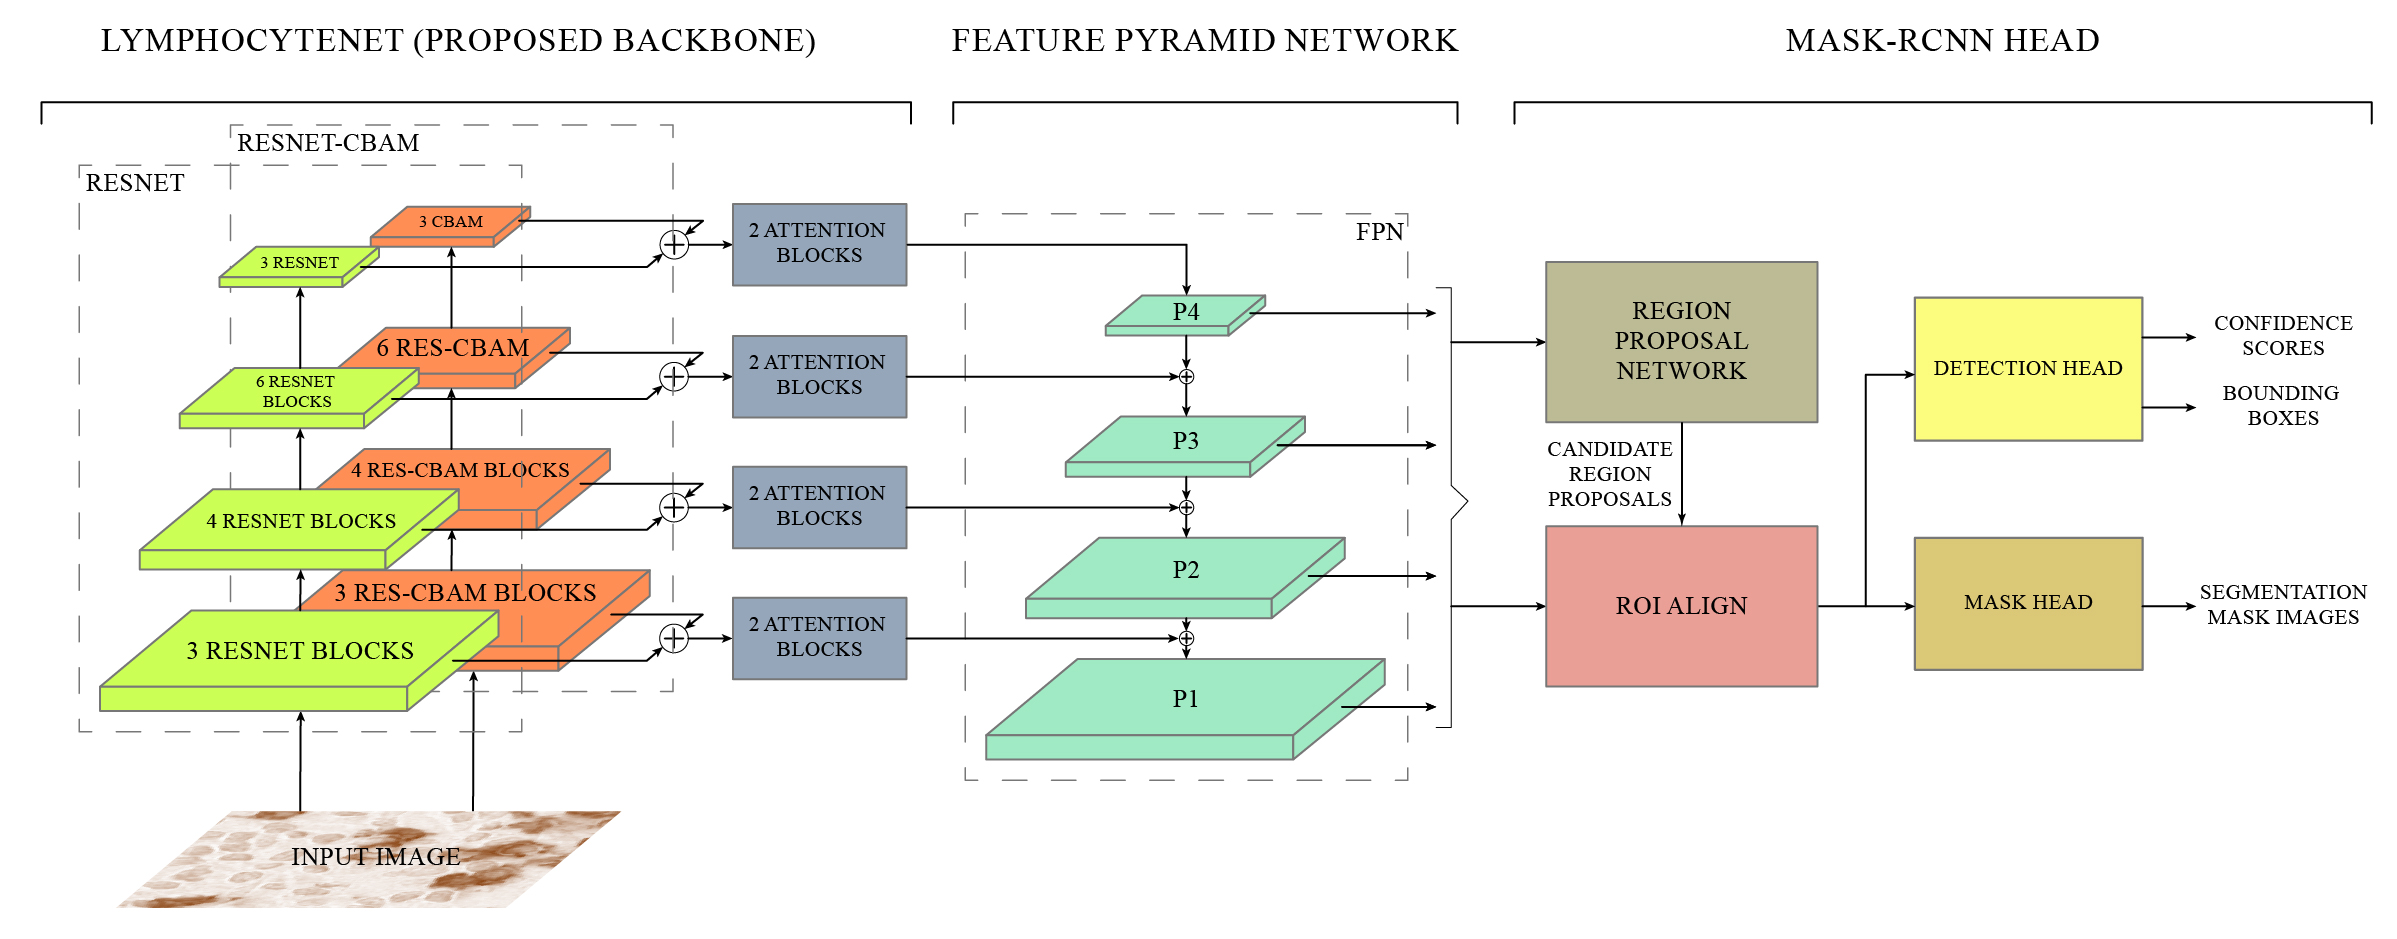
Cancer is one of the most commonly occurring deadly diseases around the world. Lymphocytes are considered as an indicator of cancer, which accumulates at the site of tumor regions in response of immune system. Lymphocyte’s detection and quantification play an important role in determining the cancer progression and therapeutic efficacy. However, automation of lymphocyte detection system using Machine learning techniques poses a number of challenges such as unavailability of annotations, sparse representation of lymphocytes, and irregular deposition of stains and presence of artifacts, which gives the false impression of lymphocytes on tissues. Therefore, this project aims to develop an automated detection of lymphocyte in histopathological images. In this regard, the idea of Channel Boosting is used in the backbone of Mask-RCNN to improve its feature extraction ability. Two different backbones are integrated using custom attention blocks and by applying addition operation. An open-source dataset LYSTO is used to evaluate the proposed LymphocyteNet on open-source dataset LYSTO and compared the performance with state-of-the-art architectures. The proposed channel boosted architecture shows improvement in performance in terms of kappa (0.9044), f-score (0.8930), precision (0.8919) and recall (0.8940). The learning capacity of the proposed LymphocyteNet is further evaluated by performing multi-class detection on H&E stained NuCLS dataset. The proposed LymphocyteNet shows good generalization with an f-score of 0.725. The promising result suggests that the idea of channel boosting enhances the learning capacity and can be exploited to improve the detection on complex datasets.
https://www.youtube.com/watch?v=k0JHGUCu158
LYSTO Dataset was used in this research work.
| Backbone of Mask-RCNN | Recall | Precision | F-Score | Kappa |
|---|---|---|---|---|
| Proposed LymphocyteNet (+) | 0.8940 | 0.8920 | 0.8930 | 0.9044 |
| Proposed LymphocyteNet (x) | 0.9190 | 0.8530 | 0.8843 | 0.8909 |
| ResNet-50 | 0.8850 | 0.8650 | 0.8749 | 0.8432 |
| ResNet-CBAM-50 | 0.8620 | 0.8930 | 0.8777 | 0.8889 |
The code in given colab is written using MMDetection toolbox.
- Open the given notebook in Google Colab using following link.
- Run cells one-by-one as written in the notebook up to the cell containing "train_detector(...)" function call.
The proposed backbone is defined under the section "Define Custom Model". For readibilty it's recommended to add your backbone in same section. The new backbone should be included in two ways: 1) Under For Colab cell containing backbone definiton, and 2) Under For File cell as a string containing same code, which is used to generate its python file automatically. Following are steps to add new backbone.
-
Create new cell and import atleast the following libraries.
import torch
import torch.nn as nn
import torch.nn.functional as F
from mmdet.models import BACKBONES
-
Define custom model (backbone) as a python class, it must be a child class of
torch.nn.Moduleclass directly or indirectly. It must be implemented with following function definitions.class CustomBackbone(Module): def __init__(self): super(CustomBackbone, self).__init__() ... def forward(self, x): ... def init_weights(self, pretrained=None): ...
-
Write following decorator above the defined class.
@BACKBONES.register_module(force=True, name='CustomBackbone')
class CustomBackbone(Module):
    def __init__(self):
        super(CustomBackbone, self).__init__()
        ...
-
Use this code to verify and view the working of CustomBackbone class.
images = torch.rand(2, 3, 224, 224).to(device)
backbone_network = CustomBackbone().to(device)
print(f'Architecture of {backbone_network.__clas__.__name__}\n', backbone_network)
backbone_network.init_weights(pretrained=pretrained)
backbone_network.eval()
levels = backbone_network(images)
for i, level in enumerate(levels):
    print(f'level{i} -> {levels[i].shape}')
-
Copy the above defined code (complete) and paste in the following template.
backbone_file_data = r"""
    # PASTE THE CUSTOM BACKBONE CODE HERE
"""

backbone_base_path = '/content/mmdetection/mmdet/models/backbones/'
backbone_file_name = 'custom_backbone.py'
backbone_file_path = os.path.join(backbone_base_path, backbone_file_name)
with open(backbone_file_path, 'w') as backbone_file:
    backbone_file.write(backbone_file_data)
    print(f'<backbone_file_data> saved to "{backbone_file_path}"')
More details at: customize_models
The custom evaluation hook is defined under the section "Define Custom Hook". For readibilty it's recommended to add your hook in same section. The new hook should be included in two ways: 1) Under For Colab cell containing hook definiton, and 2) Under For File cell as a string containing same code, which is used to generate its python file automatically. Following are steps to add new hook.
-
Create new cell and import atleast the following libraries.
import mmcv
from mmcv import Config
from mmcv.runner import HOOKS, Hook
from mmdet.apis import single_gpu_test
-
Define custom hook as a python class, it must be a child class of
mmcv.runner.Hookclass directly or indirectly. To create hook for evaluation purposes theafter_epochmethod must be implemented.class CustomHook(Hook): def __init__(self, path_config, base_dir): ... def after_epoch(self, runner): ...
-
Write following decorator above the defined class.
@HOOKS.register_module(force=True, name="CustomHook")
class CustomHook(Module):
    def __init__(self):
        super(CustomHook, self).__init__()
        ...
-
Copy the above defined code (complete) and paste in the following template.
custom_hook_file_data = r"""
    # PASTE THE CUSTOM HOOK CODE HERE
"""

custom_hook_base_path = 'mmdet/core/utils/'
custom_hook_file_name = 'custom_hook.py'
custom_hook_file_path = os.path.join(custom_hook_base_path, custom_hook_file_name)
with open(custom_hook_file_path, 'w') as custom_hook_file:
    custom_hook_file.write(custom_hook_file_data)
    print(f'<custom_hook_file_data> saved to "{custom_hook_file_path}"')
More details at: customize_runtime
The custom config is defined under the section "Define Custom Config". For readibilty it's recommended to add your config in same section. The new config needs to be written in a string format, which is used to generate its python file automatically. Following are steps to add new config file.
-
Create new cell and add your configurations in the following template.
# create config folder if not already created
setting1 = 1
config_base_path = 'configs/custom_config/'
mmcv.mkdir_or_exist(os.path.abspath(config_base_path))

# create config file and store config data declared above
config_file_name = f'custom_config{setting}.py'
config_file_path = os.path.join(config_base_path, config_file_name)

# lymph config file content
config_file_data = f"""
    # WRITE YOUR CONFIG HERE
"""

with open(config_file_path, 'w') as config_file:
    config_file.write(config_file_data)
    print(f'<config_file_data> saved to "{config_file_path}"')
More details at: config
