How to setup python and DL libs on your new macbook pro
The new apple silicon is pretty amazing, it is fast and very power efficient, but does it work for data science? The first thing you need is to install python. To do so, refer to this video from the amazing Jeff Heaton.
- Install apple developer tools: Just git clone something, and the install will be triggered.
You have 2 options:
- Install miniconda3: This is a small and light version of anaconda that only contains the command line iterface and no default packages.
- Install miniforge: This is a fork of miniconda that has the default channel
conda-forge(instead of conda default), this is a good thing as almost every package you want to use is in this channel.
Note: As your ML packages are on
conda-forgeif you install miniconda3 you will always need to append the flag-c conda-forgeto find/install your libraries.
- (Optional) Install Mamba on top of your miniconda/miniforge install, it makes everything faster.
Note: Don't forget to choose the ARM M1 binaries
You can now create you environment and start working!
#this will create an environment called wandb with python and all these pkgs
conda create -c conda-forge --name=wandb python wandb pandas numpy matplotlib jupyterlab

# or with mamba
mamba create -c conda-forge --name=wandb python wandb pandas numpy matplotlib jupyterlab

#if you use miniforge, you can skip the channel flag
conda create --name=wandb python wandb pandas numpy matplotlib jupyterlab
Note: To work inside the environment, you will need to call
conda activate env_name.
Apple has made binaries for tensorflow 2 that supports the GPU inside the M1 processor. This makes training way faster than CPU. You need can grab tensorflow install intruction from the apple website here or use the environment files that are provided here. (tf_apple.yml). I also provide a linux env file in case you want to try.
Pytorch works straight out of the box, but only on CPU. There is a plan to release GPU support in the next months, follow Soumith Chintala for up to date info on this.
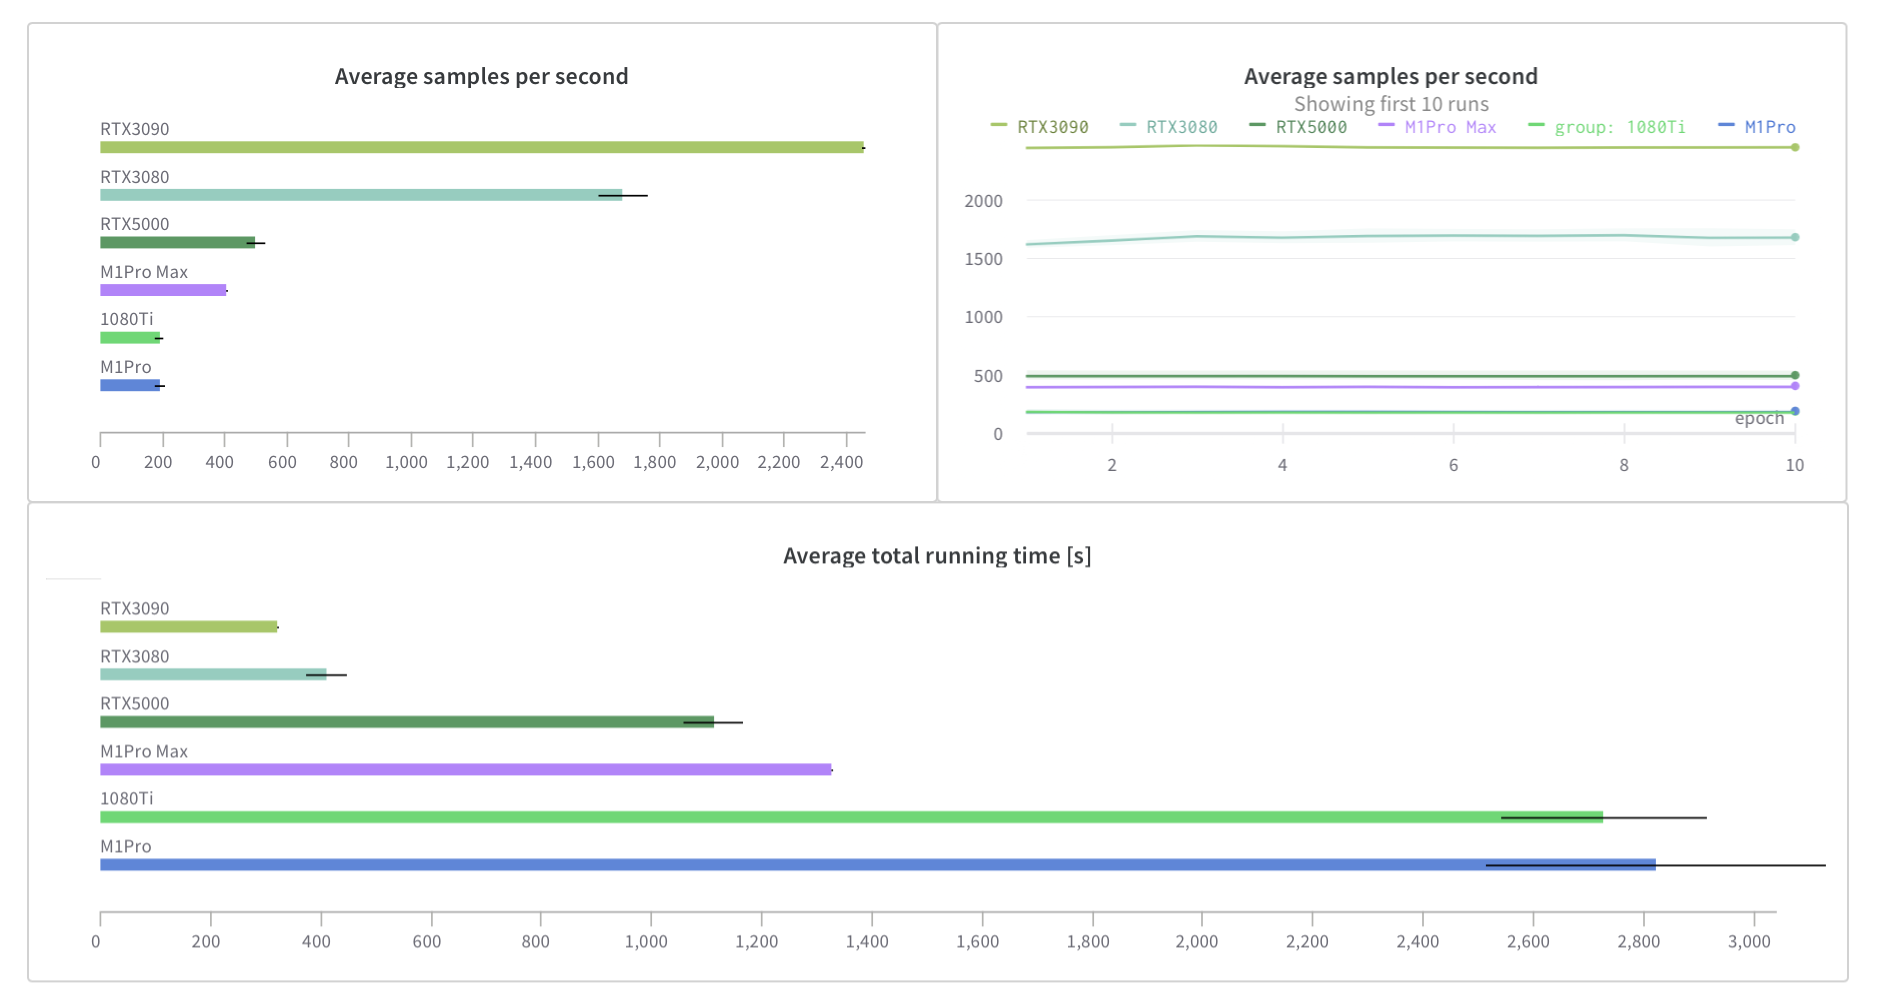
 You can check some runs on this report. To run the benchmark yourself in your new macbook pro:
- setup the enviroment:
conda env create --file=tf_apple.yml
conda activate tf- You will need a [wandb][wandb.ai] account, follow instructions once the script is launched.
- Run the training:
python scripts/keras_cvp.py --hw "your_gpu_name" --repeat 3 --trainableThis will run the training script 3 times with all parameters trainable (not finetuning)
Note: I also provide a pytorch training script, but you will need to install pytorch first. It may be useful once pytroch adds GPU support.
We can also run the benchmarks on linux using nvidia docker containers::
- Install
dockerwith following official nvidia documentation. Once the installation of docker and nvidia support is complete, you can run the tensorflow container. You cant test that your setup works correctly by running the dummy cuda container and yo should see thenvidia-smioutput:
sudo docker run --rm --gpus all nvidia/cuda:11.0-base nvidia-smiNow with the tensorflow container:
- Pull the container:
sudo docker pull nvcr.io/nvidia/tensorflow:21.11-tf2-py3once the download has finished, you can run the container with:
- Run the containter, replace the
path_to_folderwith the path to this repository. This will link this folder inside the docker container to/codepath.
sudo docker run --gpus all -it --rm -v path_to_folder/apple_m1_pro_python:/code nvcr.io/nvidia/tensorflow:21.11-tf2-py3once inside the container install the missing libraries:
$ pip install wandb fastcore tensorflow_datasets- And finally run the benchmark, replace
your_gpu_namewith your graphcis card name:RTX3070m,A100, etc... With modern Nvidia hardware (after RTX cards) you should enable the--fp16flag to use the tensor cores on your GPU.
python scripts/keras_cvp.py --hw "your_gpu_name" --trainable --fp16Note: You may need
sudoto run docker.
Note2: Using this method is substantially faster than installing the python libs one by one, please use the NV containers.