Converting mp4 videos to mp3 in a microservices architecture.
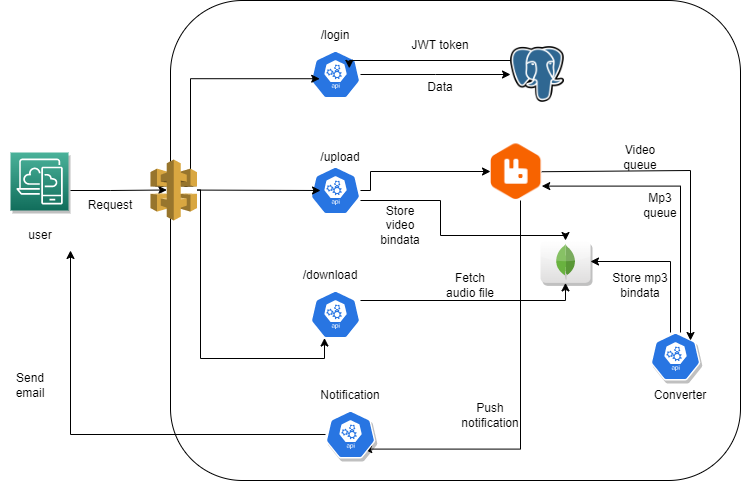
This document provides a step-by-step guide for deploying a Python-based microservice application on AWS Elastic Kubernetes Service (EKS). The application comprises four major microservices: auth-server, converter-module, database-server (PostgreSQL and MongoDB), and notification-server.
Before you begin, ensure that the following prerequisites are met:
-
Create an AWS Account: If you do not have an AWS account, create one by following the steps here.
-
Install Helm: Helm is a Kubernetes package manager. Install Helm by following the instructions provided here.
-
Python: Ensure that Python is installed on your system. You can download it from the official Python website.
-
AWS CLI: Install the AWS Command Line Interface (CLI) following the official installation guide.
-
Install kubectl: Install the latest stable version of
kubectlon your system. You can find installation instructions here. -
Databases: Set up PostgreSQL and MongoDB for your application.
Follow these steps to deploy your microservice application:
-
MongoDB and PostgreSQL Setup: Create databases and enable automatic connections to them.
-
RabbitMQ Deployment: Deploy RabbitMQ for message queuing, which is required for the
converter-module. -
Create Queues in RabbitMQ: Before deploying the
converter-module, create two queues in RabbitMQ:mp3andvideo. -
Deploy Microservices:
- auth-server: Navigate to the
auth-servermanifest folder and apply the configuration. - gateway-server: Deploy the
gateway-server. - converter-module: Deploy the
converter-module. Make sure to provide your email and password inconverter/manifest/secret.yaml. - notification-server: Configure email for notifications and two-factor authentication (2FA).
- auth-server: Navigate to the
-
Application Validation: Verify the status of all components by running:
kubectl get all
-
Destroying the Infrastructure
-
Log in to AWS Console:
- Access the AWS Management Console with your AWS account credentials.
-
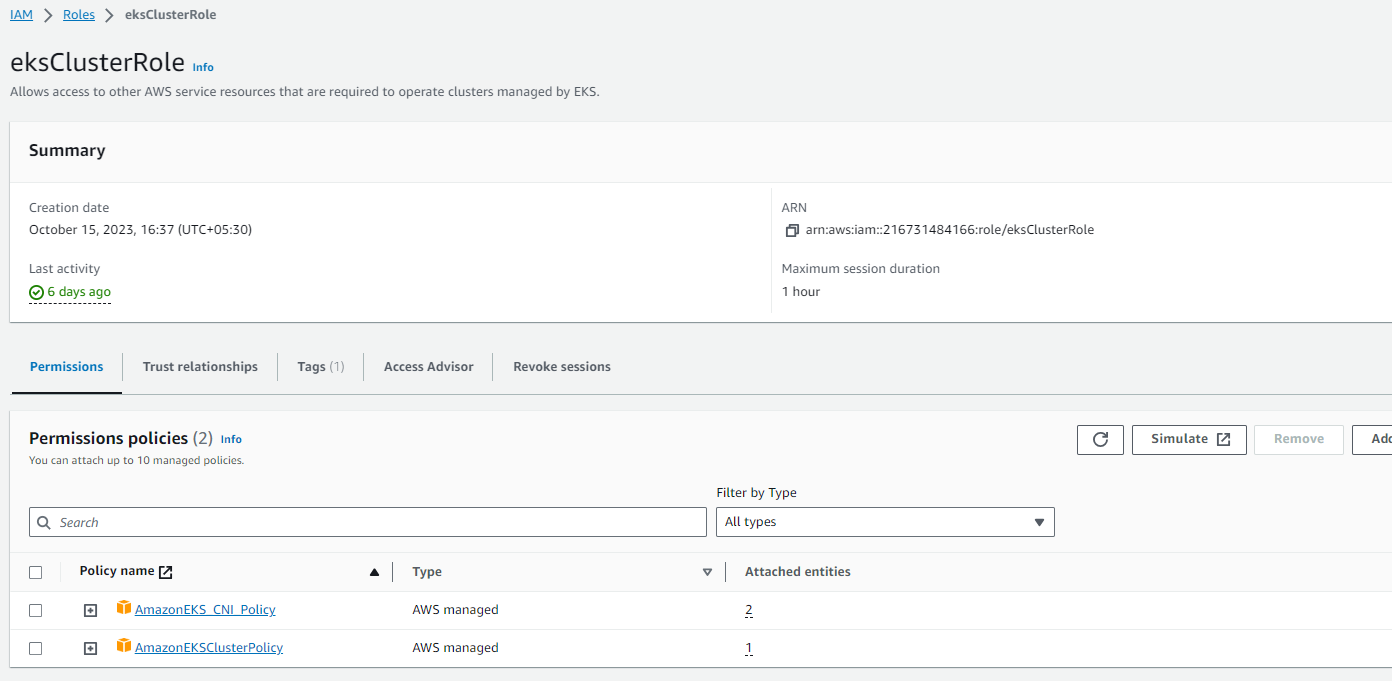
Create eksCluster IAM Role
- Follow the steps mentioned in this documentation using root user
- After creating it will look like this:
- Please attach
AmazonEKS_CNI_Policyexplicitly if it is not attached by default
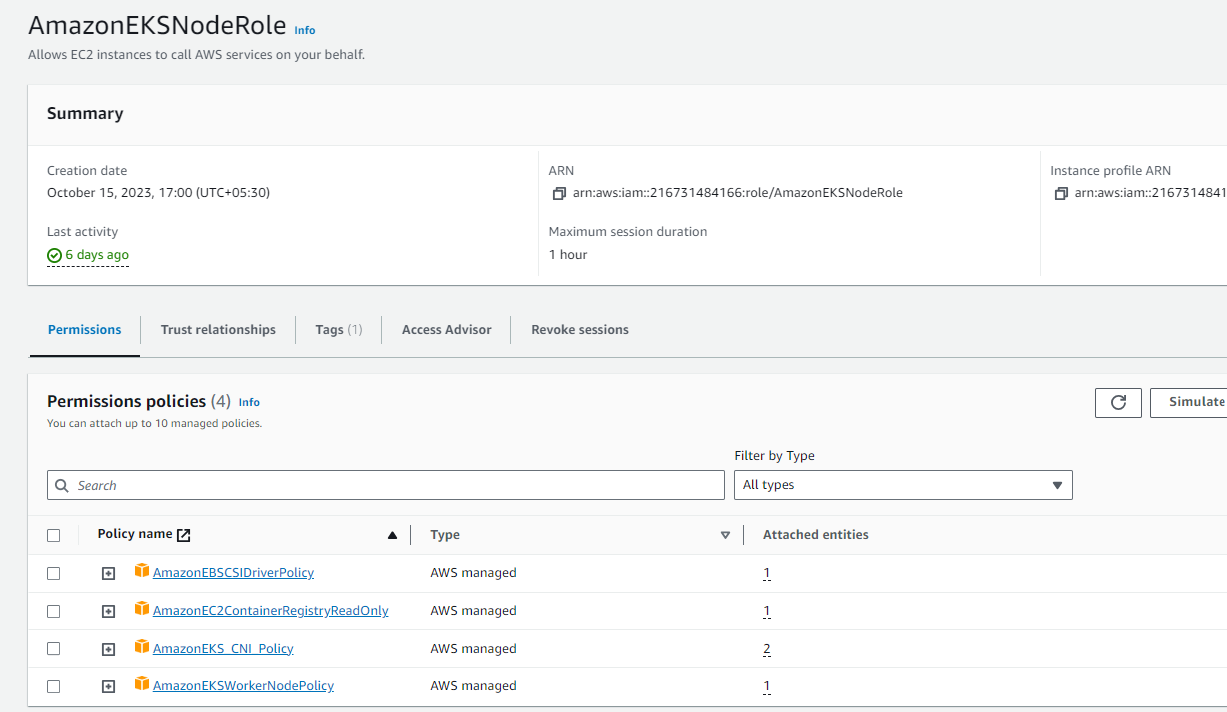
- Create Node Role - AmazonEKSNodeRole
- Follow the steps mentioned in this documentation using root user
- Please note that you do NOT need to configure any VPC CNI policy mentioned after step 5.e under Creating the Amazon EKS node IAM role
- Simply attach the following policies to your role once you have created
AmazonEKS_CNI_Policy,AmazonEBSCSIDriverPolicy,AmazonEC2ContainerRegistryReadOnlyincase it is not attached by default - Your AmazonEKSNodeRole will look like this:
-
Open EKS Dashboard:
- Navigate to the Amazon EKS service from the AWS Console dashboard.
-
Create EKS Cluster:
- Click "Create cluster."
- Choose a name for your cluster.
- Configure networking settings (VPC, subnets).
- Choose the
eksClusterIAM role that was created above - Review and create the cluster.
-
Cluster Creation:
- Wait for the cluster to provision, which may take several minutes.
-
Cluster Ready:
- Once the cluster status shows as "Active," you can now create node groups.
-
In the "Compute" section, click on "Add node group."
-
Choose the AMI (default), instance type (e.g., t3.medium), and the number of nodes (attach a screenshot here).
-
Click "Create node group."
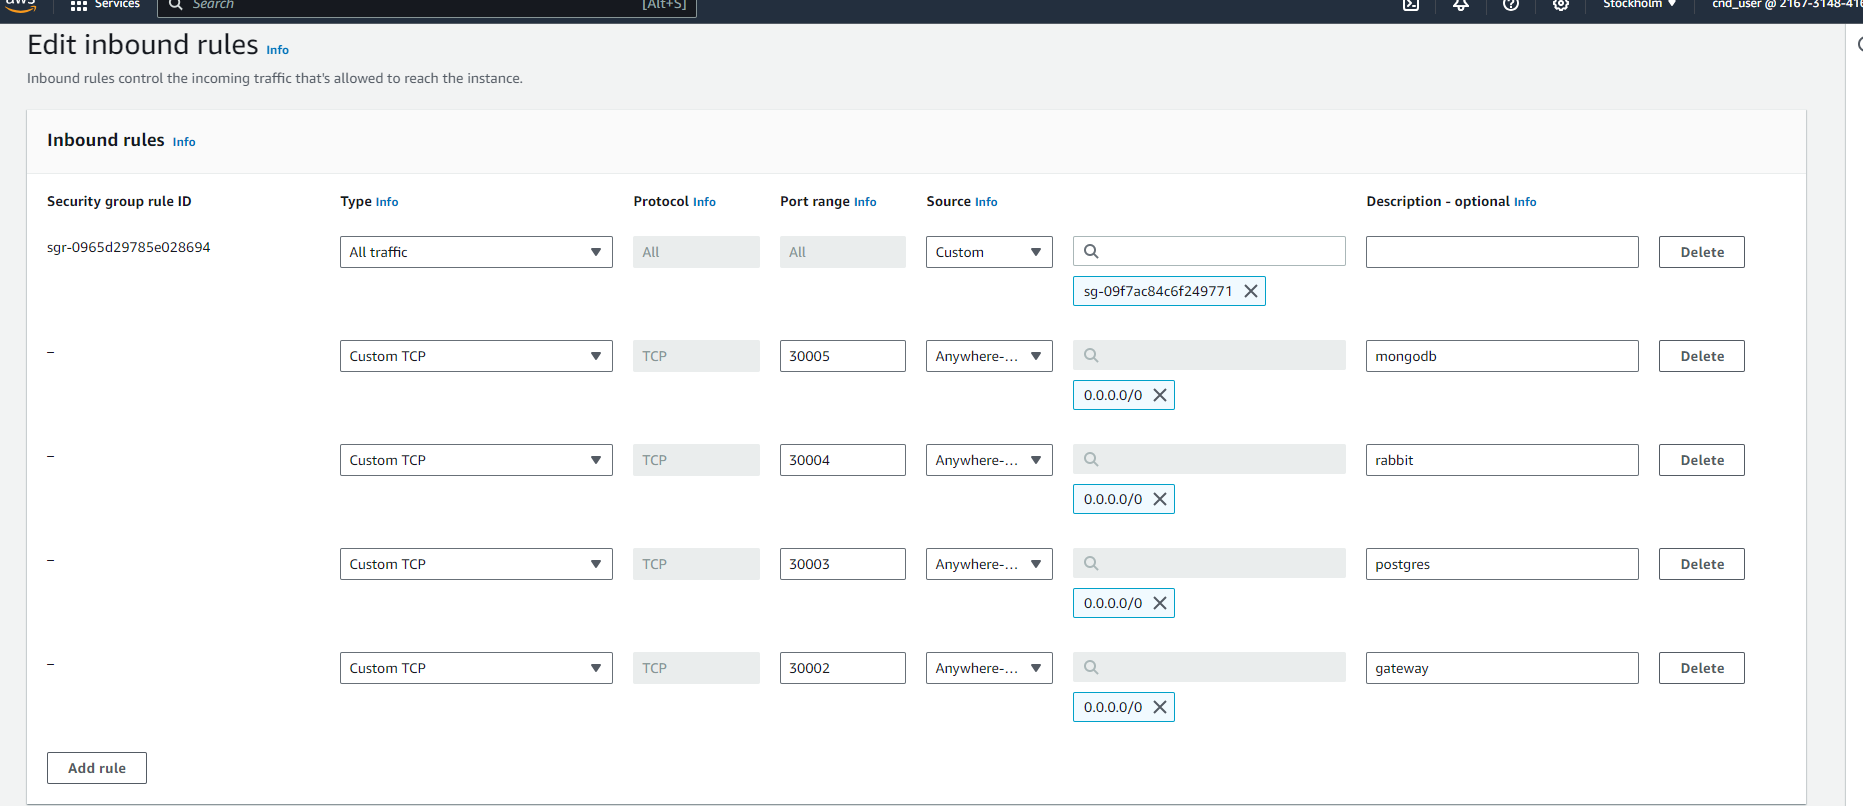
NOTE: Ensure that all the necessary ports are open in the node security group.
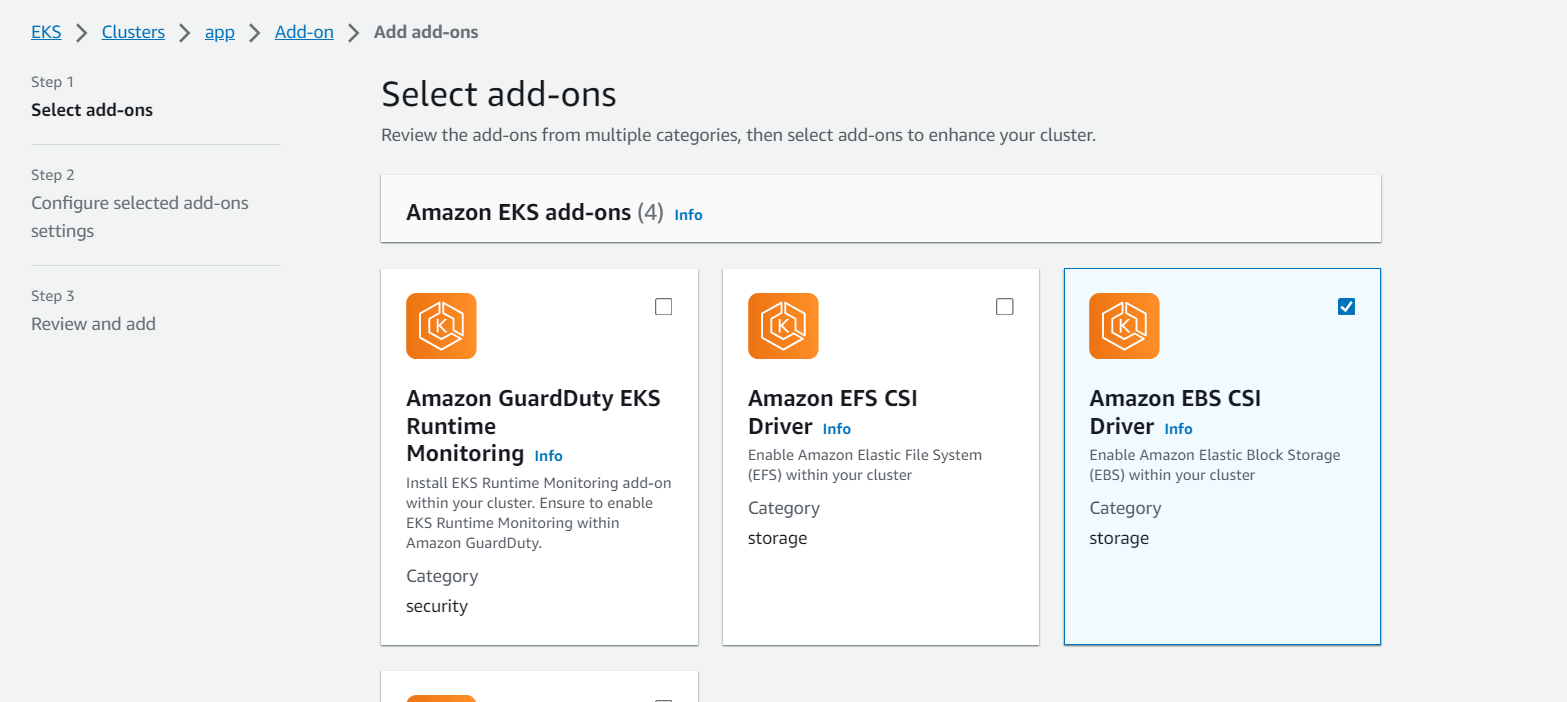
- enable addon
ebs csithis is for enabling pvcs once cluster is created
-
Clone the code from this repository.
-
Set the cluster context:
aws eks update-kubeconfig --name <cluster_name> --region <aws_region>
Here are some essential Kubernetes commands for managing your deployment:
To install MongoDB, set the database username and password in values.yaml, then navigate to the MongoDB Helm chart folder and run:
cd Helm_charts/MongoDB
helm install mongo .
Connect to the MongoDB instance using:
mongosh mongodb://<username>:<pwd>@<nodeip>:30005/mp3s?authSource=admin
Set the database username and password in values.yaml. Install PostgreSQL from the PostgreSQL Helm chart folder and initialize it with the queries in init.sql. For PowerShell users:
cd ..
cd Postgres
helm install postgres .
Connect to the Postgres database and copy all the queries from the "init.sql" file.
psql 'postgres://<username>:<pwd>@<nodeip>:30003/authdb'
Deploy RabbitMQ by running:
helm install rabbitmq .
Ensure you have created two queues in RabbitMQ named mp3 and video. To create queues, visit <nodeIp>:30004> and use default username guest and password guest
NOTE: Ensure that all the necessary ports are open in the node security group.
-
Auth Service:
cd auth-service/manifest kubectl apply -f . -
Gateway Service:
cd gateway-service/manifest kubectl apply -f . -
Converter Service:
cd converter-service/manifest kubectl apply -f . -
Notification Service:
cd notification-service/manifest
kubectl apply -f .
After deploying the microservices, verify the status of all components by running:
kubectl get all
For configuring email notifications and two-factor authentication (2FA), follow these steps:
-
Go to your Gmail account and click on your profile.
-
Click on "Manage Your Google Account."
-
Navigate to the "Security" tab on the left side panel.
-
Enable "2-Step Verification."
-
Search for the application-specific passwords. You will find it in the settings.
-
Click on "Other" and provide your name.
-
Click on "Generate" and copy the generated password.
-
Paste this generated password in
converter/manifest/secret.yamlalong with your email.
Run the application through the following API calls:
-
Login Endpoint
POST http://nodeIP:30002/login
curl -X POST http://nodeIP:30002/login -u <email>:<password>Expected output: success!
-
Upload Endpoint
POST http://nodeIP:30002/upload
curl -X POST -F 'file=@./video.mp4' -H 'Authorization: Bearer <JWT Token>' http://nodeIP:30002/uploadCheck if you received the ID on your email.
-
Download Endpoint
GET http://nodeIP:30002/download?fid=<Generated file identifier>
curl --output video.mp3 -X GET -H 'Authorization: Bearer <JWT Token>' "http://nodeIP:30002/download?fid=<Generated fid>"
To clean up the infrastructure, follow these steps:
-
Delete the Node Group: Delete the node group associated with your EKS cluster.
-
Delete the EKS Cluster: Once the nodes are deleted, you can proceed to delete the EKS cluster itself.
