by, Austin Lawrence and Andrew Turchina
Tag tracking in ROS is the method of using matrix barcodes to estimate the pose of an object. Doing so enables the user to a whole variety of robotic applications, including robotic manipulation, augmented reality, and measurement. This writeup evaluates three ROS tag tracking packages (ar_ sys, ar_pose, visp _auto _tracker, and ar _ track _ alvar). The purpose of writeup is to document multiple tag tracking packages in ROS and make comparisons on a number of metrics.
This is a project in response to ME495 in Northwestern's Master of Science in Robotics program. We are currently working on the ROS Indigo distribution running on Linux Ubuntu 14.04.
The first step is to verify the functionality of your hardware, primarily, a USB camera or Kinect. In this writeup, we utilize a Logitech HD C310 monocular webcam for purposes of tag tracking. Any camera driver node satisfying the standard ROS camera interface can be used.
Upon plugging in the camera and acquiring necessary drivers, we will verify the directory of the camera for our launch files. To do this:
cd /dev
ls
Your camera directory will be of the form /dev/video* , where * represents an integer. If you have multiple cameras plugged into your machine, you will need to determine which directory corresponds to your webcam of interest by running the above commands and evaluating which video disappears.
We can test test the video output of the webcam to verify everything is as it should be. With roscore running in a separate terminal, enter:
rosrun usb_cam usb_cam_node _video_device:=/dev/video*
rosrun image_view image_raw image:=/usb_cam/image_raw
**A special note: usb_cam accepts private parameters (not to be confused with global parameters. Private parameters are denoted with an asterisk (~) in ROS documentation and executed with an underscore ( _ ).
You should see video feedback of your webcam through a newly populated window. For further reading, see documentation on ROS usb_cam and ROS image_view.
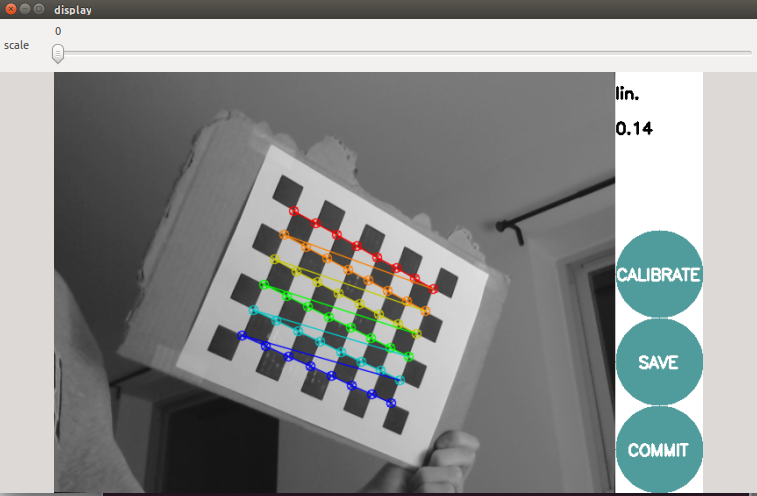
All the tag tracking packages reviewed on this page require camera calibration files. The ultimate goal of calibration is to compensate for the unique physical characteristics of a camera. For example, it would be difficult to collect meaningful imagery around the perimeter of a fisheye lens without some means of geometric compensation. As a result, we create a calibration .yaml file by sampling several photos of a known object and calculating a mean.
The steps are very well laid out in the Official ROS Wiki for calibrating both monocular and stereo camera setups. Note, you will need to simultaneously run your usb camera and cameracalibrator.py. To run your camera, do:
rosrun usb_cam usb_cam_node _video_device:=/dev/video*
where * represents the value of your USB camera directory. You will run cameracalibrator.py with the following arguments:
usb camera and cameracalibrator.py. To run your camera, do:
rosrun camera_calibration cameracalibrator.py --size 8x6 --square 0.108 image:=/usb_cam/image_raw camera:=/usb_cam
Your end goal is to create a .yaml file by sampling 40+ samples with the checkerboard pattern and selecting the 'save' and 'calibrate' options.
In all the proceeding launch files, you will need to specify the path to your .yaml file that you create in this step as your calibration file.
##GET THIS REPO
Download this repository and save into your catkin/src folder. Afterwords, update your catkin and ROS workplaces with:
catkin_make
rospack profile
##SETUP OF ar_sys
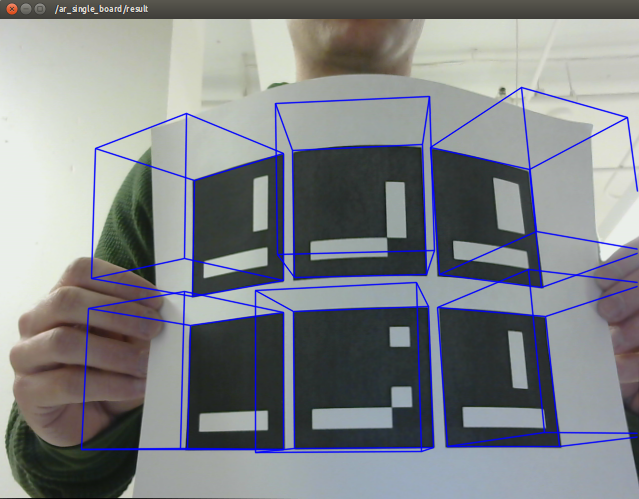
ar_sys achieves 3D pose estimation through the identification of ArUco marker boards. It is fortunately released to the ROS environment and fairly well documented. The appeal in this is that the user can quickly download the necessary packages and build an adequate launch file for achieving functionality. Download the package with:
sudo apt-get install ros-indigo-ar_sys
and be sure to rebuild your catkin and ROS workspaces using:
catkin_make
rospack profile
You can generate your own tags via this AruCo board generator. Generally, an AruCu board is a binary matrix that can represent one of 1024 unique identifiers. This also implies a mild limitation in the software, provided your application has a need for a greater number of unique identifiers. Generate some marker boards and print out some samples.
To launch the software on your webcam, do:
roslaunch tag_tracking ar_sys.launch
As a reminder, you will likely need to modify the directory to your calibration within the launch file and properly define your video source. It is also possible that you may need uvc_camera if it is not already built into your system. Do this with:
sudo apt-get install ros-indigo-uvc-camera
And rebuild your catkin and ROS workspaces.
Upon running the launch file, you should notice an output similar to the image below when you display an AruCo board to your webcam.
##SETUP OF ar_pose
ar_pose is similar in context to ar_sys.
ar_pose is not released to the ROS environment and will need to be built from source. Under normal circumstances, one would unzip this package into their catkin workspace and rebuild. Unfortunately, ar_pose has not been pushed to ROS Indigo and will not build within your catkin folder. This is clearly illustrated by the presence of manifest.xml file in place of a package.xml.
Because of this constraint, our assessment of ar_pose ends here. We will note the community's initiatives to push an updated version of ar_pose via xqms's efforts on Github found here.
##SETUP OF visp_auto_tracker
visp_auto_tracker is released to the ROS environment and may be acquired by doing:
sudo apt-get install ros-indigo-visp-auto-tracker
Be sure to rebuild your ROS and catkin workspace.
To run the package, do:
roslaunch tag_tracking visp.launch
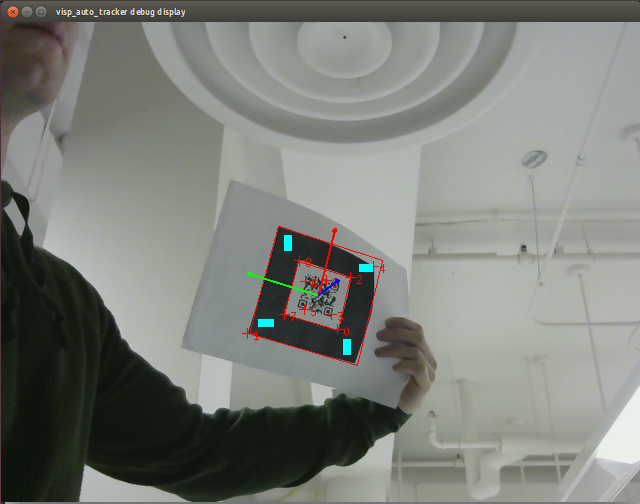
visp_auto_tracker should work with any generic QR code that you can find on the internet. The size of the code is not too relevant, though its receptibility is proportional to the resolution of your webcam.
visp_auto_tracker very conveniently accepts a parameter 'marker_size', which is used to publish the 'object_position' topic. One could do:
To run the package, do:
rostopic echo /visp_auto_tracker/object_position
to see a live readout of the QR code's pose. Note that the XYZ position coordinates are given in units of meters, whereas roll/pitch/yaw (confusingly denoted also as XYZ) returns a value between -1 and 1 from angle -pi to pi.
##SETUP OF ar_track_alvar
Though the ROS wiki for ar_track_alvar does not illustrate the package as released to the ROS environment, one can still acquire it with the following:
sudo apt-get install ros-indigo-ar-track-alvar
Rebuild your catkin and ROS workspaces afterwards.
ar_track_alvar relies the generation of Alvar tags, which is not identical to any of the aforementioned tags. You will need to produce your own. You can do this by printing a generic sample, or alternatively, generating your own:
rosrun ar_track_alvar createMarker
Run the launch file with:
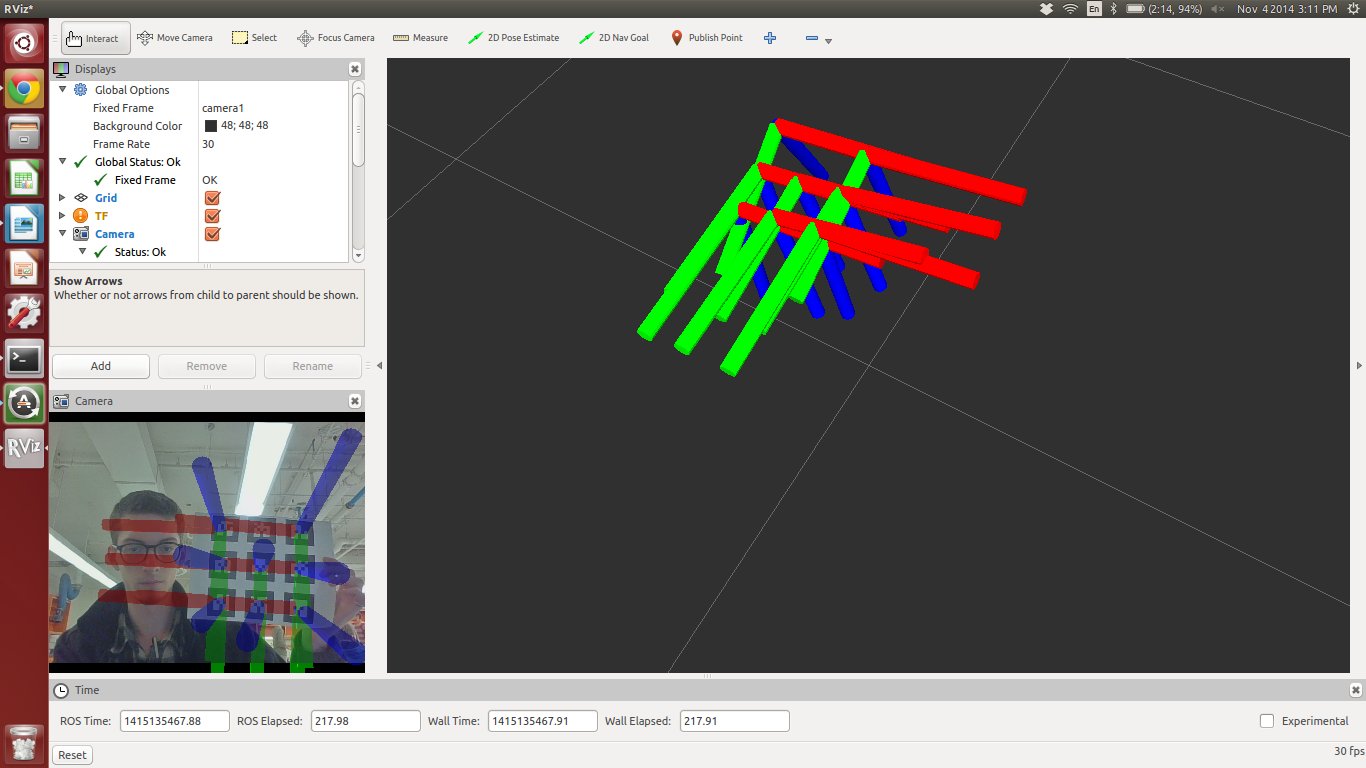
roslaunch tag_tracking ar_track.launch
. Again, you will need to edit your camera parameters within the launch file to make this work for you.
Upon launching, it is likely that your rviz is not configured correctly. To do this, change your fixed frame to 'camera1' and verify that tf data is on display. If not, select 'add', followed by 'tf'. Afterwards, you should find that rviz will track and calculate the pose of your markers based on the parameters that you've passed into the launch file.
##RESULTS
Generally speaking, there is a golden ratio between camera resolution and the physical size of your tags. Higher resolution and larger tags will increase the tracking distance, but at an obvious cost of more sophisticated hardware and/or larger amounts of required real estate. In any case, we noted our tracking results given 5cmx5cm markers and a 640x480 webcam resolution.
###Quantifiable:
Noise estimation
ar_sys: +/-.1 pixel @ 30cm distance
visp_auto_tracker: +/- 2mm at 1 foot distance
ar_track_alvar: +/-.1 pixel @ 30cm distance
Tracking distance
ar_sys: 30cm to 120cm
visp_auto_tracker: 60cm to 300cm
ar_track_alvar: 30cm to 300cm
Sampling frequency
ar_sys: 30hz
visp_auto_tracker: 30hz
ar_track_alvar: 10hz
Ease of use
All prebuilt packages were relatively straightforward to use. There is ambiguity on functions of the launch files, but once that is straightened out, it's more or less plug and play.
Light sensitivity
Each tag tracker was tested in a well lit room and a dimly lit room. The results were similar in each condition with a difference noticed was a quicker decline in performance as the distance from the camera increased. In all cases, tracking ability completely fell off when lighting is equivalent to a few candles.
Marker orientation
All trackers maintain the total pose of the tag and return a transform. Overall, the trackers are sensitive to the transforms of the trackers and can reasonably predict a coordinate frame for each node.
Lost markers
Both ar_sys and ar_track_alvar possess the ability to resume tracking at their maximum distances. This differs drastically from visp_auto_tracker, which once a tag is lost, the user must reestablish the tracking node near the minimum distance.
Multiple tags
All trackers possess the ability to track multiple objects. Though we never attempted to seek a maximum limit, simultaneously tracking six objects in all scenarios did not affect sampling frequency or quality of data.
Three different ROS tag tracking packages were studied and modified for use. Depending on the application will dictate which package may best suit the reader. In particular, scenarios where high sampling frequency is of importance would favor ar_sys for its precise measurements and computational efficiency. As a mild cost, the user is confined to 1024 unique tags. If a larger selection is desired, visp_auto_tracker will satisfy this need at a cost of lower precision and restrictions when losing markers. ar_track_pose, as it is configured in this repository, works with rviz right out of the box and has high precision. As a consequence, a low sampling frequency restricts the applications that are suitable for it.