简中 | English
elog4cpp : means that this is a very easy to use and very efficient in performance c++ logging library. It supports c++11 and above, and is fully cross-platform.
The use of easy is reflected in:
- Simple api, you only need to focus on an
elog::Logclass, or static methodLog::<LEVEL>, or macro definitionELG_<LEVEL>. - Formatting output is simple because the fmt library is used for formatting output.
- Custom formatting is simple because custom
formatteris supported, and fourformattersare preconfigured, including defaultFormatter, colorfulFormatter, jsonFormatter, and customFormatter. - Easy to configure, supports reading configuration items via
jsonfile with one click. - Easy to introduce, support
cmakecommand to introduce and use the project with one click.
Performance efficiency is reflected in:
- The latency of outputting a log is only
180nssynchronously and120nsasynchronously, which is at least 4 times the performance of spdlog.
For benchmark, see tests/bench_start.cc
- C++11 and above, which is cross-platform
The following two methods are recommended for introduction.
-
Method 1: Introduce via the
FetchContentmodule in cmake.- add the following code to the project cmake to introduce, domestic if the network problems can not use this gitee image source: https://gitee.com/acking-you/elog4cpp.git
include(FetchContent) FetchContent_Declare( elog4cpp GIT_REPOSITORY https://github.com/ACking-you/elog4cpp.git GIT_TAG origin/fetch GIT_SHALLOW TRUE) FetchContent_MakeAvailable(elog4cpp) - Link
elogin the target that needs to use the library.target_link_libraries(target elog)
- add the following code to the project cmake to introduce, domestic if the network problems can not use this gitee image source: https://gitee.com/acking-you/elog4cpp.git
-
Method 2: Download the source code manually and then introduce it via the cmake command.
-
download the project source code via the git command
git clone https://github.com/ACking-you/elog4cpp.git --recursive
-
Add the project to a subproject.
add_subdirectory(elog4cpp) -
Link
elogin the target that needs to use the library.target_link_libraries(target elog)
-
-
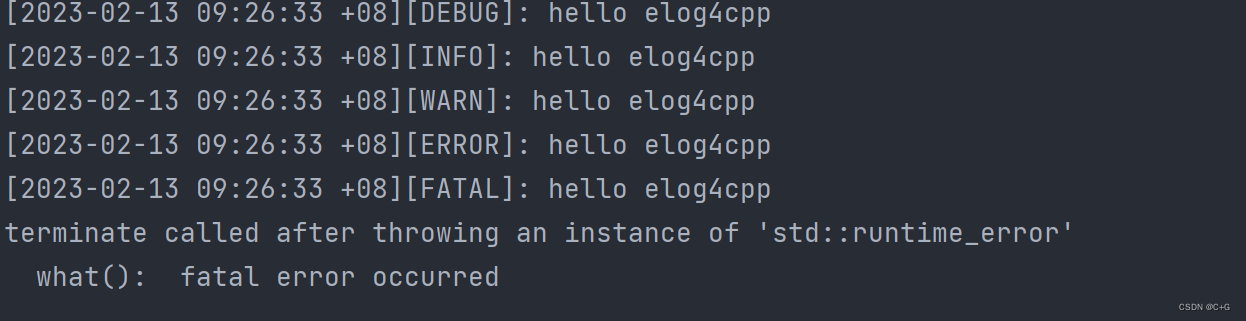
Without any configuration, we can directly call the static method output to the terminal with the following code.
#include <elog/logger.h>
using namespace elog;

int main()
{
    Log::trace("hello elog4cpp");
    Log::debug("hello elog4cpp");
    Log::info("hello elog4cpp");
    Log::warn("hello elog4cpp");
    Log::error("hello elog4cpp");
    Log::fatal("hello elog4cpp");
}
The output is as follows.
Through the above example, we need to understand the following three points.
- The output levels of this log library are
trace,debug,info,warn,error,fatal. - The default output level is
debug, which means that thetracelevel is not output. - The
fatallevel of output will throw an exception.
In fact, if there is an error in
errnoat theerrororfatallevel of output, then the corresponding error will be output, which is useful some time. - The output levels of this log library are
-
In the previous example, we were unable to output the log at
tracelevel, now we try to change its minimum output level and then add more information to the output (such as file name, line number, function name, etc.) and output the output in color highlighting.The code is as follows:
#include <elog/logger.h>
using namespace elog;

int main()
{
    GlobalConfig::Get()
        .setLevel(Levels::kTrace)
        .setFormatter(formatter::colorfulFormatter);
    Log::trace(loc::current(), "hello elog4cpp");
    Log::debug(loc::current(), "hello elog4cpp");
    Log::info(loc::current(), "hello elog4cpp");
    Log::warn(loc::current(), "hello elog4cpp");
    Log::error(loc::current(), "hello elog4cpp");
}
The output looks like this:
From the above example code, we found that if we need to get information such as file name, we need to pass
loc::current()in the first parameter, obviously most of the time we will find it troublesome to use this, so we can solve this problem through macros, you can do like the following, before introducing<elog/logger.h>defineENABLE_ELG_LOGmacro before introducing<ELG_<LEVEL>to use the shorter macro definitionELG_<LEVEL>.#define ENABLE_ELG_LOG #include <elog/logger.h> using namespace elog; int main() { GlobalConfig::Get() .setLevel(Levels::kTrace) .setFormatter(formatter::colorfulFormatter); ELG_TRACE("hello elog4cpp"); ELG_DEBUG("hello elog4cpp"); ELG_INFO("hello elog4cpp"); ELG_WARN("hello elog4cpp"); ELG_ERROR("hello elog4cpp"); }
The code generated by this macro definition is equivalent to the code in the previous example.

-
The previous examples all just output to the console, we now output the content to a file. The code is as follows:
#define ENABLE_ELG_LOG
#include <elog/logger.h>
using namespace elog;

int main()
{
    GlobalConfig::Get()
        .setFilepath(". /log/")
        .setLevel(Levels::kTrace)
        .setFormatter(formatter::colorfulFormatter);
    ELG_TRACE("hello elog4cpp");
    ELG_DEBUG("hello elog4cpp");
    ELG_INFO("hello elog4cpp");
    ELG_WARN("hello elog4cpp");
    ELG_ERROR("hello elog4cpp");
}
The output of the above code is output both to the file and to the console,
setFilepath(". /log/")specifies that the output file is in thelogfolder at the next level. Note that the file path passed here can only be the output file's folder path, meaning that file output only supports scrolling logs. If the parameter is changed to". /log"then the output folder path is the parent directory, and the output file names are prefixed withlog. The output folder is named in the following format:.<DATE TIME>.<USERNAME>.<PID>.log.If you want to disable output to the console, just add the following configuration:GlobalConfig::Get().enableConsole(false). Similarly, if you don't need to output to a file, you need to keeplog_filepathat the default value ofnullptr.
After the above three practices, you should have understood the basic use of this library, and if you need to understand the corresponding use in detail, you can continue to learn more about the following contents.
All configurations are based on the Config class or the GlobalConfig class. Note the relationship between these two classes, the Config class acts as a base class for GlobalConfig, Config contains some output generic configuration, which is generally used for local configuration, and GlobalConfig contains some special one-time configuration, which is generally used as a global singleton for global configuration.
If no local configuration is set, the global configuration is used by default. If you are using static methods or macros for log printing, then you can only use configuration via global configuration.
All global configurations are configured through a global singleton GlobalConfig, which can be obtained by calling GlobalConfig::Get.
-
call the methods of
GlobalConfigto configure it, as follows.The special methods are as follows:
GlobalConfig::setRollSize(int size): Sets the maximum size over which a single file will create a new file for log printing, with mb as the base unit.GlobalConfig::setFlushInterval(int flushinterval): Sets how often to flush the log to disk, in seconds.GlobalConfig::setFilepath(const char* basedir): set the output path of the scrolling log, note that the path passed in is not a single file path, but a folder path, this log library only supports scrolling log.GlobalConfig::enableConsole(bool s): set whether to output to console.
The methods inherited from
configare as follows:Config::setFlag(Flags flag): Sets flags, which can be used to control the content of the log output in a more fine-grained way, for flags there are the following enumerations.kDate: whether to output the date.kTime: whether to output the time.kLongname: whether to output long file names.kShortname: whether to output short file names.kLine: whether output the line number.kFuncName: whether output the function name.kThreadId: whether output the thread id.kStdFlags: representskDate | kTime | kShortname | kLine | kFuncName, the or operation inside means the corresponding function is enabled.
Config::setLevel(Levels level): set the minimum log output level.Config::setName(const char* name): Set the name of the logger, which will be added to the output.Config::setBefore(callback_t const& cb): Sets the callback function that occurs before formatting.Config::setAfter(callback_t const& cb): Sets the callback function that occurs after formatting.Config::setFormatter(formatter_t const& formatter): Sets the formatter, which is already written by default as follows.defaultFormatter: The default formatter.colorfulFormatter: bring color to the output of the console desk, based on the default formatter.jsonFormatter: Output in json format.customFromString(str) -> formatter_t: This is a custom formatter that you can get from the string you pass in, please see the subsequent description for details on how to use it.
-
configure by passing in the json configuration file, the details are as follows. The key methods are
loadFromJSONandloadToJSON, which are used to read information from the json file to set the variable value ofGlobalConfigand invert the value ofGlobalConfigaccording to the value of the variable. to generate the corresponding json file. The specificjsonconfiguration file is as follows, and all usage is described in thecomments.{ "comments": [ "The following values are all comments generated by default to explain the considerations for filling in the parameters", "name:optional parameter, if not filled by default, the log output will have no name", "roll_size: the threshold value for rolling the log, in mb", "flush_interval: the time in seconds to flush the log background", "out_console: whether to turn on the output console, is bool value", "out_file: if or not to turn on the output log file, use null value if not, use a folder directory if you turn on", "flag: used to turn on the log corresponding to the output data content, there are date, time, line, file, short_file, tid, func seven, can be turned on at the same time through the + sign, of course, you can also directly use default, which indicates that all options other than tid", "level:used to specify the global minimum output level, there are trace,debug,info,warn,error,fatal, the default use debug", "format: used to specify the global log formatting, there are default, colorful, custom three, the default take default, if you use custom, you need to add fmt_string", "fmt_string: only when the formatter select custom used to set the custom formatter, the corresponding data is expressed as follows: %T:time,%t:tid,%F:filepath,%f:func,%e:error info,%L:long levelText,%l: short levelText,%v:message ,%c color start %C color end" ], "elog": { "flag": "default", "flush_interval": 3, "formatter": "default", "level": "debug", "out_console": true, "out_file": "null", "roll_size": 20 } }
Two simple and complete usage examples are as follows.
-
configuration via the
GlobalConfigmethod.#define ENABLE_ELG_LOG #include <elog/logger.h> using namespace elog; int main() { GlobalConfig::Get() .setRollSize(4) .setFlushInterval(3) .setFilepath(". /log/") .enableConsole(true) .setFlag(kStdFlags + kThreadId) .setLevel(kTrace) .setName("elog") .setBefore([](output_buf_t& buf) { buf.append("before"); }) .setAfter([](output_buf_t& buf) { buf.append("after"); }) .setFormatter(formatter::customFromString("%c[%L][%T][tid:%t][name:%n][file:%F][func:%f]:%v%C")); ELG_TRACE("hello elog4cpp"); ELG_DEBUG("hello elog4cpp"); ELG_INFO("hello elog4cpp"); ELG_WARN("hello elog4cpp"); ELG_ERROR("hello elog4cpp"); }
The printed result is as follows:
-
Similarly, you can directly load the corresponding configuration items using the equivalent
jsonconfiguration file.The configuration items are as follows:
{
  "elog": {
    "flag": "default+tid",
    "flush_interval": 3,
    "name": "elog",
    "formatter": "custom",
    "fmt_string": "%c[%L][%T][tid:%t][name:%n][file:%F][func:%f]:%v%C",
    "level": "trace",
    "out_console": true,
    "out_file": ". /log/",
    "roll_size": 4
  }
}
The code is as follows:
#define ENABLE_ELG_LOG
#include <elog/logger.h>
using namespace elog;

int main()
{
	GlobalConfig::Get()
		.loadFromJSON(". /config.json")
		.setBefore([](output_buf_t& buf) {
			buf.append("before");
		})
		.setAfter([](output_buf_t& buf) {
			buf.append("after");
		});
	ELG_TRACE("hello elog4cpp");
	ELG_DEBUG("hello elog4cpp");
	ELG_INFO("hello elog4cpp");
	ELG_WARN("hello elog4cpp");
	ELG_ERROR("hello elog4cpp");
}

A local configuration means that a separate Config configuration can be used by creating a separate class. Some configurations are only available globally, specifically roolSize, flushInterval, outConsole, outFile, and because the thread responsible for output on the backend can only be a single instance, these configurations can also only be configured once.
The steps on how to use the local configuration are as follows.
- Through
Log::RegisterConfiginto your customConfig. - Create a
Logusing the configuration with theConfigname you inject. - Using the
Logobject, call its correspondingprintlnandprintfmethods to print.
The sample code is as follows.
#include <elog/logger.h>
#include <memory>
#include <vector>
using namespace elog;

void config_global()
{
	GlobalConfig::Get()
		.loadFromJSON(". /config.json")
		.setBefore([](output_buf_t& buf) {
			buf.append("before");
		})
		.setAfter([](output_buf_t& buf) {
			buf.append("after");
		});
}

void register_local_config()
{
	auto config = make_unique<Config>();
	config->log_formatter = formatter::colorfulFormatter;
	config->log_name = "local_config";
	config->log_level = kTrace;
	config->log_flag = kStdFlags + kThreadId;
	config->log_before = [](output_buf_t& buf) {
		buf.append("before");
	};
	config->log_after = [](output_buf_t& buf) {
		buf.append("after");
	};
	// Register Config
	Log::RegisterConfig("local_config",std::move(config));
}

int main()
{
	config_global();
    register_local_config();
	// Create Log object and set the corresponding Config and level
	auto trace = Log(kTrace, "local_config");
	trace.printf("hello {}", "world");
	trace.println("hello", std::vector<int>{1, 2, 32});
	//Change the log output level
	trace.set_level(kDebug);
	trace.printf("hello {}", "world");
	trace.println("hello", std::vector<int>{1, 2, 32});
	//Can be safely copied to continue to use
	auto info = trace;
	info.set_level(kInfo);
	info.printf("hello {}", "world");
	info.println("hello", std::vector<int>{1, 2, 32});
}
Note: Registering Config is not thread-safe, make sure you complete the registration of Config before logging out.
If you have read the previous section, then you should have some idea about the role of formatter, which is an interface implementation for controlling formatted output.
defaultFormatter: This is the default formatter, with a fixed format.jsonFormatter: This is the default formatter with a fixed format.colorfulFormatter: The output is in the same format as the formatter, but with color highlighting when output to the console.customFromString: can customize the output format according to the string passed in by the user. Specific description.- %T: indicates the whole date and time, also includes the time zone.
- %t: indicates the thread id.
- %F: indicates which file the log output comes from.
- %f: indicates which function the log output came from.
- %e: indicates the error message if there is an error in
errno, otherwise it is empty. - %n: indicates the name of the current logger, or null if it does not exist.
- %L: indicates a long string representing the logging level, such as
TRACE. - %l: indicates a short string representing the log level, such as
TRC. - %v: indicates the content of the log output.
- %c and %C: indicates the start and end of the color, valid only in terminals that support
\033.
Since you want formatter, it is important to be clear about what exactly formatter is designed to do in this log library. In fact, formatter is simply a callback function in this log library, with the following function signature.
using formatter_t = std::function<void(Config* config, context const& ctx, buffer_t&buf,Appenders apender_type)>;The meaning of each parameter is as follows.
config: The current configuration used for log output.ctx: the content of the current log output, including the contents of the log to be output, the log level and line number, and other information.buf: thebufferthat the current log will be output to after final formatting.appder_type: this is an enumeration representing the destination of the current log formatted output, specifically either file or console.
Based on the above explanation, if you want to implement a formatter of your own, you can customize the formatted output to buffer by using the configuration information of config and the output information of ctx and the destination information of appender_type.
With the above understanding, we can implement our own formatter by looking at the already implemented formatter, for example, the source code link for defaultFormatter is as follows: src/formatter.cc
In order to make the output of file location information without manually adding the loc::current() parameter, the log library provides ELG_<LEVEL> to simplify this process, so if file location information is needed you can replace Log::<Level> with the following macro.
- ELG_TRACE
- ELG_DEBUG
- ELG_INFO
- ELG_WARN
- ELG_ERROR
- ELG_FATAL
Note: Before using the above macro, you need to define the
ENABLE_ELG_LOGmacro before#include<elog/logger.h>.
By defining the ENABLE_ELG_CHECK macro, we can use the following macro definitions to more easily check the relationship between values.
- Assertion macro that throws an exception if the condition is not met.
ELG_CHECK_EQ(a,b)is equivalent toELG_ASSERT_IF(a == b).ELG_CHECK_NQ(a,b)is equivalent toELG_ASSERT_IF(a != b).ELG_CHECK_GE(a,b)is equivalent toELG_ASSERT_IF(a > b).ELG_CHECK_GT(a,b)is equivalent toELG_ASSERT_IF(a >= b).ELG_CHECK_LE(a,b)is equivalent toELG_ASSERT_IF(a < b).ELG_CHECK_LT(a,b)is equivalent toELG_ASSERT_IF(a <= b).ELG_CHECK_NOTNULL(a)is equivalent toELG_ASSERT_IF(a != nullptr).
- Judgment assertion, custom printing.
After passing in the judgment condition, an object will be returned for you to print the prompt message, and you can choose different levels to print, such as the following example to print the
tracelevel.ELG_CHECK(1 == 2).trace("1 != 2");
There are also the following functions that provide convenience.
elog::Ptr: Used to force arbitrary pointers tovoid*, this is to facilitate printing the value of the pointer directly.elog::WaitForDone: waits for a background thread to flush log information to disk, which is useful at times.