sample-active-site-components
This repository contains a set of active sample site components to showcase how to implement custom components within Acoustic Content (formerly Watson Content Hub) Sites feature. The samples include a Youtube video integration, a charting smaple with Chart.js, and an Iframe app.
Table of Contents
- Table of Contents
- Introduction
- Sample Screenshots
- Prerequisites
- Install and deploy the sample
- Edit your content in WCH
- Samples go live
- Appendix - Alternative Step-by-step Tutorial without installable packages
- License
Introduction
This sample repository provides three example plugin components for your Oslo sites. It includes a Youtube component, a Chart component, and an Iframe component. With the Youtube component, you can embed your favorite Youtube videos in your Oslo sites. With the Chart component, you can create your own chart based on your customized data leveraging the ng2-charts library. With the Iframe component, you can display any websites in a customized iframe window. To enable these 3 components, you have to install the packages content-artifacts and package site-application-files by following the steps below.
There are two options to installing the samples - running a set of commands to just copy the files or following a step by step tutorial to learn how to build the samples.
You could see what example plugin components look like here:
Youtube component

Chart component

Iframe component

Prerequisites
- A WCH tenant in Trial or Standard Tier
- Latest wch-site-application source (see: https://github.com/ibm-wch/wch-site-application)
- Wchtools-cli v2.0.3 or above
- Node.js v6.11.1 or above
Install and deploy the sample
Configure your Wchtools
- Get your WCH tenant API URL. Open the Hub information dialog from the "About" flyout menu in the left navigation pane of the Watson Content Hub user interface. Copy the API URL for your WCH tenant.
- Run
wchtools initin your command line. Enter your username and API URL to configure the wchtools
Clone and install the sample content-artifacts and site-application-files
- Change the command line directory to site application's root directory (i.e. wch-site-application). If you haven't already done so, perform all of the required installation steps for the site application repo.
- Using the Git URL to the sample-active-components repository, run this command to copy the needed sample site-application-files and update the layout settings for the new component.
npm run install-layouts-from-git https://github.com/ibm-wch/sample-active-site-components.git
- Install required external modules for site-application-files. e.g: npm install ng2-charts --save
Build and Deploy your components
- From within the wch-site-application directory run:
- Run
npm run buildto compile the project. Make sure there is no error during the build process. - Run
npm run deployto your WCH tenant. After that, you can see your changes in your WCH live site.
Edit your content in WCH
- Go to Your WCH homepage -> Content -> My Content and assets. You will see the sample content there.

- Click on one of contents. You would see our preset values in content. If you want to use your customized value in content, please click on "Create draft" to edit the content.
- For details about the meaning of each value in sample content, please refer to the Appendix tutorial.
Samples go live
- Go to Your WCH homepage -> YOUR USERNAME on the top bar -> Hub information.
- You could view your newest site by clicking "Live site".
Appendix - Alternative Step-by-step Tutorial without installable packages
- In this section, we will include the complete tutorial to create 3 sample components from scratch. It is not required if you choose to install packages above.
Youtube Player
- Find Video ID for selected Youtube video. Go to https://www.youtube.com/. Find your favorite video and get the videoID for that video. For example, if you want to play this video, https://www.youtube.com/watch?v=DC4dRht4Z9c, in your Oslo site, the video ID for this video would be
DC4dRht4Z9cin the URL parameters. - Create a new content type named "Youtube" in WCH. Create elements under type "Text" in "Element palette" labeled as "videoID", and under type "Toggle" in "Element palette" labeled as "showYoutubeLogo".
The type should look like in this way:

- Create new content with the "Youtube" content type. In the "videoID" field, input your video ID from Step1. "showYoutubeLogo" would define whether the official "Youtube" logo shows up in your customized player.
- Create a layout in your Oslo project. In the root directory of your Oslo site, run the following commands to configure your WCH tenant info and create a layout with type "Youtube":
wchtools init
npm run create-layout -- --type "Youtube"
- Deploy your newly created layout to WCH tenant. After you created your layout locally, you have to deploy it to WCH make it live. In the root directory of your Oslo site, run
npm run build-deploy - Create a new page that contains the new layout. In your "Site manager" of your WCH site, add a "Standard page" named "Video" with content you created in Step 3.
- Implement your code in newly created component. In
src/app/layouts/youtube/youtubeLayout.html, replace the original code with following code:
<div class="ytcomponent" [id]="(onRenderingContext | async).id">
	<h3>Youtube Sample Video - IBM Watson Content Hub Demo Video</h3>
	<div class="video-container">
		<iframe id="ytplayer" type="text/html" width="720" height="405" [src]="url" frameborder="0" allowfullscreen></iframe>
	</div>
</div>
In src/app/layouts/youtube/youtubeLayout.scss, add this code:
.ytcomponent
{
	text-align: center;
	padding-top: 35px;
	overflow: hidden;
}
.video-container
{
	padding-bottom: 56.25%;
}
.video-container iframe {
	width: 100%;
	max-height: 405px;
	max-width: 720px;
}
In src/app/layouts/youtube/youtubeLayout.ts, add this line in the top of file:
import {DomSanitizer, SafeResourceUrl} from '@angular/platform-browser';
In the "YoutubeLayoutComponent" class, please change your class to the following code:
export class YoutubeLayoutComponent extends TypeYoutubeComponent {
	url: SafeResourceUrl;
	baseURL: string;

    constructor(private sanitizer: DomSanitizer) {
        super();
		this.safeSubscribe(this.onVideoid, (id) => {
    		this.safeSubscribe(this.onShowyoutubelogo, (showLogo) => {
        		if (showLogo === false)
        		{
        		    this.baseURL = 'https://www.youtube.com/embed/' + id + '?modestbranding=1';
        		}
        		else
        		{
        			this.baseURL = 'https://www.youtube.com/embed/' + id;
        		}
        		this.url =  this.sanitizer.bypassSecurityTrustResourceUrl(this.baseURL);
	        });
        });
    }
}
- Test your component. After you finished the first 7 steps, you could test either locally by running
npm start, or remotely by runningnpm run build-deploy.
Charts
- Install ng2-charts (https://github.com/valor-software/ng2-charts) and Chart.js packages. In your root directory of your Oslo site, run this command to install pacakges:
npm install ng2-charts --save
- Import ChartsModule in sample.module.ts. In {root directory of Oslo project}/src/app/sample.module.ts, add ChartsModule in this way:
import { ChartsModule } from 'ng2-charts/ng2-charts';

export const SAMPLE_MODULE = [
	ChartsModule
];
- Create a new Taxonomy that contains chart type. Chart.js supports 6 different chart types. By creating a new Taxonomy named "graph", you can manage your chart type in your WCH tenant. Go to Your WCH Homepage -> Content Model -> Taxonomies -> Create taxonomy. Name the taxonomy as "graph". Add following categories,
line,bar,radar,pie,polarArea,doughnut, by clicking "Add parent category". After you have finished, your "graph" taxonomy should look like this:
- Create a new content type named "Chart" in WCH. Create an element under type "Category" in "Element palette" labeled as "type" in "Properties". In "Custom desplay", choose Select category -> Graph -> Graph.
- Create a new content with "Chart" content type. In the "type" dropdown menu, select
baras our chart type. - Create a layout in your Oslo project. In the root directory of your Oslo site, run the following commands to configure your WCH tenant info and create a layout with type "Chart":
wchtools init
npm run create-layout -- --type "Chart"
- Deploy your newly created layout to WCH tenant. After you created your layout locally, you have to deploy it to WCH make it live. In the root directory of your Oslo site, run
npm run build-deploy - Create a new page that contains the new layout. In your "Site manager" of your WCH site, add a "Standard page" named "Chart" with content you created in Step 4.
- Implement your code in the newly created component. In
src/app/layouts/chart/chartLayout.html, replace the original code with following code:
<div class="chart-component">
	<div [id]="(onRenderingContext | async).id" class="row">
		<h2>Sample Radar Chart - Chart.js</h2>
		<div class="chart" style="display: block;">
			<canvas baseChart width="400" height="400"
				[datasets]="chartData"
				[labels]="chartLabels"
				[options]="chartOptions"
				[colors]="chartColors"
				[legend]="chartLegend"
				[chartType]="chartType"
				(chartClick)="chartClicked($event)"></canvas>
		</div>
		<div class="table-container" style="overflow-x:auto;">
			<table class="table table-responsive table-condensed">
				<tr>
					<th *ngFor="let label of chartLabels">{{label}}</th>
				</tr>
				<tr *ngFor="let d of chartData">
					<td *ngFor="let label of chartLabels; let j=index">{{d && d.data[j]}}</td>
				</tr>
			</table>
		</div>
	</div>
</div>
In src/app/layouts/chart/chartLayout.scss, add this code:
.row
{
	padding: 30px;
	text-align: center;
	max-width: 800px;
	margin-right: auto;
	margin-left: auto;
}
.chart
{
	padding-top: 50px;
}
In src/app/layouts/chart/chartLayout.ts, add these two lines in the top of file:
import { UtilsService } from '../../common/utils/utils.service';
import { OnInit } from '@angular/core';
In the "ChartLayoutComponent" class, please change your class to the following code:
export class ChartLayoutComponent extends TypeChartComponent implements OnInit {
    public chartData:Array<any> = [
	{data: [65, 59, 80, 81, 56, 55, 40], label: 'Series A'},
	{data: [28, 48, 40, 19, 86, 27, 90], label: 'Series B'},
	{data: [18, 48, 77, 9, 100, 27, 40], label: 'Series C'}
];
	public chartLabels:Array<any> = ['January', 'February', 'March', 'April', 'May', 'June', 'July'];
	public chartOptions:any = {
	    responsive: true
	};
	public chartLegend:boolean = true;
	//If you want to set your Chart type in WCH
	public chartType:string;
	//If you want to set your Chart type in code
    //public chartType:string = 'bar';

    constructor(public utilService: UtilsService) {
        super();
	}
    ngOnInit()
	{
	    this.chartType = this.utilService.getFirstCategory(this.renderingContext, 'type');
	}
    // function called when you click on the chart
	public chartClicked(e:any):void {
		console.log(e);
	}
}
chartData stores all the data you want to plot in your chart. chartLabels would label your data in your Chart. chartLegend defines whether you would like to show a legend in your chart. chartType defines the type of chart you want to use for your chart. It would be one of 6 types of charts: line, bar, radar, pie, polarArea, doughnut. You can changed your type in the content you created in the Step 5 in WCH. chartClicked is a function that would become active if there is mouse click action on your chart. You can customize the click event function here.
Note: If you want to customize the color of your Chart, you can insert this code in your ChartLayoutComponent class:
/* Comment out chartColors if you only want to use default colors */
public chartColors:Array<any> = [
	{ // grey
	backgroundColor: 'rgba(148,159,177,0.2)',
	borderColor: 'rgba(148,159,177,1)',
	pointBackgroundColor: 'rgba(148,159,177,1)',
	pointBorderColor: '#fff',
	pointHoverBackgroundColor: '#fff',
	pointHoverBorderColor: 'rgba(148,159,177,0.8)'
	},
	{ // dark grey
	backgroundColor: 'rgba(77,83,96,0.2)',
	borderColor: 'rgba(77,83,96,1)',
	pointBackgroundColor: 'rgba(77,83,96,1)',
	pointBorderColor: '#fff',
	pointHoverBackgroundColor: '#fff',
	pointHoverBorderColor: 'rgba(77,83,96,1)'
	},
	{ // grey
	backgroundColor: 'rgba(148,159,177,0.2)',
	borderColor: 'rgba(148,159,177,1)',
	pointBackgroundColor: 'rgba(148,159,177,1)',
    pointBorderColor: '#fff',
	pointHoverBackgroundColor: '#fff',
	pointHoverBorderColor: 'rgba(148,159,177,0.8)'
	}
];
/* Comment out chartColors if you only want to use default colors */
- Test your component. After you finished the first 8 steps, you could test either locally by running
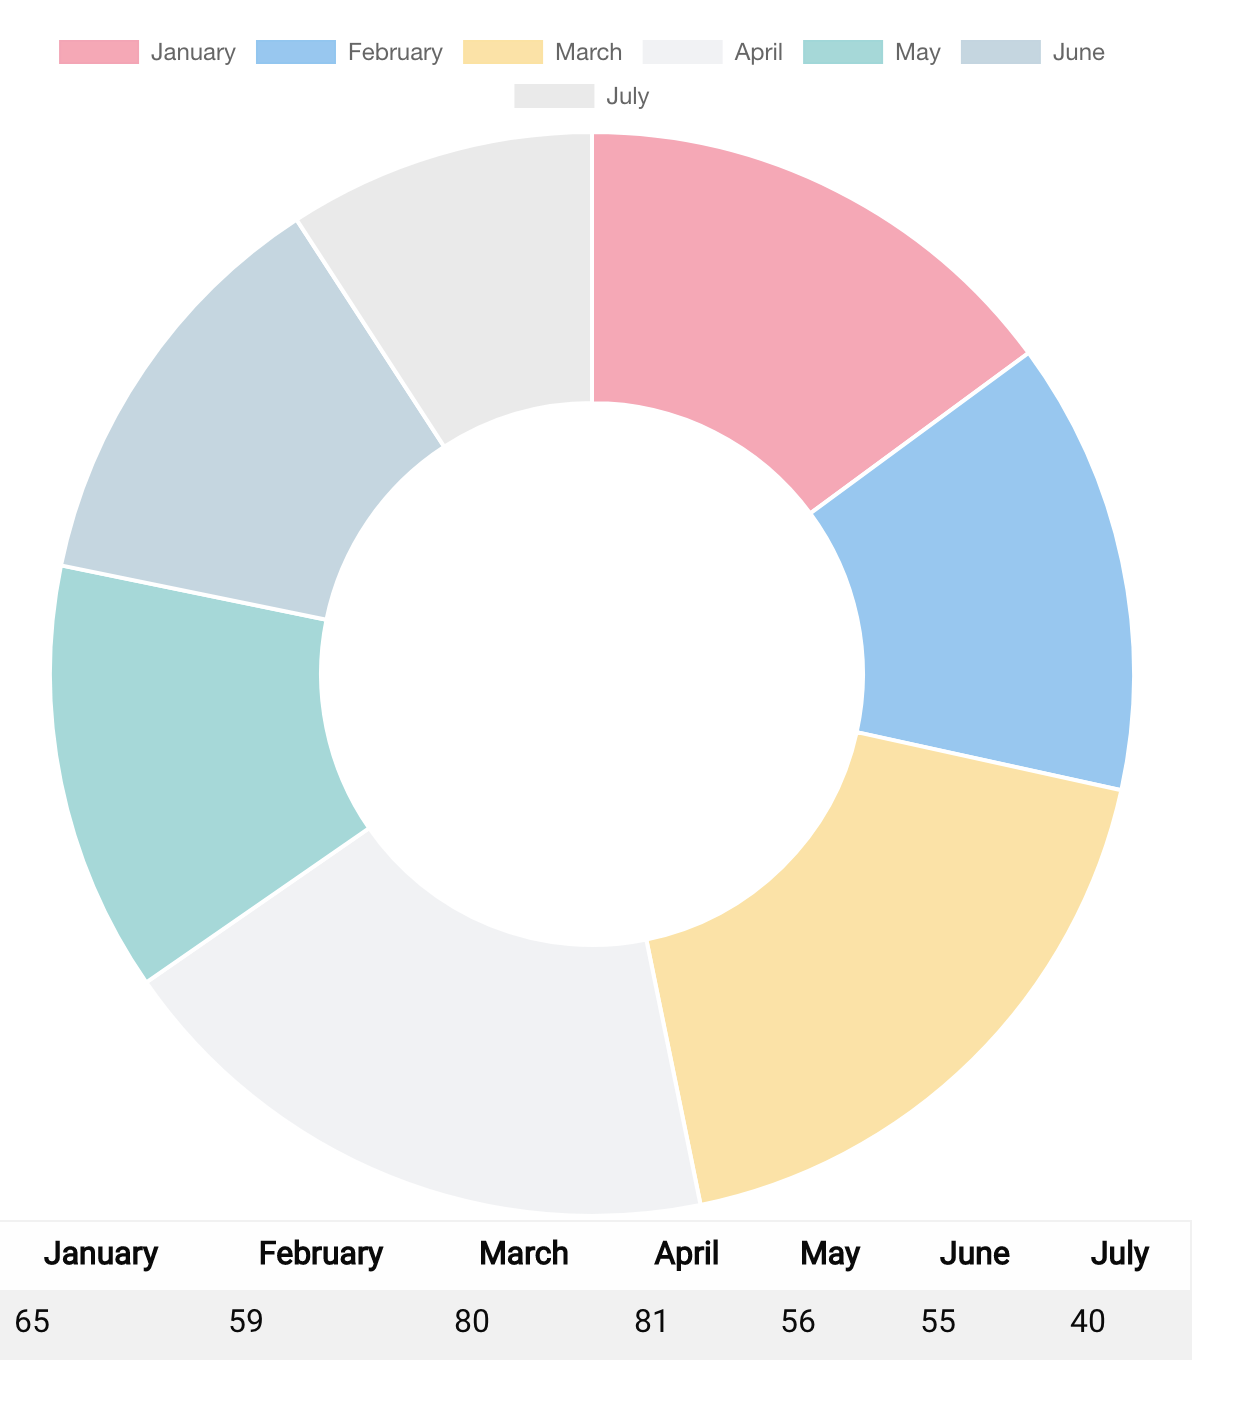
npm start, or remotely by runningnpm run build-deploy. You would see this chart in your Oslo site: If you change your chart type to "line" in WCH, it will look like this:
 Chart type "radar":
 Chart type "pie":
 Chart type "polarArea":
 Chart type "doughnut":

Iframe
This is an example of a content type you can create and add to your site. The first thing that needs to be done in order to add a new component is to the create the content type. The Iframe will have the following elements and settings: Name: Iframe
Elements: source: link (required)
width: number (required, minimum value of 0)
height: number (required, minimum value of 0)
After creating the content type, run the npm script in the Oslo project:
npm run create-layout -- --type Iframe
This will generate the template files for the new component.
Then you will find the generated src/app/components/iframe/abstractIframeComponent.ts file. There will be three bounded elements:
@RenderingContextBinding()
readonly source: Link;

@RenderingContextBinding()
readonly width: number;

@RenderingContextBinding()
readonly height: number;
These are the variables to use to access the content type data.
To use these in the src/app/layouts/iframe/iframeLayout.html file, just reference them with the angular notation. Here is the layout that will be defined:
<div class="iframe-component" [id]="(onRenderingContext | async).id">
	<h2>Iframe component example</h2>
	<iframe class="wch-iframe" [src]="source.linkURL | formattedText:'resourceUrl'" [width]="width" [height]="height">
		Sorry, your browser does not support inline frames.
	</iframe>
</div>
And the scss can be added to the src/app/layouts/iframe/iframeLayout.scss file:
.iframe-component
{
	text-align: center;
	padding: 30px;
}
.wch-iframe {
	resize: both;
	max-width: 100%;
}
And that is all the code that needs to be added to make a new Iframe component. The only thing left to do is build and deploy the code to the live site.
To build, run: npm run build
After a successful build, deploy: npm run deploy
To add the new component to a page, go to WCH, create a new content item from the new Iframe content type, fill in the elements with your data, and add that content item to a page of the site.
License
See the included license file License .