- Use case
- Features
- Set up
- SPA customization
- Implementation details
- Integrate with an existing Oslo-based site
You want your website to show personalized pages and content based on attributes of the current user. Examples of an attribute could be a brand or a user role. After a user logs in, new page links appear that are relevant to that person. The home page also updates to show content reflecting the current user's role or brand.
This is not a security feature. Access via a direct URL to currently hidden pages is not restricted; they are just not displayed in the header navigation.
- Login:
- Includes a mock login layout and angular component, where users can optionally select their role on the site
- Login status is persisted in
localStorageuntil the user explicitly logs out - An angular authentication service ensures user data stay in sync between the login component, header and other content
- The authentication service can be updated to use a real authentication backend, instead of
localStorage - The list of brands/tags used, can be edited in the Login form content item, no code change required
- Navigation:
- The site header filters the page navigation, based on tags associated with the current user role
- Anonymous users, or those with no assigned role, see pages which contain no user role tags
- Users that are logged in see pages that are not tagged, plus pages tagged for their role
- Personalized content:
- The home page shows personalized content, based on the user role tags
- Anonymous users, or those with no assigned role, see generic information on the home page
- Users that are logged in see targeted content on the home page, which is tagged for their role
- Site:
- Package contains a full WCH site, with editable source code based on the Oslo sample site
- Header and home page display the current username with a role-based icon
- All content, header and footer information are customizable through the WCH UI
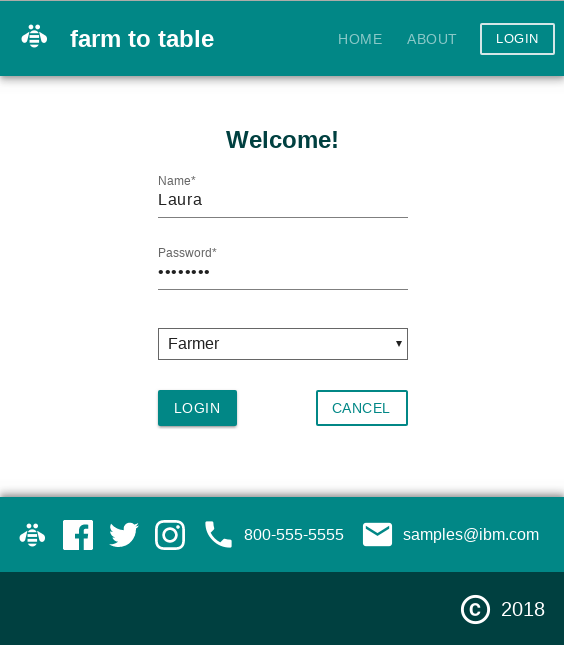
Mock login screen with role selection enabled:
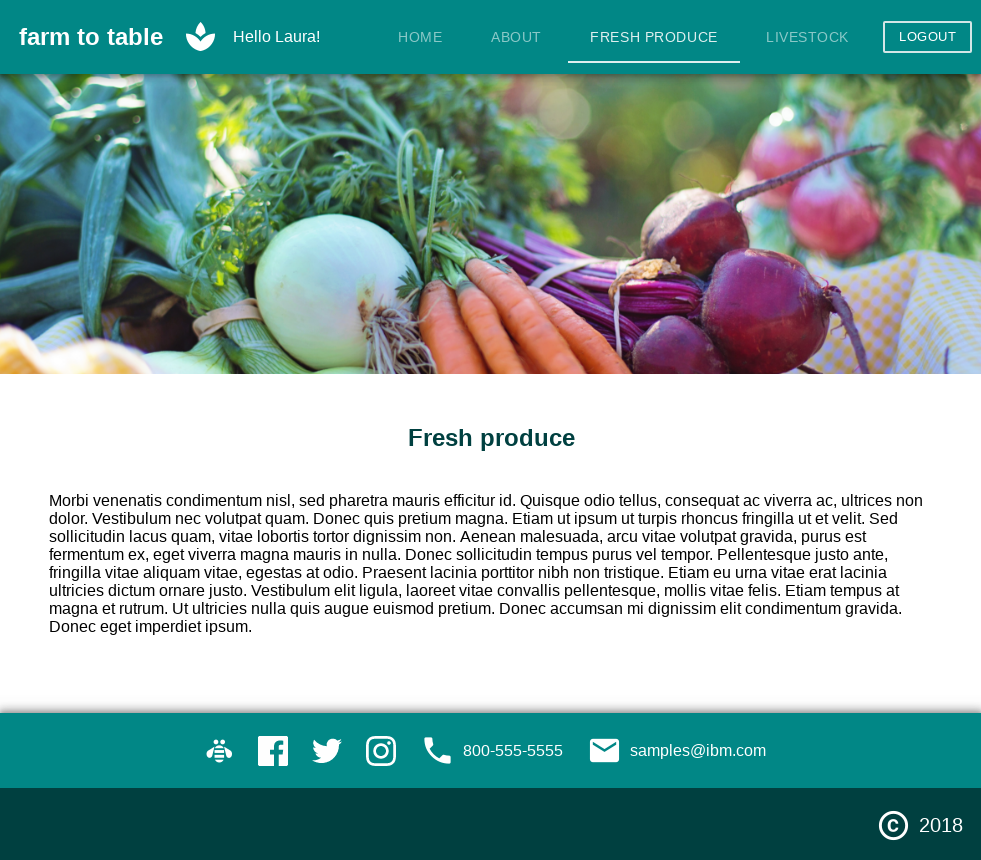
Site as seen by a Farmer:
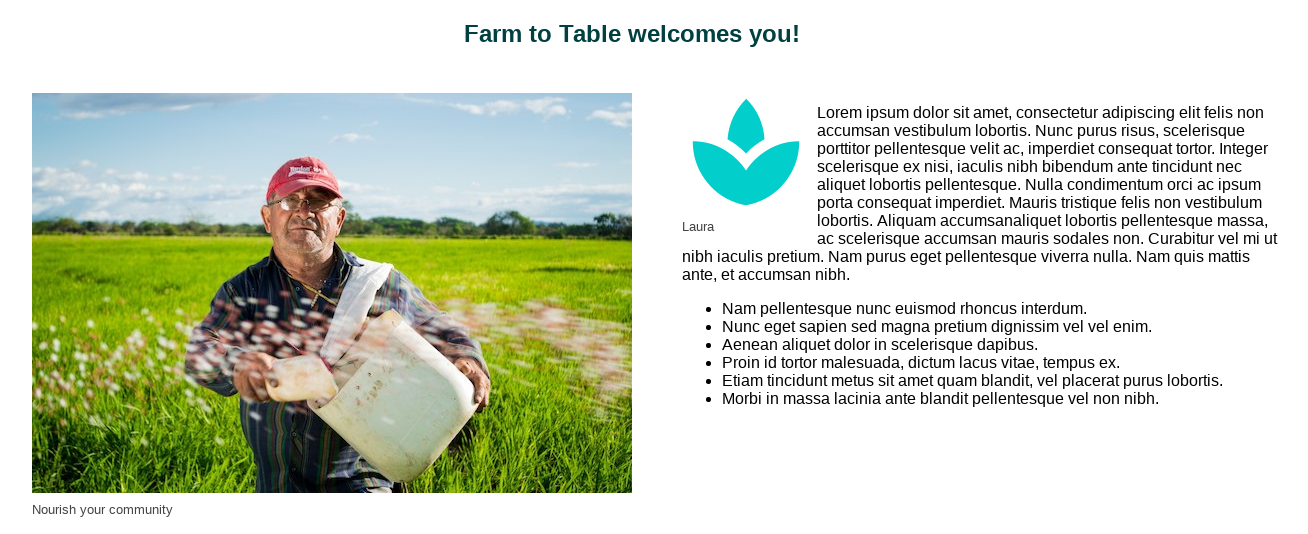
Home page as seen by a Farmer:
- A WCH tenant in Trial or Standard Tier
- wchtools-cli v2.1.3 or above
- Node.js v6.11.1 or above
- Download the sample-sites-pzn zip and unpackage it into an empty directory
- Run
npm installin your new directory
- Run
wchtools initto setup the WCH tools CLI
- Run
wchtools delete -A --all -vto empty your tenant. WARNING: This will delete all your tenant's Content, Assets, Types, Layouts, Pages, Taxonomies and Image Profiles. Read more here - Run
npm run init-contentto deploy all the sample pages, content and assets - Run
npm run build-deployto build and deploy the application code to your tenant
You can edit this sample code to make it your own. This package is based on the Oslo Single Page Application (SPA) sample site, so the same programming model applies.
- Set the tenant information by changing the values in src/app/Constants.ts. This information can be retrieved from the WCH user menu under "Hub information".
- Go to Hub set up -> General settings -> Security and set your trusted domains (or
*) - Run
npm startfor a development server, and navigate to http://localhost:4200/. The app will automatically reload if you change any of the source files.
- Build the project with
npm run build. Use the-prodflag for a production build - When changes to your site are ready, run
npm run deployto push them to your tenant
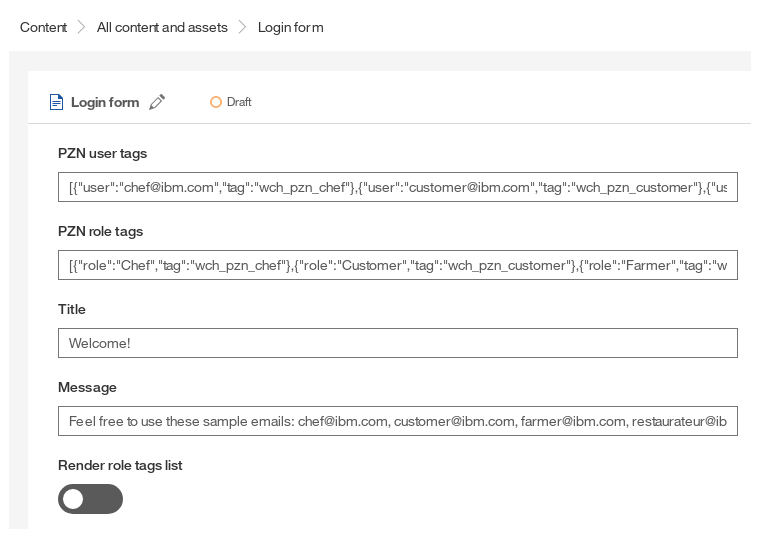
Login form content item:
The sample shows personalized pages and content to users logged in under certain roles. The personalized items are mapped to the user roles by tagging the associated content. The tags used are controlled by JSON objects stored in the Login form content item. They can be updated in WCH without touching the SPA code. There are two ways to map users to role tags:
- The PZN user tags JSON explicitly associates user IDs with roles. The sample contains this data:
[
	{
		"user":"chef@ibm.com",
		"tag":"wch_pzn_chef"
	},
	{
		"user":"customer@ibm.com",
		"tag":"wch_pzn_customer"
	},
	{
		"user":"farmer@ibm.com",
		"tag":"wch_pzn_farmer"
	},
	{
		"user":"restaurateur@ibm.com",
		"tag":"wch_pzn_restaurateur"
	},
	{
		"user":"chef2@ibm.com",
		"tag":"wch_pzn_chef"
	},
	{
		"user":"customer2@ibm.com",
		"tag":"wch_pzn_customer"
	},
	{
		"user":"farmer2@ibm.com",
		"tag":"wch_pzn_farmer"
	},
	{
		"user":"restaurateur2@ibm.com",
		"tag":"wch_pzn_restaurateur"
	}
]
- With Render role tags list mode on, users choose from a list of available roles upon login. The PZN role tags JSON contains the follow user roles and associated tags:
[
	{
		"role":"Chef",
		"tag":"wch_pzn_chef"
	},
	{
		"role":"Customer",
		"tag":"wch_pzn_customer"
	},
	{
		"role":"Farmer",
		"tag":"wch_pzn_farmer"
	},
	{
		"role":"Restaurateur",
		"tag":"wch_pzn_restaurateur"
	}
]
To get the list of pages for the navigation, an Apache Solr search is performed:
<API URL>/delivery/v1/search?q=*:*&fl=name,id&fq=classification:content&fq=type:("Standard page" OR "Design page")&fq=((*:* AND -tags:wch_pzn_*) OR tags:(<user role tag>))
It looks for:
- published items
- those classified as content
- content of type Standard page or Design page
- items that do not have any tags prefixed with
wch_pzn_(everybody sees these pages) - items with a role-based tag from the JSON above (only for authenticated users)
This list of "allowed" content items (taggedPages) is used to filter the full list of pages (sitePages) (retrieved by the SDK rendering context):
	// the full list of pages from the RenderingContext:
	const sitePages = this.rc && this.rc.context ? this.rc.context.site.pages : [];
	// filter sitePages by what is in taggedPages (retrieved via the search URL detailed above)
	// a sitePage is rejected if there is not a taggedPage with an id that matches the sitePage's contentId
	return sitePages.filter(sitePage => {
		return taggedPages.some(taggedPage => taggedPage.id === sitePage.contentId);
	});
See more in /sample-sites-pzn/src/app/wchHeader/wchHeader.component.ts
The Home page contains a content item of the Personalized content type. This item performs a search to retrieve and display custom content based on the current user's role (or an un-tagged item if there is no role):
readonly TYPE: string = 'Image with information';
const pznTagQuery = this.pzn_tag ? `OR tags:(${this.pzn_tag}))` : ')';
this.queryString = `fl=document:%5Bjson%5D,lastModified&fq=classification:(content)&fq=type:("${this.TYPE}")&fq=((*:* AND -tags:wch_pzn_*)${pznTagQuery}&rows=1`;
It looks for:
- 1 item
- those classified as content
- content of type Image with information (note: this can be changed to any type you want, by updating the
TYPEvariable) - an item with the current role-based tag (
this.pzn_tag)
This query is fed into a special query component:
	<div *ngIf="isLoggedIn" class="pzn-pic">
		<wch-contentquery [query]='queryString' #q>
			<wch-contentref *ngFor="let rc of q.onRenderingContexts | async" [renderingContext]="rc"></wch-contentref>
		</wch-contentquery>
	</div>
See more in /sample-sites-pzn/src/app/layouts/personalized-content/personalizedContentLayout.ts
The header and home page both contain icons that are different for each user role. These are simple font-based icons, which update via CSS:
/* custom role-based logos */
.wch_pzn_chef .logo.pzn-icon i:before {
	content: "restaurant_menu";
}
.wch_pzn_customer .logo.pzn-icon i:before {
	content: "face";
}
.wch_pzn_farmer .logo.pzn-icon i:before {
	content: "spa";
}
.wch_pzn_restaurateur .logo.pzn-icon i:before {
	content: "lightbulb_outline";
}
.NO_ROLE .logo.pzn-icon i:before {
	content: "account_circle";
}
The content of the icon DOM node switches based on the current role tag, which is added as a CSS class on any parent element. The NO_ROLE fallback is assigned if the user is anonymous or does not have a role.
See more in /sample-sites-pzn/src/app/app.scss
The login page is a custom component using angular reactive forms. Both the login page and the header make calls to the observable authentication service, which stores the user status and data in localStorage. Abstracting to a shared service lets various page components share the user information. This service could then easily be extended to make real authentication calls to your own back-end services.
Read more in /sample-sites-pzn/src/app/layouts/login/loginLayout.ts and /sample-sites-pzn/src/app/common/authService/auth.service.ts
If you already have a site based on the Oslo sample, you can manually include these personalization features.
- Download the sample-sites-pzn zip and unpackage it into an empty directory
- Unpackage /sample-sites-pzn/scripts/osloPackage.zip into [root directory of your site]/osloPackage
- Run
npm run install-layouts-from-folder osloPackage - Run
wchtools push -A -v --dir osloPackage/content-artifacts
- Copy /sample-sites-pzn/src/app/common/authService/ into [root directory of your site]/src/app/common/
- Register the authService in [root directory of your site]/src/app/app.module.ts:
import { AuthService } from './common/authService/auth.service';
//...
	providers: [
		//...
		AuthService
	]
- Integrate the
ReactiveFormsModulemodule from angular in [root directory of your site]/src/app/app.module.ts:
import {FormsModule,ReactiveFormsModule} from '@angular/forms';
	imports: [
		//...
		FormsModule,
		ReactiveFormsModule,
		//...
	]
- In WCH, go to All content and assets -> Login form
- Create a draft and edit the available roles with one of the 2 following options:
-
Update the PZN user tags JSON to associated usernames (ie:
user) with tags (ie:tag). Example:[{"user":"decor@ibm.com","tag":"wch_pzn_living"},{"user":"chef@ibm.com","tag":"wch_pzn_dining"},{"user":"relaxing@ibm.com","tag":"wch_pzn_sleeping"}] -
Turn on the Render role tags list toggle, and update the PZN role tags JSON to define your roles/brands (ie:
role) and their associated tags (ie:tag). Example:[{"role":"Living","tag":"wch_pzn_living"},{"role":"Dining","tag":"wch_pzn_dining"},{"role":"Sleeping","tag":"wch_pzn_sleeping"}]
-
Note: Use the wch_pzn_ prefix, otherwise you will need to update the search query for pages in a later step.
- Optionally change the Title and Message displayed on the login screen
- Publish your changes
- Open [root directory of your site]/src/app/responsiveHeader/responsive-header.html for editing
- Replace
rc?.context?.site.pageswiththis.pages - Open [root directory of your site]/src/app/responsiveHeader/responsiveHeader.component.ts for editing
- Import the services and constants:
import {HttpClient} from '@angular/common/http';
import {Router} from '@angular/router';
import {AuthService} from '../common/authService/auth.service';
import {environment} from '../environment/environment';
//...
	constructor(configService: ConfigServiceService, private authService: AuthService, private http: HttpClient, private router: Router) {
- Add these variables to the
ResponsiveHeaderComponentclass:
	authSub: Subscription;
	loading: boolean = false;
	isLoggedIn: boolean = false;
	username: string = '';
	pzn_tag: string = '';
- Replace the ngOnDestroy function with the following to unsubscribe from the authentication service:
	ngOnDestroy() {
		this.configSub.unsubscribe();
		this.authSub.unsubscribe();
	}
- Replace the
set renderingContextfunction with:
	public set renderingContext(aValue: RenderingContext) {
		if(aValue) {
			if(this._hasPagesChanged(aValue.context.site.pages)){
				this.refreshPages();
			}
		}
		this.rc = aValue;
		this.cachedChildren = new Map<string, any[]>();
	}
- Replace the
_hasPagesChangedfunction with:
	_hasPagesChanged(newPages){
		let current = newPages || [];
		let previous = this.rc && this.rc.context ? this.rc.context.site.pages : [];

		return (JSON.stringify(current) != JSON.stringify(previous));
	}
- Add these functions to subscribe to authentication changes and filter the page navigation list whenever a user logs in or out:
	ngOnInit() {
		this.isLoggedIn = this.authService.isLoggedIn();
		this.username = this.authService.getName();
		this.pzn_tag = this.authService.getPZN();
		this.refreshPages();
		this.authSub = this.authService.authUpdate.subscribe(userInfo => {
			this.isLoggedIn = !!userInfo;
			this.username = userInfo ? userInfo.name : '';
			this.pzn_tag = userInfo ? userInfo.pzn : '';
			this.refreshPages();
		});
	}

	logout() {
		this.authService.logout();
		this.router.navigate(['home']);
	}

	refreshPages() {
		const pznTagQuery = this.pzn_tag ? `OR tags:(${this.pzn_tag}))` : ')';
		const pageSearchUrl = `${environment.apiUrl}/delivery/v1/search?q=*:*&fl=name,id&fq=classification:content&fq=type:("Standard page" OR "Design page")&fq=((*:* AND -tags:wch_pzn_*)${pznTagQuery}`;

		this.loading = true;
		this.http.get<any>(pageSearchUrl).subscribe(pageDocs => {
			this.pages = pageDocs && pageDocs.numFound > 0 ? this.filterPages(pageDocs.documents) : [];
			this.loading = false;
			console.log('Filtered pages are: %o', this.pages);
		}, error => {
			this.pages = this.rc && this.rc.context ? this.rc.context.site.pages : [];
			this.loading = false;
			console.error('Error retrieving filtered page content items: %o. Fallback to using site pages: %o', error, this.pages);
		});
	}

	filterPages(taggedPages, sitePages?) {
		sitePages = sitePages ? sitePages : this.rc && this.rc.context ? JSON.parse(JSON.stringify(this.rc.context.site.pages)) : [];
		console.log('Filtering the site pages  %o  by the tagged page content item search result  %o', sitePages, taggedPages);
		// filter sitePages by what is in taggedPages
		// a sitePage is rejected if there is not a taggedPage with an id that matches the sitePage's contentId
		return sitePages.filter(sitePage => {
			// filter 1 level of children
			if(sitePage.children.length) {
				sitePage.children = this.filterPages(taggedPages, sitePage.children);
			}
			return taggedPages.some(taggedPage => taggedPage.id === sitePage.contentId);
		});
	}
- Open [root directory of your site]/src/app/responsiveHeader/wch-menu-item/wchMenuItem.component.ts for editing
- Remove child page caching in the
getVisibleChildrenfunction, so pages in the drop-down menus can be updated when a user logs in or out:
	getVisibleChildren(page): any[] {
		let visibleChildren = page.children.filter((child) => {
			return !child.hideFromNavigation;
		});
		return visibleChildren
	}
- Open [root directory of your site]/src/app/responsiveHeader/responsive-header.html for editing
- Add the username, login and logout links:
	<span *ngIf="isLoggedIn">{{username}} ::</span>
	<a *ngIf="!isLoggedIn" style="color:#555;text-decoration:underline;" [routerLink]="['login']">Login</a>
	<a *ngIf="isLoggedIn" style="color:#555;text-decoration:underline;" href="javascript:;" (click)="logout()">Logout</a>
- Re-style as necessary to match your site
- In WCH, go to All content and assets -> Personalized content
- Create a draft, then edit or delete the Title and Message elements. These pieces of text are shown to all users, anonymous or logged in.
- Go to Website -> Site manager
- Pick a page on which to place the personalized component, go to menu -> Edit content and click Create draft
- Add the Personalized content to the page and publish your changes
- Open [root directory of your site]/src/app/app.scss and add styles to display a custom icon for each role/brand. This example just uses initials, but you can easily replace these with strings from a font-based icon set (eg: Material icons):
/* custom role-based logos */
.wch_pzn_living .logo.pzn-icon i:before {
	content: "L";
}
.wch_pzn_dining .logo.pzn-icon i:before {
	content: "D";
}
.wch_pzn_sleeping .logo.pzn-icon i:before {
	content: "S";
}
.NO_ROLE .logo.pzn-icon i:before {
	content: "?";
}
Note: This component queries items of content type Image with information. You can change this by updating the TYPE variable in [root directory of your site]/src/app/layouts/personalized-content/personalizedContentLayout.ts. For example:
readonly TYPE: string = 'Lead image with information';
- In WCH, go to All content and assets
- Add one or more
wch_pzn_*tags defined in the Create your roles section to some of your pages - Tag one content item of type Image with information (unless you've changed this in personalizedContentLayout.ts) for each role. We tag 1 item for each role because the Personalized content displays one piece of content.
Note: Remember that any tagged item will now only show up for logged in users with the associated role or brand.
- Run
npm run build-deploy


