Lambda Notes on Reproducing Training on a Local Machine
Clone Repo
git clone https://github.com/lambdal/imagenet18.git
cd imagenet18
Setup python3 virtualenv
Assumes python3 version is 3.6
pip3 install --upgrade virtualenv --user
virtualenv -p python3 env
source env/bin/activate

pip install -r requirements_local.txt
Data Preparation
wget https://s3.amazonaws.com/yaroslavvb/imagenet-data-sorted.tar
wget https://s3.amazonaws.com/yaroslavvb/imagenet-sz.tar

tar -xvf imagenet-data-sorted.tar -C /mnt/data/data
tar -xvf imagenet-sz.tar -C /mnt/data/data

cd /mnt/data/data
mv raw-data imagenet
Train
ulimit -n 4096
python -m torch.distributed.launch \
--nproc_per_node=8 --nnodes=1 --node_rank=0 \
training/train_imagenet_nv.py /mnt/data/data/imagenet \
--fp16 --logdir ./ncluster/runs/lambda-hyperplane --distributed --init-bn0 --no-bn-wd \
--phases "[{'ep': 0, 'sz': 128, 'bs': 512, 'trndir': '-sz/160'}, {'ep': (0, 7), 'lr': (1.0, 2.0)}, {'ep': (7, 13), 'lr': (2.0, 0.25)}, {'ep': 13, 'sz': 224, 'bs': 224, 'trndir': '-sz/320', 'min_scale': 0.087}, {'ep': (13, 22), 'lr': (0.4375, 0.043750000000000004)}, {'ep': (22, 25), 'lr': (0.043750000000000004, 0.004375)}, {'ep': 25, 'sz': 288, 'bs': 128, 'min_scale': 0.5, 'rect_val': True}, {'ep': (25, 28), 'lr': (0.0025, 0.00025)}]" --skip-auto-shutdown
Lambda GPU Cloud - single instance
12.6 h, 29 epochs 93.05% accuracy

ulimit -n 4096
python -m torch.distributed.launch \
--nproc_per_node=4 --nnodes=1 --node_rank=0 \
training/train_imagenet_nv.py /home/ubuntu/data/imagenet \
--workers=4 --fp16 --logdir ./ncluster/runs/lambda-cloud-1-instance --distributed --init-bn0 --no-bn-wd \
--phases "[{'ep': 0, 'sz': 128, 'bs': 256, 'trndir': '-sz/160'}, {'ep': (0, 8), 'lr': (0.5, 1.0)}, {'ep': (8, 15), 'lr': (1.0, 0.125)}, {'ep': 15, 'sz': 224, 'bs': 112, 'trndir': '-sz/320', 'min_scale': 0.087}, {'ep': (15, 25), 'lr': (0.22, 0.022)}, {'ep': (25, 28), 'lr': (0.022, 0.0022)}, {'ep': 28, 'sz': 288, 'bs': 64, 'min_scale': 0.5, 'rect_val': True}, {'ep': (28, 29), 'lr': (0.00125, 0.000125)}]" --skip-auto-shutdown
- ulimit: to avoid "OSError: [Errno 24] Too many open files with 0.4.1".
nproc_per_node: number of GPUs on your local machine.
nnodes: number of node, set to one for training with a single machine.
logdir: directory for logging the results.
phases: training schedule. Copied from the "one machine" setting in the original train.py file.
Gather Results
python dawn/prepare_dawn_tsv.py \
--events_path=ncluster/runs/path-to-logdir/events.out.tfevents.xxx
events_path: path to the event file. Should be found inside of the logdir.
Original README
Code to reproduce ImageNet in 18 minutes, by Andrew Shaw, Yaroslav Bulatov, and Jeremy Howard. High-level overview of techniques used is here
Pre-requisites: Python 3.6 or higher
pip install -r requirements.txt
aws configure  (or set your AWS_ACCESS_KEY_ID/AWS_SECRET_ACCESS_KEY/AWS_DEFAULT_REGION)
python train.py  # pre-warming
python train.py
To run with smaller number of machines:
python train.py --machines=1
python train.py --machines=4
python train.py --machines=8
python train.py --machines=16
Your AWS account needs to have high enough limit in order to reserve this number of p3.16xlarge instances. The code will set up necessary infrastructure like EFS, VPC, subnets, keypairs and placement groups. Therefore permissions for these those resources are needed.
Checking progress
Machines print progress to local stdout as well as logging TensorBoard event files to EFS. You can:
- launch tensorboard using tools/launch_tensorboard.py
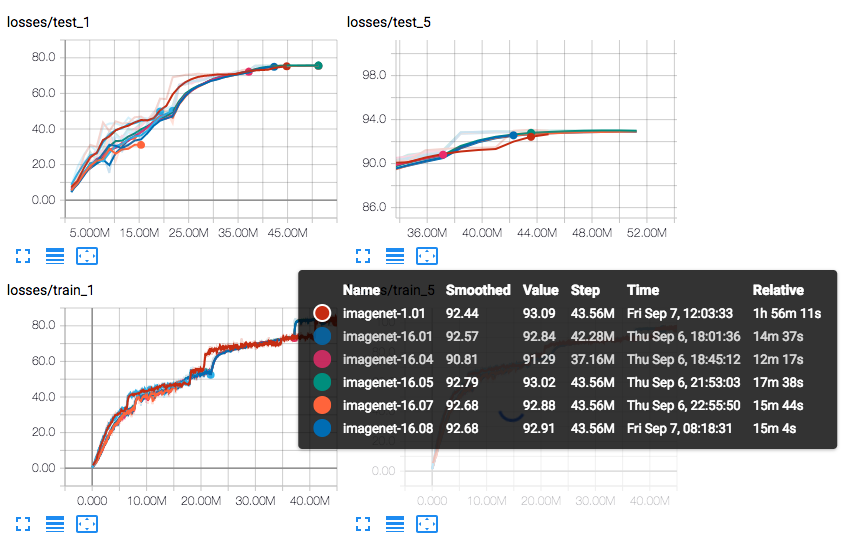
That will provide a link to tensorboard instance which has loss graph under "losses" group. You'll see something like this under "Losses" tab

- Connect to one of the instances using instructions printed during launch. Look for something like this
2018-09-06 17:26:23.562096 15.imagenet: To connect to 15.imagenet
ssh -i /Users/yaroslav/.ncluster/ncluster5-yaroslav-316880547378-us-east-1.pem -o StrictHostKeyChecking=no ubuntu@18.206.193.26
tmux a
This will connect you to tmux session and you will see something like this
.997 (65.102)   Acc@5 85.854 (85.224)   Data 0.004 (0.035)      BW 2.444 2.445
Epoch: [21][175/179]    Time 0.318 (0.368)      Loss 1.4276 (1.4767)    Acc@1 66.169 (65.132)   Acc@5 86.063 (85.244)   Data 0.004 (0.035)      BW 2.464 2.466
Changing LR from 0.4012569832402235 to 0.40000000000000013
Epoch: [21][179/179]    Time 0.336 (0.367)      Loss 1.4457 (1.4761)    Acc@1 65.473 (65.152)   Acc@5 86.061 (85.252)   Data 0.004 (0.034)      BW 2.393 2.397
Test:  [21][5/7]        Time 0.106 (0.563)      Loss 1.3254 (1.3187)    Acc@1 67.508 (67.693)   Acc@5 88.644 (88.315)
Test:  [21][7/7]        Time 0.105 (0.432)      Loss 1.4089 (1.3346)    Acc@1 67.134 (67.462)   Acc@5 87.257 (88.124)
~~21    0.31132         67.462          88.124
The last number indicates that at epoch 21 the run got 67.462 top-1 test accuracy and 88.124 top-5 test accuracy.
Other notes
If you run locally, you may need to download imagenet yourself, follow instructions here -- https://github.com/diux-dev/cluster/tree/master/pytorch#data-preparation