This sample provide two Github action that will create all the infrastructure in place to have a private APIM exposed to public Internet using Application Gateway with WAF.
3 samples application are available in the Github repository but are not deployed today with the Github Actions, this need to be done manually if desired.

First step is to Fork this repository.
Here the tool you need to installe on your machine.
-
Install the official Powershell Let's Encrypt client
-
Dotnet 3.1 SDK
Here the list of all supported clients if you want to implement your own logic for the Let's Encrypt Certificate.
This demo is using Azure Public DNS Zone, you will need to have a domain that you own from any register. Once is done you need to configure your DNS in your domain register with Azure DNS Public Zone entry.
It's all explain here.
Be sure you already configured your Azure Public DNS Zone.
First create a service principal running the following command.
$ az ad sp create-for-rbac --name <ServicePrincipalName>Take note of the output you will need it to create Github Secrets.
Now go to the folder scripts, there you have a powershell called letsEncrypt.ps1.
This script will connect to your Azure Subscription passed in parameters and create a TXT challenge in your Azure DNS Public Zone.
First run this command
$ Set-PAServer LE_PRODNow with the information retrieved when you created the service principal you can create your certificate.
Be sure your Service Principal have access to modify your Azure Public DNS Zone. If you want to use least priviledge refer to this doc.
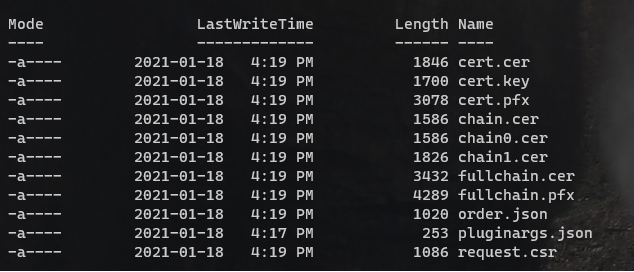
$ .\letsEncrypt.ps1 -certNames *.contoso.com -acmeContact john@contoso.com -aZSubscriptionId <subId> -aZTenantId <tenantId> -aZAppUsername <sp_username> -aZAppPassword <sp_password> -pfxPassword <pfxPassword>When the command is finished, a new folder called pa will be created inside the scripts folder.
If you browse in it inside the last child folder of acme-v02.api.letsencrypt.org you will see those files.
To create the architecture and all Azure resources you need to setup some Github Secrets before.
Here the list of all Github secrets that need to create before running the Github Action.
| Secret Name | Description | Link |
|---|---|---|
| ADMIN_VAULT_OBJECT_ID | This is the object ID of the super admin that you want to give access to KeyVault | |
| PA_TOKEN | You need to have a personnal access token to write secrets after running the first github action. You can find the information (here)[https://docs.github.com/en/github/authenticating-to-github/creating-a-personal-access-token]. The PA needs the public_repo scope. This is needed for this specific (github action)[https://github.com/gliech/create-github-secret-action]. | |
| SP_AZURE_CREDENTIALS | Secret that contains the credential to run Az Login. | (Action)[https://github.com/marketplace/actions/azure-login] |
| PUBLISHER_NAME | The publisher name associated to APIM | |
| PUBLISHER_EMAIL | The publisher email associated to APIM | |
| ADMIN_USERNAME_SQL | The username admin for the SQL Azure Database | |
| ADMIN_PASSWORD_SQL | The password for the SQL Azure Database | |
| HOSTNAME | The hostname of your domain like contoso.com | |
| ADMIN_USERNAME | The admin username of the Jumpbox and on prem VM | |
| ADMIN_PASSWORD | The password of the Jumpbox and on prem VM | |
| SUBSCRIPTION_ID | The subscription ID where to deploy the Az Resources | |
| SP_PRINCIPAL_OBJECT_ID | The object ID related to the SP that run the github action | |
| SUBSCRIPTION_ID | The subscription ID where you run the github action | |
| SHARED_KEY | The shared key needed for the VPN connection https://docs.microsoft.com/en-us/azure/vpn-gateway/vpn-gateway-howto-vnet-vnet-resource-manager-portal |
Now go in the Actions Tab

Select Deploy APIM Infra

On the right menu click the Run workflow button and click the Run workflow green button.

The Github action will take around 45 minutes to complete. The Github action will create 3 new Github secrets needed to execute the next pipeline.
Now upload you generated or existing certificate in Azure KeyVault.
Go to the certificates tabs in your Azure KeyVault

From there click the Generate/Import button and import your pfx files from your certificate.
Once the certificate is imported in KeyVault click on it.
You will find a textbox with the label Secret Identifier.
Copy the value from that textbox you will need to create a Github secret.

Now you need to create a new Github secrets with the value copied before. The name of the secret is CERT_LINK.
Next go to your API Management and custom domains

Create a new hostname for the API Gateway related to your private DNS zone and select the certificate you uploaded in the KeyVault.

Now retrieve the private IP of the Api Management
Go to your Azure Private DNS Zone and create a new A record entry

Now you are ready to run the next Github Action, go back to Github Action and select Deploy Application Gateway Infra and run the worflow.
Once the Github Action is executed go to your Application Gateway and in the menu Backend health. Be sure the Application Gateway can reach the APIM Gateway.

Get the public ip of the App GW and add a record in your Azure Public DNS Zone.

Use the jumpbox to test the nslookup resolution like the example below.

Normally this should use the private IP
Now do a nslookup from your computer, this should use the public ip of the Application Gateway (it can take up to 24 hours to work depending of your DNS server).

This sample create two resources group, each one with a VPN Gateway, you will need to create a connection between them to mock cloud to on premise environment.
For more details how to do this click here
Because end-to-end encryption is not done and the SSL stop at AppGW Level, when configure your API be sure to set the URL Scheme to both.
If an error of Keyvault soft delete occurs when running the Github action this mean you have some keyvault pending because of the soft delete.

In this case you need to run those commands in the proper subscription using Azure CLI.
$ az keyvault list-deleted
$ az keyvault purge --name <name of the vault>
Those steps are only required if you want to deploy the web application provided in this sample.
This Github contains 3 app used for the demo

The TodoWeb is the front end MVC app, the TodoApi is the one hosted in the cloud and Weather API is the one hosted in the Virtual Machine.
How to deploy those applications are out of this scope, but the next section will show you what you need to register in your Azure Active Directory to be able to run those sample apps.
You will need to create 3 applications registration in Azure AD, the flow used here is this one.

What is really important is the scope you create in TodoApi and WeatherApi.
For TodoApi you need to create one scope called Todo.Api.All and for WeatherApi the scope is Weather.Get.All.
Once you have those the two APIs created with the proper scope just give permission to those scope to TodoWeb.
Be sure next to create the Application Secret for the TodoWeb app.
For more details about using Azure Active Directory with .Net Application refer to the officiel Microsoft documentation.
Important
In the manifest file of all three application be sure to set the version of the property accessTokenAcceptedVersion to the value 2.
Here the appsettings of TodoApi that you need to configure in the WebApp in the Azure Portal.
[
  {
    "name": "AzureAd:ClientId",
    "value": "<ClientID of the TodoApi in Azure AD>",
    "slotSetting": false
  },
  {
    "name": "AzureAd:Instance",
    "value": "https://login.microsoftonline.com/",
    "slotSetting": false
  },
  {
    "name": "AzureAd:TenantId",
    "value": "<Your AzureAD Tenant ID>",
    "slotSetting": false
  },
  {
    "name": "ConnectionStrings:Sql",
    "value": "<Sql Connection string of the SQL Azure>",
    "slotSetting": false
  },
  {
    "name": "WEBSITE_NODE_DEFAULT_VERSION",
    "value": "6.9.1",
    "slotSetting": false
  }
]

Now you can publish the TodoWeb to Azure using Visual Studio or Azure CLI.

You can now configure the TodoApi in APIM with the policy you want to test.
This application is different and hosted in the virtual machine called win1api. You will need to connect to this virtual machine with RDP and first install IIS from the server role.
Once is done you will need to install .Net Core 3.1 hosting bundle
You can find the Microsoft .Net core here
Now you can install your .Net Core application in ISS, once is done modify the appsettings.json with those parameters.
{
    "AzureAd": {
        "Instance": "https://login.microsoftonline.com/",
        "TenantId": "<TenantId of your Azure AD>",
        "ClientId": "<ClientId of Weather App in Azure AD>"
    }
}
You can now configure the Weather in APIM with the policy you want to test.
Here the appsettings of TodoWeb that you need to configure in the WebApp in the Azure Portal.
[
  {
    "name": "AzureAd:CallbackPath",
    "value": "/signin-oidc",
    "slotSetting": false
  },
  {
    "name": "AzureAd:ClientId",
    "value": "<The ClientId of TodoWeb in AzureAD>",
    "slotSetting": false
  },
  {
    "name": "AzureAd:ClientSecret",
    "value": "<The ClientSecret of TodoWeb in AzureAD>",
    "slotSetting": false
  },
  {
    "name": "AzureAd:Instance",
    "value": "https://login.microsoftonline.com/",
    "slotSetting": false
  },
  {
    "name": "AzureAd:SignedOutCallbackPath",
    "value": "/signout-callback-oidc",
    "slotSetting": false
  },
  {
    "name": "AzureAd:TenantId",
    "value": "<Your Azure AD TenantId>",
    "slotSetting": false
  },
  {
    "name": "TodoList:ApiAccessKey",
    "value": "<Subscription Key of APIM to call TodoApi>",
    "slotSetting": false
  },
  {
    "name": "TodoList:TodoListAppId",
    "value": "<ClientId of TodoApi>",
    "slotSetting": false
  },
  {
    "name": "TodoList:TodoListBaseAddress",
    "value": "<BaseUrl Of TodoApi from APIM>",
    "slotSetting": false
  },
  {
    "name": "TodoList:TodoListScope",
    "value": "api://<ClientId of TodoApi>/Todo.Api.All",
    "slotSetting": false
  },
  {
    "name": "WeatherApp:ApiAccessKey",
    "value": "<Subscription Key of APIM to call Weather Api>",
    "slotSetting": false
  },
  {
    "name": "WeatherApp:WeatherAppId",
    "value": "<ClientId of WeatherApi>",
    "slotSetting": false
  },
  {
    "name": "WeatherApp:WeatherBaseAddress",
    "value": "<BaseUrl of WeatherApi From APIM>",
    "slotSetting": false
  },
  {
    "name": "WeatherApp:WeathertScope",
    "value": "api://<ClientId of WeatherApi>/Weather.Get.All",
    "slotSetting": false
  },
  {
    "name": "WEBSITE_NODE_DEFAULT_VERSION",
    "value": "6.9.1",
    "slotSetting": false
  }
]
Now you can publish the TodoWeb to Azure using Visual Studio or Azure CLI.