-
Source code for the paper "Effective drug-target interaction prediction with mutual interaction neural network".
-
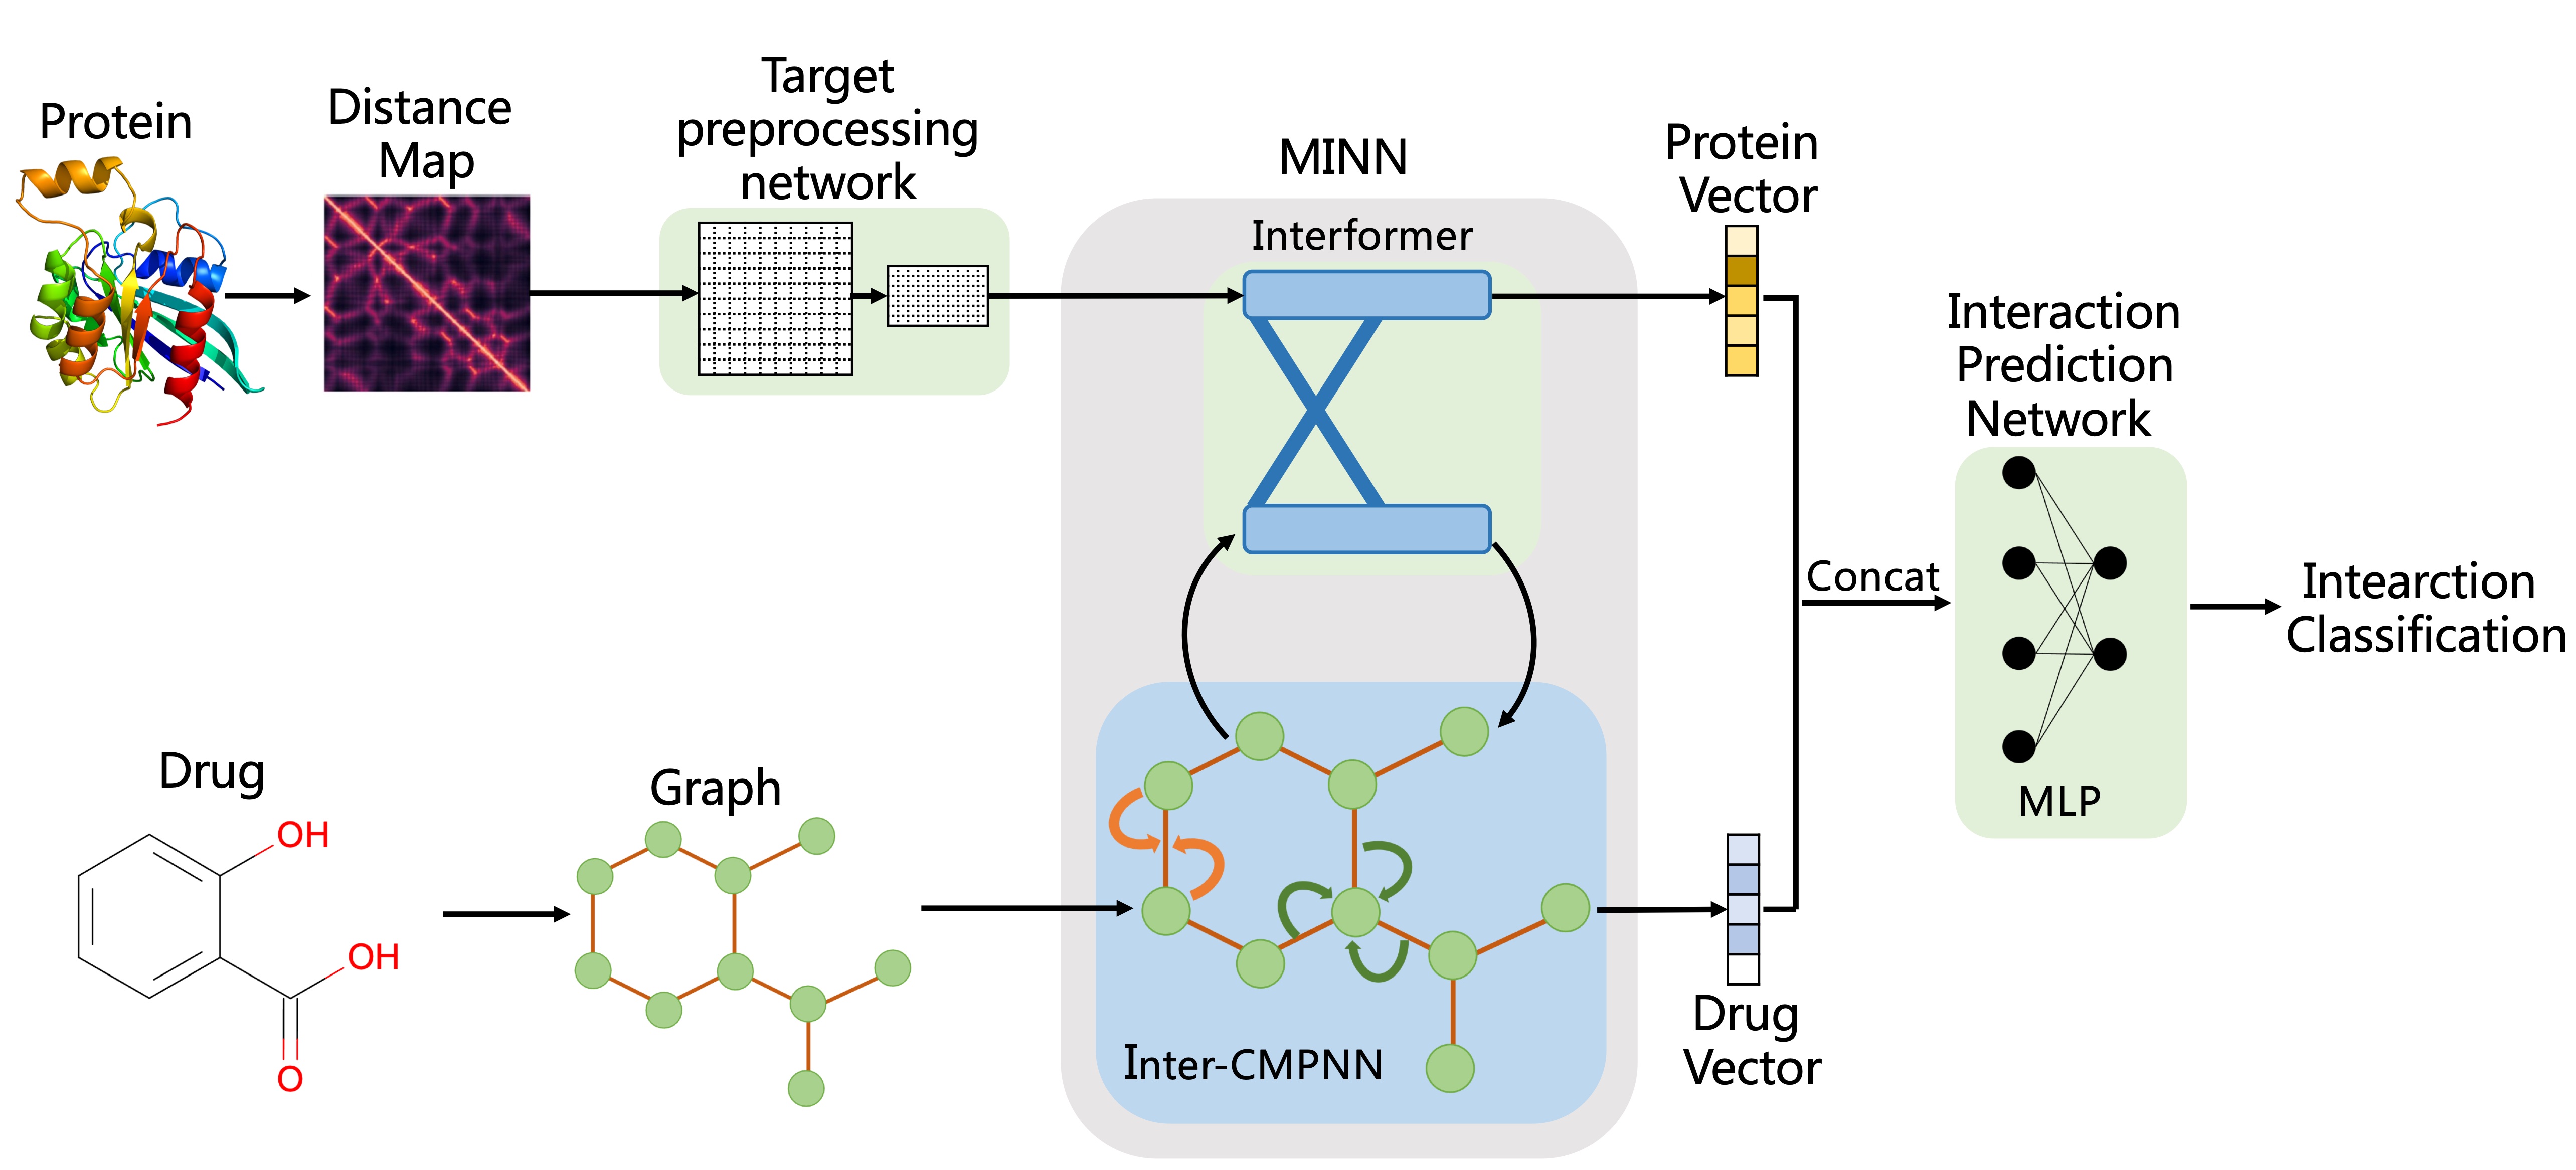
MINN-DTI is a model for drug-target interaction (DTI) prediction. MINN-DTI combines an interacting-transformer module (called Interformer) with an improved Communicative Message Passing Neural Network (CMPNN) (called Inter-CMPNN) to better capture the two-way impact between drugs and targets, which are represented by molecular graph and distance map respectively.
- The code was built based on DrugVQA, CMPNN and transformerCPI. Thanks a lot for their code sharing!
All data used in this paper are publicly available and consistent with that used by DrugVQA , which can be accessed here : DrugVQA.
- base dependencies:
  - dgl
  - dgllife
  - numpy
  - pandas
  - python>=3.7
  - pytorch>=1.7.1
  - rdkit
- We also provide an environment file for Anaconda users. You can init your environment by
conda env create -f environment.yaml. - Need download the chemprop package from CMPNN and put it in model/ directory.
- Before training a model on the datasets uesd in this paper, you must prepare data and file directory as follows (take DUD-E as an example):
-
- Select or create your local data directory for the DUD-E dataset, such as
data/DUD-E.
- Select or create your local data directory for the DUD-E dataset, such as
-
- Download
data/DUDE/contactMapanddata/DUDE/dataPredirectories including proetin contact maps, SMIELS and labels from DrugVQA repository.
- Download
-
- Put the downloaded
contactMapanddataPrefolders in your data directory(data/DUD-E)
- Put the downloaded
-
- All default arguments are provided in the model/data.py for training.
- You can modify the model/data.py directly to set up your model
- The following arguments must be set according to your data directory
# Path of training data file
trainFoldPath = '../data/DUDE/dataPre/DUDE-foldTrain1'
# Directory of protein contact maps
contactPath = '../data/DUDE/contactMap'
# Path of the protein contact map dict file
contactDictPath = '../data/DUDE/dataPre/DUDE-contactDict'- Run any one command below using model/main.py to train a model, model files will be saved in
model_pkl/my/
$ python model/main.py
# Specify GPU
$ CUDA_VISIBLE_DEVICES=0 python model/main.py
# Running in the background
$ nohup python model/main.py > train.log 2>&1 &
$ CUDA_VISIBLE_DEVICES=0 nohup python model/main.py > train.log 2>&1 &- You can train your model on your own datasets Follow the steps above.
- The only thing you need to do is organize your data in the format used here, you have to:
- Prepare a training data file like this file
- Prepare a protein contact map dict file like this file
- Prepare protein contact maps like this file
- Specify the path of the above files in model/data.py as
Set argumentsinTraining on datasets uesd in this papersection bove
- Before testing a model, you must prepare data and file directory
- Besides
contactMapanddataPrefolders, you need to downloaddecoy_smileandactive_smilefolders from DrugVQA repository and put them in your data directory.
- Besides
- All default arguments are provided in the model/dataTest.py for testing.
- You can modify the model/dataTest.py directly to set up your testing
- The following arguments must be set according to your data directory
# Path of test list file
testFoldPath = '../data/DUDE/dataPre/DUDE-foldTest1'
# Directory of protein contact maps
contactPath = '../data/DUDE/contactMap'
# Path of the protein contact map dict file
contactDictPath = '../data/DUDE/dataPre/DUDE-contactDict'
# Directory of SMILES file of active or decoy molecules
DECOY_PATH = '../data/DUDE/decoy_smile'
ACTIVE_PATH = '../data/DUDE/active_smile'- Run any one command below using model/mainTest.py to test your models, results including AUC and other indicators will be written in
test.log
# Running in the background
# Setting model file: ../model_pkl/my/DUDE-fold-h0501-235.pkl
$ nohup python model/mainTest.py .py --checkpoint_path ../model_pkl/my/DUDE-fold-h0501-235.pkl 2>&1 > test.log
# Specify GPU
$ CUDA_VISIBLE_DEVICES=0 nohup python model/mainTest.py .py --checkpoint_path ../model_pkl/my/DUDE-fold-h0501-235.pkl 2>&1 > test.log- To test or predict on independent datasets you need to organize your data in the format used here:
- Prepare protein contact maps and contact map dict file as above
- Prepare a test list of target names separated by spaces(named mytest here)
- Put lists of active SMILES and decoy SMILES named XXX_actives_final.ism and XXX_decoys_final.ism (XXX is target name in test list
mytest) of targets inactive_smileanddecoy_smilefolds Separately with one SMILES per line (named active_smile and decoy_smile), put them all in active_smile for prediction task.
- Modify the following arguments in model/dataTest.py
# Path of test list file
testFoldPath = '../data/DUDE/dataPre/mytest'
# Directory of protein contact maps
contactPath = '../data/DUDE/contactMap'
# Path of the protein contact map dict file
contactDictPath = '../data/DUDE/dataPre/DUDE-contactDict'
# Directory of SMILES file of active or decoy molecules
DECOY_PATH = '../data/DUDE/decoy_smile'
ACTIVE_PATH = '../data/DUDE/active_smile'- Run any one command below using model/mainTest.py to test your models, testing and predicting results including predicting results of each sample will be written in
mytest.log
# Running in the background
# Setting model file: ../model_pkl/my/DUDE-fold-h0501-235.pkl
$ nohup python model/mainTest.py .py --checkpoint_path ../model_pkl/my/DUDE-fold-h0501-235.pkl 2>&1 > mytest.log
# Specify GPU
$ CUDA_VISIBLE_DEVICES=0 nohup python model/mainTest.py .py --checkpoint_path ../model_pkl/my/DUDE-fold-h0501-235.pkl 2>&1 > mytest.log